
Popular categories
Looking for a yarn?


Comments / Questions (35)
![]() Gitte Andersen wrote:
Gitte Andersen wrote:
På billedet ser blusen ud til at have båd udskæring. Jeg har strikket str s præcist efter opskriften, men min halsudskæring sidder helt til omkring halsen. Hvad skal jeg gøre anderledes?
29.01.2021 - 12:38DROPS Design answered:
Hej Gitte, det lyder til at du skal have flere masker i halsen eller så skal du strikke på en tykkere pind for at få maskerne lidt større. God fornøjelse!
29.01.2021 - 12:53
![]() Maria Iselin Dahl wrote:
Maria Iselin Dahl wrote:
Heia:) Ønsker veldig å bestille denne genseren. Men vil ha den lang. Hva gjør jeg da? Skal jeg velge stor størrelse?
24.01.2021 - 20:18DROPS Design answered:
Hej Maria, Bestil nogle ekstra nøgler, Følg den størrelse du normalt bruger og tag genseren på undervejs, så kan du selv bestemme hvor lang du vil have den, det er fordelen ved at strikke oppefra og ned :)
26.01.2021 - 16:04
![]() Debbie wrote:
Debbie wrote:
At the neck I’m trying to increase to 147 stitches, an increase of 31 stitches but it doesn’t divide into 116 evenly, what do I do?? Thank you!
23.12.2020 - 22:37DROPS Design answered:
Dear Debbie, you will find how to increase evenly here. Happy knitting!
04.01.2021 - 07:49
![]() Nina wrote:
Nina wrote:
Fant ut av det:)
15.04.2020 - 12:42
![]() Nina wrote:
Nina wrote:
Rettelse : 42+85+16 masker.
15.04.2020 - 12:10
![]() Nina wrote:
Nina wrote:
Jeg får ikke maskeantallet på bolen til å stemme. Str small. Jeg har satt av masker til erm samt lagt opp 8 nye i hver side. Likevel blir det 143 masker til bol og ikke 186 som beskrevet. 42+16 nye+43. Hvordan kan det bli 186 masker på bolen? 59+59 er avsatt til ermer.
15.04.2020 - 11:00
![]() Naja wrote:
Naja wrote:
I diagrammet står der at man skal lave et omslag med bundfarven mellem to masker. Vil det sige, at i række 5, hvor det første omslag skal laves, skal være i naturfarve og i række 13, skal det tredje omslag så laves i gråblå? Eller hvordan skal det forståes? Kort sagt, hvad betyder ‘bundfarven i mønsterborten’?
27.03.2020 - 19:35DROPS Design answered:
Hei Naja. Ja, det er slik du først skriver. Ved første økning er bunnfagen på mønstret natur = kast med natur (i str s-m-l), men ved de andre økningene er bunnfagen gråblå = kast med gråblå. I størrelse xl-xxl-xxxl er bunnfargen natur ved de 4 første økningene og ved de andre økningene gråblå. God Fornøyelse!
30.03.2020 - 15:57
![]() Monica wrote:
Monica wrote:
Ser at oppskriften står på engelsk, skulle gjerne hatt den på norsk, går det?
18.03.2020 - 12:44DROPS Design answered:
Hej Du kan ändra språket precis under bilderna. Mvh DROPS Design
18.03.2020 - 13:15
![]() Karin Framnes wrote:
Karin Framnes wrote:
Skal begynne på bærestykketå er litt usikker. Skal det strikkes 18 rapporter a 6 masker før en begynner på mønstret. Å skal økningen bare være på diagrammet.
05.02.2020 - 10:37
![]() Grete Dehli wrote:
Grete Dehli wrote:
Hva strikker jeg først.. bolen eller ermene...
30.01.2020 - 12:14DROPS Design answered:
Hej Du stickar bolen först. Lycka till!
30.01.2020 - 13:11
|
||||||||||
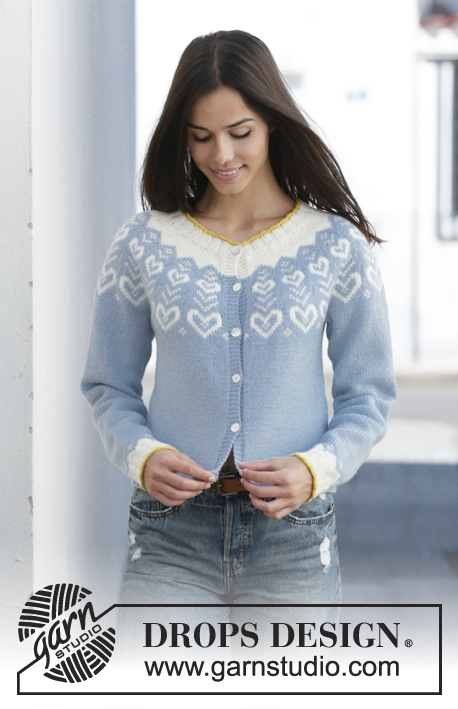
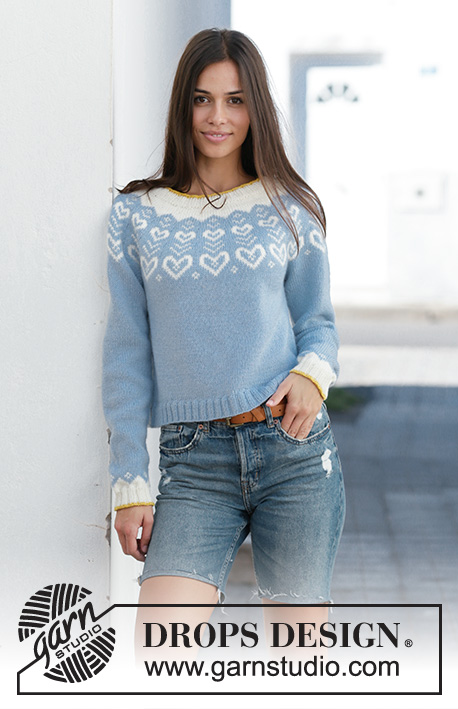
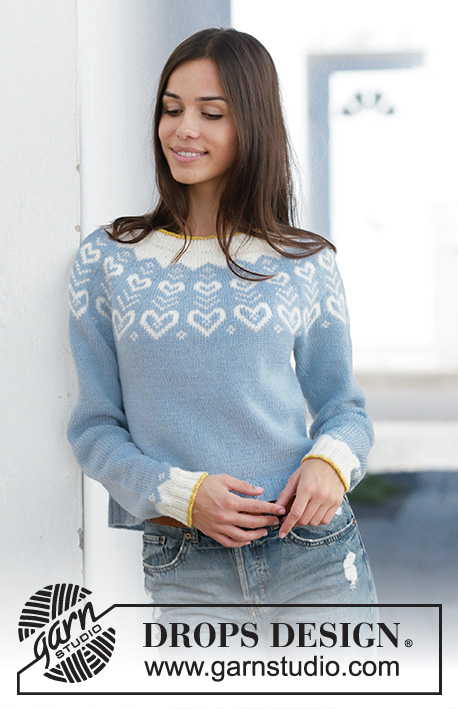
Dear to my Heart Sweater#deartomyheartsweater |
||||||||||
 |
 |
|||||||||
Knitted jumper in DROPS Merino Extra Fine. The piece is worked top down with round yoke and Nordic pattern. Sizes S - XXXL.
DROPS 199-7 |
||||||||||
|
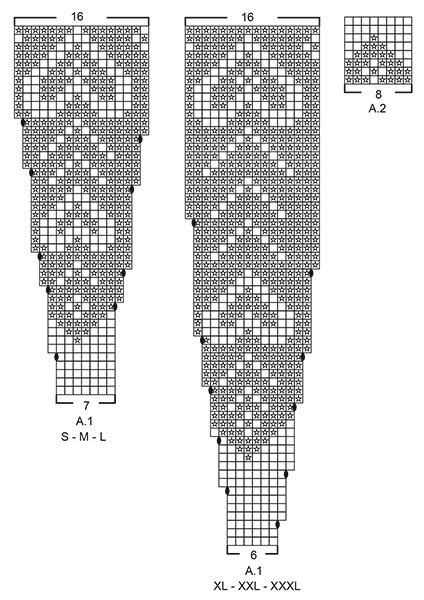
------------------------------------------------------- EXPLANATIONS FOR THE PATTERN: ------------------------------------------------------- ELEVATION (back of neck): To make the jumper slightly higher at the back of the neck when working the yoke, work an elevation as described below. Skip this section if you do not want an elevation. Insert 1 marker at the beginning of the round (= mid back). Start from the right side with off white and knit 14-15-16-16-17-18 stitches, turn, tighten strand and purl 28-30-32-32-34-36 stitches. Turn, tighten strand and knit 42-45-48-48-51-54 stitches, turn, tighten strand and purl 56-60-64-64-68-72 stitches. Turn, tighten strand and knit 70-75-80-80-85-90 stitches, turn, tighten strand and purl to mid back. Then work YOKE as described in text. PATTERN: See diagrams A.1 and A.2. Choose diagram for your size (applies to A.1). INCREASE TIP-1 (evenly spaced): To work out how to increase evenly, count the total number of stitches on the needle (e.g. 108 stitches) and divide by the number of increases to be made (e.g. 18) = 6. In this example, increase by making 1 yarn over after each 6th stitch. On the next round knit the yarn overs twisted to avoid holes. INCREASE TIP-2 (for sides of body): Start 3 stitches before the marker thread, make 1 yarn over, knit 6 (marker thread sits in the middle of these 6 stitches), make 1 yarn over (= 2 stitches increased). Increase the same way at the second marker thread. On the next round knit the yarn overs twisted to avoid holes. Then work the new stitches in stocking stitch. DECREASE TIP (for mid under sleeves): Start 3 stitches before the marker thread, knit 2 together, knit 2 (marker thread sits between these 2 stitches), slip 1 stitch as if to knit, knit 1 and pass the slipped stitch over the knitted stitch (= 2 stitches decreased). KNITTING TIP: To avoid the knitting tension becoming tighter when working pattern, it is important not to have tight strands at the back. You can increase the needle size when working pattern if this is a problem. CASTING-OFF TIP: To avoid the cast-off edge being tight, you can cast off with a larger needle size. Or make 1 yarn over after approx. each 8th stitch at the same time as you cast off (yarn overs cast off as normal stitches). ------------------------------------------------------- START THE PIECE HERE: ------------------------------------------------------- JUMPER - SHORT OVERVIEW OF THE PIECE: Neck and yoke are worked in the round with circular needle, top down. The yoke is divided for body and sleeves. The body is continued in the round with circular needle, top down. The sleeves are worked in the round with short circular needle/double pointed needles, top down. NECK: Cast on 108-112-116-120-124-128 stitches with short circular needle size 3 mm and mustard. Knit 1 round. Change to off white and work rib in the round (= knit 2 / purl 2) for 3 cm. Change to short circular needle size 4 mm. Knit 1 round where you increase 18-21-31-18-26-28 stitches evenly spaced – read INCREASE TIP-1 = 126-133-147-138-150-156 stitches. Knit 1 round. Now you can work an ELEVATION in the back of the neck – read description above. If you do not want an elevation, go straight to YOKE. YOKE: Read KNITTING TIP and work A.1 in the round (= 18-19-21-23-25-26 repeats of 7-7-7-6-6-6 stitches). Continue this pattern and increase as shown in the diagram. REMEMBER THE KNITTING TENSION! When A.1 has been completed there are 288-304-336-368-400-416 stitches on the needle. Continue with stocking stitch and grey blue until the piece measures 19-21-23-25-27-29 cm from the cast-on edge mid front. The next round is worked as follows: Knit 42-45-49-54-60-63 stitches (= ½ back piece), place the next 59-61-69-75-79-81 stitches on 1 thread for sleeve, cast on 8-10-10-10-12-16 new stitches on the needle (= in side under sleeve), knit 85-91-99-109-121-127 stitches (= front piece), place the next 59-61-69-75-79-81 stitches on 1 thread for sleeve, cast on 8-10-10-10-12-16 new stitches on the needle (= in side under sleeve) and knit the remaining 43-46-50-55-61-64 stitches (= ½ back piece). Cut the strand. Body and sleeves are continued separately. THE PIECE IS NOW MEASURED FROM HERE! BODY: = 186-202-218-238-266-286 stitches. Insert 1 marker thread in each side of the body, in the middle of the 8-10-10-10-12-16 stitches under the sleeves. Allow the marker threads to follow your work onwards; they will be used when increasing in the sides. Start the round by one of the marker threads and work in the round with grey blue. When the piece measures 4 cm from the division in all sizes, increase 1 stitch on each side of both marker threads – read INCREASE TIP-2 (= 4 stitches increased). Increase like this every 8 cm a total of 3 times in each side = 198-214-230-250-278-298 stitches. Continue working until the piece measures 22 cm from the division in all sizes (or to desired length; there is 3 cm left to finished length). Knit 1 round where you increase 38-38-46-46-54-58 stitches evenly spaced = 236-252-276-296-332-356 stitches. This is done to avoid the rib being tight. Change to circular needle size 3 mm and work rib in the round (= knit 2 / purl 2) for 3 cm. Loosely cast off with knit over knit and purl over purl – read CASTING-OFF TIP! The jumper measures approx. 48-50-52-54-56-58 cm from the shoulder down. SLEEVE: Place the 59-61-69-75-79-81 stitches from the thread on the one side of the piece on circular needle/double pointed needles size 4 mm and knit up 1 stitch in each of the 8-10-10-10-12-16 stitches cast on under the sleeve = 67-71-79-85-91-97 stitches. Insert 1 marker thread in the middle of the 8-10-10-10-12-16 stitches under the sleeve. Allow the marker thread to follow your work onwards; it will be used when decreasing mid under sleeve. Start the round by the marker thread and work stocking stitch in the round with grey blue. When the piece measures 2 cm from the division in all sizes, decrease 2 stitches mid under sleeve – read DECREASE TIP! Decrease like this every 4½-3½-2½-2½-2-1½ cm a total of 9-11-14-14-17-20 times = 49-49-51-57-57-57 stitches. Continue working until the piece measures 40-39-37-36-34-33 cm from the division (or to desired length; there is 6 cm left to finished length, decreases are finished mid under sleeve and there are shorter measurements in larger sizes due to wider neck and longer yoke). Knit 1 round with grey blue where you decrease 1-1-3-1-1-1 stitches evenly spaced = 48-48-48-56-56-56 stitches. Work A.2 in the round (= 6-6-6-7-7-7 repeats of 8 stitches). When A.2 is finished knit 1 round with off white where you decrease 0-0-0-4-4-0 stitches evenly spaced = 48-48-48-52-52-56 stitches. There is now 3 cm left to finished length; if you want a longer sleeve continue with off white to desired length. Change to double pointed needles size 3 mm. Work rib in the round (= knit 2 / purl 2) for 3 cm. Change to mustard and work 1 round of rib. Then loosely cast off with mustard and knit over knit and purl over purl – read CASTING-OFF TIP! The sleeve measures approx. 46-45-43-42-40-39 cm from the division. Work the other sleeve in the same way. |
||||||||||
Diagram explanations |
||||||||||
|
||||||||||
 |
||||||||||
 |
||||||||||
Have you finished this pattern?Tag your pictures with #dropspattern #deartomyheartsweater or submit them to the #dropsfan gallery. Do you need help with this pattern?You'll find 29 tutorial videos, a Comments/Questions area and more by visiting the pattern on garnstudio.com. © 1982-2026 DROPS Design A/S. We reserve all rights. This document, including all its sub-sections, has copyrights. Read more about what you can do with our patterns at the bottom of each pattern on our site. |
||||||||||


With over 40 years in knitting and crochet design, DROPS Design offers one of the most extensive collections of free patterns on the internet - translated to 17 languages. As of today we count 324 catalogues and 12290 patterns translated into English (UK/cm). 12290
We work hard to bring you the best knitting and crochet have to offer, inspiration and advice as well as great quality yarns at incredible prices! Would you like to use our patterns for other than personal use? You can read what you are allowed to do in the Copyright text at the bottom of all our patterns. Happy crafting!
Post a comment to pattern DROPS 199-7
We would love to hear what you have to say about this pattern!
If you want to leave a question, please make sure you select the correct category in the form below, to speed up the answering process. Required fields are marked *.