
Popular categories
Looking for a yarn?


Comments / Questions (77)
![]() Barbara wrote:
Barbara wrote:
Hola. En la primera vuelta de A.3 van todos los puntos en azul denim? Gracias
07.09.2017 - 22:21DROPS Design answered:
Hola Barbara. La primera fila de A.3 se trabaja con azul denim.
11.09.2017 - 23:59
![]() Beate wrote:
Beate wrote:
Danke Anton. Jetzt weiss ich wo mein Fehler ist.
13.07.2016 - 09:00
![]() Beate wrote:
Beate wrote:
Hallo, wenn ich in Runde stricke und die Rückreihen dann links stricke bekomme ich kraus rechts.Was mache ich falsch?
12.07.2016 - 14:43Anton answered:
Hallo Beate! In Runden gibt es keine Rückreihen.
12.07.2016 - 17:19
![]() Monica wrote:
Monica wrote:
Buongiorno. Ho acquistato il filato e vorrei realizzare questa maglia senza ferri circolari. Non capisco pero' una cosa: la spiegazione del "dietro". Devo avviare 129 m. (taglia L) e cominciare subito con il motivo A2? O cominciare con A1 come descritto per i ferri circolari? Grazie!
05.06.2016 - 22:08DROPS Design answered:
Buongiorno Monica. Per lavorare in parti separate, per il dietro avvia la metà delle m indicate, quindi 168 m (consigliamo di aggiungere una m vivagno ai lati). Lavora poi il diag.A1 su queste m e poi lavora il diagramma A2. Deve iniziare con le indicazioni riportate nella sezione corpo, dimezzando il numero di m: in questa sezione trova le indicazioni per lavorare fino agli scalfi. Sotto il paragrafo Dietro, trova le indicazioni dallo scalfo in avanti. Buon lavoro!
05.06.2016 - 22:16
![]() Monica wrote:
Monica wrote:
Buongiorno. Ho acquistato il filato e vorrei realizzare questa maglia senza ferri circolari. Non capisco pero' una cosa: la spiegazione del "dietro". Devo avviare 129 m. (taglia L) e cominciare subito con il motivo A2? O cominciare con A1 come descritto per i ferri circolari? Grazie!
05.06.2016 - 22:05DROPS Design answered:
Buongiorno Monica. Per lavorare in parti separate, per il dietro avvia la metà delle m indicate, quindi 168 m (consigliamo di aggiungere una m vivagno ai lati). Lavora poi il diag.A1 su queste m e poi lavora il diagramma A2. Deve iniziare con le indicazioni riportate nella sezione corpo, dimezzando il numero di m: in questa sezione trova le indicazioni per lavorare fino agli scalfi. Sotto il paragrafo Dietro, trova le indicazioni dallo scalfo in avanti. Buon lavoro!
05.06.2016 - 22:15
![]() Priscilla Bouring wrote:
Priscilla Bouring wrote:
Bonjour, je suis relativement novice et vient de commencer mon tricot. Mais je bute déjà devant le A1!!! Je ne comprends pas le 3e et 4e rang de A1. Si je fais 8 diminutions et 8 jetés, à priori je retombe sur mes pieds. Mais d'après les explications, il ne faut pas tricoter le jeté, donc je n'ai plus mes 17 mailles au rang 4, mais seulement 9! est-ce que j'ai mal compris le schéma, ou y a-t-il une erreur quelque part? Merci pour votre aide précieuse:)
06.05.2016 - 09:45DROPS Design answered:
Bonjour Mme Bouring, le jeté du 3ème rang de A.1 ne se tricote pas torse pour former un jour, c'est-à-dire qu'on va le tricoter "normalement" dans le brin avant au rang/tour suivant. Votre nombre de mailles doit effectivement toujours rester le même dans chaque motif. Bon tricot!
06.05.2016 - 10:09
![]() Pia Rasmussen wrote:
Pia Rasmussen wrote:
Hjælp. Har købt garn til denne trøje i xl. Den er mega stor. Prøver str m og s, som også er alt for store. Regner mig så frem til 230 m på p 4 i stedet for og diagram A1-A2 fra 169-18 i stedet som bliver pænere. Har strikket 39 cm af bollen nu og har kun 1 ngl blå tilbage. Det vil sige at mønster og garn passer slet ikke sammen på nogen måde. Jeg ved ikke om der er nok hvid heller. Kan i hjælpe med mere garn? Blå parti nr 26-322, hvid 01-318
04.05.2016 - 19:33DROPS Design answered:
Hej Pia, hvis du strikker i DROPS Cotton Light, følger opskriften og overholder strikkefastheden, så får du nøjagtig de mål du ser i måleskitsen nederst i måleskitsen og så skal der være nok garn. God fornøjelse!
06.05.2016 - 10:21
![]() Anna wrote:
Anna wrote:
Skøn bluse, nyder at strikke på den - men nu har jeg fået syet den sammen (dog uden ærmer endnu) og den er meget udringet på ryggen også. Er dette meningen, eller har jeg misset instrukser om at skulle lukke anderledes af til hals på rygstykket end forstykket?
04.05.2016 - 04:42DROPS Design answered:
Hej Anna, ja det stemmer, for og rygstykke er ens, men naturligvis kan du selv vælge at strikke bagstykket lidt højere inden du lukker af for hals, da kan du i så fald måle efter forstykket. God fornøjelse!
04.05.2016 - 08:10
![]() Nina wrote:
Nina wrote:
The videos and your answer to a previous question describe the exact opposite instructions for the K 5 tog and K5 tog twisted that appear in the pattern. Can you advise?
28.01.2016 - 15:29DROPS Design answered:
Dear Nina, videos have been edited, text under pattern was correct. Happy knitting!
22.09.2016 - 13:32
![]() Bente Kruse Jensen wrote:
Bente Kruse Jensen wrote:
Er stadig i tvivl min strikkeprøve passer hvis jeg f.eks skal strikke str. M og den på målskitsen er 108 cm hele vejen rundt og 21 masker skal give 10 cm så er 315 masker som der står jeg skal slå op efter min lommeregner mindst 100 masker for meget ?
24.11.2015 - 21:08DROPS Design answered:
Hej Bente, jo men det stemmer i og med du starter med en lille flæse-bølgekant. Efter A.1-A.3 har du kun 225 m tilbage. God fornøjelse!
25.11.2015 - 11:55
|
|||||||||||||||||||||||||||||||||||||
Nautical Waves#nauticalwavessweater |
|||||||||||||||||||||||||||||||||||||
 |
 |
||||||||||||||||||||||||||||||||||||
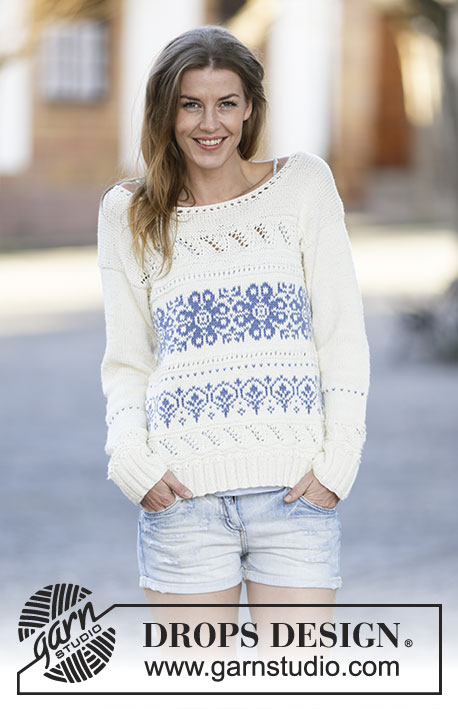
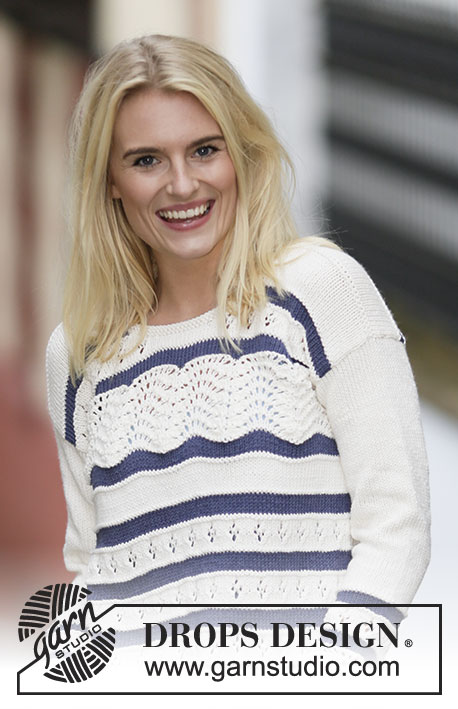
Knitted DROPS jumper with lace pattern and stripes in ”Cotton Light”. Size: S - XXXL.
DROPS 161-31 |
|||||||||||||||||||||||||||||||||||||
|
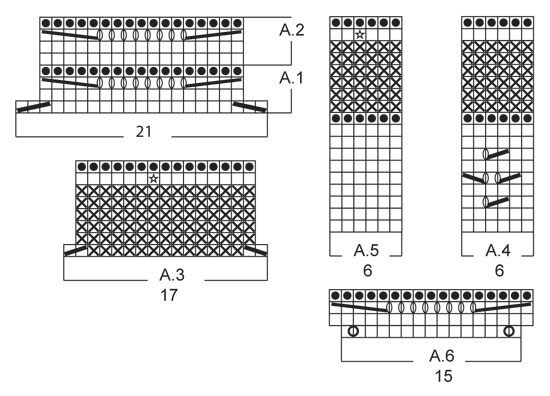
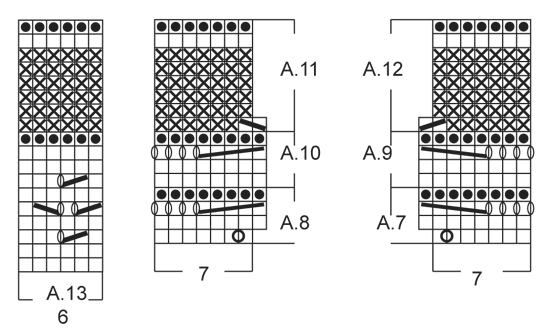
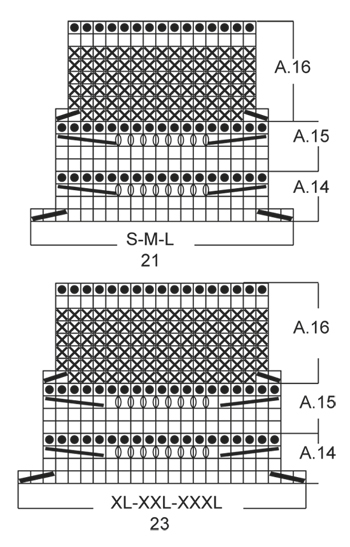
GARTER ST (back and forth): K all rows. 1 ridge = 2 rows K. GARTER ST (worked in the round): * K 1 round and P 1 round *, repeat from *-*. 1 ridge = 2 rounds. PATTERN: See diagrams A.1-A.16. The diagrams show all rows in pattern seen from RS. KNITTING TIP: K 5 twisted tog as follows: K 5, pass next to last st worked over the last so that this st is around the last st, repeat until all 4 sts have been passed over (= 4 sts dec). K 5 tog as follows: K 5, pass them back on left needle, pass the next to last st over the last so that this st is around the last st, repeat until all 4 sts have been passed over (= 4 sts dec), pass the last st worked back on right needle. INCREASE TIP: Work until 1 st remains before marker, 1 YO, K 2 (marker is in the middle of these), 1 YO = 2 sts inc. On next round K YO twisted to avoid holes. ---------------------------------------------------------- BODY: Worked in the round on circular needle. Cast on 273-315-336-378-399-462 sts on circular needle size 4 mm with off white. Work 1 ridge in GARTER ST - see explanation above. Switch to circular needle size 4.5 mm. Work A.1 (= 21 sts) 13-15-16-18-19-22 times in total. After A.1, there are 221-255-272-306-323-374 sts on needle. Then work A.2 (= 17 sts) over A.1. Repeat A.2 2-2-2-3-3-3 times in total vertically. Work A.3 over A.2. After first round of A.3, there are 195-225-240-270-285-330 sts on needle. On last round in A.3 (see star in diagram) dec or inc differently in the different sizes: Size S and XXL: Inc 4 sts evenly = 199-289 sts. Size M-L-XL-XXXL: Dec 2-5-5-5 sts evenly = 223-235-265-325 sts. REMEMBER THE KNITTING TENSION Then work as follows: A.4 (= 6 sts) 33-37-39-44-48-54 times in total, finish with 1st sts in the diagram. Repeat A.4 3-3-3-3-4-4 times in total vertically. Then work A.5 1 time vertically. On last round in A.5 (see star in diagram), dec 3-3-1-1-3-5 sts evenly = 196-220-234-264-286-320 sts. After last round in A.5 continue as follows: 4-10-6-6-4-5 sts in stocking st, A.6 6-6-7-8-9-10 times in width, 8-20-12-12-8-10 sts in stocking st, A.6 6-6-7-8-9-10 times in width, 4-10-6-6-4-5 sts in stocking st. NOTE: P the sts in stocking st in the sides when working P in A.6. After A.6, there are 220-244-262-296-322-360 sts on needle. Work A.2 over A.6, P the sts in stocking st when working P in A.2. Repeat A.2 5-5-6-5-5-6 times in total vertically. AT THE SAME TIME when piece measures 44-45-46-47-48-49 cm, cast off for armhole as follows: Cast off the first 2-3-1-2-2-2 sts, 2-7-5-4-2-3 sts in stocking st, A.2 6-6-7-8-9-10 times in width as before, 2-7-5-4-2-3 sts in stocking st, cast off the next 4-6-2-4-4-4 sts, 2-7-5-4-2-3 sts in stocking st, A.2 6-6-7-8-9-10 times in width as before, 2-7-5-4-2-3 sts in stocking st, cast off the last 2-3-1-2-2-2 sts = 106-116-129-144-157-176 sts on front piece and 106-116-129-144-157-176 sts on back piece. Now finish each part separately. Fasten off. BACK PIECE: = 106-116-127-144-157-176 sts. When A.2 has been worked 5-5-6-5-5-6 times vertically, work A.3 over A.2. When A.3 has been worked 1 time vertically, there are 94-104-115-128-139-156 sts on needle. Then work as follows from RS: 2-1-5-1-2-3 sts in stocking st, A.4 6-7-7-9-9-11 times in total, 18-18-21-18-27-18 sts in stocking st, A.13 6-7-7-9-9-11 times in total, 2-1-5-1-2-3 sts in stocking st. When the first 4 rows of A.4/A.13 have been worked, slip the middle 12-12-13-14-15-16 sts on a stitch holder for neck and finish each shoulder separately (= 41-46-51-57-62-70 sts). Continue to cast off for neck on every row from neck as follows: Cast off 3 sts 1 time, 2 sts 2 times, 1 st 4-4-5-4-5-4 times = 30-35-39-46-50-59 sts remain for shoulder. When A.4/A.13 have been worked 1 time vertically, work piece in off white and stocking st until finished measurements. Work 1 ridge over all sts when piece measures 59-61-63-65-67-69 cm. Cast off. Work the other shoulder the same way. FRONT PIECE: Work as on back piece. SLEEVE: Worked in the round on double pointed needles. Cast on 63-63-63-69-69-69 sts on double pointed needle size 4 mm with off white. Work 1 ridge in GARTER ST - see explanation above. Insert 1 marker at the beg of the round. Switch to double pointed needles size 4.5 mm. Work A.14 (= 3 times in width) – see diagram for correct size. Work A.15 over A.14 5 times in total. Then work A.16 over A.15. When A.16 has been worked 1 time vertically, there are 45-45-45-51-51-51 sts on needle. Then work as follows: K 2, A.13 7-7-7-8-8-8 times in total in width, finish with K 1. AT THE SAME TIME when piece measures 12-10-10-10-10-10 cm, inc 1 st on each side of marker – see INCREASE TIP. Repeat inc every 3½-3-2½-2½-2-1½ cm 10-12-14-13-16-18 more times = 67-71-75-79-85-89 sts. When A.13 has been worked 1 time vertically, work piece in off white and stocking st until finished measurements. Cast off when piece measures 51-49-48-46-44-42 cm (shorter measurements in the larger sizes because of longer sleeve cap and wider shoulders). Knit another sleeve the same way. ASSEMBLY: Sew the shoulder seam. Sew in the sleeves inside 1 edge st. NECK EDGE: Work piece in the round on circular needle size 4 mm with off white, pick up 100-120 sts around the entire neck incl sts from stitch holders. Work 2 ridges. Cast off. |
|||||||||||||||||||||||||||||||||||||
Diagram explanations |
|||||||||||||||||||||||||||||||||||||
|
|||||||||||||||||||||||||||||||||||||
 |
|||||||||||||||||||||||||||||||||||||
 |
|||||||||||||||||||||||||||||||||||||
 |
|||||||||||||||||||||||||||||||||||||
 |
|||||||||||||||||||||||||||||||||||||
Have you finished this pattern?Tag your pictures with #dropspattern #nauticalwavessweater or submit them to the #dropsfan gallery. Do you need help with this pattern?You'll find 35 tutorial videos, a Comments/Questions area and more by visiting the pattern on garnstudio.com. © 1982-2026 DROPS Design A/S. We reserve all rights. This document, including all its sub-sections, has copyrights. Read more about what you can do with our patterns at the bottom of each pattern on our site. |
|||||||||||||||||||||||||||||||||||||


With over 40 years in knitting and crochet design, DROPS Design offers one of the most extensive collections of free patterns on the internet - translated to 17 languages. As of today we count 324 catalogues and 12290 patterns translated into English (UK/cm). 12290
We work hard to bring you the best knitting and crochet have to offer, inspiration and advice as well as great quality yarns at incredible prices! Would you like to use our patterns for other than personal use? You can read what you are allowed to do in the Copyright text at the bottom of all our patterns. Happy crafting!
Post a comment to pattern DROPS 161-31
We would love to hear what you have to say about this pattern!
If you want to leave a question, please make sure you select the correct category in the form below, to speed up the answering process. Required fields are marked *.