
Popular categories
Looking for a yarn?


Comments / Questions (7)
![]() MATILDE wrote:
MATILDE wrote:
Como podría hacer este patrón en una talla 3-4 años?
13.01.2025 - 13:43DROPS Design answered:
Hola Matilde, puedes usar el siguiente modelo como guía: https://www.garnstudio.com/pattern.php?id=1040&cid=23, y aplicar las medidas y números de puntos de la talla 3/4 años de ese modelo pero usando este patrón y este diagrama de rayas; tendrás que hacer tú los cálculos necesarios para adaptarlo. El cuadrado a ganchillo podrás adaptarlo una vez hayas terminado el jersey; puede ser que necesites hacerlo algo más pequeño. Puedes ir comparándolo a la abertura en el jersey para comprobar el tamaño necesario del cuadrado.
19.01.2025 - 13:48
![]() Pia wrote:
Pia wrote:
Hur vet man hur många varv man stickar av varje färg? Står ju bara att sticka enl M1
24.03.2024 - 08:24DROPS Design answered:
Hej Pia - Mönster: Se diagram M.1 - Obs: varje rand stickas över 9 v.
03.04.2024 - 15:00
![]() Pia Lüders wrote:
Pia Lüders wrote:
Wie ist die Farbreihenfolge im Vorderteil-Rückenteil.?Vielen Dank
17.03.2024 - 18:03DROPS Design answered:
Liebe Frau Lüders, das finden Sie mit Diagram M.1 - siehe rechts von der Maßskizze. Viel Spaß beim Stricken!
18.03.2024 - 09:30
![]() Float wrote:
Float wrote:
Gibt es ein Video oder genauer erklärte Anleitung wie man den Halsausschnitt strickt?
07.10.2018 - 20:12DROPS Design answered:
Liebe Frau Float, die mittleren Maschen für den Halsausschnitt legen Sie still, und dann weiter hin und zurück stricken - Begin/Ende der Reihen ist jetzt am Hals - gleichzeitig ketten Sie weitere Maschen für den Neck am Anfang jeder Reihe auf beiden Seiten (Hin sowie Rückreihen). Viel Spaß beim stricken!
08.10.2018 - 09:16
![]() Julia Glas wrote:
Julia Glas wrote:
Wenn ich die Länge stricke, die angegeben ist, ende ich mit unterschiedlichen Farben. Habe Größe 5/6 Jahre gestrickt ( vielleicht passt es bei den anderen Größen). Wenn ich die Ärmel fertig habe und alles auf eine Nadel nehme, muss es farblich passen. Das tut es aber nicht. Entweder müssen die Ärmel kürzer gestrickt werden, oder der Körper länger. Habe mich dann logischerweise für den längeren Körper entschieden. Aber wäre super wenn man dass nochmal genau nachprüfen und korrigieren könnte.
05.10.2015 - 09:18DROPS Design answered:
Wie gesagt, wenn Sie sich den Pulli anschauen, sehen Sie, dass die Ärmel vor der Passe nicht mit der gleichen Farbe enden wie das Rumpfteil. Wichtig ist, dass Sie bei Ärmel und Rumpf jeweils einen Farbstreifen zu Ende gestrickt haben (in dieser Hinsicht müssen Sie die Länge tatsächlich anpassen), dann stricken Sie mit der nächsten Farbe weiter, am Rumpfteil folgt diese neue gemeinsame Farbe dann auf eine andere Farbe als an den Ärmeln.
07.10.2015 - 10:26
![]() Julia Glas wrote:
Julia Glas wrote:
Leider passen die Streifen der Ärmel und des Pulloverunterteils nicht überein. Bitte einmal überprüfen.
27.09.2015 - 18:39DROPS Design answered:
Wenn Sie beim Foto genau hinschauen, sehen Sie, dass Unterteil und Ärmel unten beginnend noch gleich sind. Die Ärmel sind aber länger als das Pulloverunterteil, darum sind dort mehr Streifen zu sehen.
03.10.2015 - 10:50
![]() Julia Glas wrote:
Julia Glas wrote:
Leider passen die Streifen der Ärmel und des Pulloverunterteils nicht überein. Bitte einmal überprüfen.
27.09.2015 - 10:38
|
|||||||||||||||||||
Emily Stripes |
|||||||||||||||||||
 |
 |
||||||||||||||||||
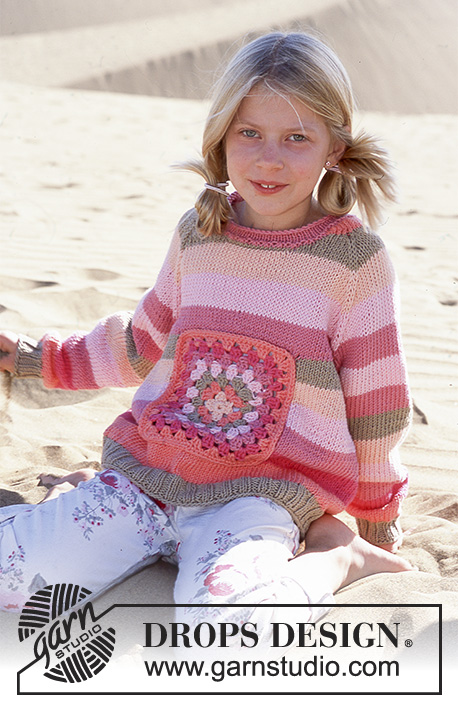
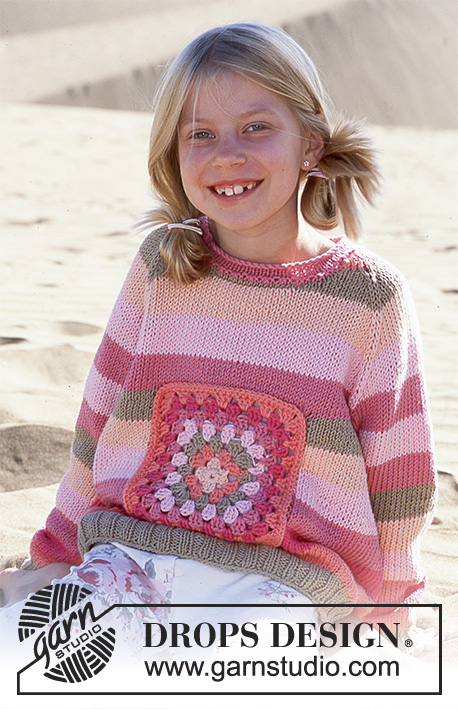
DROPS Children’s knitted jumper with crochet square and raglan in "Paris"
DROPS 89-5 |
|||||||||||||||||||
|
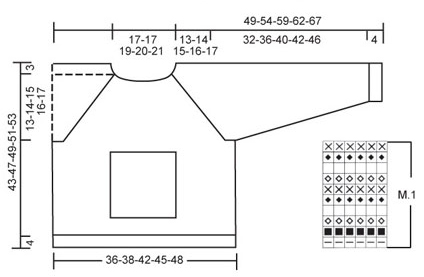
Knitting tension: Remember needle size is only a guide. 17 stitches x 22 rows with needle size 5 mm and stocking stitch = 10 x 10 cm. Rib: * K2, P2 *, repeat from *-*. Pattern: See diagram M.1 - NOTE: Each stripe is worked over 9 rows Ridge/Garter stitch (back and forth on needle): 1 ridge = Knit 2 rows. Decrease tip (for raglan): Decrease as follows in each transition between body and sleeves: From the right side (start 2 stitches before the marker thread): K2 together, (marker thread), slip 1 stitch as if to knit, K1, pass slipped stitch over. From wrong side (start 2 stitches before marker thread): P2 twisted together, (marker thread), P2 together. Knitting tip: If your knitting tension is not correct in height and your work is too tight, the decreases for raglan will be too short and the armhole too small. This can be adjusted for by working 1 extra round without decreases regularly between decreases. ------------------------------------------------------- Body: Cast on 124-128-144-152-164 stitches with circular needle size 4 mm and dark beige and knit 1 round. Then work rib until piece measures 4 cm. Insert 1 marker thread in each side. Change to circular needle size 5 mm and continue with stocking stitch according to M.1 to finished length - see description above. Remember the knitting tension! Read the whole of the next section before continuing. Opening for insertion of crochet square: When piece measures 10-13-11-12-10 cm, knit 1 round but the 28-28-32-32-38 middle stitches on the front piece are purled. On the next round, cast off the middle 26-26-30-30-36 stitches on front piece (here you will insert the crochet square) = 98-102-114-122-128 stitches. Work stocking stitch back and forth on needle with 1 stitch in garter stitch in each side (= edge stitch for seam). When piece measures 25-28-29-30-31 cm cast on 26-26-30-30-36 new stitches mid front over the cast off stitches = 124-128-144-152-164 stitches. Continue working in the round at the same time as the middle 28-28-32-32-38 stitches in front are purled on the first round (the other stitches are continued in stocking stitch), then work stocking stitch over all stitches. Armhole: When piece measures 27-30-31-32-33 cm cast off 6 stitches in each side for armholes (i.e. 3 stitches on each side of marker threads) = 56-58-66-70-76 stitches left on front and back pieces. Lay piece to one side and work sleeves. Sleeve: Cast on 32-36-36-40-40 stitches with double pointed needles size 4 mm and dark beige and knit 1 round. Then work rib until piece measures 4 cm. Change to double pointed needles size 5 mm and continue with stocking stitch according to M.1(M.1 is worked up to where you place sleeves on same needle as body). When piece measures 6 cm increase 2 stitches mid under sleeve every 4.5-5-5-5-4.5 cm a total of 7-7-8-8-10 times = 46-50-52-56-60 stitches. When sleeve measures approx. 36-40-44-46-50 cm (adjust so that the stripe on the sleeve matches the stripe on the body. Avoid 1 wide stripe middle of sleeve) cast off 6 stitches mid under sleeve = 40-44-46-50-54 stitches. Lay piece to one side and work 1 more sleeve. Yoke: Place sleeves on same circular needle as body, where you cast off stitches for armholes = 192-204-224-240-260 stitches. Insert 1 marker thread in all transitions between body and sleeves (= 4 marker threads). Read the next 2 paragraphs before continuing. Raglan: Read Knitting tip! Decrease 1 stitch on each side of all marker threads (= 8 decreases). Decrease every 2nd round - see Decrease tip: 1 stitch 15-15-16-16-16 times and then every round: 1 stitch 0-2-2-4-6 times. Neckline: At the same time, when piece measures 37-39-41-43-45 cm place the middle 12-14-14-16-16 stitches on 1 thread for neck. Then decrease towards neck every 2nd row: 2 stitches 2-0-0-0-0 times and 1 stitch 2-6-6-6-6 times. After all decreases to raglan and neck there are 48-42-54-52-56 stitches left on needle. Neck: Knit up approx. 24 to 30 stitches (incl. stitches from thread) around the neck with medium pink and place all stitches on double pointed needles size 4 mm = approx. 66 to 86 stitches. Work 1 round stocking stitch at the same time as you adjust the number of stitches to 65-72-72-78-80 stitches. Work 5 rounds stocking stitch and loosely cast off - NOTE: So that the cast-off edge is not tight make a yarn over after approx. every 4th stitch at the same time as you cast off (yarn overs cast off as normal stitches). Assembly: Sew openings under sleeves. Crochet square: Crochet tension: Remember hook size is only a guide. 1 crochet square with hook size 5 mm and 6 rounds measures approx. 18 x 18 cm. Crochet info: The first treble crochet at the beginning of round is replaced by 3 chain stitches. Stripe colours: Round 1 = peach, Round 2 = apricot, Round 3 = dark beige, Round 4 = light pink, Round 5 = medium pink, Round 6 = shocking pink. Begin at the beginning again after each round. NOTE: Work the strand end from each colour in at the same time as you work the next round; this avoids fastening so many strands at the end. Crochet square: Read crochet info! Work 4 chain stitches with hook size 5 mm and peach and form them into a ring with 1 slip stitch - see description of stripes above. Round 1: * 3 treble crochets around ring, 2 chain stitches *, repeat from *-* a total of 4 times and finish with 1 slip stitch in the 3rd chain stitch at beginning of round, cut strand. Round 2: 4 chain stitches, * 3 treble crochets around next chain-space, 2 chain stitches, 3 treble crochets around same chain-space, 1 chain stitch * repeat from *-* a total of 3 times and finish with 3 treble crochets around the last chain-space, 2 chain stitches, 2 treble crochets around the same chain-space and 1 slip stitch in the 3rd chain stitch at beginning of round, cut strand. Round 3: * 3 treble crochets around next chain-space, 1 chain stitch, 3 treble crochets around next chain-space, 2 chain stitches, 3 treble crochets around same chain-space, 1 chain stitch *, repeat from *-* a total of 3 times and finish with 3 treble crochets around next chain-space, 1 chain stitch, 3 treble crochets around next chain-space, 2 chain stitches, 3 treble crochets around same chain-space, 1 chain stitch and 1 slip stitch in the 3rd chain stitch at beginning of round, cut strand. Continue to increase in this way with 2 treble crochet-groups in each corner and 2 chain stitches between these treble crochet-groups and 1 treble crochet-group in the other chain-spaces with 1 chain stitch between each. When square measures 15x15-15x15-18x18-18x18-21x21 cm cut the strand. Sew the square into the opening mid front - sew with small stitches edge to edge with the ridge so that the seam is flat. |
|||||||||||||||||||
Diagram explanations |
|||||||||||||||||||
|
|||||||||||||||||||
 |
|||||||||||||||||||
Have you finished this pattern?Tag your pictures with #dropspattern or submit them to the #dropsfan gallery. Do you need help with this pattern?You'll find 31 tutorial videos, a Comments/Questions area and more by visiting the pattern on garnstudio.com. © 1982-2026 DROPS Design A/S. We reserve all rights. This document, including all its sub-sections, has copyrights. Read more about what you can do with our patterns at the bottom of each pattern on our site. |
|||||||||||||||||||


With over 40 years in knitting and crochet design, DROPS Design offers one of the most extensive collections of free patterns on the internet - translated to 17 languages. As of today we count 324 catalogues and 12290 patterns translated into English (UK/cm). 12290
We work hard to bring you the best knitting and crochet have to offer, inspiration and advice as well as great quality yarns at incredible prices! Would you like to use our patterns for other than personal use? You can read what you are allowed to do in the Copyright text at the bottom of all our patterns. Happy crafting!
Post a comment to pattern DROPS 89-5
We would love to hear what you have to say about this pattern!
If you want to leave a question, please make sure you select the correct category in the form below, to speed up the answering process. Required fields are marked *.