
Popular categories
Looking for a yarn?


Comments / Questions (642)
Elizabeth Preece wrote:
I just want to say a big thank you I have knitted this pattern 4 times for myself and my girls we love it, we have a good system they buy the yarn and I do the knitting. Again thankyou.
25.03.2016 - 10:26
![]() Wouke wrote:
Wouke wrote:
Hallo, ik ben bijna klaar met achterpand alles gaat goed. Ben bij armsgaten bij de hals Nu staat er brei bij een hoogte van 72 cm 4 naalden recht. Moet ik nu heen en terug recht breien(ribbelsteek) of is het tricotsteek
23.03.2016 - 14:48DROPS Design answered:
Hoi Wouke. 4 naalden recht = ribbelsteek
24.03.2016 - 14:47
![]() Rita wrote:
Rita wrote:
Ik heb het al opgelost: 84 steken opgezet. Bij 4 r 4 av 2 st gemeerderd. De mouw verder met 6 st minder gebreid
12.03.2016 - 11:22
![]() Rita wrote:
Rita wrote:
Nog even een aanvulling op mijn vraag. De voorpanden en het achterpand heb ik al af. Daar klopt de stekenverhouding goed.
10.03.2016 - 18:56
![]() Rita wrote:
Rita wrote:
Ik begrijp de mouw niet. Ik moet 100 steken opzetten. Dat wordt weliswaar teruggeberacht tot 50 steken, maar dan nog krijg je een hele wijde mouw. Op de foto is het een aansluitende mouw. Hoe kan dit?
10.03.2016 - 18:46DROPS Design answered:
Hoi. Het patroon is correct. De rand van de mouw is wijder dan de rest (zie ook foto). Je mindert al in de 2 nld. Met 50 st boordsteek heb je een omtrek van rond de 20 cm (boordsteek trekt meer samen dan tricotsteken). Vanaf 10 cm brei je verder in averecht tricotsteek (50 st = ongeveer 23 cm omtrek) en meerdert vanaf 13 cm zoals beschreven.
11.03.2016 - 11:07
![]() Truid wrote:
Truid wrote:
Sorry the question was meant to say knit 4 rows over middle 40 stitches not middle 40 rows! Thank- you.
11.12.2015 - 07:19
![]() Turid wrote:
Turid wrote:
Almost completed the back of sweater. It says knit 4 rows over middle 40 rows. Does this mean knit both right side and wrong side or does it mean to do these stitches in reverse stockinette like the rest of the sweater. If you knit each every row you will get garter stitch.
11.12.2015 - 04:58DROPS Design answered:
Dear Turid, that's correct, you will work 4 rows garter st over the middle 40 sts, then bind off the middle 30 sts (= you keep then 5 sts in garter st towards neckline on each shoulder). Happy knitting!
11.12.2015 - 10:01
![]() Nyllie wrote:
Nyllie wrote:
Thanks so much for the help and replies. I have knit 11 of your patterns which are beautiful and they have turned out wonderfully! This is the 3rd pattern where I have used this question/ comment section and am very pleased with the feature. The patterns are well written anf when needed this section is a great way to get clarification.👍👏
01.12.2015 - 19:06
![]() Inge wrote:
Inge wrote:
Vanaf 49 cm moet er geminderd worden voor de hals. Dit moet bij het rechter voorpand NA alle voorbiessteken en de 4 tricotsteken als ik het goed begrijp en ook al bij eerdere vragen heb gelezen. Ik begrijp alleen niet wat er wordt bedoeld met " 1 st r afh, 1 st r, afgeh st overh". Er moet dan iedere 2e naald 1 steek geminderd worden door aan de goede kant steeds twee steken samen te breien neem ik aan, maar hoe doe je dat als het twee verschillende steken zijn? Voor welke steek kies je dan?
30.11.2015 - 06:42DROPS Design answered:
Hoi Inge. Bij het rechter voorpand kies je voor TIP VOOR HET MINDEREN NA DE ST - dus 1 st r afh, 1 st r, afgeh st overh. Je mindert VOOR de st op het linker voorpand (2 st r samen)
30.11.2015 - 14:36
![]() Nyllie wrote:
Nyllie wrote:
Not sure how to do decreases for back and sides. Decreases begin when back is 12 cm. It says to do decreases from right side by knitting two together and by slip one as if to knit knit one and pass slip stitch over but the right side is purl in reverse stockinette so do I purl 2 tog and s as if to purl purl one and.........?
26.11.2015 - 06:01DROPS Design answered:
Dear Nyllie, this dec tip (slip 1, K, psso) applies to neck, on the side, dec by P2 tog on each side (from RS). Happy knitting!
26.11.2015 - 09:35
|
||||||||||||||||||||||
Bluebird#bluebirdcardigan |
||||||||||||||||||||||
 |
 |
|||||||||||||||||||||
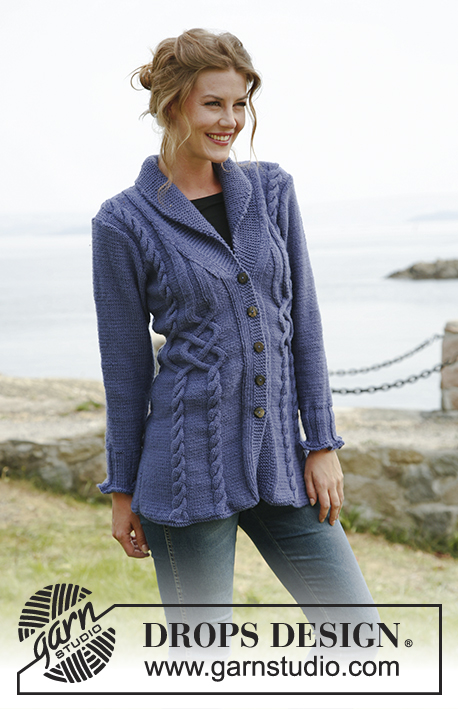
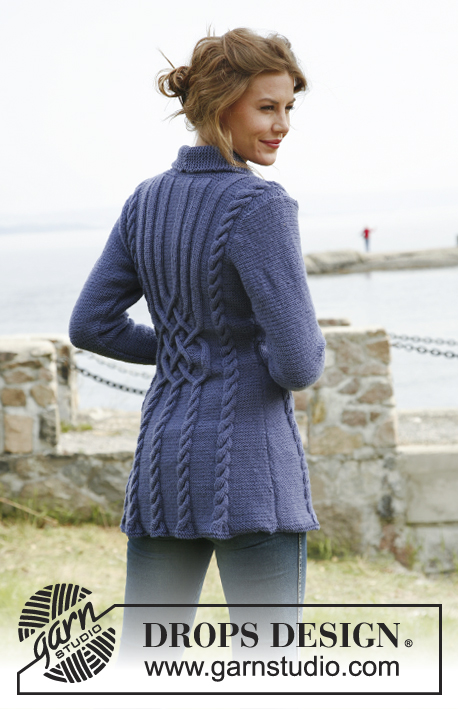
Knitted DROPS jacket with cables in ”Karisma”. Size: S to XXXL.
DROPS 134-1 |
||||||||||||||||||||||
|
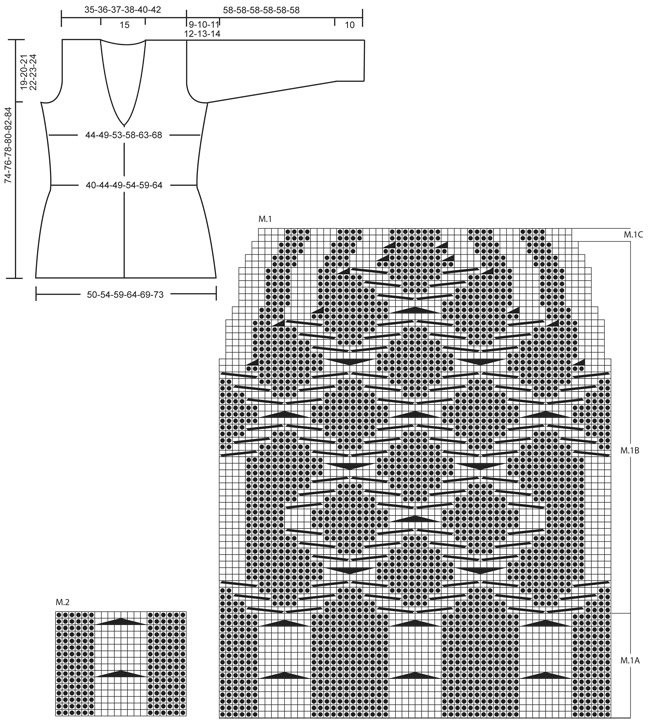
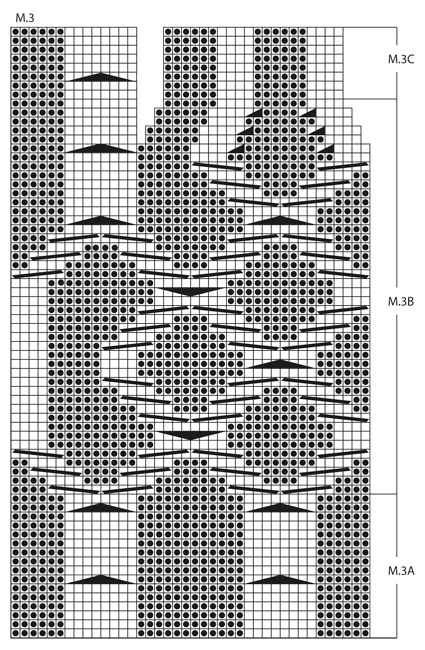
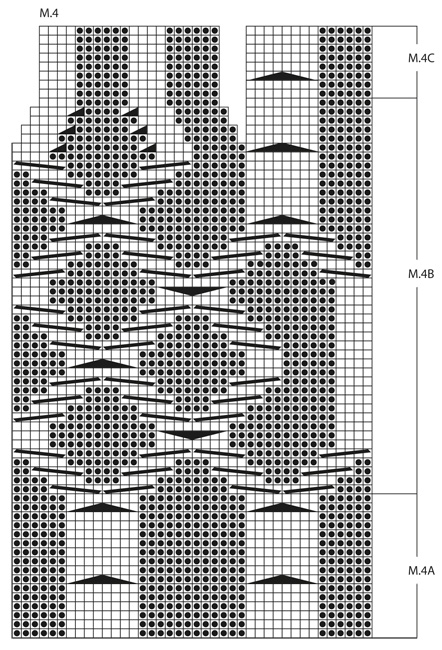
PATTERN: See diagram M.1 to M.4 – diagrams show pattern from RS (1st row = RS). GARTER ST (back and forth on needle): K all rows. KNITTING TIP (applies to band): Work the 5 band sts in garter st with double yarn the entire piece, i.e. have a little ball on the side that is only used on band. When inc for collar, work the inc sts with double yarn. This is done to make the band and the collar nice and firm. BUTTON HOLES: Cast off for button holes on right front band from RS. 1 BUTTON HOLE = cast off 3rd and 4th band st from mid front, on next row cast on 2 new sts over these sts. Cast off for button holes when piece measures: SIZE S: 18, 25, 32, 39 and 46 cm SIZE M: 19, 26, 33, 40 and 47 cm SIZE L: 20, 27, 34, 41 and 48 cm SIZE XL: 21, 28, 35, 42 and 49 cm SIZE XXL: 22, 29, 36, 43 and 50 cm SIZE XXXL: 23, 30, 37, 44 and 51 cm INCREASE TIP (applies to collar): Inc inside outermost band st by making 1 YO, on next row K YO twisted (i.e. work in back loop of st instead of front) to avoid holes. DECREASE TIP (applies to neck): Dec from RS inside the sts inc for collar + the 5 band sts + the first 3 sts in stocking st. Dec as follows AFTER these sts: Slip 1 st as if to K, K 1, psso. Dec as follows BEFORE these sts: K 2 tog. -------------------------------------------------------- -------------------------------------------------------- BACK PIECE: Worked back and forth on needle. Cast on 126-136-146-156-174-184 sts on straight needles size 3.5 mm with Karisma. K 2 rows (1st row = RS), switch to needle size 4 mm. READ ALL OF THE FOLLOWING SECTION BEFORE CONTINUING: PATTERN: Continue as follows (from RS): 1 edge st in GARTER ST – see explanation above, 12-17-22-27-16-21 sts in reverse stocking st, diagram M.2 (= 20 sts) 1-1-1-1-2-2 times, diagram M.1A (= 60 sts), diagram M.2 (= 20 sts) 1-1-1-1-2-2 times, 12-17-22-27-16-21 sts in reverse stocking st and 1 edge st in garter st. When piece measures 29-30-31-32-33-34 cm, work diagram M.1B over diagram M.1A, work the other sts as before (dec 12 sts in diagram M.1B as shown in diagram). After diagram M.1B, continue to work diagram M.1C over diagram M.1B. SIDE DEC AND SIDE INC: When piece measures 12 cm, dec 1 st in each side. Repeat dec every 2½ cm a total of 10 times. When piece measures 40 cm, inc 1 st in each side. Repeat inc every 3 cm a total of 4 times (work inc sts in reverse stocking st). After all dec and inc there are 102-112-122-132-150-160 sts on the needle. ARMHOLES: When piece measures 55-56-57-58-59-60 cm, cast off and dec for armholes at the beg of every row in each side as follows: 5 sts 1 time in all sizes, 3 sts 0-1-1-2-3-4 times, 2 sts 1-2-4-4-5-5 times and 1 st 3-2-2-3-5-5 times = 82-84-86-88-92-96 sts. Continue the pattern as before with 1 edge st in garter st in each side. When piece measures 70-72-74-76-78-80 cm, K 4 rows over the middle 40 sts (work the other sts as before). Then cast off the middle 30 sts for neck. Finish each shoulder (= 26-27-28-29-30-31 sts) separately. Continue the pattern with 5 sts in garter st towards the neck. When piece measures 74-76-78-80-82-84 cm, work the 8 sts over the cable in diagram M.2 tog 2 by 2 = 22-23-24-25-26-27 sts remain on needle. On next row cast off all sts K over K and P over P. RIGHT FRONT PIECE: Worked back and forth on needle. Cast on 68-73-78-83-92-97 sts (incl 5 band sts towards mid front and 1 edge st in the side) on needles size 3.5 mm with Karisma. READ KNITTING TIP! K 2 rows (1st row = RS), switch to needle size 4 mm. READ ALL OF THE FOLLOWING SECTION BEFORE CONTINUING! PATTERN: Continue as follows (= from RS): SIZE S, M, L and XL: 5 band sts in garter st, 4 sts in stocking st, 6 sts in reverse stocking st, diagram M.3A (= 40 sts), 12-17-22-27 sts in reverse stocking st and 1 edge st in garter st. Size XXL and XXXL: 5 band sts in garter st, 4 sts in stocking st, 6 sts in reverse stocking st, diagram M.3A (= 40 sts), M.2 (= 20 sts), 16-21 sts in reverse stocking st and 1 edge st in garter st. When piece measures 29-30-31-32-33-34 cm, work diagram M.3B over diagram M.3A, work the other sts as before (dec 6 sts in diagram M.3B as shown in diagram). After diagram M.3B, continue to work diagram M.3C over these sts. SIDE DEC AND SIDE INC: When piece measures 12 cm, dec 1 st in the side. Repeat dec every 2½ cm a total of 10 times. When piece measures 40 cm, inc 1 st in the side. Repeat inc every 3 cm a total of 4 times (work inc sts in reverse stocking st). BUTTON HOLES: At the same time when piece measures 18-19-20-21-22-23 cm, cast off for button holes - see explanation above. COLLAR: At the same time when piece measures 47-48-49-50-51-52 cm, from RS inc 2 sts for collar as follows: Make 1 YO after first st and 1 YO after second st, on next row K both YOs twisted to avoid holes. Continue to inc 1 st for collar on every other row a total of 12 times and then every 4th row a total of 6 times – SEE INCREASE TIP! After all inc, there are 20 inc collar sts and 25 sts in garter st in total (all these sts are worked with double yarn). NECKLINE: At the same time when piece measures 49-50-51-52-53-54 cm, dec 1 st towards the neck - SEE DECREASE TIP! Repeat dec every other row a total of 12 times and then on every 4th row a total of 8 times. ARMHOLE: At the same time when piece measures 55-56-57-58-59-60 cm, cast off and dec for armhole in the side as on back piece. After all inc and dec, there are 46-47-48-49-51-53 sts on needle. Work until piece measures 74-76-78-80-82-84 cm, adjust so that next row is worked from RS. Continue to work the 8 sts over the cable tog 2 by 2 = 42-43-44-45-47-49 sts on needle. On next row (= WS), cast off the first 22-23-24-25-27-29 sts for shoulder, K the rest of row. Continue like this over the remaining 20 collar sts: * K 2 rows over all sts, K 2 rows over only the outermost 14 sts (towards mid front) *, repeat from *-* until collar measures approx. 7-8 cm at the inside (it will then measure approx. 14-16 cm at the edge). Cast off. LEFT FRONT PIECE: Cast on and work as right front piece but reversed. I.e. after 2 rows K, work pattern as follows (from RS): SIZE S, M, L and XL: 1 edge st in garter st, P 12-17-22-27 sts, diagram M.4A (= 40 sts), P 6 sts, K 4 sts and 5 band sts in garter st. Size XXL and XXXL: 1 edge st in garter st, P 16-21 sts, diagram M.2 (= 20 sts), diagram M.4A, P 6 sts, K 4 sts and 5 band sts in garter st. Then work diagram M.4B and diagram M.4C instead of diagram M.3B and diagram M.3C. Sts over cable on shoulder are cast off from WS and shoulder sts from RS; this is done opposite from right front piece to avoid cutting the thread when working the collar. SLEEVE: Worked back and forth on needle. Cast on 100-100-100-116-116-132 sts (incl 1 edge st in each side) on needle size 3.5 mm with Karisma. K 1 row (1st row = RS) and P 1 row, then K all sts tog 2 by 2 = 50-50-50-58-58-66 sts. K 1 row from WS. Then work rib = K 4/P 4 with 1 edge st in garter st in each side. When piece measures 10 cm, switch to needle size 4 mm and continue in reverse stocking st. AT THE SAME TIME when piece measures 13-13-13-13-11-11 cm, inc 1 st each side, repeat inc every 3-2½-2-2-2-2 cm a total of 12-14-16-15-17-16 times = 74-78-82-88-92-98 sts. When piece measures 49-48-47-46-45-44 cm (shorter measurements in the larger sizes because of longer sleeve cap and broader shoulder width) cast off and dec for sleeve cap at beg of every row in each side: 4 sts 1 time, 2 sts 3 times, 1 st 5-6-7-9-10-12 times and then 2 sts in each side until piece measures 57 cm. Continue to cast off 3 sts 1 time in each side, then cast off the remaining sts. Sleeve measures approx. 58 cm. ASSEMBLY: Sew the shoulder seams. Sew collar tog mid back, edge to edge to avoid a chunky seam. Sew collar to the back of neckline. Sew in sleeves and sew under arm and side seams in one inside 1 edge st. Sew on buttons. |
||||||||||||||||||||||
Diagram explanations |
||||||||||||||||||||||
|
||||||||||||||||||||||
 |
||||||||||||||||||||||
 |
||||||||||||||||||||||
 |
||||||||||||||||||||||
Have you finished this pattern?Tag your pictures with #dropspattern #bluebirdcardigan or submit them to the #dropsfan gallery. Do you need help with this pattern?You'll find 11 tutorial videos, a Comments/Questions area and more by visiting the pattern on garnstudio.com. © 1982-2026 DROPS Design A/S. We reserve all rights. This document, including all its sub-sections, has copyrights. Read more about what you can do with our patterns at the bottom of each pattern on our site. |
||||||||||||||||||||||


With over 40 years in knitting and crochet design, DROPS Design offers one of the most extensive collections of free patterns on the internet - translated to 17 languages. As of today we count 324 catalogues and 12290 patterns translated into English (UK/cm). 12290
We work hard to bring you the best knitting and crochet have to offer, inspiration and advice as well as great quality yarns at incredible prices! Would you like to use our patterns for other than personal use? You can read what you are allowed to do in the Copyright text at the bottom of all our patterns. Happy crafting!
Post a comment to pattern DROPS 134-1
We would love to hear what you have to say about this pattern!
If you want to leave a question, please make sure you select the correct category in the form below, to speed up the answering process. Required fields are marked *.