
Popular categories
Looking for a yarn?


Comments / Questions (642)
![]() Marie José wrote:
Marie José wrote:
Goede dag, Ik snap de mindering van de mouw niet, in het patroon staat kant bij een hoogte van 49, 48, 47, 46, 45, 44 cm ( minder cm voor de grootste maten voor een grotere mouw kop en bredere schouders) af. Daar ik de grootste maat ben aan het breien. De rest kom ik uit
27.03.2019 - 23:59DROPS Design answered:
Dag Marie José,
Als je de grootste maat breit, begin je bij de mouw met afkanten bij een hoogte van 44 cm.
28.03.2019 - 12:26
![]() Jill wrote:
Jill wrote:
Where are the updated charts mentioned in corrections? when knitting the lattice work centre back, the lattice came out perfectly on the WRONG SIDE1 while the cable was fine. I was working pattern on right side according to instructions, with the dots as purl, and squares as knit, so that bit was OK. How do I download the adjusted charts?
05.03.2019 - 02:21DROPS Design answered:
Dear Jill, if you printed the pattern after the corrections have been done, then you printed the adjusted diagrams/pattern. Happy knitting!
05.03.2019 - 11:30
![]() Sazanne Cochrane wrote:
Sazanne Cochrane wrote:
Are there a written instructions available for the cable patterns , please. My sight is not good enough to be able to follow the chart and I would love to be able to make Bluebird jacket. Thankyou
21.02.2019 - 15:00DROPS Design answered:
Dear Mrs Cochrane, we only have diagram to this pattern, you could maybe try to enlarge it with a copy machine? Happy knitting!
21.02.2019 - 16:16
![]() Carol Gordon wrote:
Carol Gordon wrote:
1) I did a gauge sample and it came to exactly the right size. Then I started on the back and it seems to me to be 12 cm too big. Can I make it smaller by perling only two stitches at the beginning and end of the rows instead of 12 stitches? 2) How do I find the pattern corrections?
09.02.2019 - 21:13DROPS Design answered:
Dear Carol, please do not forget that the cardigan has a slightly peplum-y shape, that is wider at the botton, and there will be considerable narrowing (decrases) at the waistline, so it may seem at the first few cm, that is is too wide when it is actually the right size. You can find the corrections by clicking on the red text just above the diagrams, and the diagram explanations. Happy Knitting!
11.02.2019 - 04:01
![]() Francine wrote:
Francine wrote:
Bonjour Merci beaucoup encore une fois pour votre réponse rapide. Cordialement
07.02.2019 - 12:21
![]() FRANCINE wrote:
FRANCINE wrote:
Bonsoir Je vous ai déjà sollicité pour une question précédemment et je vous remercie pour la rapidité à laquelle vous m'avez répondu. je voulais vous sollicité de nouveau et vous demander de m'expliquer comment diminuer les 12 mailles dans M.1B, pour le dos, car je ne comprends pas très bien où cela se situe sur le diagramme. avec mes remerciements anticipés Cordialement
06.02.2019 - 16:58DROPS Design answered:
Bonjour Francine, les diminutions de M.1B se font dans les 19 derniers rangs de la partie M.1B, on va diminuer 6 fois au total 2 m ens à l'envers (triangle noir sur 2 mailles= dernier symbole de la légende) dans le diagramme soit un total de 12 diminutions. Bon tricot!
07.02.2019 - 08:50
![]() Marche wrote:
Marche wrote:
Bonsoir Combien faut-il commander de pelotes sur ce modèle, pour une taille XL s'il vous plaît ? Merci Cordialement
26.01.2019 - 23:01DROPS Design answered:
Bonjour Marche, il vous faut 20 pelotes de DROPS Karisma. Bon travail!
28.01.2019 - 07:37Carol wrote:
Are the inc and dec (at the collar on front sides) on either side of the 4stocking sts (after th band)? Thank you
15.11.2018 - 07:28DROPS Design answered:
Dear Carol, the inc for collar are done inside the edge st (= outermost band st) - see INCREASE TIP (applies to collar) and the dec for neck are done before/after the 3 sts in stocking st (before/after the 5 band st + the sts inc for collar) - see DECREASE TIP (applies to neck). Happy knitting!
15.11.2018 - 09:03
![]() Tineke De Jager wrote:
Tineke De Jager wrote:
Ik ben toe aan het minderen bij de hals maar begrijp de zin \"minder als volgt NA deze st:1 st r afh, 1 st r, afgeh st overh. Minder als volgt VOOR deze st: 2 st recht samen\" Moet je dan twee keer minderen?
02.11.2018 - 16:33DROPS Design answered:
Dag Tineke,
Nee, je mindert niet 2 keer, maar er zijn verschillende technieken van minderen beschreven, eentje voor als je ná de betreffende steken moet minderen en eentje voor als je vóór de betreffende steken moet minderen.
In de praktijk komt het er op neer dat je op het rechter voorpand met een andere techniek mindert dan op het linker voorpand.
05.11.2018 - 08:36
![]() Kelly Minton wrote:
Kelly Minton wrote:
How many rows or inches are there between each buttonhole?
25.10.2018 - 02:21DROPS Design answered:
Hi Kelly, The measurements for working each buttonhole are given under Instructions - buttonholes at the top of the pattern. Happy knitting!
25.10.2018 - 08:12
|
||||||||||||||||||||||
Bluebird#bluebirdcardigan |
||||||||||||||||||||||
 |
 |
|||||||||||||||||||||
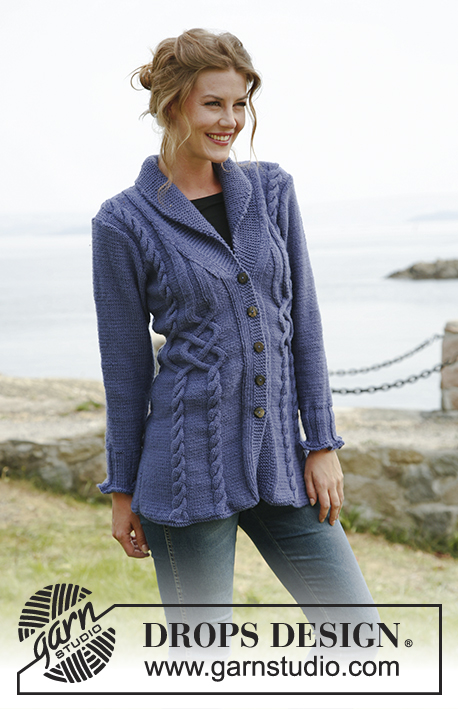
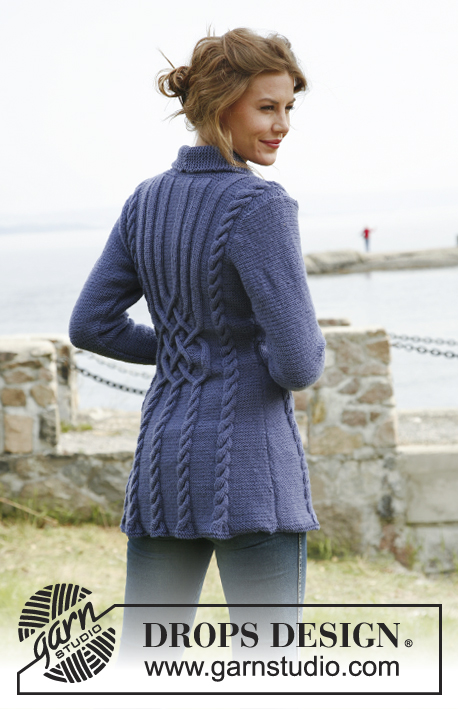
Knitted DROPS jacket with cables in ”Karisma”. Size: S to XXXL.
DROPS 134-1 |
||||||||||||||||||||||
|
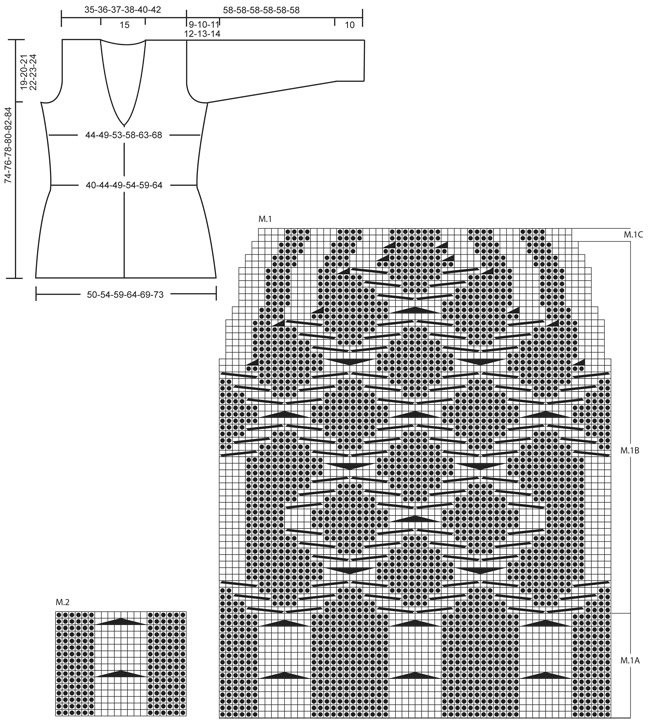
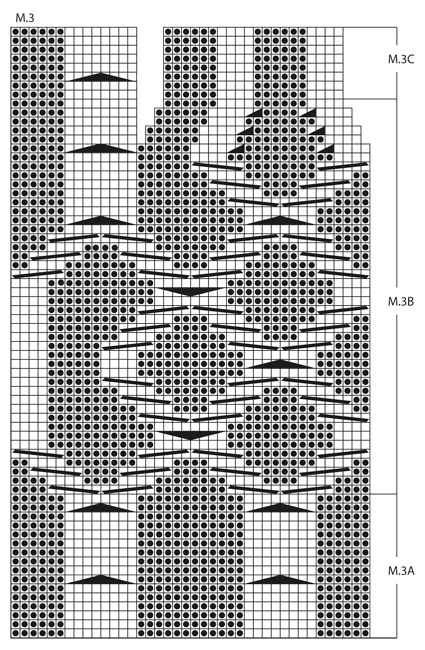
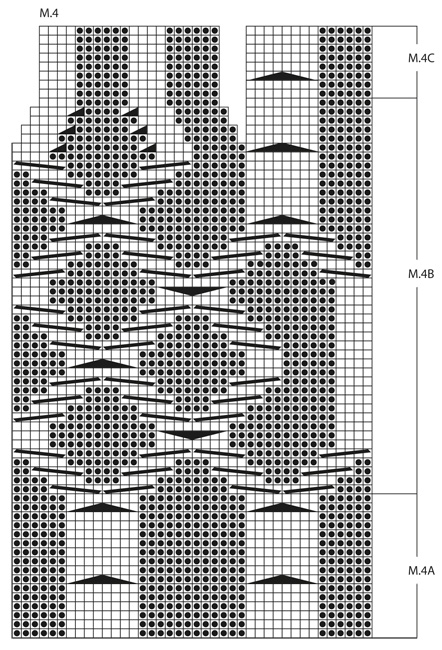
PATTERN: See diagram M.1 to M.4 – diagrams show pattern from RS (1st row = RS). GARTER ST (back and forth on needle): K all rows. KNITTING TIP (applies to band): Work the 5 band sts in garter st with double yarn the entire piece, i.e. have a little ball on the side that is only used on band. When inc for collar, work the inc sts with double yarn. This is done to make the band and the collar nice and firm. BUTTON HOLES: Cast off for button holes on right front band from RS. 1 BUTTON HOLE = cast off 3rd and 4th band st from mid front, on next row cast on 2 new sts over these sts. Cast off for button holes when piece measures: SIZE S: 18, 25, 32, 39 and 46 cm SIZE M: 19, 26, 33, 40 and 47 cm SIZE L: 20, 27, 34, 41 and 48 cm SIZE XL: 21, 28, 35, 42 and 49 cm SIZE XXL: 22, 29, 36, 43 and 50 cm SIZE XXXL: 23, 30, 37, 44 and 51 cm INCREASE TIP (applies to collar): Inc inside outermost band st by making 1 YO, on next row K YO twisted (i.e. work in back loop of st instead of front) to avoid holes. DECREASE TIP (applies to neck): Dec from RS inside the sts inc for collar + the 5 band sts + the first 3 sts in stocking st. Dec as follows AFTER these sts: Slip 1 st as if to K, K 1, psso. Dec as follows BEFORE these sts: K 2 tog. -------------------------------------------------------- -------------------------------------------------------- BACK PIECE: Worked back and forth on needle. Cast on 126-136-146-156-174-184 sts on straight needles size 3.5 mm with Karisma. K 2 rows (1st row = RS), switch to needle size 4 mm. READ ALL OF THE FOLLOWING SECTION BEFORE CONTINUING: PATTERN: Continue as follows (from RS): 1 edge st in GARTER ST – see explanation above, 12-17-22-27-16-21 sts in reverse stocking st, diagram M.2 (= 20 sts) 1-1-1-1-2-2 times, diagram M.1A (= 60 sts), diagram M.2 (= 20 sts) 1-1-1-1-2-2 times, 12-17-22-27-16-21 sts in reverse stocking st and 1 edge st in garter st. When piece measures 29-30-31-32-33-34 cm, work diagram M.1B over diagram M.1A, work the other sts as before (dec 12 sts in diagram M.1B as shown in diagram). After diagram M.1B, continue to work diagram M.1C over diagram M.1B. SIDE DEC AND SIDE INC: When piece measures 12 cm, dec 1 st in each side. Repeat dec every 2½ cm a total of 10 times. When piece measures 40 cm, inc 1 st in each side. Repeat inc every 3 cm a total of 4 times (work inc sts in reverse stocking st). After all dec and inc there are 102-112-122-132-150-160 sts on the needle. ARMHOLES: When piece measures 55-56-57-58-59-60 cm, cast off and dec for armholes at the beg of every row in each side as follows: 5 sts 1 time in all sizes, 3 sts 0-1-1-2-3-4 times, 2 sts 1-2-4-4-5-5 times and 1 st 3-2-2-3-5-5 times = 82-84-86-88-92-96 sts. Continue the pattern as before with 1 edge st in garter st in each side. When piece measures 70-72-74-76-78-80 cm, K 4 rows over the middle 40 sts (work the other sts as before). Then cast off the middle 30 sts for neck. Finish each shoulder (= 26-27-28-29-30-31 sts) separately. Continue the pattern with 5 sts in garter st towards the neck. When piece measures 74-76-78-80-82-84 cm, work the 8 sts over the cable in diagram M.2 tog 2 by 2 = 22-23-24-25-26-27 sts remain on needle. On next row cast off all sts K over K and P over P. RIGHT FRONT PIECE: Worked back and forth on needle. Cast on 68-73-78-83-92-97 sts (incl 5 band sts towards mid front and 1 edge st in the side) on needles size 3.5 mm with Karisma. READ KNITTING TIP! K 2 rows (1st row = RS), switch to needle size 4 mm. READ ALL OF THE FOLLOWING SECTION BEFORE CONTINUING! PATTERN: Continue as follows (= from RS): SIZE S, M, L and XL: 5 band sts in garter st, 4 sts in stocking st, 6 sts in reverse stocking st, diagram M.3A (= 40 sts), 12-17-22-27 sts in reverse stocking st and 1 edge st in garter st. Size XXL and XXXL: 5 band sts in garter st, 4 sts in stocking st, 6 sts in reverse stocking st, diagram M.3A (= 40 sts), M.2 (= 20 sts), 16-21 sts in reverse stocking st and 1 edge st in garter st. When piece measures 29-30-31-32-33-34 cm, work diagram M.3B over diagram M.3A, work the other sts as before (dec 6 sts in diagram M.3B as shown in diagram). After diagram M.3B, continue to work diagram M.3C over these sts. SIDE DEC AND SIDE INC: When piece measures 12 cm, dec 1 st in the side. Repeat dec every 2½ cm a total of 10 times. When piece measures 40 cm, inc 1 st in the side. Repeat inc every 3 cm a total of 4 times (work inc sts in reverse stocking st). BUTTON HOLES: At the same time when piece measures 18-19-20-21-22-23 cm, cast off for button holes - see explanation above. COLLAR: At the same time when piece measures 47-48-49-50-51-52 cm, from RS inc 2 sts for collar as follows: Make 1 YO after first st and 1 YO after second st, on next row K both YOs twisted to avoid holes. Continue to inc 1 st for collar on every other row a total of 12 times and then every 4th row a total of 6 times – SEE INCREASE TIP! After all inc, there are 20 inc collar sts and 25 sts in garter st in total (all these sts are worked with double yarn). NECKLINE: At the same time when piece measures 49-50-51-52-53-54 cm, dec 1 st towards the neck - SEE DECREASE TIP! Repeat dec every other row a total of 12 times and then on every 4th row a total of 8 times. ARMHOLE: At the same time when piece measures 55-56-57-58-59-60 cm, cast off and dec for armhole in the side as on back piece. After all inc and dec, there are 46-47-48-49-51-53 sts on needle. Work until piece measures 74-76-78-80-82-84 cm, adjust so that next row is worked from RS. Continue to work the 8 sts over the cable tog 2 by 2 = 42-43-44-45-47-49 sts on needle. On next row (= WS), cast off the first 22-23-24-25-27-29 sts for shoulder, K the rest of row. Continue like this over the remaining 20 collar sts: * K 2 rows over all sts, K 2 rows over only the outermost 14 sts (towards mid front) *, repeat from *-* until collar measures approx. 7-8 cm at the inside (it will then measure approx. 14-16 cm at the edge). Cast off. LEFT FRONT PIECE: Cast on and work as right front piece but reversed. I.e. after 2 rows K, work pattern as follows (from RS): SIZE S, M, L and XL: 1 edge st in garter st, P 12-17-22-27 sts, diagram M.4A (= 40 sts), P 6 sts, K 4 sts and 5 band sts in garter st. Size XXL and XXXL: 1 edge st in garter st, P 16-21 sts, diagram M.2 (= 20 sts), diagram M.4A, P 6 sts, K 4 sts and 5 band sts in garter st. Then work diagram M.4B and diagram M.4C instead of diagram M.3B and diagram M.3C. Sts over cable on shoulder are cast off from WS and shoulder sts from RS; this is done opposite from right front piece to avoid cutting the thread when working the collar. SLEEVE: Worked back and forth on needle. Cast on 100-100-100-116-116-132 sts (incl 1 edge st in each side) on needle size 3.5 mm with Karisma. K 1 row (1st row = RS) and P 1 row, then K all sts tog 2 by 2 = 50-50-50-58-58-66 sts. K 1 row from WS. Then work rib = K 4/P 4 with 1 edge st in garter st in each side. When piece measures 10 cm, switch to needle size 4 mm and continue in reverse stocking st. AT THE SAME TIME when piece measures 13-13-13-13-11-11 cm, inc 1 st each side, repeat inc every 3-2½-2-2-2-2 cm a total of 12-14-16-15-17-16 times = 74-78-82-88-92-98 sts. When piece measures 49-48-47-46-45-44 cm (shorter measurements in the larger sizes because of longer sleeve cap and broader shoulder width) cast off and dec for sleeve cap at beg of every row in each side: 4 sts 1 time, 2 sts 3 times, 1 st 5-6-7-9-10-12 times and then 2 sts in each side until piece measures 57 cm. Continue to cast off 3 sts 1 time in each side, then cast off the remaining sts. Sleeve measures approx. 58 cm. ASSEMBLY: Sew the shoulder seams. Sew collar tog mid back, edge to edge to avoid a chunky seam. Sew collar to the back of neckline. Sew in sleeves and sew under arm and side seams in one inside 1 edge st. Sew on buttons. |
||||||||||||||||||||||
Diagram explanations |
||||||||||||||||||||||
|
||||||||||||||||||||||
 |
||||||||||||||||||||||
 |
||||||||||||||||||||||
 |
||||||||||||||||||||||
Have you finished this pattern?Tag your pictures with #dropspattern #bluebirdcardigan or submit them to the #dropsfan gallery. Do you need help with this pattern?You'll find 11 tutorial videos, a Comments/Questions area and more by visiting the pattern on garnstudio.com. © 1982-2026 DROPS Design A/S. We reserve all rights. This document, including all its sub-sections, has copyrights. Read more about what you can do with our patterns at the bottom of each pattern on our site. |
||||||||||||||||||||||


With over 40 years in knitting and crochet design, DROPS Design offers one of the most extensive collections of free patterns on the internet - translated to 17 languages. As of today we count 324 catalogues and 12290 patterns translated into English (UK/cm). 12290
We work hard to bring you the best knitting and crochet have to offer, inspiration and advice as well as great quality yarns at incredible prices! Would you like to use our patterns for other than personal use? You can read what you are allowed to do in the Copyright text at the bottom of all our patterns. Happy crafting!
Post a comment to pattern DROPS 134-1
We would love to hear what you have to say about this pattern!
If you want to leave a question, please make sure you select the correct category in the form below, to speed up the answering process. Required fields are marked *.