
Popular categories
Looking for a yarn?


Comments / Questions (642)
![]() Jan Hodgkinson wrote:
Jan Hodgkinson wrote:
Is it possible to have the details for the diagrams written please? I cannot work from diagrams - but really love this jacket.
11.09.2014 - 17:28DROPS Design answered:
Dear Mrs Hodgkinson, you will find here all informations about reading diagrams. Happy knitting!
15.09.2014 - 10:17
![]() Melanie Puls wrote:
Melanie Puls wrote:
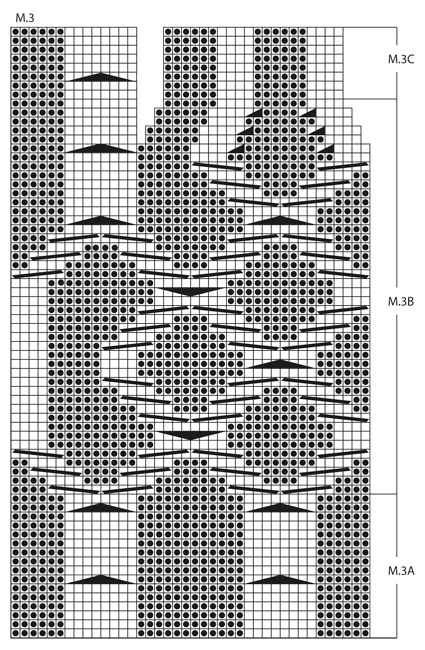
Guten Tag. ich stricke gerade diese wunderschöne jacke, komme aber mit dem Diagramm der Vorderseiten nicht klar. Kurz bevor im Diagramm M3C beginnt, teilt sich das Diaramm und es werden keine Maschen mehr angezeigt. Wie soll ich dies stricken? Maschen abketten?
28.08.2014 - 12:25DROPS Design answered:
Die Maschen, die jeweils rechts und links nicht mehr angezeigt werden, existieren nicht mehr, weil Sie ja in der jeweiligen Reihe davor 2 Abnahmen durch Zusammenstricken gemacht haben. Die "freien Plätze" ignorieren Sie also einfach.
01.09.2014 - 13:37
![]() Teresa wrote:
Teresa wrote:
I'm an accomplished knitter in Aran but I don't understand the pattern, I got as far as the first two rows &after many hours of trying, I failed, please help me to start off on the back
26.08.2014 - 22:49DROPS Design answered:
Dear Teresa, you are welcome to ask your DROPS store for individual help or write your question there - please explain which part you don't understand and which size you are knitting. Happy knnitting!
27.08.2014 - 09:23
![]() Elsa wrote:
Elsa wrote:
Hej! Jag undrar lite över storlekar, jag är mitt emellan stl S och M och är nu väldigt osäker på vilken jag ska sticka. Bystvidden för S är 88, och mitt mått är ca 92, tror ni att det går att blocka ut stl S några cm till mitt mått? Är nämligen rädd för att koftan kommer bli för stor och inte sitta snyggt om jag väljer M.
13.08.2014 - 23:34DROPS Design answered:
Hej Elsa. Pröv at strikke en pröve og vask/block den og se hvor meget den giver sig. Det kommer ogsaa an paa hvordan de övrige maal passer dig (talje, skulder osv).
14.08.2014 - 16:13
![]() Riitta Autio wrote:
Riitta Autio wrote:
Onko mallipiirroksessa vain oikeanpuolen kerrokset
27.05.2014 - 17:17DROPS Design answered:
Piirrokset näyttävät kaikkia kerroksia oikealta puolelta katsottuna.
28.05.2014 - 17:02
![]() Claudine wrote:
Claudine wrote:
Je mesure 1m65 et cette veste est trop longue pour moi. Comment calculer pour la diminuer de 6cm compte tenu des diminutions pour la taille et des augmentations ensuite. Dois-je ôter 3cm jusqu'aux emmanchures et 3cm jusqu'aux épaules tout en sachant que toutes les diminutions et augmentations ne pourront pas se faire tous les 2cm 1/2 et 3cm Pouvez-vous m'aider ? Cordialement
06.05.2014 - 14:11DROPS Design answered:
Bonjour Claudine, pour toute aide individuelle, contactez le magasin où vous avez acheté votre laine, il pourra vous aider. Bon tricot!
06.05.2014 - 15:07Tanja Whiteman wrote:
Is it posible to have this pattern written out completely? my mom age 82 is kniting this jacket for her granddaugter and is having difficulty in counting the block, she said it would be easier for her just to read the pattern. please would love any help for her.
04.05.2014 - 17:40DROPS Design answered:
Dear Mrs Whiteman, this pattern is only available as it is now. What about printing a larger copy of the diagram - this could be also useful at the same time as written pattern. Happy knitting!
05.05.2014 - 09:02
![]() Sandra Tanner wrote:
Sandra Tanner wrote:
Your patterns come in small,medium,large etc could you tell me what the measurements are for these sizes of ladies patterns
01.05.2014 - 21:14DROPS Design answered:
Dear Mrs Tanner, you will find at the end of the pattern a measurement chart with all measures in cm taken flat from side to size. Compare these to a similar garment you like the shape to find the matching size. Happy knitting!
02.05.2014 - 09:55
![]() Audur Proppe wrote:
Audur Proppe wrote:
Hello I can´t see the decrease of 12 stitches in M1B, only in M1C, am I missing something? Thank you
28.04.2014 - 19:57DROPS Design answered:
Dear Mrs Poppe, the decreases are reprensated by a black triangle over 2 squares (last symbol in diagram text), they are done in the upper part of M.1B (no dec in M.1C = 2 rows repeat). Happy knitting!
29.04.2014 - 09:24
![]() Geraldine Nesbitt wrote:
Geraldine Nesbitt wrote:
Ah! should I have started decreasing when work measured 12cms from the beginning -row 1 ? I must add I think the patterns you have are gorgeous and such a bonus that you have this help section. Thank you
23.04.2014 - 21:32DROPS Design answered:
Dear Mrs Nesbitt, yes you are correct, all measurements are from the beg, ie, you work M.1A & M.2, when piece measures 12 cm, start dec, when work measuures 30 c, start M.1B, when work measures 40 cm, start inc... Happy knitting!
24.04.2014 - 09:34
|
||||||||||||||||||||||
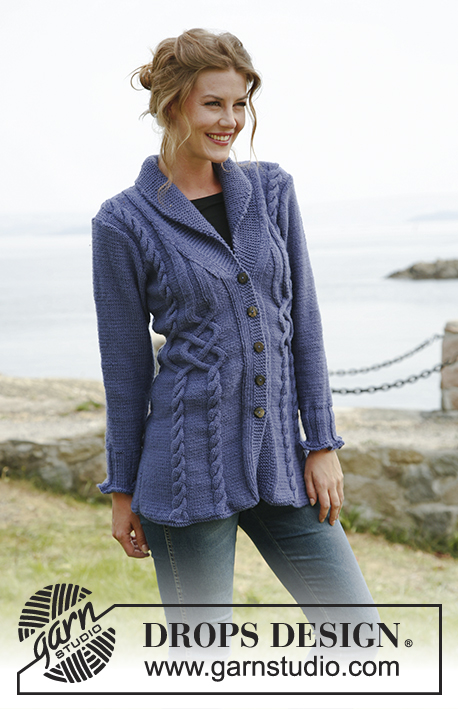
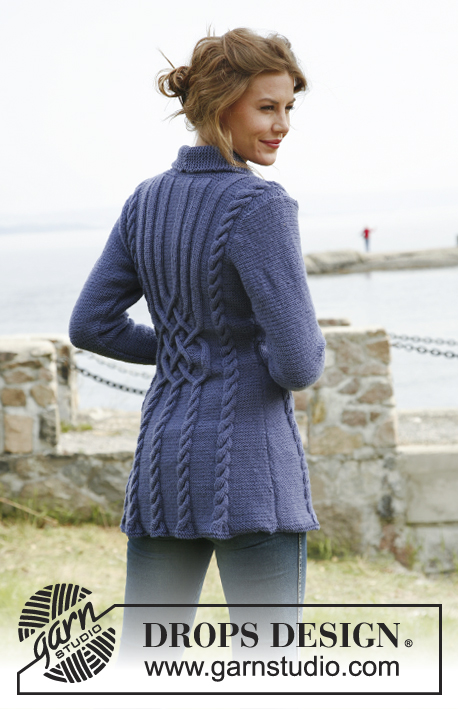
Bluebird#bluebirdcardigan |
||||||||||||||||||||||
 |
 |
|||||||||||||||||||||
Knitted DROPS jacket with cables in ”Karisma”. Size: S to XXXL.
DROPS 134-1 |
||||||||||||||||||||||
|
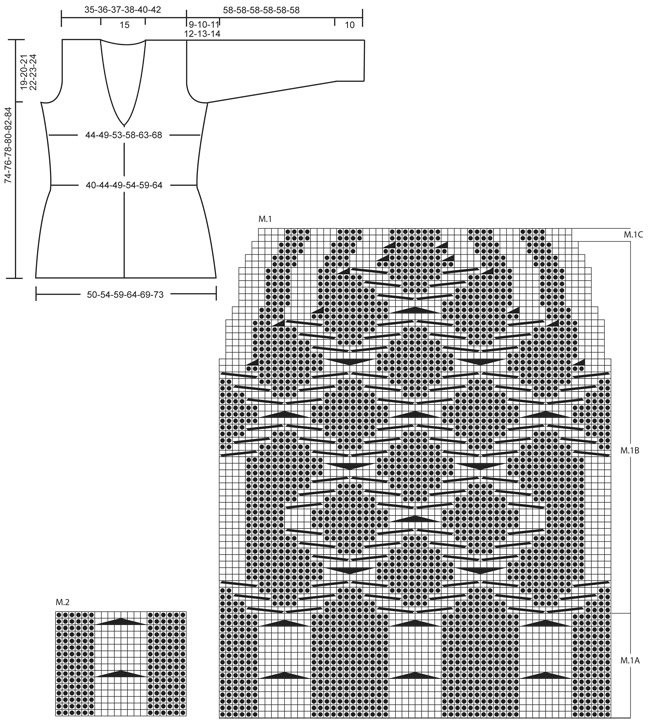
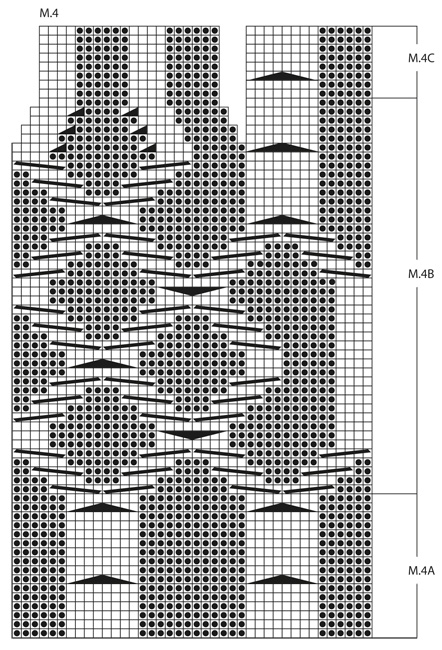
PATTERN: See diagram M.1 to M.4 – diagrams show pattern from RS (1st row = RS). GARTER ST (back and forth on needle): K all rows. KNITTING TIP (applies to band): Work the 5 band sts in garter st with double yarn the entire piece, i.e. have a little ball on the side that is only used on band. When inc for collar, work the inc sts with double yarn. This is done to make the band and the collar nice and firm. BUTTON HOLES: Cast off for button holes on right front band from RS. 1 BUTTON HOLE = cast off 3rd and 4th band st from mid front, on next row cast on 2 new sts over these sts. Cast off for button holes when piece measures: SIZE S: 18, 25, 32, 39 and 46 cm SIZE M: 19, 26, 33, 40 and 47 cm SIZE L: 20, 27, 34, 41 and 48 cm SIZE XL: 21, 28, 35, 42 and 49 cm SIZE XXL: 22, 29, 36, 43 and 50 cm SIZE XXXL: 23, 30, 37, 44 and 51 cm INCREASE TIP (applies to collar): Inc inside outermost band st by making 1 YO, on next row K YO twisted (i.e. work in back loop of st instead of front) to avoid holes. DECREASE TIP (applies to neck): Dec from RS inside the sts inc for collar + the 5 band sts + the first 3 sts in stocking st. Dec as follows AFTER these sts: Slip 1 st as if to K, K 1, psso. Dec as follows BEFORE these sts: K 2 tog. -------------------------------------------------------- -------------------------------------------------------- BACK PIECE: Worked back and forth on needle. Cast on 126-136-146-156-174-184 sts on straight needles size 3.5 mm with Karisma. K 2 rows (1st row = RS), switch to needle size 4 mm. READ ALL OF THE FOLLOWING SECTION BEFORE CONTINUING: PATTERN: Continue as follows (from RS): 1 edge st in GARTER ST – see explanation above, 12-17-22-27-16-21 sts in reverse stocking st, diagram M.2 (= 20 sts) 1-1-1-1-2-2 times, diagram M.1A (= 60 sts), diagram M.2 (= 20 sts) 1-1-1-1-2-2 times, 12-17-22-27-16-21 sts in reverse stocking st and 1 edge st in garter st. When piece measures 29-30-31-32-33-34 cm, work diagram M.1B over diagram M.1A, work the other sts as before (dec 12 sts in diagram M.1B as shown in diagram). After diagram M.1B, continue to work diagram M.1C over diagram M.1B. SIDE DEC AND SIDE INC: When piece measures 12 cm, dec 1 st in each side. Repeat dec every 2½ cm a total of 10 times. When piece measures 40 cm, inc 1 st in each side. Repeat inc every 3 cm a total of 4 times (work inc sts in reverse stocking st). After all dec and inc there are 102-112-122-132-150-160 sts on the needle. ARMHOLES: When piece measures 55-56-57-58-59-60 cm, cast off and dec for armholes at the beg of every row in each side as follows: 5 sts 1 time in all sizes, 3 sts 0-1-1-2-3-4 times, 2 sts 1-2-4-4-5-5 times and 1 st 3-2-2-3-5-5 times = 82-84-86-88-92-96 sts. Continue the pattern as before with 1 edge st in garter st in each side. When piece measures 70-72-74-76-78-80 cm, K 4 rows over the middle 40 sts (work the other sts as before). Then cast off the middle 30 sts for neck. Finish each shoulder (= 26-27-28-29-30-31 sts) separately. Continue the pattern with 5 sts in garter st towards the neck. When piece measures 74-76-78-80-82-84 cm, work the 8 sts over the cable in diagram M.2 tog 2 by 2 = 22-23-24-25-26-27 sts remain on needle. On next row cast off all sts K over K and P over P. RIGHT FRONT PIECE: Worked back and forth on needle. Cast on 68-73-78-83-92-97 sts (incl 5 band sts towards mid front and 1 edge st in the side) on needles size 3.5 mm with Karisma. READ KNITTING TIP! K 2 rows (1st row = RS), switch to needle size 4 mm. READ ALL OF THE FOLLOWING SECTION BEFORE CONTINUING! PATTERN: Continue as follows (= from RS): SIZE S, M, L and XL: 5 band sts in garter st, 4 sts in stocking st, 6 sts in reverse stocking st, diagram M.3A (= 40 sts), 12-17-22-27 sts in reverse stocking st and 1 edge st in garter st. Size XXL and XXXL: 5 band sts in garter st, 4 sts in stocking st, 6 sts in reverse stocking st, diagram M.3A (= 40 sts), M.2 (= 20 sts), 16-21 sts in reverse stocking st and 1 edge st in garter st. When piece measures 29-30-31-32-33-34 cm, work diagram M.3B over diagram M.3A, work the other sts as before (dec 6 sts in diagram M.3B as shown in diagram). After diagram M.3B, continue to work diagram M.3C over these sts. SIDE DEC AND SIDE INC: When piece measures 12 cm, dec 1 st in the side. Repeat dec every 2½ cm a total of 10 times. When piece measures 40 cm, inc 1 st in the side. Repeat inc every 3 cm a total of 4 times (work inc sts in reverse stocking st). BUTTON HOLES: At the same time when piece measures 18-19-20-21-22-23 cm, cast off for button holes - see explanation above. COLLAR: At the same time when piece measures 47-48-49-50-51-52 cm, from RS inc 2 sts for collar as follows: Make 1 YO after first st and 1 YO after second st, on next row K both YOs twisted to avoid holes. Continue to inc 1 st for collar on every other row a total of 12 times and then every 4th row a total of 6 times – SEE INCREASE TIP! After all inc, there are 20 inc collar sts and 25 sts in garter st in total (all these sts are worked with double yarn). NECKLINE: At the same time when piece measures 49-50-51-52-53-54 cm, dec 1 st towards the neck - SEE DECREASE TIP! Repeat dec every other row a total of 12 times and then on every 4th row a total of 8 times. ARMHOLE: At the same time when piece measures 55-56-57-58-59-60 cm, cast off and dec for armhole in the side as on back piece. After all inc and dec, there are 46-47-48-49-51-53 sts on needle. Work until piece measures 74-76-78-80-82-84 cm, adjust so that next row is worked from RS. Continue to work the 8 sts over the cable tog 2 by 2 = 42-43-44-45-47-49 sts on needle. On next row (= WS), cast off the first 22-23-24-25-27-29 sts for shoulder, K the rest of row. Continue like this over the remaining 20 collar sts: * K 2 rows over all sts, K 2 rows over only the outermost 14 sts (towards mid front) *, repeat from *-* until collar measures approx. 7-8 cm at the inside (it will then measure approx. 14-16 cm at the edge). Cast off. LEFT FRONT PIECE: Cast on and work as right front piece but reversed. I.e. after 2 rows K, work pattern as follows (from RS): SIZE S, M, L and XL: 1 edge st in garter st, P 12-17-22-27 sts, diagram M.4A (= 40 sts), P 6 sts, K 4 sts and 5 band sts in garter st. Size XXL and XXXL: 1 edge st in garter st, P 16-21 sts, diagram M.2 (= 20 sts), diagram M.4A, P 6 sts, K 4 sts and 5 band sts in garter st. Then work diagram M.4B and diagram M.4C instead of diagram M.3B and diagram M.3C. Sts over cable on shoulder are cast off from WS and shoulder sts from RS; this is done opposite from right front piece to avoid cutting the thread when working the collar. SLEEVE: Worked back and forth on needle. Cast on 100-100-100-116-116-132 sts (incl 1 edge st in each side) on needle size 3.5 mm with Karisma. K 1 row (1st row = RS) and P 1 row, then K all sts tog 2 by 2 = 50-50-50-58-58-66 sts. K 1 row from WS. Then work rib = K 4/P 4 with 1 edge st in garter st in each side. When piece measures 10 cm, switch to needle size 4 mm and continue in reverse stocking st. AT THE SAME TIME when piece measures 13-13-13-13-11-11 cm, inc 1 st each side, repeat inc every 3-2½-2-2-2-2 cm a total of 12-14-16-15-17-16 times = 74-78-82-88-92-98 sts. When piece measures 49-48-47-46-45-44 cm (shorter measurements in the larger sizes because of longer sleeve cap and broader shoulder width) cast off and dec for sleeve cap at beg of every row in each side: 4 sts 1 time, 2 sts 3 times, 1 st 5-6-7-9-10-12 times and then 2 sts in each side until piece measures 57 cm. Continue to cast off 3 sts 1 time in each side, then cast off the remaining sts. Sleeve measures approx. 58 cm. ASSEMBLY: Sew the shoulder seams. Sew collar tog mid back, edge to edge to avoid a chunky seam. Sew collar to the back of neckline. Sew in sleeves and sew under arm and side seams in one inside 1 edge st. Sew on buttons. |
||||||||||||||||||||||
Diagram explanations |
||||||||||||||||||||||
|
||||||||||||||||||||||
 |
||||||||||||||||||||||
 |
||||||||||||||||||||||
 |
||||||||||||||||||||||
Have you finished this pattern?Tag your pictures with #dropspattern #bluebirdcardigan or submit them to the #dropsfan gallery. Do you need help with this pattern?You'll find 11 tutorial videos, a Comments/Questions area and more by visiting the pattern on garnstudio.com. © 1982-2026 DROPS Design A/S. We reserve all rights. This document, including all its sub-sections, has copyrights. Read more about what you can do with our patterns at the bottom of each pattern on our site. |
||||||||||||||||||||||


With over 40 years in knitting and crochet design, DROPS Design offers one of the most extensive collections of free patterns on the internet - translated to 17 languages. As of today we count 324 catalogues and 12290 patterns translated into English (UK/cm). 12290
We work hard to bring you the best knitting and crochet have to offer, inspiration and advice as well as great quality yarns at incredible prices! Would you like to use our patterns for other than personal use? You can read what you are allowed to do in the Copyright text at the bottom of all our patterns. Happy crafting!
Post a comment to pattern DROPS 134-1
We would love to hear what you have to say about this pattern!
If you want to leave a question, please make sure you select the correct category in the form below, to speed up the answering process. Required fields are marked *.