
Popular categories
Looking for a yarn?


Comments / Questions (642)
![]() Pascale Genevée wrote:
Pascale Genevée wrote:
Bonjour, je suis arrivée à l"encolure et au col. Je ne comprends pas du tout comment on forme à la fois le col et l'encolure et où effectuer augmentations et diminutions. Merci d'avance.
19.10.2015 - 20:51DROPS Design answered:
Bonjour Mme Genevée, pour le col: on augmente d'abord 2 m (1 m lis, 1 jeté, 1 m end, 1 jeté - devant droit), puis on augmente 12 fois 1 m tous les 2 rangs et 6 fois tous les 4 rangs (= 1 m lis, 1 jeté - devant droit). Pour l'encolure (devant droit), on diminue 1 m après les m augmentées pour le col + les m de la bordure devant. On commence à augmenter pour le col à 47-52 cm (cf taille) et on commence à diminuer pour l'encolure à 49-54 cm. Bon tricot!
20.10.2015 - 10:25Hélène Fortier wrote:
Bonjour A 47 cm lorsque je commence le col - Est-ce que la première augmentation se fait après la maille lisière ou après les 5 mailles de bordure ? merci beaucoup
16.09.2015 - 23:06DROPS Design answered:
Bonjour Mme Fortier, à 47 cm, on augmente 2 m pour le col ainsi, en commençant sur l'endroit (par la bordure devant): 1 m end, 1 jeté, 1 m end, 1 jeté, continuez comme avant. Augmentez ensuite 1 seule m: 12 fois tous les 2 rangs puis 6 fois tous les 4 rangs. Bon tricot!
17.09.2015 - 09:05
![]() Sarah wrote:
Sarah wrote:
Jeg har problemer med indtagningen på rygstykke. Jeg starter med 126 m, men skal indtage 1 m på hver side i 10 omg totalt. Dvs, det bliver 20 masker i alt. Derefter skal jeg udtage 1 m på hver side i 4 omgang totalt. Det bliver 8 masker. Dvs 126 - 20 - 8.... Men opskriften siger at jeg skal have 102 masker tilbage. Hvordan kan det lade sig gøre?
28.08.2015 - 14:14DROPS Design answered:
Hej Sarah, husk også indtagningerne ifølge diagrammet. God fornøjelse!
06.10.2015 - 15:48
![]() Maria wrote:
Maria wrote:
Hei. Aldri strikket så komplisert mønster. Det ble veldig pent og god fassong. Men jakka nupper etter ganske lit bruk. Kan men unngå det?
12.08.2015 - 11:23DROPS Design answered:
Hej Maria, Dejligt at du synes om modellen. Ja forsög at undgå jakke med syntetfoer. Hvis jakken har fået lidt nupper, så kan de skäres eller klippes bort og jakken vil se ud som ny. Held og lykke!
28.08.2015 - 16:17Helen Shaw wrote:
Could you clarify the decrease tip that applies to the front neck. Where the tip says Dec as follows BEFORE these sts: K2 tog - what stitches is it referring to and do you decrease twice on one row or once over two rows.
03.08.2015 - 02:03DROPS Design answered:
Dear Mrs Shaw, you dec for neck after (right front piece) or before (left front piece) the sts inc for collar + the 5 band sts + the first 3 sts in stocking st (from mid front). You dec for neck 1 st every other row a total of 12 times then every 4th row a total of 8 times. Happy knitting!
03.08.2015 - 10:03
![]() Ulla Jouttijarvi wrote:
Ulla Jouttijarvi wrote:
Jeg har problemer med højre forstykke kraven. Hvor får i de 25 retstrik-m fra? Efter alle udtagninger er der 20 nye krave-m og 25 retstrik-m totalt.
23.07.2015 - 17:25DROPS Design answered:
Hej Ulla, De 25 m er de 20 nye + de 5 forkantm som alle strikkes i retstrik med dobbelt garn. God fornøjelse!
28.07.2015 - 15:08Elizabeth wrote:
Used your pattern, just thought i would tell you thankyou it looks amazing. Second time round i have changed it a little my dayghter loved it
19.05.2015 - 17:02
![]() Ilona Roem wrote:
Ilona Roem wrote:
Jammer dat ik geen antwoord heb mogen ontvangen.
17.05.2015 - 09:27
![]() Lorraine Quesnel wrote:
Lorraine Quesnel wrote:
Thank you so much. It worked I can now continue my sweater
17.05.2015 - 02:06
![]() Lorraine Quesnel wrote:
Lorraine Quesnel wrote:
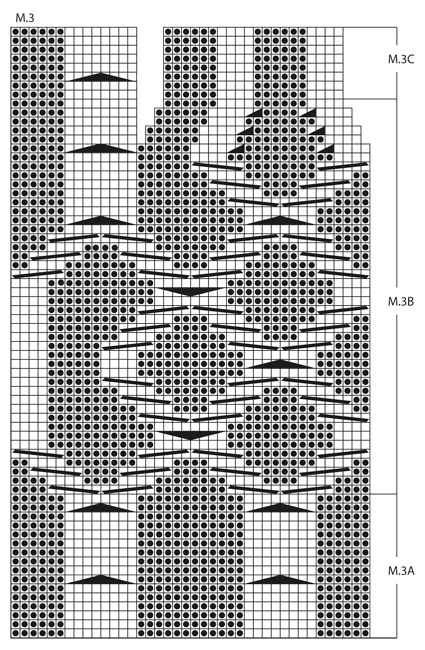
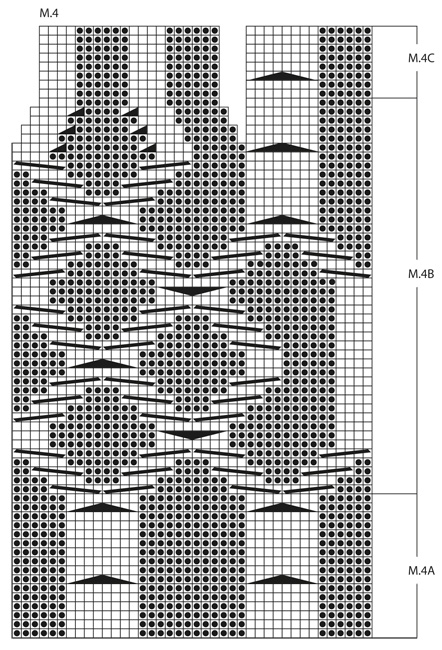
I am knitting pattern 134_1 and .I am on the top of M3B just before M3C where you start to decrease then it's k 4,p10,k4,p6 then that gap then k8 ,p6 then the rest of the stiches. Its that gap that I need to know if I get another yarn ball to complete the shoulders?
16.05.2015 - 03:15DROPS Design answered:
Dear Mrs Quesnel, at the top of M3B you dec 2 sts (black triangle = last symbol under diagram text) on the next 3 rows from RS, the gap are there because sts are decreased, just skip the gaps and continue working diagrams as before. Happy knitting!
16.05.2015 - 09:59
|
||||||||||||||||||||||
Bluebird#bluebirdcardigan |
||||||||||||||||||||||
 |
 |
|||||||||||||||||||||
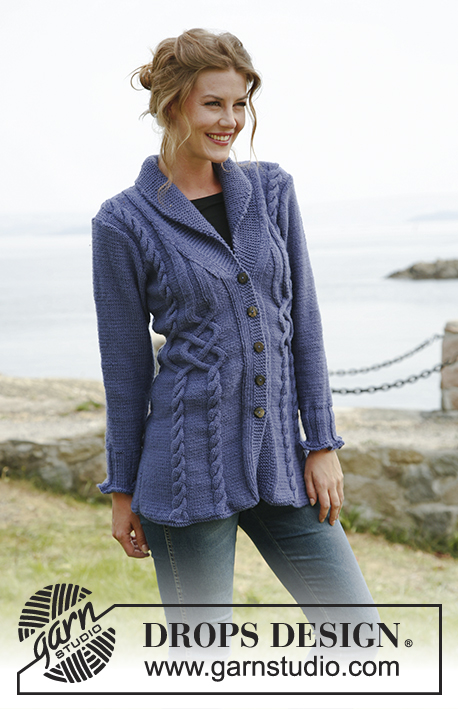
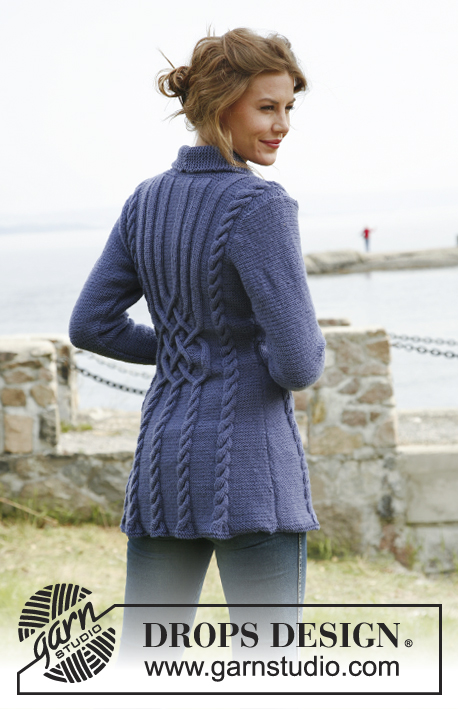
Knitted DROPS jacket with cables in ”Karisma”. Size: S to XXXL.
DROPS 134-1 |
||||||||||||||||||||||
|
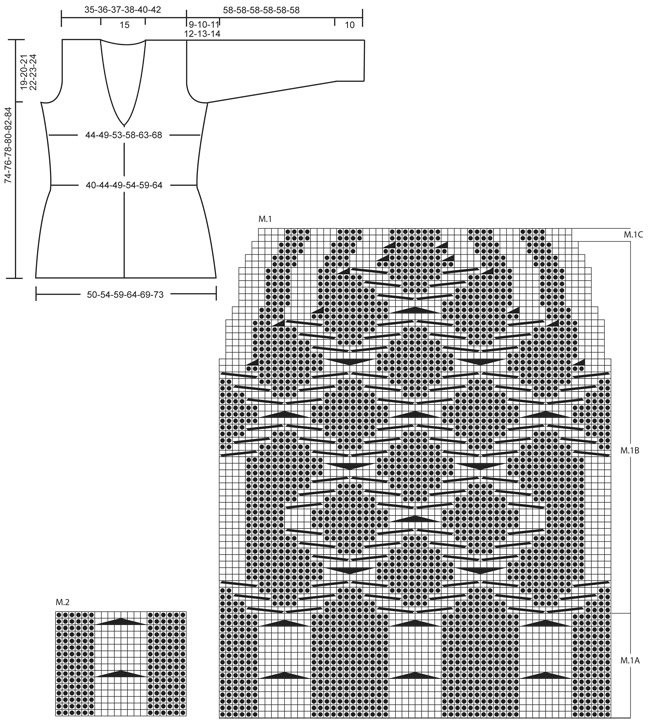
PATTERN: See diagram M.1 to M.4 – diagrams show pattern from RS (1st row = RS). GARTER ST (back and forth on needle): K all rows. KNITTING TIP (applies to band): Work the 5 band sts in garter st with double yarn the entire piece, i.e. have a little ball on the side that is only used on band. When inc for collar, work the inc sts with double yarn. This is done to make the band and the collar nice and firm. BUTTON HOLES: Cast off for button holes on right front band from RS. 1 BUTTON HOLE = cast off 3rd and 4th band st from mid front, on next row cast on 2 new sts over these sts. Cast off for button holes when piece measures: SIZE S: 18, 25, 32, 39 and 46 cm SIZE M: 19, 26, 33, 40 and 47 cm SIZE L: 20, 27, 34, 41 and 48 cm SIZE XL: 21, 28, 35, 42 and 49 cm SIZE XXL: 22, 29, 36, 43 and 50 cm SIZE XXXL: 23, 30, 37, 44 and 51 cm INCREASE TIP (applies to collar): Inc inside outermost band st by making 1 YO, on next row K YO twisted (i.e. work in back loop of st instead of front) to avoid holes. DECREASE TIP (applies to neck): Dec from RS inside the sts inc for collar + the 5 band sts + the first 3 sts in stocking st. Dec as follows AFTER these sts: Slip 1 st as if to K, K 1, psso. Dec as follows BEFORE these sts: K 2 tog. -------------------------------------------------------- -------------------------------------------------------- BACK PIECE: Worked back and forth on needle. Cast on 126-136-146-156-174-184 sts on straight needles size 3.5 mm with Karisma. K 2 rows (1st row = RS), switch to needle size 4 mm. READ ALL OF THE FOLLOWING SECTION BEFORE CONTINUING: PATTERN: Continue as follows (from RS): 1 edge st in GARTER ST – see explanation above, 12-17-22-27-16-21 sts in reverse stocking st, diagram M.2 (= 20 sts) 1-1-1-1-2-2 times, diagram M.1A (= 60 sts), diagram M.2 (= 20 sts) 1-1-1-1-2-2 times, 12-17-22-27-16-21 sts in reverse stocking st and 1 edge st in garter st. When piece measures 29-30-31-32-33-34 cm, work diagram M.1B over diagram M.1A, work the other sts as before (dec 12 sts in diagram M.1B as shown in diagram). After diagram M.1B, continue to work diagram M.1C over diagram M.1B. SIDE DEC AND SIDE INC: When piece measures 12 cm, dec 1 st in each side. Repeat dec every 2½ cm a total of 10 times. When piece measures 40 cm, inc 1 st in each side. Repeat inc every 3 cm a total of 4 times (work inc sts in reverse stocking st). After all dec and inc there are 102-112-122-132-150-160 sts on the needle. ARMHOLES: When piece measures 55-56-57-58-59-60 cm, cast off and dec for armholes at the beg of every row in each side as follows: 5 sts 1 time in all sizes, 3 sts 0-1-1-2-3-4 times, 2 sts 1-2-4-4-5-5 times and 1 st 3-2-2-3-5-5 times = 82-84-86-88-92-96 sts. Continue the pattern as before with 1 edge st in garter st in each side. When piece measures 70-72-74-76-78-80 cm, K 4 rows over the middle 40 sts (work the other sts as before). Then cast off the middle 30 sts for neck. Finish each shoulder (= 26-27-28-29-30-31 sts) separately. Continue the pattern with 5 sts in garter st towards the neck. When piece measures 74-76-78-80-82-84 cm, work the 8 sts over the cable in diagram M.2 tog 2 by 2 = 22-23-24-25-26-27 sts remain on needle. On next row cast off all sts K over K and P over P. RIGHT FRONT PIECE: Worked back and forth on needle. Cast on 68-73-78-83-92-97 sts (incl 5 band sts towards mid front and 1 edge st in the side) on needles size 3.5 mm with Karisma. READ KNITTING TIP! K 2 rows (1st row = RS), switch to needle size 4 mm. READ ALL OF THE FOLLOWING SECTION BEFORE CONTINUING! PATTERN: Continue as follows (= from RS): SIZE S, M, L and XL: 5 band sts in garter st, 4 sts in stocking st, 6 sts in reverse stocking st, diagram M.3A (= 40 sts), 12-17-22-27 sts in reverse stocking st and 1 edge st in garter st. Size XXL and XXXL: 5 band sts in garter st, 4 sts in stocking st, 6 sts in reverse stocking st, diagram M.3A (= 40 sts), M.2 (= 20 sts), 16-21 sts in reverse stocking st and 1 edge st in garter st. When piece measures 29-30-31-32-33-34 cm, work diagram M.3B over diagram M.3A, work the other sts as before (dec 6 sts in diagram M.3B as shown in diagram). After diagram M.3B, continue to work diagram M.3C over these sts. SIDE DEC AND SIDE INC: When piece measures 12 cm, dec 1 st in the side. Repeat dec every 2½ cm a total of 10 times. When piece measures 40 cm, inc 1 st in the side. Repeat inc every 3 cm a total of 4 times (work inc sts in reverse stocking st). BUTTON HOLES: At the same time when piece measures 18-19-20-21-22-23 cm, cast off for button holes - see explanation above. COLLAR: At the same time when piece measures 47-48-49-50-51-52 cm, from RS inc 2 sts for collar as follows: Make 1 YO after first st and 1 YO after second st, on next row K both YOs twisted to avoid holes. Continue to inc 1 st for collar on every other row a total of 12 times and then every 4th row a total of 6 times – SEE INCREASE TIP! After all inc, there are 20 inc collar sts and 25 sts in garter st in total (all these sts are worked with double yarn). NECKLINE: At the same time when piece measures 49-50-51-52-53-54 cm, dec 1 st towards the neck - SEE DECREASE TIP! Repeat dec every other row a total of 12 times and then on every 4th row a total of 8 times. ARMHOLE: At the same time when piece measures 55-56-57-58-59-60 cm, cast off and dec for armhole in the side as on back piece. After all inc and dec, there are 46-47-48-49-51-53 sts on needle. Work until piece measures 74-76-78-80-82-84 cm, adjust so that next row is worked from RS. Continue to work the 8 sts over the cable tog 2 by 2 = 42-43-44-45-47-49 sts on needle. On next row (= WS), cast off the first 22-23-24-25-27-29 sts for shoulder, K the rest of row. Continue like this over the remaining 20 collar sts: * K 2 rows over all sts, K 2 rows over only the outermost 14 sts (towards mid front) *, repeat from *-* until collar measures approx. 7-8 cm at the inside (it will then measure approx. 14-16 cm at the edge). Cast off. LEFT FRONT PIECE: Cast on and work as right front piece but reversed. I.e. after 2 rows K, work pattern as follows (from RS): SIZE S, M, L and XL: 1 edge st in garter st, P 12-17-22-27 sts, diagram M.4A (= 40 sts), P 6 sts, K 4 sts and 5 band sts in garter st. Size XXL and XXXL: 1 edge st in garter st, P 16-21 sts, diagram M.2 (= 20 sts), diagram M.4A, P 6 sts, K 4 sts and 5 band sts in garter st. Then work diagram M.4B and diagram M.4C instead of diagram M.3B and diagram M.3C. Sts over cable on shoulder are cast off from WS and shoulder sts from RS; this is done opposite from right front piece to avoid cutting the thread when working the collar. SLEEVE: Worked back and forth on needle. Cast on 100-100-100-116-116-132 sts (incl 1 edge st in each side) on needle size 3.5 mm with Karisma. K 1 row (1st row = RS) and P 1 row, then K all sts tog 2 by 2 = 50-50-50-58-58-66 sts. K 1 row from WS. Then work rib = K 4/P 4 with 1 edge st in garter st in each side. When piece measures 10 cm, switch to needle size 4 mm and continue in reverse stocking st. AT THE SAME TIME when piece measures 13-13-13-13-11-11 cm, inc 1 st each side, repeat inc every 3-2½-2-2-2-2 cm a total of 12-14-16-15-17-16 times = 74-78-82-88-92-98 sts. When piece measures 49-48-47-46-45-44 cm (shorter measurements in the larger sizes because of longer sleeve cap and broader shoulder width) cast off and dec for sleeve cap at beg of every row in each side: 4 sts 1 time, 2 sts 3 times, 1 st 5-6-7-9-10-12 times and then 2 sts in each side until piece measures 57 cm. Continue to cast off 3 sts 1 time in each side, then cast off the remaining sts. Sleeve measures approx. 58 cm. ASSEMBLY: Sew the shoulder seams. Sew collar tog mid back, edge to edge to avoid a chunky seam. Sew collar to the back of neckline. Sew in sleeves and sew under arm and side seams in one inside 1 edge st. Sew on buttons. |
||||||||||||||||||||||
Diagram explanations |
||||||||||||||||||||||
|
||||||||||||||||||||||
 |
||||||||||||||||||||||
 |
||||||||||||||||||||||
 |
||||||||||||||||||||||
Have you finished this pattern?Tag your pictures with #dropspattern #bluebirdcardigan or submit them to the #dropsfan gallery. Do you need help with this pattern?You'll find 11 tutorial videos, a Comments/Questions area and more by visiting the pattern on garnstudio.com. © 1982-2026 DROPS Design A/S. We reserve all rights. This document, including all its sub-sections, has copyrights. Read more about what you can do with our patterns at the bottom of each pattern on our site. |
||||||||||||||||||||||


With over 40 years in knitting and crochet design, DROPS Design offers one of the most extensive collections of free patterns on the internet - translated to 17 languages. As of today we count 324 catalogues and 12290 patterns translated into English (UK/cm). 12290
We work hard to bring you the best knitting and crochet have to offer, inspiration and advice as well as great quality yarns at incredible prices! Would you like to use our patterns for other than personal use? You can read what you are allowed to do in the Copyright text at the bottom of all our patterns. Happy crafting!
Post a comment to pattern DROPS 134-1
We would love to hear what you have to say about this pattern!
If you want to leave a question, please make sure you select the correct category in the form below, to speed up the answering process. Required fields are marked *.