
Popular categories
Looking for a yarn?


Comments / Questions (7)
![]() Pamela wrote:
Pamela wrote:
Tienes foto de la espalda?
03.06.2026 - 03:17DROPS Design answered:
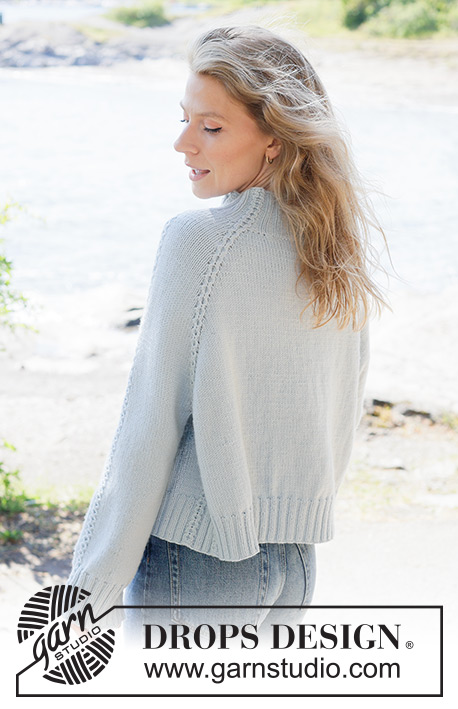
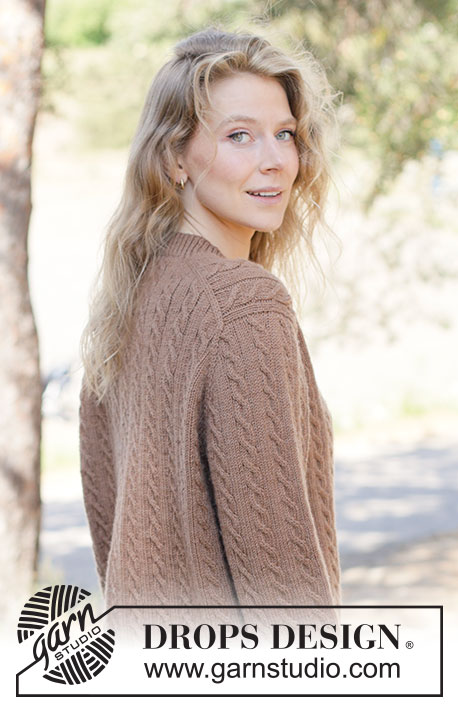
Hola Pamela, todas las fotos que están online son las fotos que tenemos disponibles de este modelo. La espalda tiene las trenzas en la línea del raglán, como en el delantero, pero no tiene las trenzas de A.2, sino que se trabaja solo en punto jersey.
08.06.2026 - 01:19
![]() Marion wrote:
Marion wrote:
Die Anzahl des Maschenanschlags ist falsch. 152 M. ??? Wen das Muster nur für Gr. L 120 Maschen beträgt. Ich bitte um Erklärung, Danke.
19.01.2026 - 20:19DROPS Design answered:
Liebe Marion, hätten Sie vielleicht A.1 nicht damit berechnet? Schauen Sie mal unten. Viel Spaß beim Stricken!
20.01.2026 - 10:25
![]() Marion wrote:
Marion wrote:
Die Anzahl des Maschenanschlags ist falsch. 152 M. ??? Wen das Muster nur für Gr. L 112 Maschen beträgt. Ich bitte um Erklärung, Danke.
19.01.2026 - 19:22DROPS Design answered:
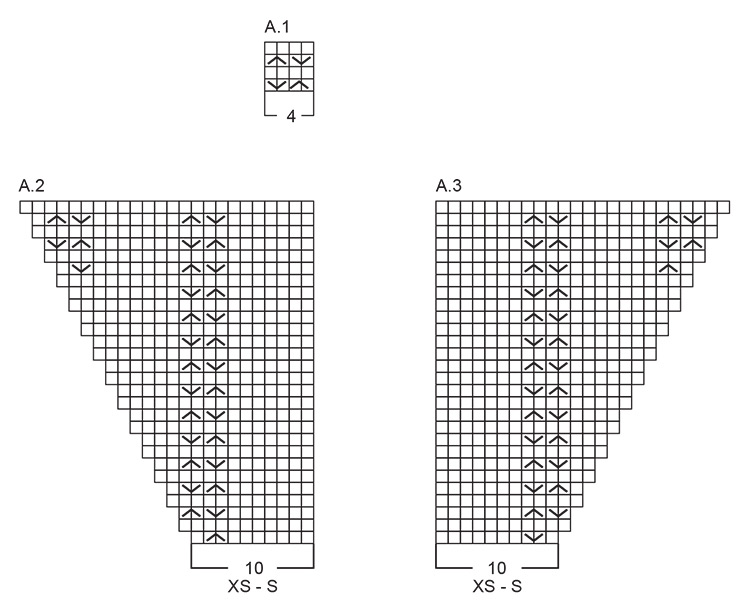
Liebe Marion, so stricken Sie in L: 7 Maschen Blende mit I-Cord, A.1 (= 4M), 14 Maschen Rippenmuster (2 li, 2 re), A.1 (= 4 M), 10 M Rippenmuster (2 li, 2 re), A.1 (= 4 M), 10 M Rippenmuster (2 li, 2 re), A.1 (= 4 M), 38 M Rippenmuster (2 li, 2 re), A.1 (4 M), 10 M Rippenmuster (2 li, 2 re), A.1 =4 M), 10 M Rippenmuster (2 li, 2 re), A.1 (4 M), 14 M Rippenmuster (2 li, 2 re), A.1 (=4 M), 7 Maschen Blende mit I-Cord = 7+4+14+4+10+4+10+4+38+4+10+4+10+4+14+4+7=152 Maschen. Viel Spaß beim Stricken!
20.01.2026 - 09:43
![]() Catharina wrote:
Catharina wrote:
Wij hebben nog steeds hetzelfde probleem dat de tekst eraf valt als je hem wilt printen, we krijgen hier veel vragen over. Er valt tekst weg als je hem print. Een andere browser lost niets op. Kan er misschien nog eens naar gekeken worden?
27.11.2025 - 15:54DROPS Design answered:
Dag Catharina,
Dit heeft mogelijk te maken met de print instellingen op je computer, kijk eventueel even naar het papierformaat en/of de marges, afdrukstand en afdrukpercentage.
27.11.2025 - 21:31
![]() Julieta wrote:
Julieta wrote:
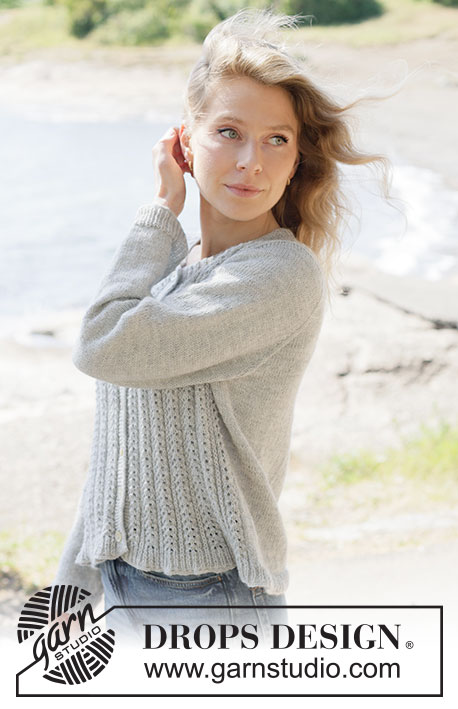
Drops 263-8 Me gustaría saber qué punto es y si tienes un vídeo. Lo tejere desde abajo y me gustaría hacerlo igual. Muchas gracias.
04.10.2025 - 10:27DROPS Design answered:
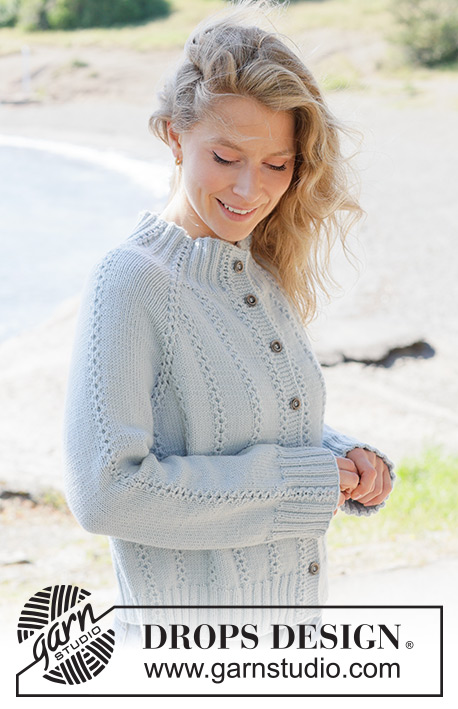
Hola Julieta, el patrón se trabaja en punto jersey, con trenzas, mientras que los bordes se trabajan en punto elástico.
06.10.2025 - 00:07
![]() Catharina wrote:
Catharina wrote:
We hebben hier helaas hetzelfde probleem als Margaret. Ook in Google Chrome, als we hem willen afdrukken of opslaan als PDF. Zelfs met minimale marges op de pagina valt er aan de rechterkant een stuk tekst weg. Bij de Rain Trail Sweater is het wel goed, bij de Cardigan niet. Kan dit aangepast worden?
18.09.2025 - 14:11DROPS Design answered:
Dag Catharina,
Helaas kan ik deze fout niet reproduceren. Het lijkt hier wel goed te gaan. Zou je misschien een andere browser kunnen proberen en/of kijken naar de exporteer instellingen?
28.09.2025 - 09:37
![]() Małgorzata wrote:
Małgorzata wrote:
Czy format do wydruku będzie poprawiony? Aktualnie przy drukowaniu wzoru trzeba niestety mocno zmniejszyć skalę, aby końcówki treści w poszczególnych wierszach nie były poucinane
02.09.2025 - 13:37DROPS Design answered:
Witaj Małgorzato, należy skorzystać z innej przeglądarki, sprawdziłam, że na Google Chrome wszystko działa poprawnie. Pozdrawiamy!
03.09.2025 - 09:10
|
||||||||||
Rain Trail Cardigan#raintrailcardigan |
||||||||||
 |
 |
|||||||||
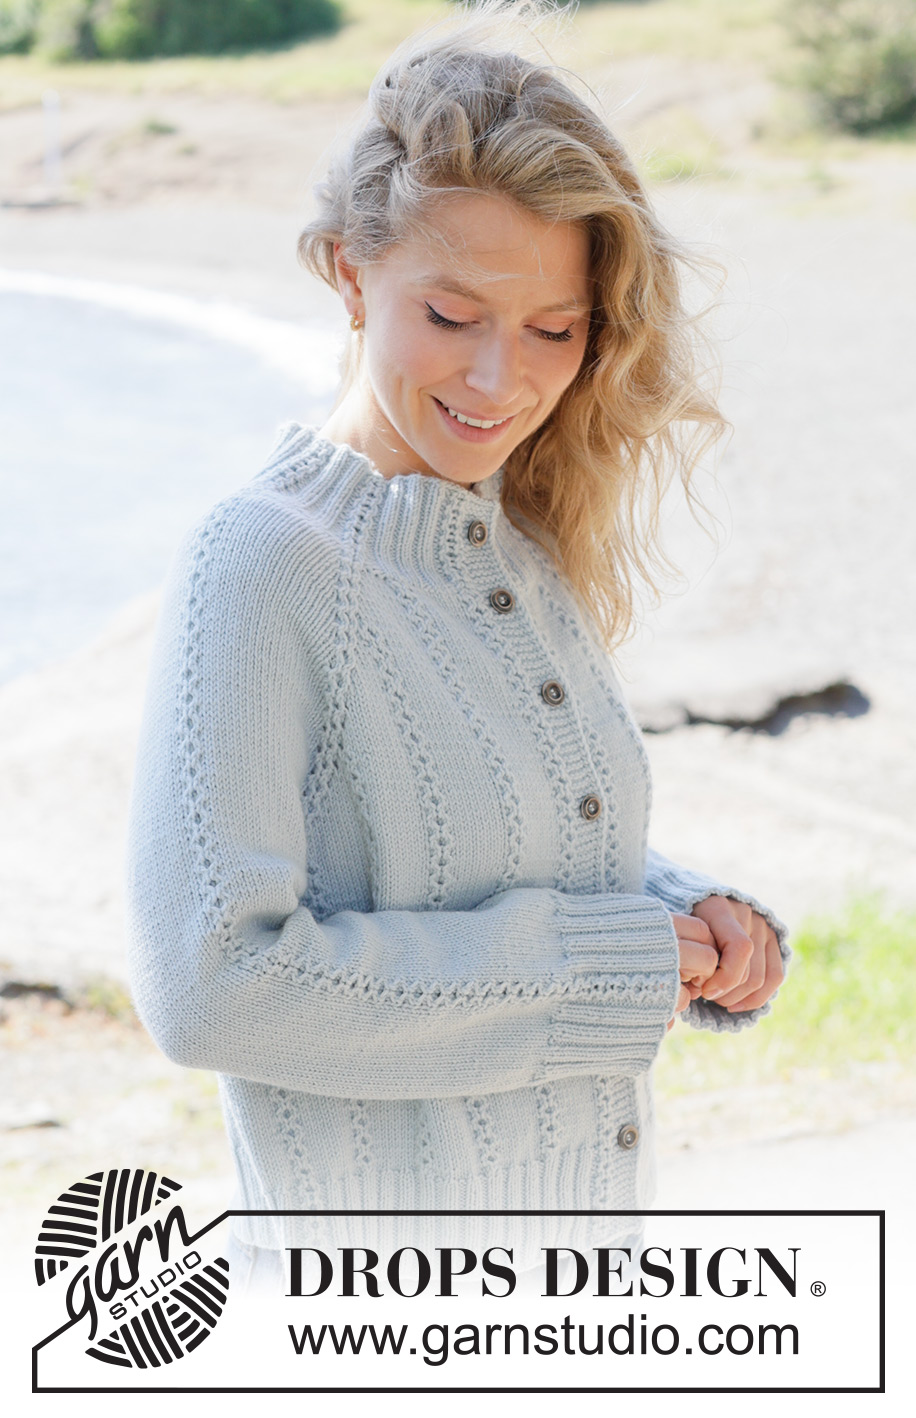
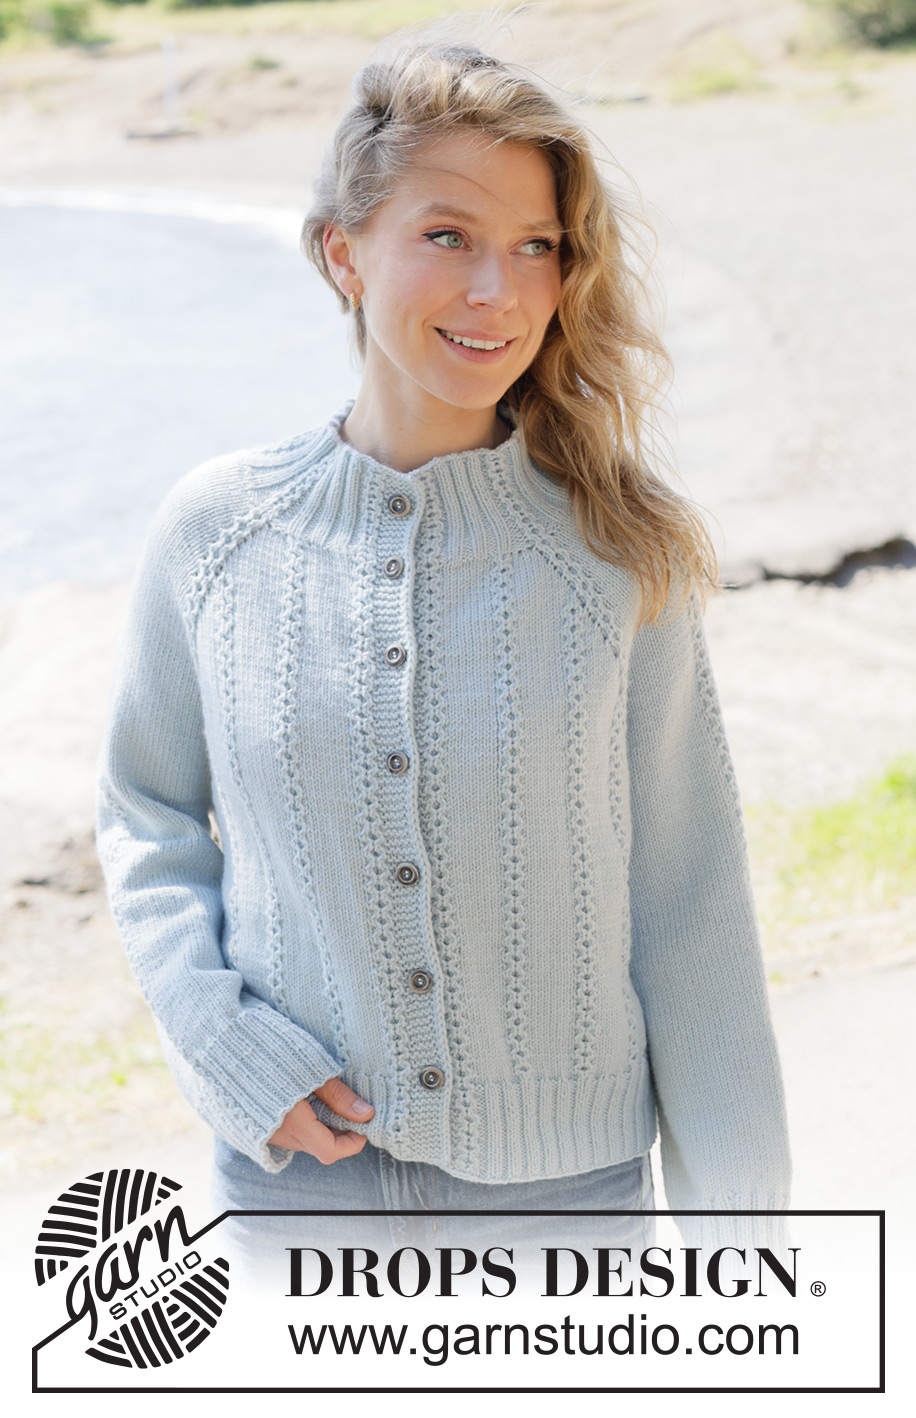
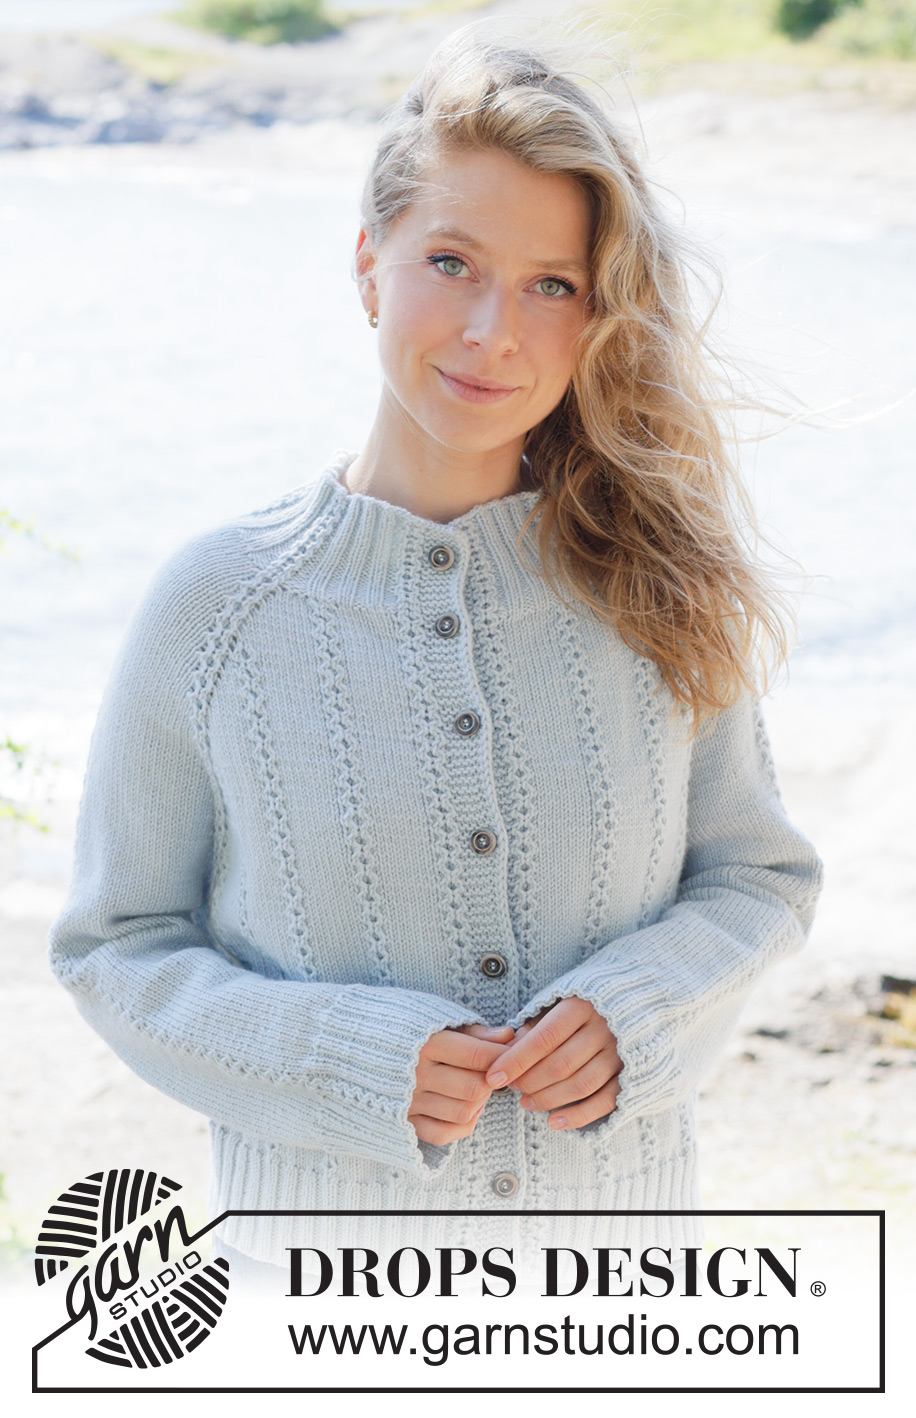
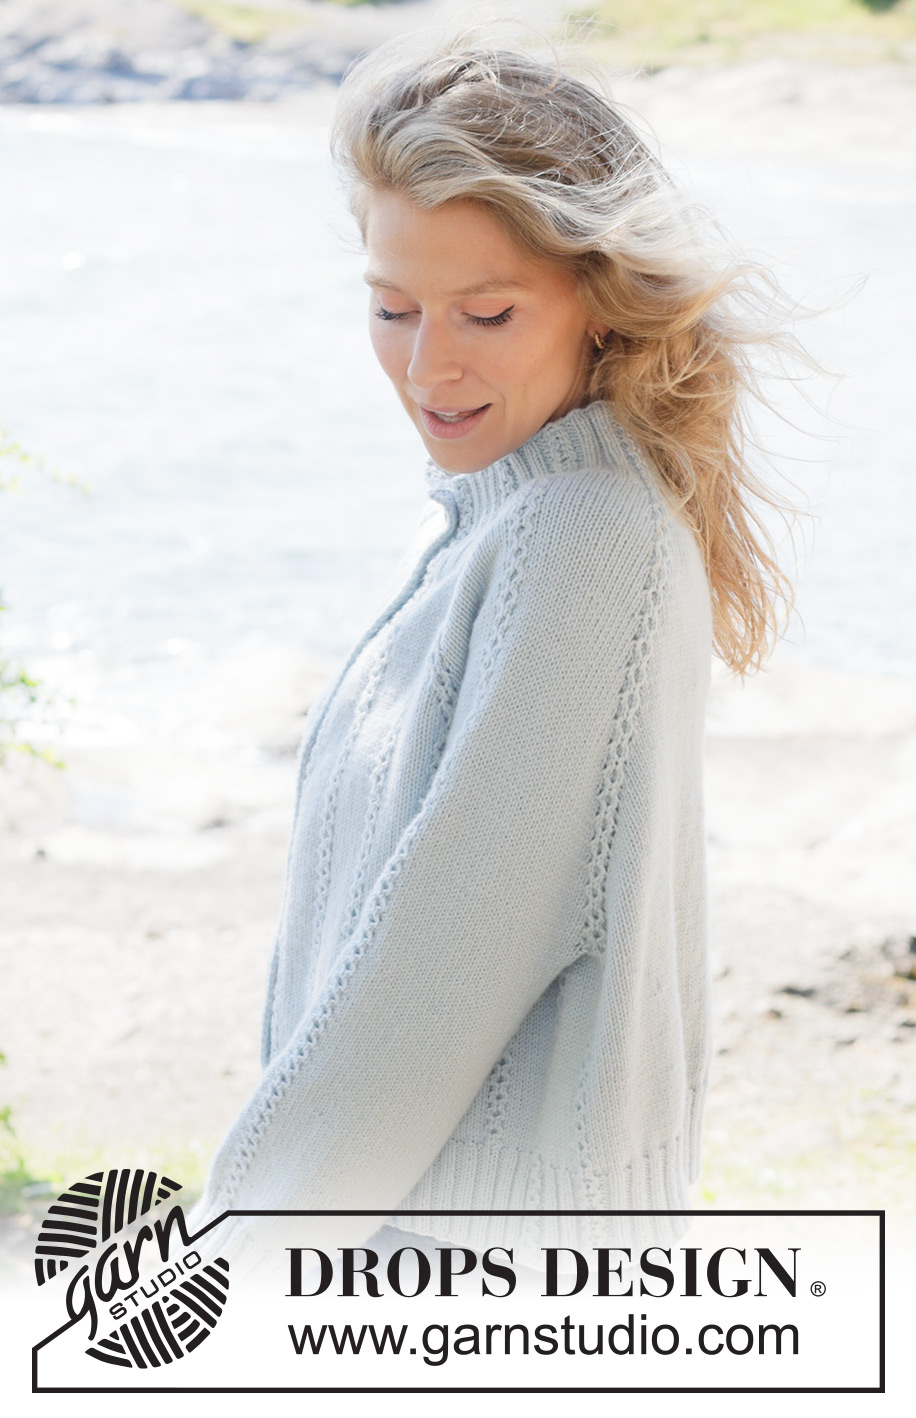
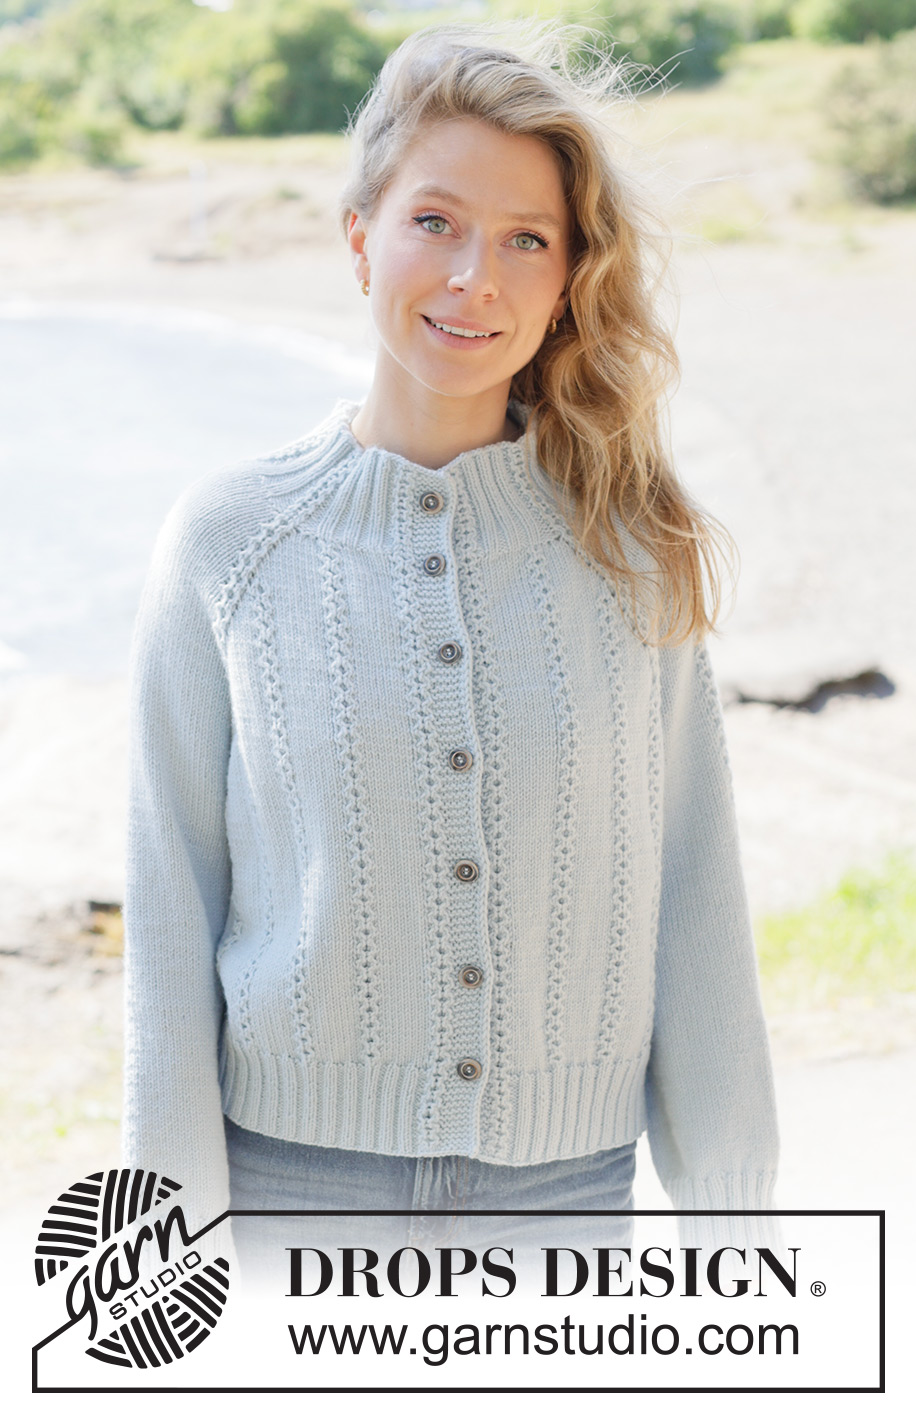
Knitted jacket in DROPS Daisy or DROPS Merino Extra Fine. The piece is worked top down with raglan, cables, high neck and I-cord. Sizes XS - XXXL.
DROPS 263-8 |
||||||||||
|
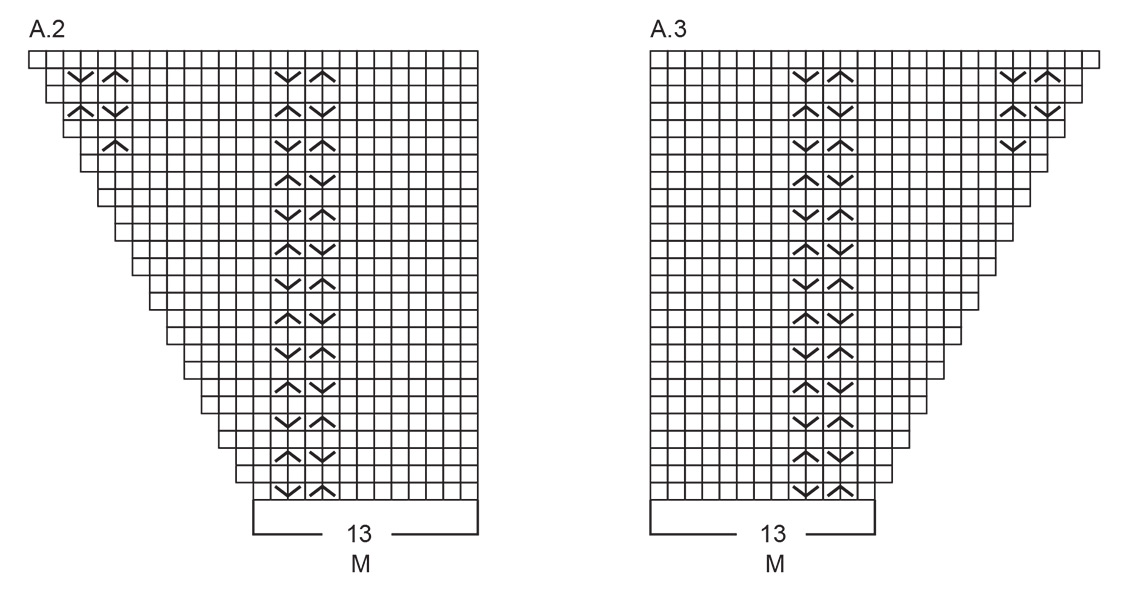
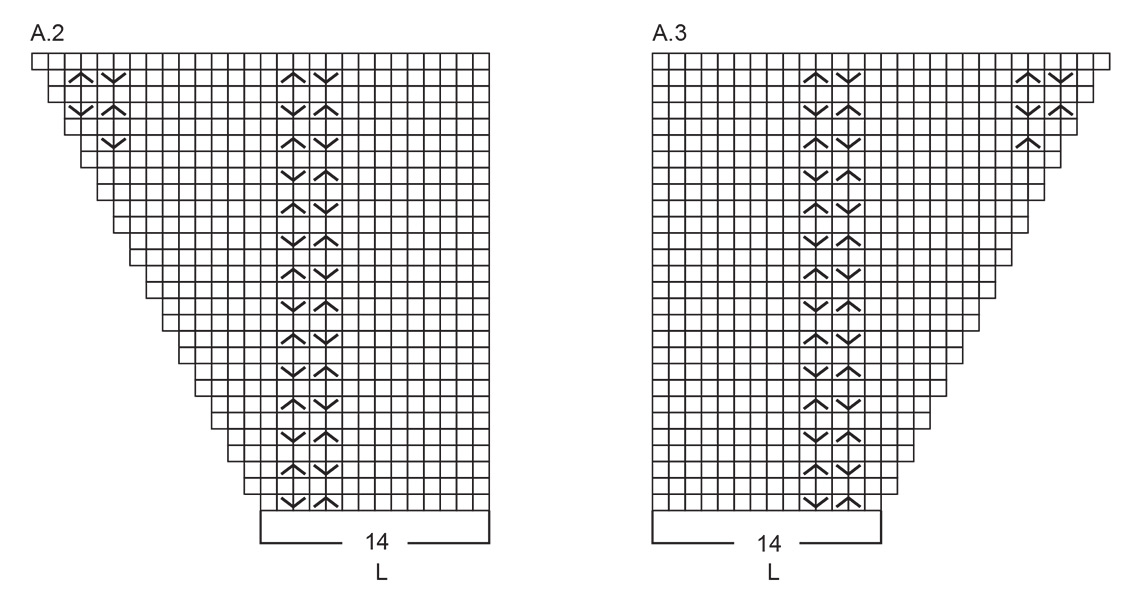
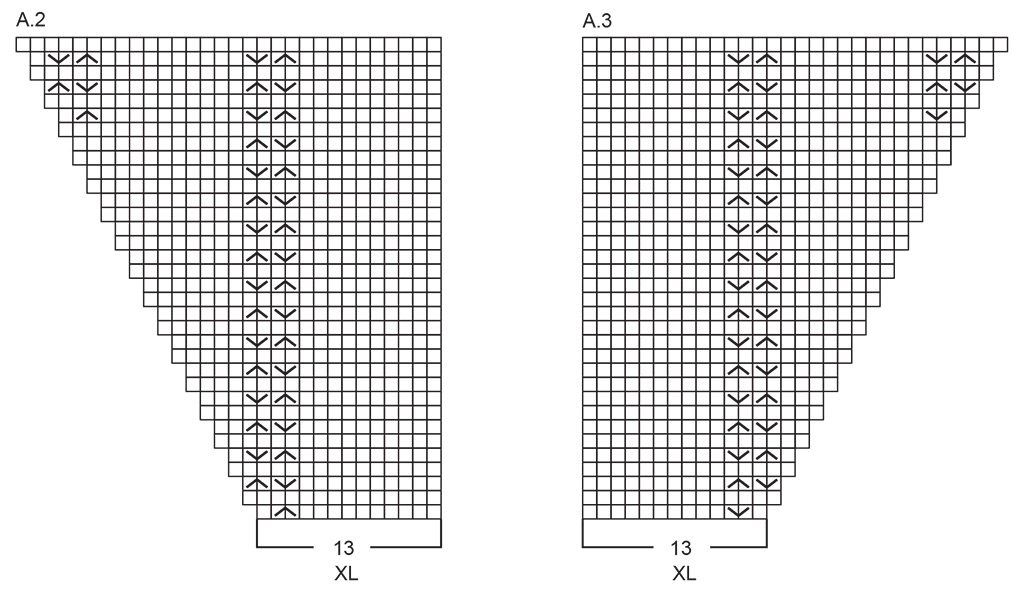
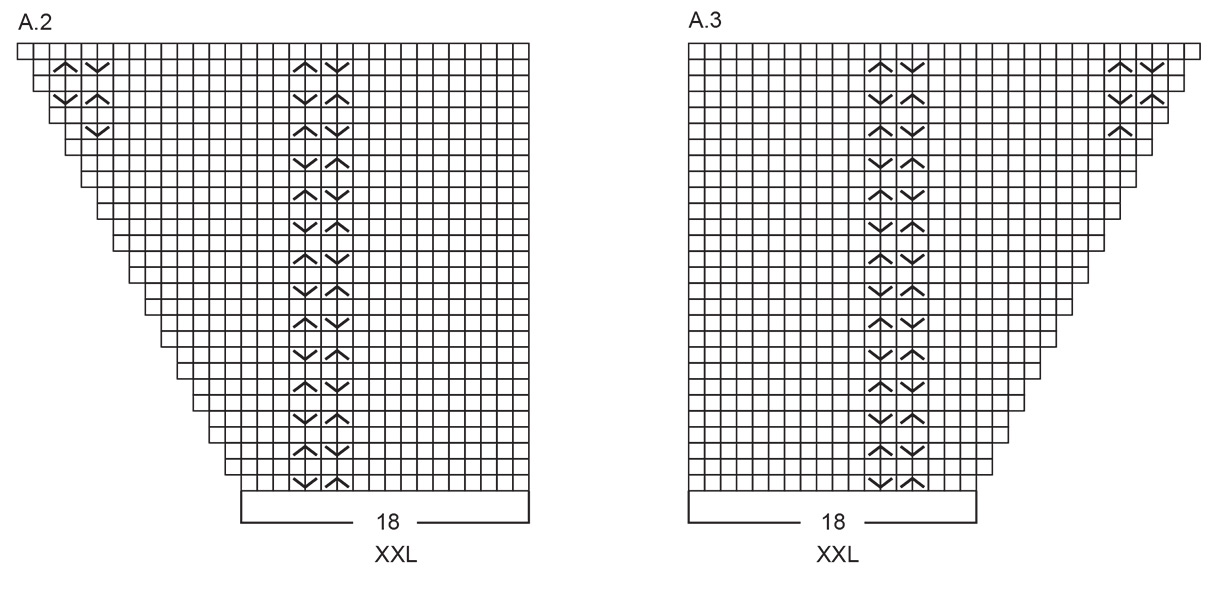
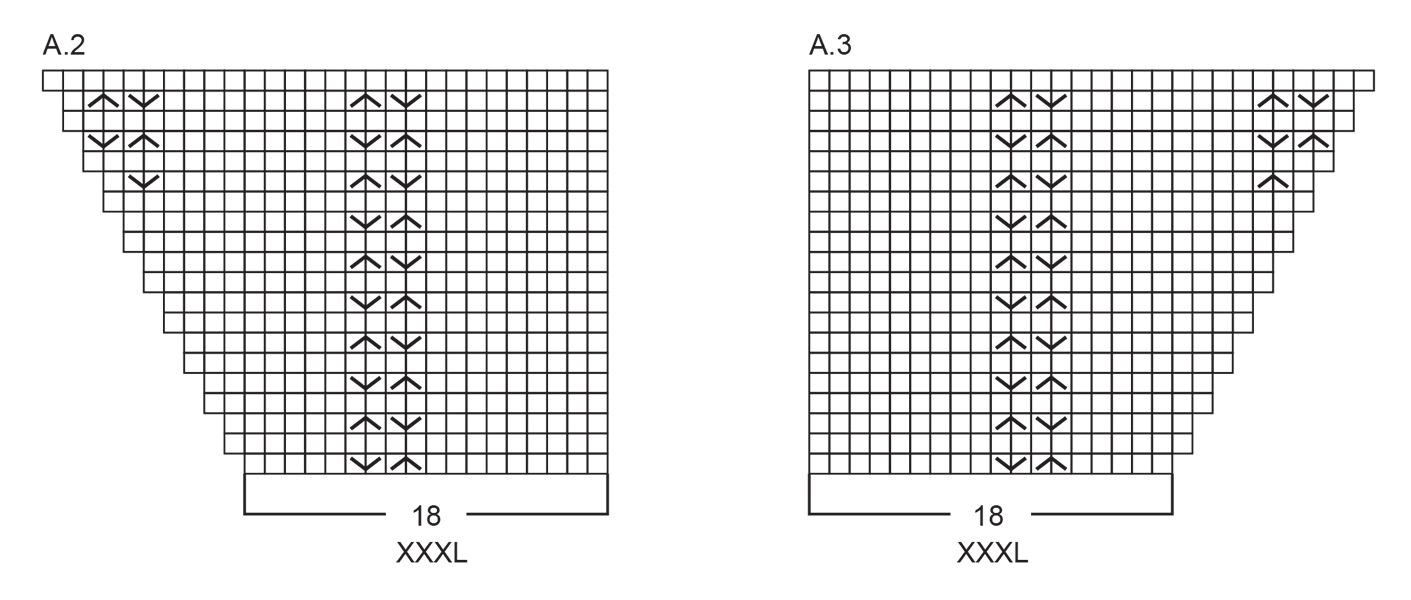
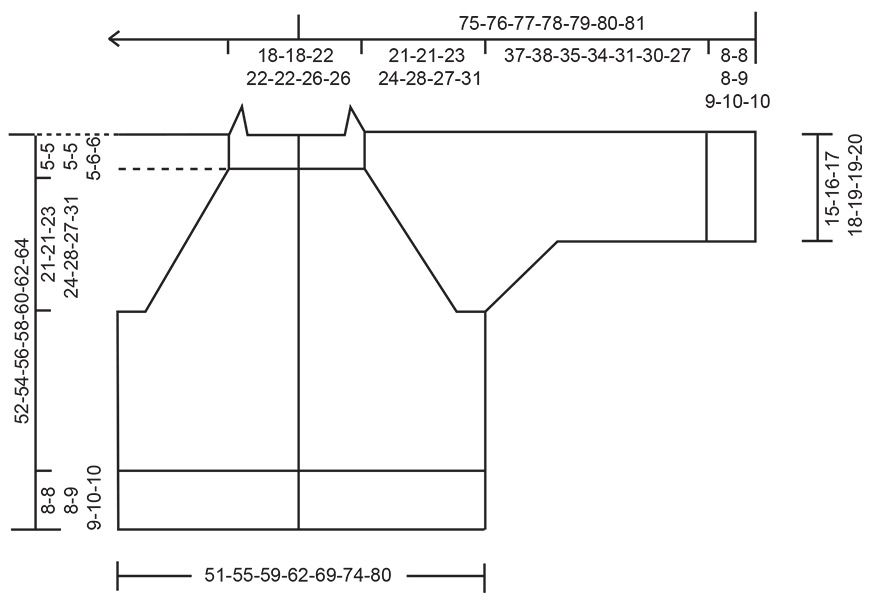
------------------------------------------------------- EXPLANATIONS FOR THE PATTERN: ------------------------------------------------------- GARTER STITCH (worked back and forth): Knit all rows, from both the right and wrong side. 1 ridge in height = knit 2 rows. BANDS WITH I-CORD: BEGINNING OF ROW: Work the band (7 stitches) as follows: Slip 1 stitch purl-wise with yarn in front, knit 1, work 5 garter stitches. END OF ROW: Work the band (7 stitches) as follows: Work until there are 7 stitches left on the row, work 5 garter stitches, slip 1 stitch purl-wise with yarn in front, knit 1. Work like this from both the right and wrong side. PATTERN: See diagrams A.1 to A.3. Choose diagram for your size (applies to A.2 and A.3). The diagrams are read from right to left when working from the right side and from left to right when working from the wrong side. RAGLAN: Increase 1 stitch by working 1 yarn over which is worked as follows on the next row: BEFORE MARKER: Purl through the back loop to avoid a hole. Then work the new stitch in stocking stitch. AFTER MARKER: Slip the yarn over off the left needle and replace it the other way round (insert the left needle through the back when replacing it). Purl through the front loop to avoid a hole. Then work the new stitch in stocking stitch. NOTE: Work the new stitches as follows: On the front piece, work them in stocking stitch and pattern as shown in the diagrams, i.e., there should be 7-7-8-9-10-11-9 stocking stitches between each cable as far as the raglan-stitches on the front pieces (1 cable = A.1 = 4 stitches). On the back piece and on the sleeves, work them in stocking stitch. INCREASE TIP (evenly spaced): To work out how to increase evenly, count the total number of stitches to be increased across (e.g., 40 stitches) and divide by the number of increases to be made (e.g., 14) = 2.9. In this example, increase by making 1 yarn-over after approx. each 3rd stitch. On the next row, work the yarn overs twisted to avoid holes. SLEEVE TIP: When knitting up stitches under the sleeve, you can get a small hole in the transition between stitches on the body and sleeve. This hole can be closed by picking up the strand between 2 stitches and working this strand twisted together with the first stitch between body and sleeve. DECREASE TIP: Decrease 1 stitch on each side of the marker thread as follows: Work until there are 3 stitches left before the marker thread, knit 2 together, knit 2 (marker thread sits between these 2 stitches) slip 1 stitch knit-wise, knit 1 and pass the slipped stitch over the knitted stitch (= 2 stitches decreased). BUTTONHOLES: Work the buttonholes on the right band (when the garment is worn) from the right side, when there are 5 stitches left on the row as follows: ROW 1 (right side): Make 1 yarn over, knit 2 together, knit 1, slip 1 purl-wise with strand in front, knit 1. ROW 2 (wrong side): Work the band as before, knit the yarn over to leave a hole. The first buttonhole is worked when the neck measures 2 cm, the second buttonhole on the first row from the right side after the neck is finished. Then work the other 5-5-5-5-5-6-6 buttonholes with 8-8-8½-9-9-7½-8 cm between each one. Adjust so the bottom buttonhole is worked in the transition between the stocking stitch/pattern and rib. ------------------------------------------------------- START THE PIECE HERE: ------------------------------------------------------- JACKET – SHORT OVERVIEW OF THE PIECE. The pattern uses both long and short needles; start with the length which fits the number of stitches and change when necessary. The neck and yoke are worked back and forth with circular needle, from mid front and top down. Cables are worked on the front pieces, middle of sleeves and along each raglan-line. When the yoke is finished, it is divided for body and sleeves and the body continued back and forth, while the sleeves wait. The sleeves are worked in the round, top down. If there is a «0» in your chosen size, skip the information and go straight to the next instruction. NECK: Cast on 136-136-152-152-152-168-168 stitches with circular needle size 4 mm and DROPS Daisy or DROPS Merino Extra Fine. Change to circular needle size 2.5 mm. Purl 1 row from the wrong side. Now work rib and PATTERN on the neck – read explanation above, as follows from the right side: Work 7 stitches according to BANDS WITH I-CORD – read explanation above, work A.1, rib (purl 2, knit 2) across the next 10-10-14-14-14-18-18 stitches, A.1, rib (purl 2, knit 2) across the next 10-10-10-10-10-10-10 stitches, A.1, rib (purl 2, knit 2) across the next 10-10-10-10-10-10-10 stitches, A.1, rib (purl 2, knit 2) across the next 30-30-38-38-38-46-46 stitches, A.1, rib (purl 2, knit 2) across the next 10-10-10-10-10-10-10 stitches, A.1, rib (purl 2, knit 2) across the next 10-10-10-10-10-10-10 stitches, A.1, rib (purl 2, knit 2) across the next 10-10-14-14-14-18-18 stitches, A.1 and finish with 7 stitches according to bands with I-cord. Continue this rib and pattern – remember the BUTTONHOLES – read description above. When the neck measures 8-9-9-10-10-11-11 cm and the next row is from the wrong side, decrease 0-0-1-0-1-0-0 stitches on each front piece (by knitting together stitches 12 and 13 from the edge) = 136-136-150-152-150-168-168 stitches. The neck is finished. Insert 1 marker inside one band; the piece is now measured from here. YOKE: Change to circular needle size 4 mm. Insert 8 markers, without working the stitches and each marker being inserted on each side of 4 stitches (= A.1 = the raglan-stitches). You increase for raglan on each side of the raglan-stitches. Count 21-21-24-25-24-29-29 stitches (= left front piece), insert marker-1 before the next stitch, count 4 stitches (= A.1 = raglan-stitches) insert marker-2 before the next stitch, count 24-24-24-24-24-24-24 stitches (= sleeve), insert marker-3 before the next stitch, count 4 stitches (= A.1 = raglan-stitches), insert marker-4 before the next stitch, count 30-30-38-38-38-46-46 stitches (= back piece), insert marker-5 before the next stitch, count 4 stitches (= A.1 = raglan-stitches), insert marker-6 before the next stitch, count 24-24-24-24-24-24-24 stitches (= sleeve), insert marker-7 before the next stitch, count 4 stitches (= A.1 = raglan-stitches), insert marker-8 before the next stitch. There are 21-21-24-25-24-29-29 stitches left (= right front piece). Continue the bands, stocking stitch and pattern back and forth, increasing for RAGLAN on each side of the raglan-stitches – read explanation above for how to increase and continue the pattern. Remember to maintain the knitting tension. Work as follows: ROW 1 (right side): Work the 7 band-stitches as before, A.1, work A.2, increase for RAGLAN on each side of A.1, knit 10-10-10-10-10-10-10 and decrease 2-2-2-2-2-0-0 stitches evenly across these stitches (= 8-8-8-8-8-10-10 knitted stitches), work A.1, knit 10-10-10-10-10-10-10 and decrease 2-2-2-2-2-0-0 stitches evenly across these stitches (= 8-8-8-8-8-10-10 knitted stitches), increase for raglan on each side of A.1, knit 30-30-38-38-38-46-46 (= back piece), increase for raglan on each side of A.1, knit 10-10-10-10-10-10-10 and decrease 2-2-2-2-2-0-0 stitches evenly across these stitches (= 8-8-8-8-8-10-10 knitted stitches), work A.1, knit 10-10-10-10-10-10-10 and decrease 2-2-2-2-2-0-0 stitches evenly across these stitches (= 8-8-8-8-8-10-10 knitted stitches), increase for raglan on each side of A.1, work A.3, A.1 and finally 7 band-stitches as before = 136-136-150-152-150-176-176 stitches. ROW 2 (wrong side): Purl with 7 band-stitches on each side (remember to work the yarn overs as described under RAGLAN). ROW 3 (right side): Work 7 band-stitches as before, A.1, continue A.2 (the increased stitches are worked as shown in the diagram – as you increase there will be 7-7-8-9-10-11-9 stocking stitches between each repeat of A.1 as far as the raglan-stitches on the front piece), increase for raglan on each side of A.1, continue with stocking stitch, A.1 and stocking stitch on the sleeve, increase for raglan on each side of A.1, knit across the back piece, increase for raglan on each side of A.1, continue with stocking stitch, A.1 and stocking stitch on the sleeve, increase for raglan on each side of A.1, continue A.3 (the increased stitches are worked as shown in the diagram – as you increase there will be 7-7-8-9-10-11-9 stocking stitches between each repeat of A.1 as far as the raglan-stitches on the front piece and as far as A.1 inside the band), work A.1 and 7 band-stitches as before (8 increased stitches) = 144-144-158-160-158-184-184 stitches. ROW 4 (wrong side): Purl with 7 band-stitches on each side (remember to work the yarn overs as described under RAGLAN). Repeat ROWS 3 and 4, 6-2-5-10-9-6-3 more times, i.e., increase for raglan 8-4-7-12-11-8-5 times (16-8-14-24-22-16-10 rows worked) = 192-160-198-240-230-232-208 stitches. Now increase as follows: ROW 1 (right side): Continue the bands, stocking stitch and pattern, increasing for raglan on each side of the raglan-stitches (8 increased stitches). ROW 2 (wrong side): Purl with 7 band-stitches on each side (remember to work the yarn overs twisted as before). ROW 3 (right side): Continue the bands, stocking stitch and pattern, increasing for raglan only on the front and back pieces, i.e., before markers 1 and 5 and after markers 4 and 8 – do not increase across the sleeves (4 stitches increased). ROW 4 (wrong side): Purl with 7 band-stitches on each side (remember to work the yarn overs twisted as before). Work ROWS 1 to 4 a total of 11-13-12-11-14-15-19 times (44-52-48-44-56-60-76 rows worked; a total of 11-13-12-11-14-15-19 increases in height on the sleeves and 22-26-24-22-28-30-38 increases in height on the front and back pieces). All increases for raglan are finished; 19-17-19-23-25-23-24 increases in height on the sleeves and 30-30-31-34-39-38-43 increases in height on the front and back pieces = 324-316-342-372-398-412-436 stitches. Continue the bands, stocking stitch and pattern without further increases until the yoke measures 21-21-23-24-28-27-31 cm from the marker mid-front. Now divide for the body and sleeves. DIVIDE FOR BODY AND SLEEVES: Work 55-55-59-63-67-71-76 stitches as before (= front piece), place the next 58-54-58-66-70-70-72 stitches on a thread for the sleeve, cast on 10-18-18-18-22-26-28 stitches (mid-under the sleeve), work 98-98-108-114-124-130-140 stitches as before (back piece), place the next 58-54-58-66-70-70-72 stitches on a thread for the sleeve, cast on 10-18-18-18-22-26-28 stitches (mid-under the sleeve), work the last 55-55-59-63-67-71-76 stitches as before (= front piece). The body and sleeves are finished separately. BODY: = 228-244-262-276-302-324-348 stitches. Continue the bands, stocking stitch and pattern, i.e., A.1 is continued on the front pieces and along all 4 raglan-lines, the other stitches are worked in stocking stitch. Work until the piece measures 39-41-43-44-46-46-48 cm from the marker mid-front. On the next row from the right side, begin the rib, AT THE SAME TIME increase stitches evenly on the first row (do not increase across the bands) as follows: ROW 1 (right side): Change to circular needle size 2.5 mm. Work the band as before, A.1, read INCREASE TIP and work rib (purl 2, knit 2) across the next 40-40-44-48-52-56-61 stitches, increasing 14-14-18-18-22-22-25 stitches evenly across these stitches (= 54-54-62-66-74-78-86 ribbed stitches), work A.1, work rib (purl 2, knit 2) across the next 10-18-18-18-22-26-28 stitches, increasing 4-4-4-4-4-8-6 stitches evenly across these stitches (= 14-22-22-22-26-34-34 ribbed stitches), work A.1, work rib (purl 2, knit 2) across the next 90-90-100-106-116-122-132 stitches, increasing 28-28-34-36-42-44-50 stitches evenly across these stitches (= 118-118-134-142-158-166-182 ribbed stitches), work A.1, work rib (purl 2, knit 2) across the next 10-18-18-18-22-26-28 stitches, increasing 4-4-4-4-4-8-6 stitches evenly across these stitches (= 14-22-22-22-26-34-34 ribbed stitches), work A.1, work rib (purl 2, knit 2) across the next 40-40-44-48-52-56-61 stitches, increasing 14-14-18-18-22-22-25 stitches evenly across these stitches (= 54-54-62-66-74-78-86 ribbed stitches), work A.1 and the band as before = 292-308-340-356-396-428-460 stitches (64-64-78-80-94-104-112 increased stitches). ROW 2 (wrong side): Work the established pattern and rib, with the 7 band-stitches on each side. Repeat these 2 rows until the rib measures 8-8-8-9-9-10-10 cm. Cast off a little loosely with knit above knit and purl above purl. The jacket measures approx. 47-49-51-53-55-56-58 cm from the marker mid-front and 52-54-56-58-60-62-64 cm from the shoulder. SLEEVES: Place the 58-54-58-66-70-70-72 sleeve-stitches from one thread on circular needle size 4 mm and knit up 1 stitch in each of the 10-18-18-18-22-26-28 stitches cast on under the sleeve – read SLEEVE TIP = 68-72-76-84-92-96-100 stitches. Insert a marker-thread in the middle of the 10-18-18-18-22-26-28 stitches under the sleeve- the round starts by the marker-thread. Work stocking stitch in the round and continue A.1 down the middle of the sleeve. AT THE SAME TIME, when the sleeve measures 1-1-1-1-1-1-1 cm from the division, decrease mid-under the sleeve – read DECREASE TIP as follows: Decrease 2 stitches every 2nd round 2-2-2-2-3-3-3 times, then decrease 2 stitches every 2 cm 0-0-1-3-4-5-5 times = 64-68-70-74-78-80-84 stitches. Continue working until the sleeve measures 37-38-35-34-31-30-27 cm from the division. Change to double pointed needles size 2.5 mm. Work rib (knit 2, purl 2), AT THE SAME TIME increase 18-22-20-24-24-22-26 stitches evenly on the first round – do not increase across A.1 and adjust so you still have purl 2 on each side of A.1 = 82-90-90-98-102-102-110 stitches. A.1 continues down the rib.. When the rib measures 8-8-8-9-9-10-10 cm, cast off slightly loosely with knit above knit and purl above purl. The sleeve measures approx. 45-46-43-43-40-40-37 cm from the division. ASSEMBLY: Sew the buttons onto the left band. |
||||||||||
Diagram explanations |
||||||||||
|
||||||||||
 |
||||||||||
 |
||||||||||
 |
||||||||||
 |
||||||||||
 |
||||||||||
 |
||||||||||
 |
||||||||||
Have you finished this pattern?Tag your pictures with #dropspattern #raintrailcardigan or submit them to the #dropsfan gallery. Do you need help with this pattern?You'll find 37 tutorial videos, a Comments/Questions area and more by visiting the pattern on garnstudio.com. © 1982-2026 DROPS Design A/S. We reserve all rights. This document, including all its sub-sections, has copyrights. Read more about what you can do with our patterns at the bottom of each pattern on our site. |
||||||||||


With over 40 years in knitting and crochet design, DROPS Design offers one of the most extensive collections of free patterns on the internet - translated to 17 languages. As of today we count 325 catalogues and 12298 patterns translated into English (UK/cm). 12298
We work hard to bring you the best knitting and crochet have to offer, inspiration and advice as well as great quality yarns at incredible prices! Would you like to use our patterns for other than personal use? You can read what you are allowed to do in the Copyright text at the bottom of all our patterns. Happy crafting!
Post a comment to pattern DROPS 263-8
We would love to hear what you have to say about this pattern!
If you want to leave a question, please make sure you select the correct category in the form below, to speed up the answering process. Required fields are marked *.