
Popular categories
Looking for a yarn?


Comments / Questions (81)
![]() Podunavac Claudette wrote:
Podunavac Claudette wrote:
Bonjour, J'essaye de faire le modèle 232-03 et suis bloquée au niveau du rang identique au 1er rang de l'empiècement. J'obtiens à la fin de ce rang 8 mailles de trop. Quelle erreur ai-je fait ? SVP expliquez-moi pas à pas comment le faire. Merci Cordialement
06.02.2024 - 11:03
![]() Podunavac Claudette wrote:
Podunavac Claudette wrote:
J'essaye de faire le modèle 232-03 et suis bloquée car je ne comprends toujours pas comment exécuter après l'empiècement le rang identique au 1er rang. J'ai 8 mailles en fin de tour qui ne sont pas tricotées (avant les mailles de la manche). Où ai-je commis une erreur ? je n'ose pas faire le 2ème rang du diagramme A1. Merci de m'aider. CDT
06.02.2024 - 10:58DROPS Design answered:
Bonjour Mme Podunavac, vérifiez que vous avez bien le bon nombre de mailles à la fin du 1er tour, vous devez avoir augmenté 4 mailles (4 jetés) sur chaque manche et 4 mailles dans chaque A.1, soit 24 mailles au total. N'hésitez pas à placer des marqueurs pour vous aider à mieux vous repérer entre chaque partie de ce 1er tour. Bon tricot!
07.02.2024 - 07:53
![]() Anna wrote:
Anna wrote:
Kun olen neulonut A1. kuvion loppuun, jatkanko A2. kuvion joka toisella kierroksella hihojen lisäyksiä (*1 langankierto 1 oikein* x3)? vai neulonko vain oikeita silmukoita jatkossa, ei langankiertoja hihoihin??
01.02.2024 - 19:08
![]() Julie wrote:
Julie wrote:
I loved working this Wave Romance pattern. It worked up quickly and beautifully, can hardly wait to wear it. The only problem is I ran out of yarn just at the start of the second sleeve. I didn't test my gauge but used recommended yarn and size needles, so I have only myself to blame and more yarn is ordered so eventually I'll even get to wear it.
18.01.2024 - 15:22
![]() Fabienne Borel wrote:
Fabienne Borel wrote:
Rebonjour, en résumé les augmentations pour le raglan (manches devant et derrière) sont celles faites avant A1 devant et après A1 devant (pareil pour le dos) et les autres augmentations sont celles faites au centre devant et derrière, ce que je ne considère pas vraiment comme le raglan mais je vois ce que vous voulez dire. Merci !
18.01.2024 - 12:57DROPS Design answered:
Bonjour Mme Borel, pas vraiment, vous augmentez pour le raglan au début et à la fin de chaque partie, donc pour les augmentations des manches sont celles faites après le A.1 avant la manche et avant le A.1 après la manche, de même pour le dos/le devant: les augmentations du dos et du devant sont celles qui sont faites après le A.1 avant le dos/le devant et avant le A.1 après le dos/le devant. Bon tricot!
19.01.2024 - 08:20
![]() Fabienne Borel wrote:
Fabienne Borel wrote:
Bonjour, me voici au rang 3 de A1 et je dois augmenter pour les manches, le dos et le devant. Si j'ai compris qu'il faut faire un jeté avant et après chaque A1, où dois-je faire l'augmentation de la manche ? Avant et après les 7 mailles de la manche donc accolée aux autres jetés =2 jetés de suite ?
17.01.2024 - 17:48DROPS Design answered:
Bonjour Mme Borel, on doit augmenter pour le raglan sur chaque partie ainsi: après A.1 = au début du tour pour la 1ère manche + avant A.1 à la fin de la manche, après A.1 au début du devant + avant A.1 à la fin du devant, après A.1 au début de la 2ème manche + avant A.1 à la fin de la 2ème manche, après A.1 au début du dos + avant A.1 à la fin du dos. Au début vous augmenterez 8 mailles à chaque fois tous les tours, puis en fonction de votre taille, vous allez augmenter peut-être alternativement 4 mailles (tous les 2 tours pour les manches mais tous les 4 tours pour le dos et le devant) et 8 mailles (manches, dos et devant). Bon tricot!
18.01.2024 - 08:40
![]() Pernille Nymann wrote:
Pernille Nymann wrote:
Kan jeg erstatte kid silk med baby merino? Og hvis , skal jeg så strikke med 2 tråde?
14.01.2024 - 21:20DROPS Design answered:
Hej Pernille, ja det kan du og ja så skal du strikke med 2 tråde :)
16.01.2024 - 13:54
![]() Fabienne Borel wrote:
Fabienne Borel wrote:
Bonjour, j'aimerais comprendre le départ de l'empiècement, le marqueur est bien le début de la manche droite ? Est-ce que les 7 mailles sont l'espace entre les diagrammes (devant et derrière) ou est-ce que ce sont les manches ? Je n'ai pas encore commencer mais j'aime bien faire mes diagrammes complets pour faire tout le tour du pull. Merci d'avance.
08.01.2024 - 17:53DROPS Design answered:
Bonjour Mme Borel, les tours commencent effectivement par la manche droite, juste après les mailles du raglan (A.1); les 7 mailles (S, M et L) sont respectivement pour le devant et le dos, entre chaque A.1.Notez les augmentations de A.1 pour préparer le point de vagues des raglans, il vous faudra aussi échantillonner avec votre propre point fantaisie pour vérifier la largeur. Bon tricot!
09.01.2024 - 07:27
![]() Barbara wrote:
Barbara wrote:
My question yesterday was unclear. My problem is with the ROW gauge which I measured over the stockinette section. My row gauge is 22 sts to 3 inches not the 4 inches required by the instructions. This will have an impact on the length over the raglan increases section. Is your row gauge is misstated? If not, do you see any problems in my doing the necessary calculations to change the instructions in the increase calculations - especially with the raglan area - to match my gauge??
13.12.2023 - 15:30DROPS Design answered:
Dear Barbara, if your number of rows in height is not right, then you might have to edit the raglan pattern to your own tension working either more or less rounds between increasing rounds to compensate the difference with the tension in the pattern so that you get the correct number of increases for raglan keeping the correct height for yoke. If you are too short, you can also just continue working yoke without increases until the correct length. Happy knitting!
13.12.2023 - 16:25
![]() Barbara wrote:
Barbara wrote:
My stitch gauge matches the pattern exactly, but my row gauge is way off - I'm getting 22 stitches for 3 inches - not the requisite 4 inches!!! Is there any chance your row gauge is misstated? If not, do you see any problems in my doing the necessary calculations to change the pattern in the increase calculations - especially with the raglan area - to match my gauge?? Thank you. PS I love your site.
12.12.2023 - 20:23DROPS Design answered:
Dear Barbara, note that the tension with the pattern will be different than the one in stocking stitch, so as long as you get 17 sts = 10 cm in the stocking stitch, then you should get the correct finished measurements as shown in chart for your size. Happy knitting!
13.12.2023 - 08:03
|
|||||||||||||||||||||||||
Wave Romance#waveromancesweater |
|||||||||||||||||||||||||
 |
 |
||||||||||||||||||||||||
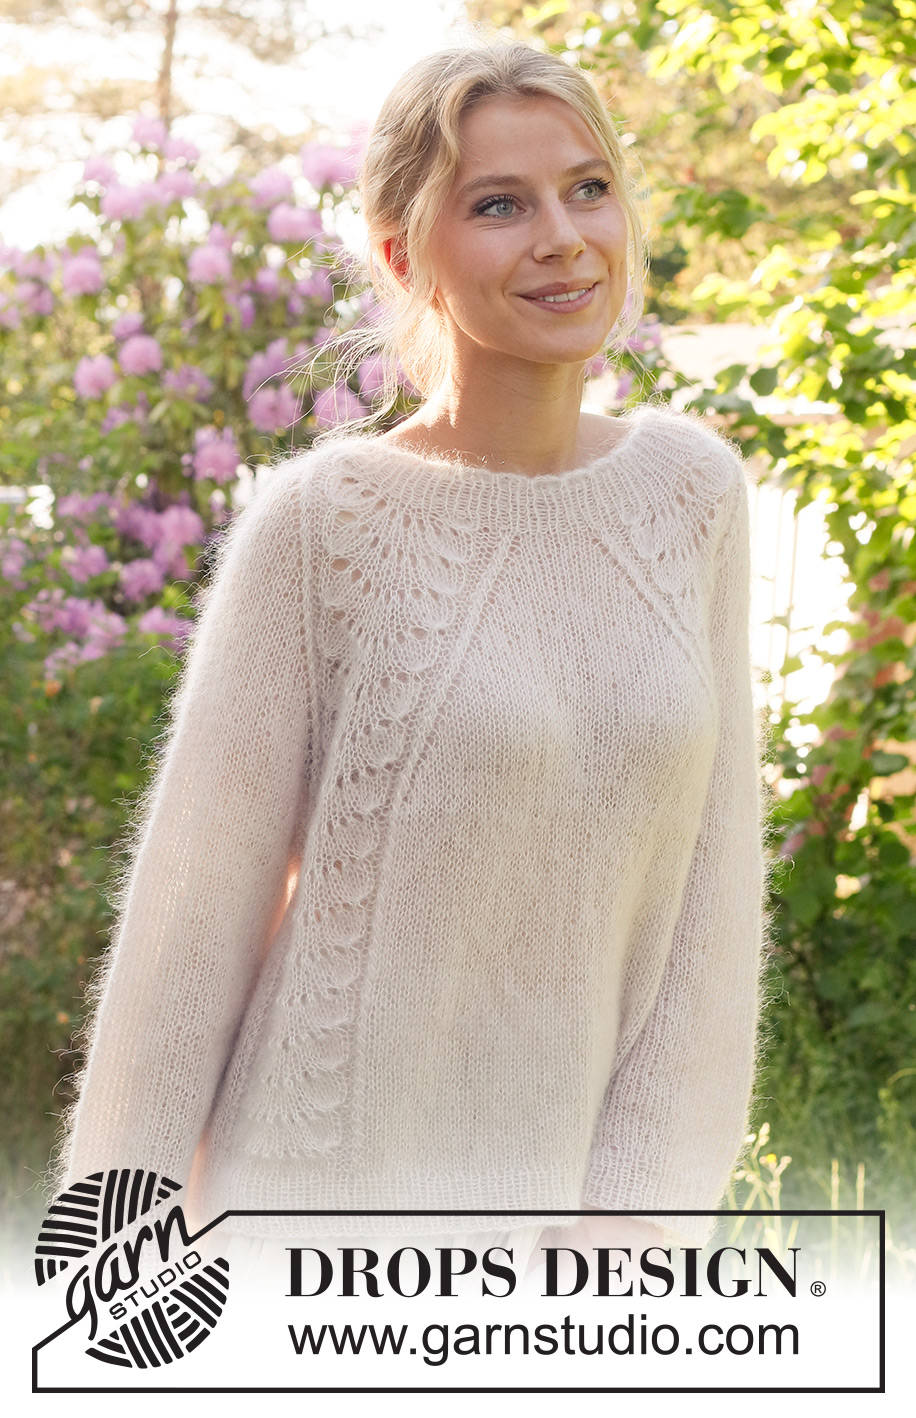
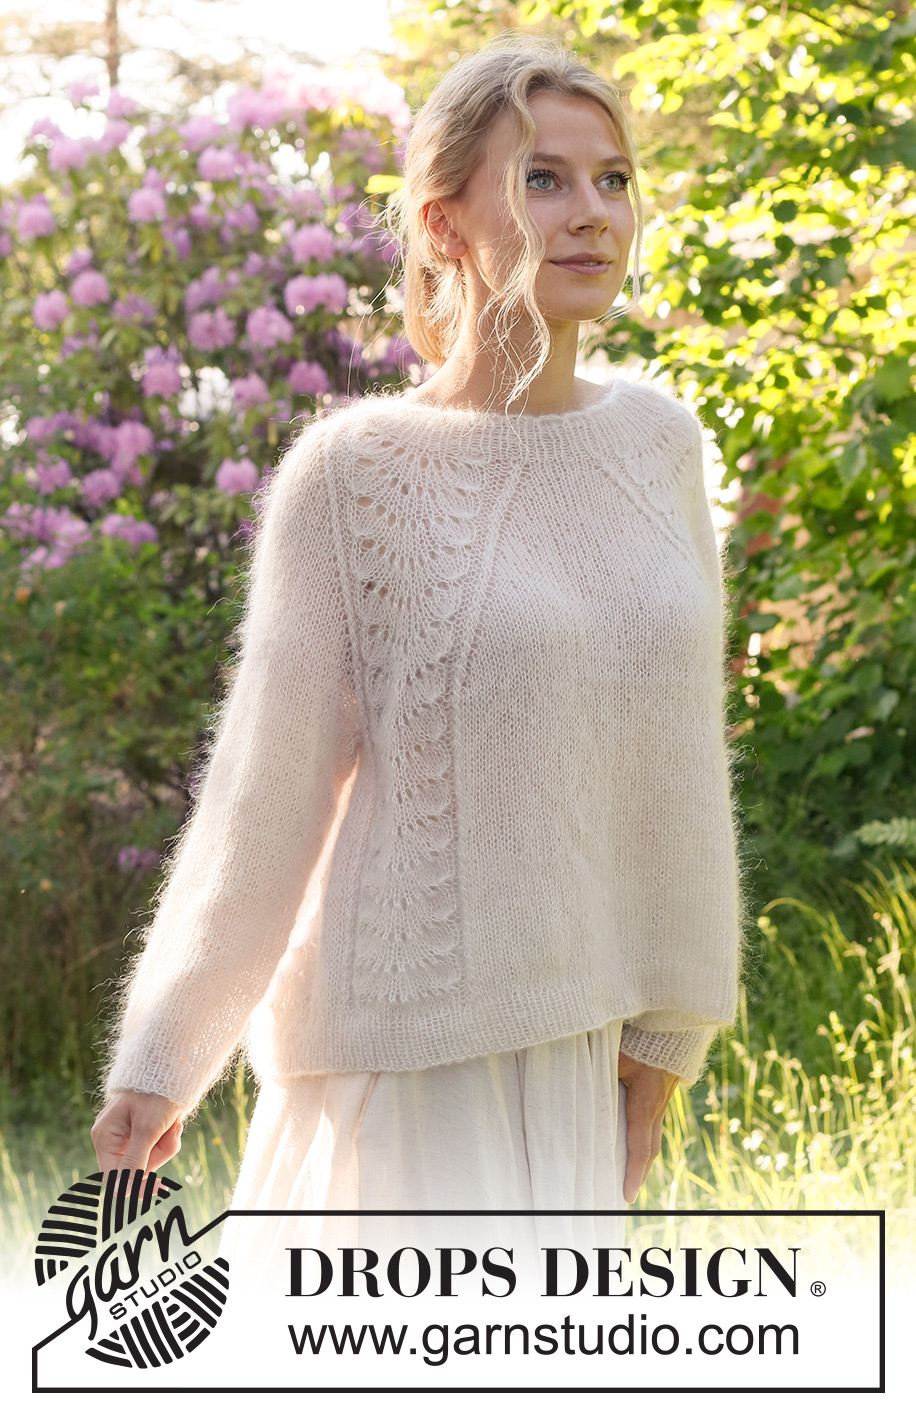
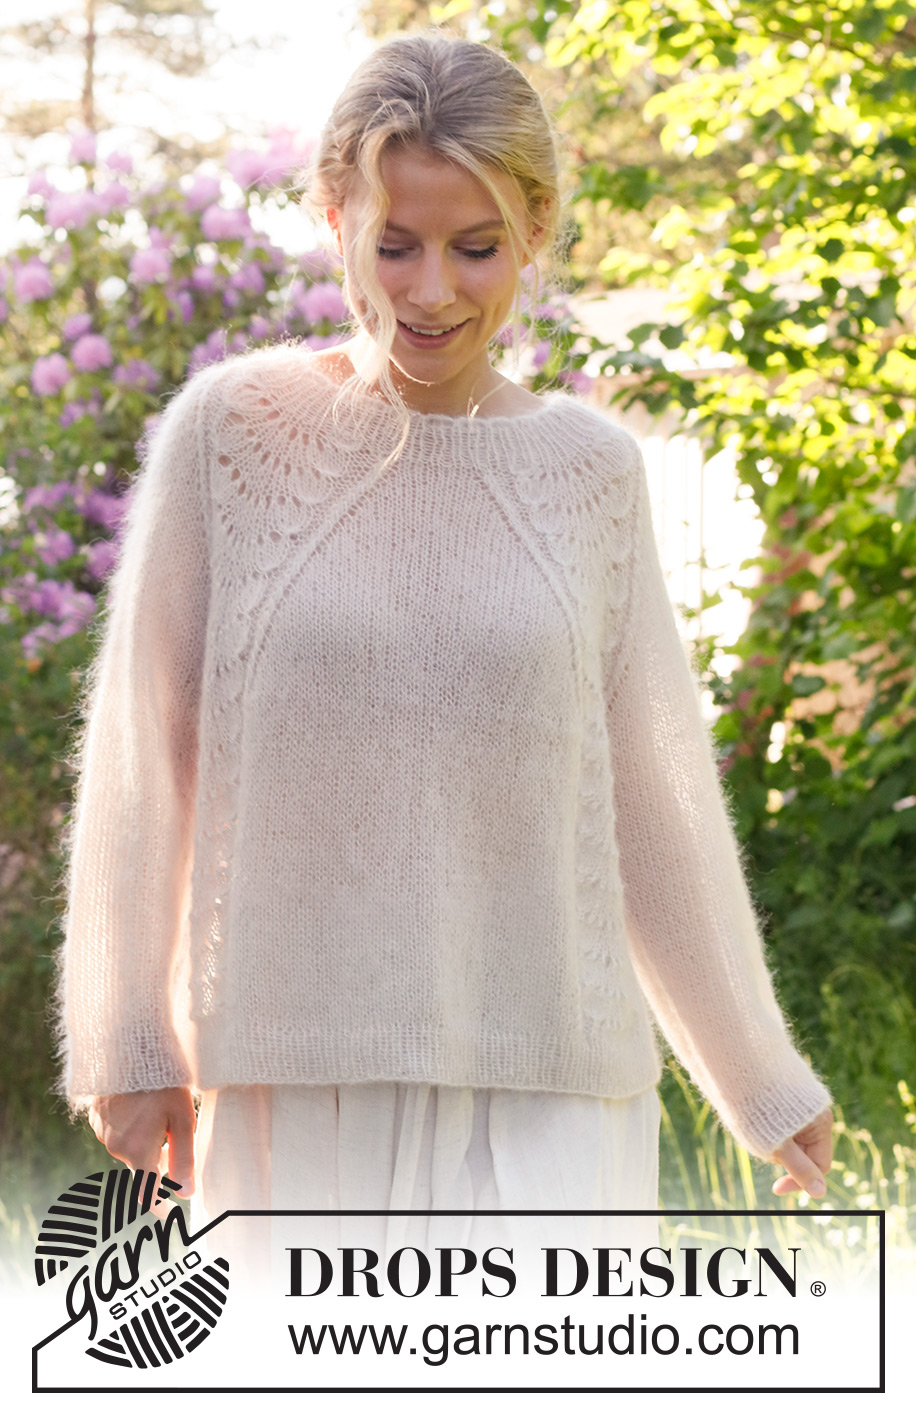
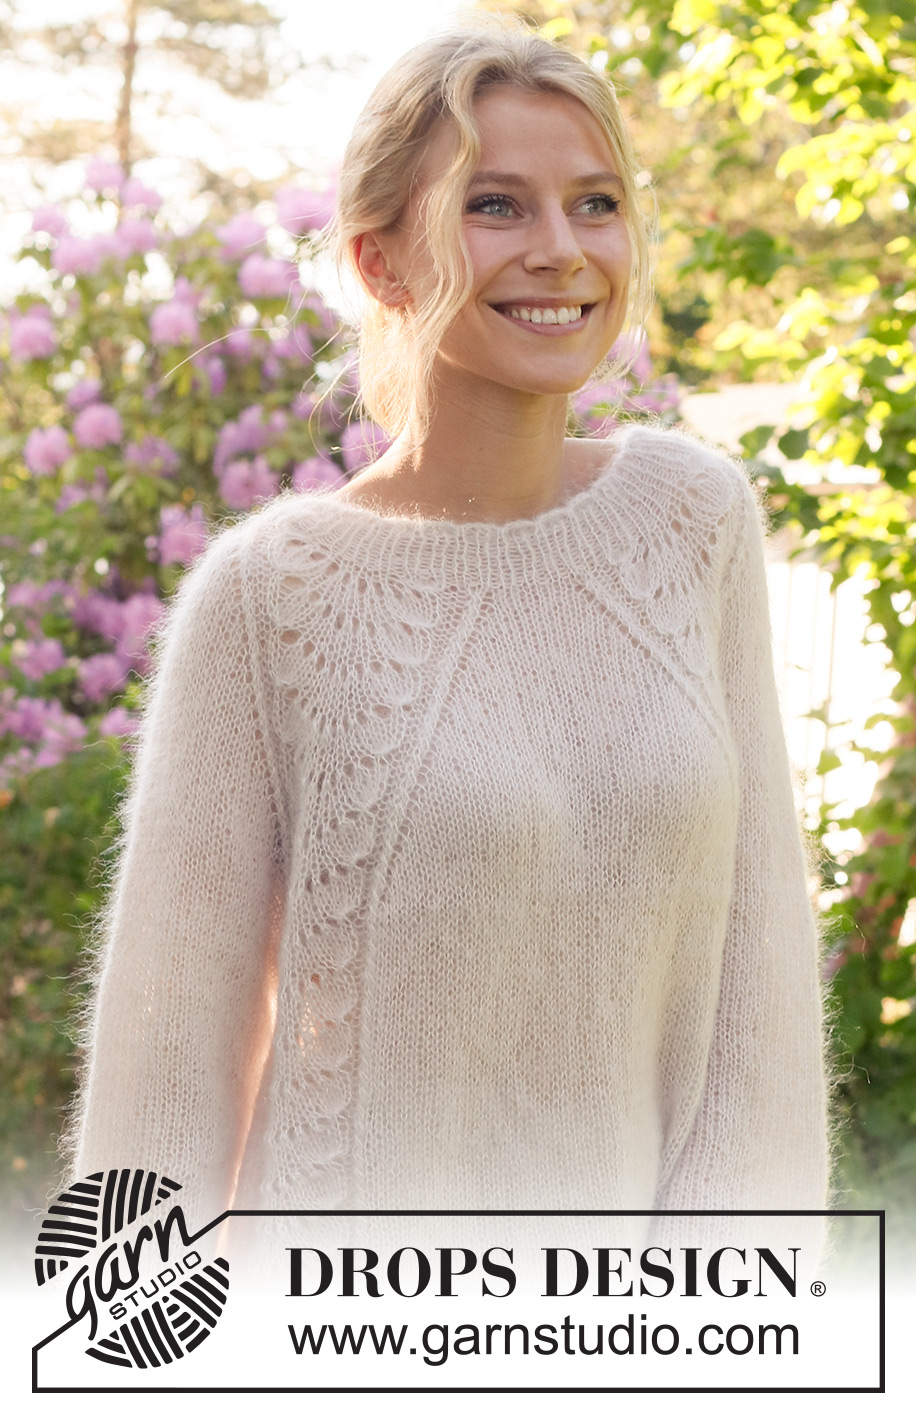
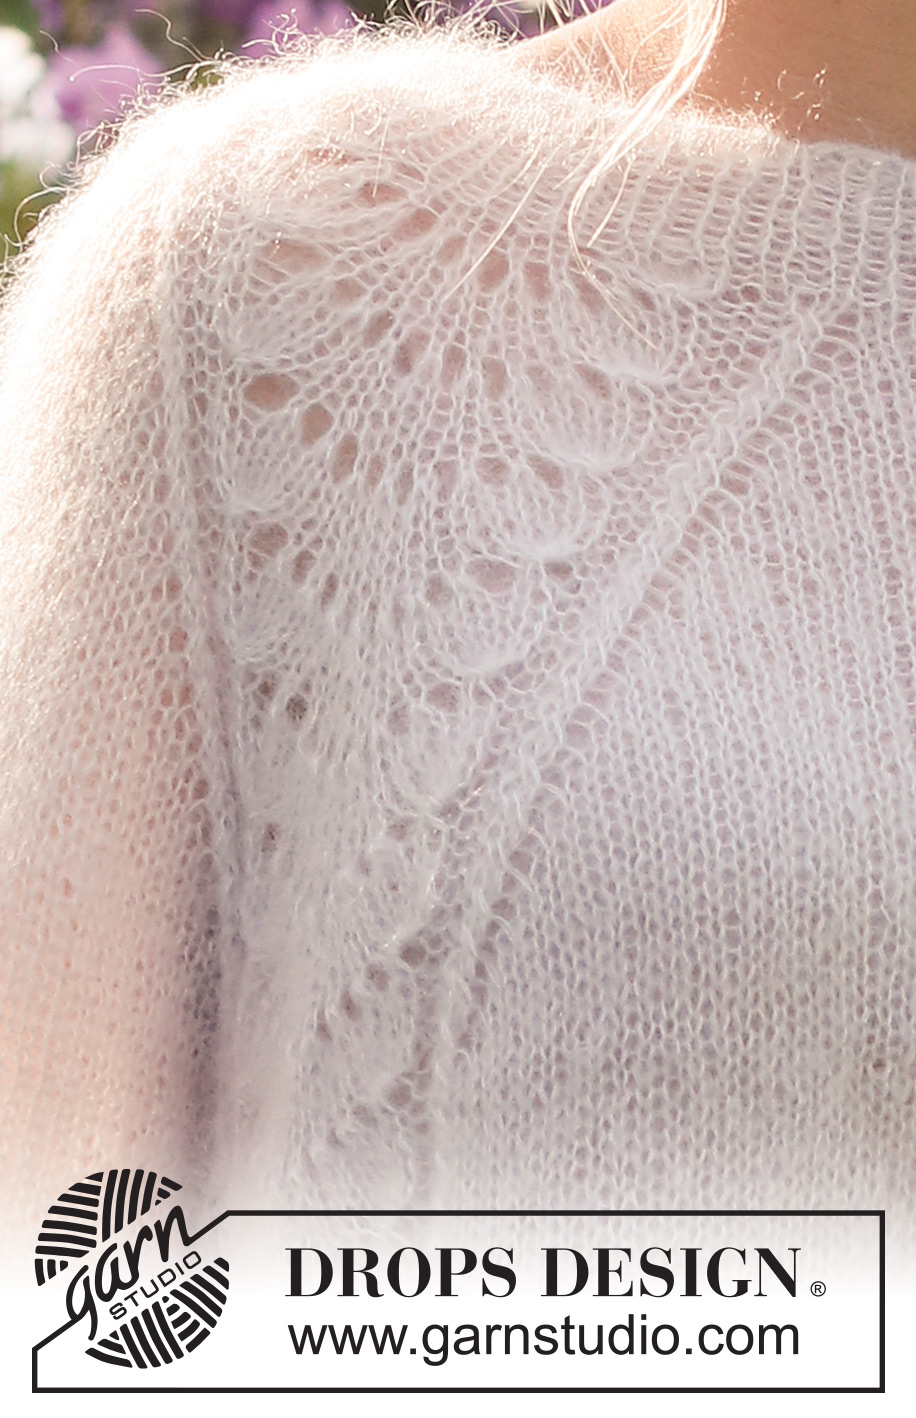
Knitted jumper in 2 strands DROPS Kid-Silk. The piece is worked top down with raglan and wave-pattern. Sizes S - XXXL.
DROPS 232-3 |
|||||||||||||||||||||||||
|
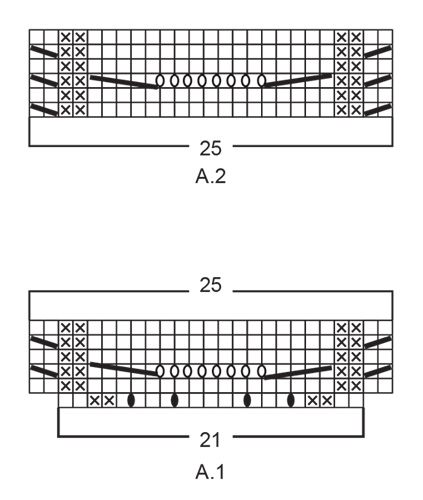
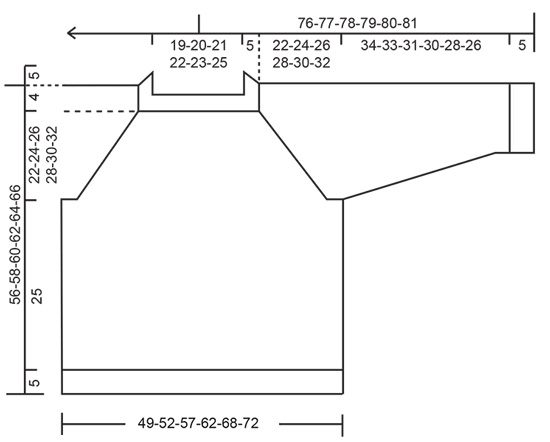
------------------------------------------------------- EXPLANATIONS FOR THE PATTERN: ------------------------------------------------------- PATTERN: See diagrams A.1 and A.2. RAGLAN: Increase in each transition between the body and sleeves by increasing before/after A.1/A.2. Increases are different on the body and sleeves, so sometimes you increase 8 stitches other times 4 stitches on the increase-round. Increase 1 stitch by making 1 yarn over. On the next round knit the yarns over twisted to avoid holes. Then work the new stitches in stocking stitch. DECREASE TIP (for sleeves): Work until there are 3 stitches left before the marker, knit 2 together, knit 2 (marker sits between these 2 stitches), slip 1 stitch as if to knit, knit 1 and pass the slipped stitch over the knitted stitch (2 stitches decreased). ------------------------------------------------------- START THE PIECE HERE: ------------------------------------------------------- JUMPER – SHORT OVERVIEW OF THE PIECE: The neck and yoke are worked in the round with circular needle, from the right shoulder and top down. The yoke is divided for body and sleeves and the body is continued in the round with circular needle. The sleeves are worked in the round with short circular needle/double pointed needles, top down. NECK WITH WAVY EDGE: Cast on 84-88-92-96-100-104 stitches with short circular needle size 4 mm and 2 strands DROPS Kid-Silk. Knit 1 round, then work rib (knit 1, purl 1). After 4 rounds of rib, work the next round as follows: Knit 1, * purl 1, knit 1, purl 1, take the right needle from the front of work and under the cast on edge, use right needle to lift the outermost stitch from left needle to the right needle, then take the right needle back around under the cast on edge (only the outermost stitch on the right needle is wrapped around the cast on edge), place this stitch back on left needle and knit the stitch (make sure the stitch is not twisted) *, work from *-* the whole round – NOTE: The last time the stitch «wrapped» will be the first stitch on the next round. The neck now has small waves along the cast-on edge. Continue the rib as before with knit 1, purl 1 until the rib (after the waves) measures 5 cm – AT THE SAME TIME on the last round increase 20-16-12-12-8-8 stitches evenly spaced = 104-104-104-108-108-112 stitches. When the rib is finished, insert 1 marker at the beginning of the round. The yoke is measured from this marker! YOKE: Change to circular needle size 5 mm. Work the first round as follows: * 1 yarn over, knit 1 *, work from *-* 3 times in total, 1 yarn over (sleeve), A.1, 7-7-7-9-9-11 stitches in stocking stitch, A.1 (front piece), * 1 yarn over, knit 1 *, work from *-* 3 times in total, 1 yarn over (sleeve), A.1, 7-7-7-9-9-11 stitches in stocking stitch, A.1 (back piece). There are 128-128-128-132-132-136 stitches. Work 1 more round of pattern as described above without increasing on the sleeves - the 4 increased stitches on each sleeve from the previous round are knitted twisted to avoid holes. REMEMBER THE KNITTING TENSION! OVERVIEW OF THE NEXT SECTION – read the whole section before continuing: Continue with the pattern. When A.1 has been worked 1 time in height, work A.2 over the 25 stitches in A.1. Repeat A.2 in height. AT THE SAME TIME on round 3 in A.1 start to increase to raglan as explained below. RAGLAN: Increase for RAGLAN by increasing 1 stitch before/after A.1/A.2 – read description above. The increases on the front/back pieces and sleeves differ as follows: FRONT/BACK PIECES: Increase every 2nd round a total of 7-11-14-17-23-27 times, then every 4th round 7-6-6-6-4-3 times. SLEEVES: Increase every 2nd round a total of 21-23-25-29-30-31 times. When all the increases are finished there are 268-288-308-340-360-380 stitches. Continue working without further increases until the piece measures 22-24-26-28-30-32 cm from the marker. Now divide for the body and sleeves: Place the first 49-53-57-65-67-69 stitches on a thread for the sleeve (the stitches between A.2 on the back and front pieces), cast on 6-6-8-8-10-10 stitches (in side under the sleeve), work the next 85-91-97-105-113-121 stitches (front piece), place the next 49-53-57-65-67-69 stitches on a thread for the sleeve (the stitches between A.2 on the back and front pieces), cast on 6-6-8-8-10-10 stitches (in side under the sleeve), work the remaining 85-91-97-105-113-121 stitches (back piece). The body and sleeves are finished separately. The piece is now measured from here! BODY: = 182-194-210-226-246-262 stitches. Continue in the round with A.2 and stocking stitch – the 6-6-8-8-10-10 stitches cast on under each sleeve are worked in stocking stitch. Work until the piece measures 25 cm from the division – make sure you have 3 or 5 rounds of stocking stitch after a round of yarn overs/decreases in A.2. Knit 1 round where you increase 18-18-20-22-24-26 stitches evenly spaced = 200-212-230-248-270-288 stitches. Change to circular needle size 4 mm. Work rib (knit 1, purl 1) for 5 cm. Cast off a little loosely. The jumper measures approx. 56-58-60-62-64-66 cm from the shoulder down. SLEEVES: Place the 49-53-57-65-67-69 stitches from the thread on the one side of the piece on short circular needle/double pointed needles size 5 mm and knit up 1 stitch in each of the 6-6-8-8-10-10 stitches cast on under the sleeve = 55-59-65-73-77-79 stitches. Insert a marker in the middle of the 6-6-8-8-10-10 stitches under the sleeve. Allow the marker to follow your work onwards; it will be used when decreasing under the sleeve. Start at the marker and work stocking stitch in the round for 4-4-3-3-2-2 cm. Now decrease 1 stitch on each side of the marker – read DECREASE TIP. Decrease like this every 5-4-3-2-2-1½ cm a total of 6-7-9-12-13-13 times = 43-45-47-49-51-53 stitches. Continue working until the sleeve measures 34-33-31-30-28-26 cm from the division. Knit 1 round where you increase 3 stitches evenly spaced = 46-48-50-52-54-56 stitches. Change to double pointed needles size 4 mm. Work rib (knit 1, purl 1) for 5 cm. Cast off a little loosely. The sleeve measures approx. 39-38-36-35-33-31 cm. Work the other sleeve in the same way. |
|||||||||||||||||||||||||
Diagram explanations |
|||||||||||||||||||||||||
|
|||||||||||||||||||||||||
 |
|||||||||||||||||||||||||
 |
|||||||||||||||||||||||||
Have you finished this pattern?Tag your pictures with #dropspattern #waveromancesweater or submit them to the #dropsfan gallery. Do you need help with this pattern?You'll find 31 tutorial videos, a Comments/Questions area and more by visiting the pattern on garnstudio.com. © 1982-2026 DROPS Design A/S. We reserve all rights. This document, including all its sub-sections, has copyrights. Read more about what you can do with our patterns at the bottom of each pattern on our site. |
|||||||||||||||||||||||||


With over 40 years in knitting and crochet design, DROPS Design offers one of the most extensive collections of free patterns on the internet - translated to 17 languages. As of today we count 325 catalogues and 12291 patterns translated into English (UK/cm). 12291
We work hard to bring you the best knitting and crochet have to offer, inspiration and advice as well as great quality yarns at incredible prices! Would you like to use our patterns for other than personal use? You can read what you are allowed to do in the Copyright text at the bottom of all our patterns. Happy crafting!
Post a comment to pattern DROPS 232-3
We would love to hear what you have to say about this pattern!
If you want to leave a question, please make sure you select the correct category in the form below, to speed up the answering process. Required fields are marked *.