
Popular categories
Looking for a yarn?


Comments / Questions (81)
![]() Azra Saric wrote:
Azra Saric wrote:
Liebe Drops-Team, gibt es Videoanleitungen zu diesem super schönen Strickanleitung. Ich habe tatsächlich Probleme diese Strickanleitung ganz zu verstehen. :( Frohe Weihnachten :) herzliche Grüsse Azra
21.12.2024 - 14:24DROPS Design answered:
Liebe Azra, ein Video für den ganzen Pullover haben wir nicht, gerne können Sie Ihr Problem hier beschreiben, so kann man Ihnen gerne weiterhelfen.
02.01.2025 - 09:46
![]() Muller Ger wrote:
Muller Ger wrote:
Bonjour Faut il tricoter ce modèle en laine double : « 2 fils DROPS Kid-Silk ? Je vous remercie par avance pour votre réponse. Cordialement
03.11.2024 - 09:12DROPS Design answered:
Bonjour Mme Ger, tout à fait, on tricote ce pull avec 2 fils Kid-Silk - ou bien si vous préférez avec le fil en double; pensez à bien vérifier votre tension: 17 mailles x 22 rangs jersey, avec 2 fils Kid-Silk = 10 x 10 cm. Bon tricot!
04.11.2024 - 09:08
![]() Rhoda wrote:
Rhoda wrote:
Hi, I am confused on the yoke part where it explains how to knit the pattern "1 yarn over, knit 1, work *-* 3 times in total " Does this include with the first YO or 3 more times? Then to work 1 more round of pattern as described. My confusion is on the second round what do you do with "1 yarn overs, knit 1, work from *-* 3 times." Do you knit the yarn overs twisted and knitted stitches in knit in order to start the pattern afresh?
10.08.2024 - 10:56DROPS Design answered:
Dear Rhoda, you need to repeat the specific instructions between * 3 times in total. So you have 3 yarn overs and 3 knit stitches. The yarn overs are worked as explained in the next sentence: "the 4 increased stitches on each sleeve from the previous round are knitted twisted to avoid holes." So all of the yarn overs are worked twisted and the knit stitches are knitted. Happy knitting!
12.08.2024 - 00:36
![]() Mireille P wrote:
Mireille P wrote:
Vos répondez quand aux questions qu'on vous pose ?
11.07.2024 - 10:23DROPS Design answered:
Bonjour Mireille, nous avons deja repondu a votre question. Bon tricot!
14.07.2024 - 00:13
![]() Mireille P wrote:
Mireille P wrote:
Bonjour à partir de où on rattache poue tricoter en rond ?
10.07.2024 - 12:44DROPS Design answered:
Bonjour Mireille, ce pull est tricote en rond des le debut. Bon travail!
13.07.2024 - 15:34
![]() Claudette Podunavac wrote:
Claudette Podunavac wrote:
Je répète mon message. Ma question était : dois-je faire entre chaque rang d'A1 et A2 un rang sans augmentation ? les explications disent : augmentations tous les 2 ou 4 rangs. Désolée de faire appel à votre obligeance mais je ne suis pas experte et je travaille toute seule. CDT
23.02.2024 - 13:05DROPS Design answered:
Bonjour Mme Podunavac, notez bien la réponse précédente (on tricote 1 fois A.1 puis on ne tricote que A.2), les augmentations des raglans (avant/après A.1 puis A.2) se font d'abord soit tous les 2 tours, soit tous les 4 tours, quand on augmente tous les 2 tours (manches, dos, devant) on va augmenter 8 mailles au total = on augmente avant et après chaque A.1), quand on augmente tous les 4 tours pour le dos/le devant on ne va augmenter que 4 mailles: 1 avant le A.1/A.2 à la fin du dos, 1 après le A.1/A.2 au début du devant, 1 avant le A.1/A.2 à la fin du devant et 1 après le A.1 au début du demi-dos. Bon tricot!
23.02.2024 - 14:06
![]() Claudette Podunavac wrote:
Claudette Podunavac wrote:
Bonsoir, Si je comprends bien après le premier rang du diagramme A1 et les suivants on n'augmente plus sur les manches les 3x 1 jetés un endroit ?
22.02.2024 - 18:29DROPS Design answered:
Bonjour Mme Podunavac, on doit augmenter pour le raglan en faisant 1 jeté avant/après chaque A.1, en même temps, quand les 6 rangs de A.1 sont faits, on tricote A.2 à la place, A.1 n'est fait qu'une seule fois pour obtenir le bon nombre de mailles (on augmente 4 mailles au 1er rang dans chaque A.1). En même temps que l'on termine A.1 et que l'on tricote A.2 , on doit augmenter pour le raglan. Bon tricot!
23.02.2024 - 08:05
![]() Sonja Lord wrote:
Sonja Lord wrote:
DROPS 232-3 Waves Romance: I'm confused by the instructions for the increase for raglan and the sleeves. Instructions say to increase every 2nd round on the sleeves and the front/back pieces. But that the Raglan is increased with every transition between the body and sleeves. So in other words, in round 1, I would increase between the body and sleeves by 2 stitches and 1 stitch on the body, and then in round 2 increase only between sleeve and body and nowhere else?
20.02.2024 - 16:37DROPS Design answered:
Hi Sonja, The first 7-11-14-17-23-27 increases for raglan are on both the body and sleeves (on each side of A.1/A.2 = 8 increased stitches). Then you continue increasing every 2nd round on the sleeves but only every 4th round on the body (alternately 4 and 8 increased stitches). Hope this helps and happy knitting!
21.02.2024 - 06:53
![]() Claudette Podunavac wrote:
Claudette Podunavac wrote:
Bonsoir, Les augmentations après le rang 3 en A 1 doivent se faire tous les 2 rangs. cela veut-il dire qu''entre chaque rang d'A1 et d'A2 je dois faire un rang sans augmentations ? Merci par avance
16.02.2024 - 18:45DROPS Design answered:
Bonjour Mme Podunavac, lorsque A.1 est terminé, vous ne le tricotez plus, à la place vous tricotez A.2, A.1 permet d'augmenter pour avoir le bon nombre de mailles pour la largeur souhaitée, mais quand les 6 rangs sont faits, on répète les 6 rangs de A.2 en hauteur, en même temps, on augmente pour le raglan tous les 2 tours. Bon tricot!
19.02.2024 - 07:36
![]() Claudette Podunavac wrote:
Claudette Podunavac wrote:
Bonjour, Au début de l\'empiècement et avant de tricoter le rang 3 d\'A1 combien de mailles dois-je avoir sur l\'aiguille ? Merci Cdt
13.02.2024 - 13:49DROPS Design answered:
Bonjour Mme Podunavac, lorsque vous tricotez le 1er tour de l'empiècement, vous avez augmenté 4 mailles sur chaque manche et 4 mailles dans chaque A.1 autrement dit 8+16= 24 mailles, ainsi, au 2ème tour vous avez 128, 132 ou 136 mailles. Tricotez ce 2ème tour sans augmenter. Au 3ème tour, augmentez 8 mailles pour le raglan (avant/après chaque A.1) et tricotez le 3ème tour de A.1 = vous augmentez 8 mailles et avez ainsi 136, 140 ou 142 mailles. Mettez bien des marqueurs entre chaque partie/diagramme, cela peut vous aider à bien vérifier votre nombre de mailles. Bon tricot!
14.02.2024 - 07:22
|
|||||||||||||||||||||||||
Wave Romance#waveromancesweater |
|||||||||||||||||||||||||
 |
 |
||||||||||||||||||||||||
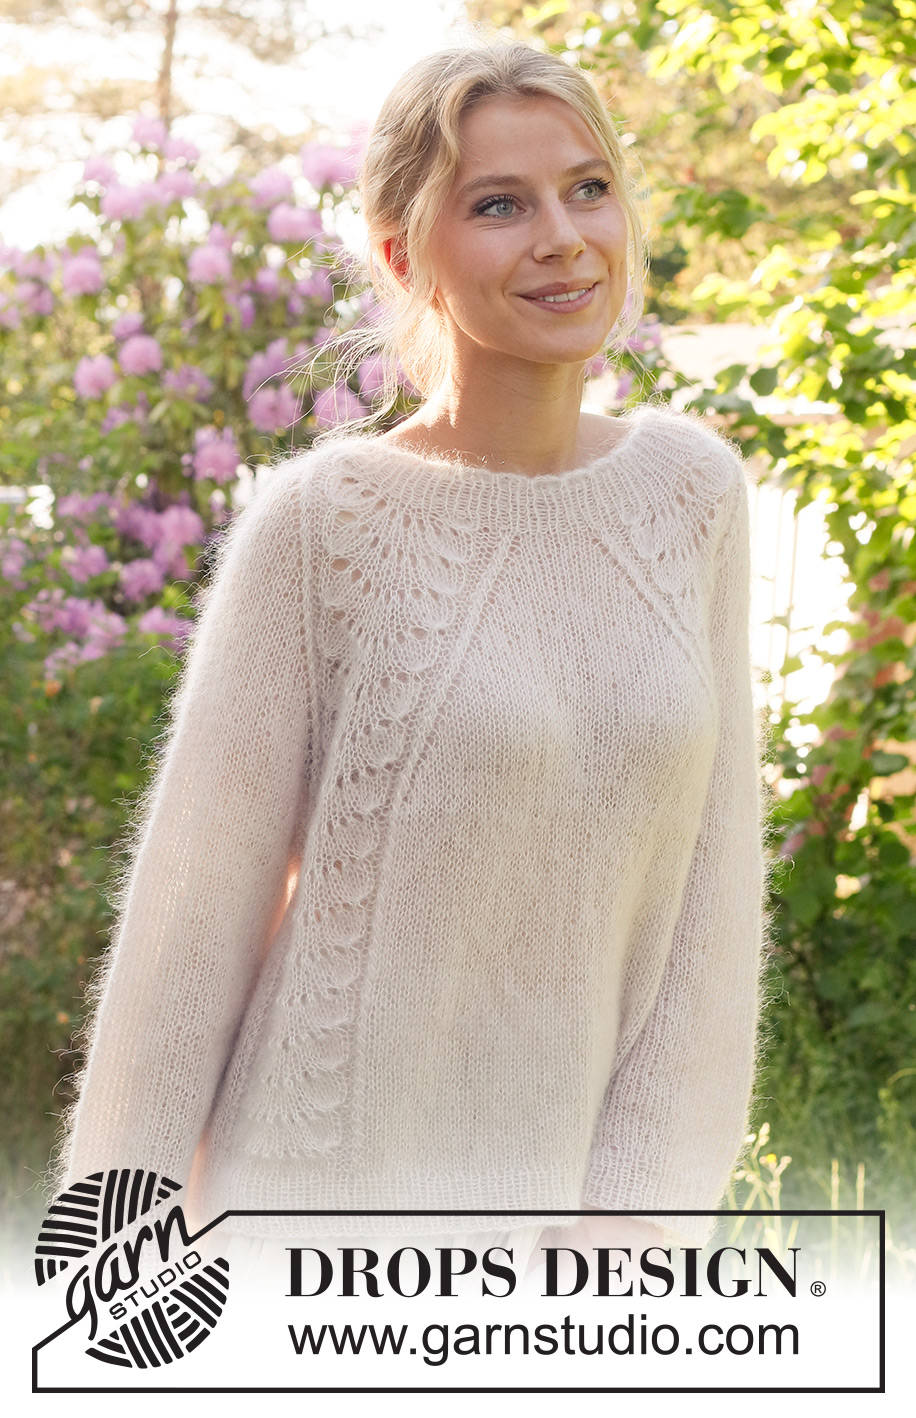
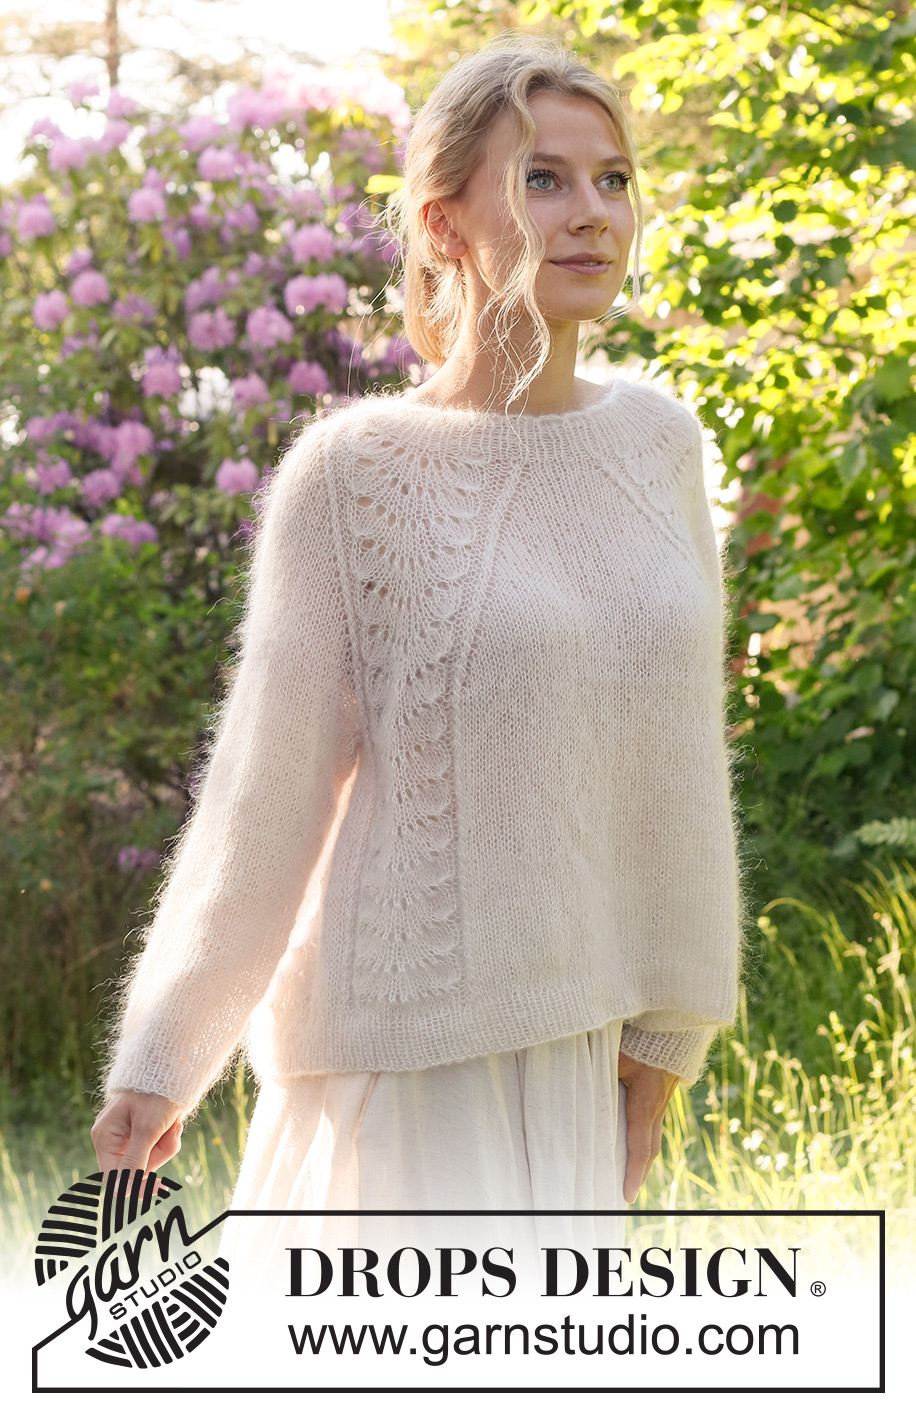
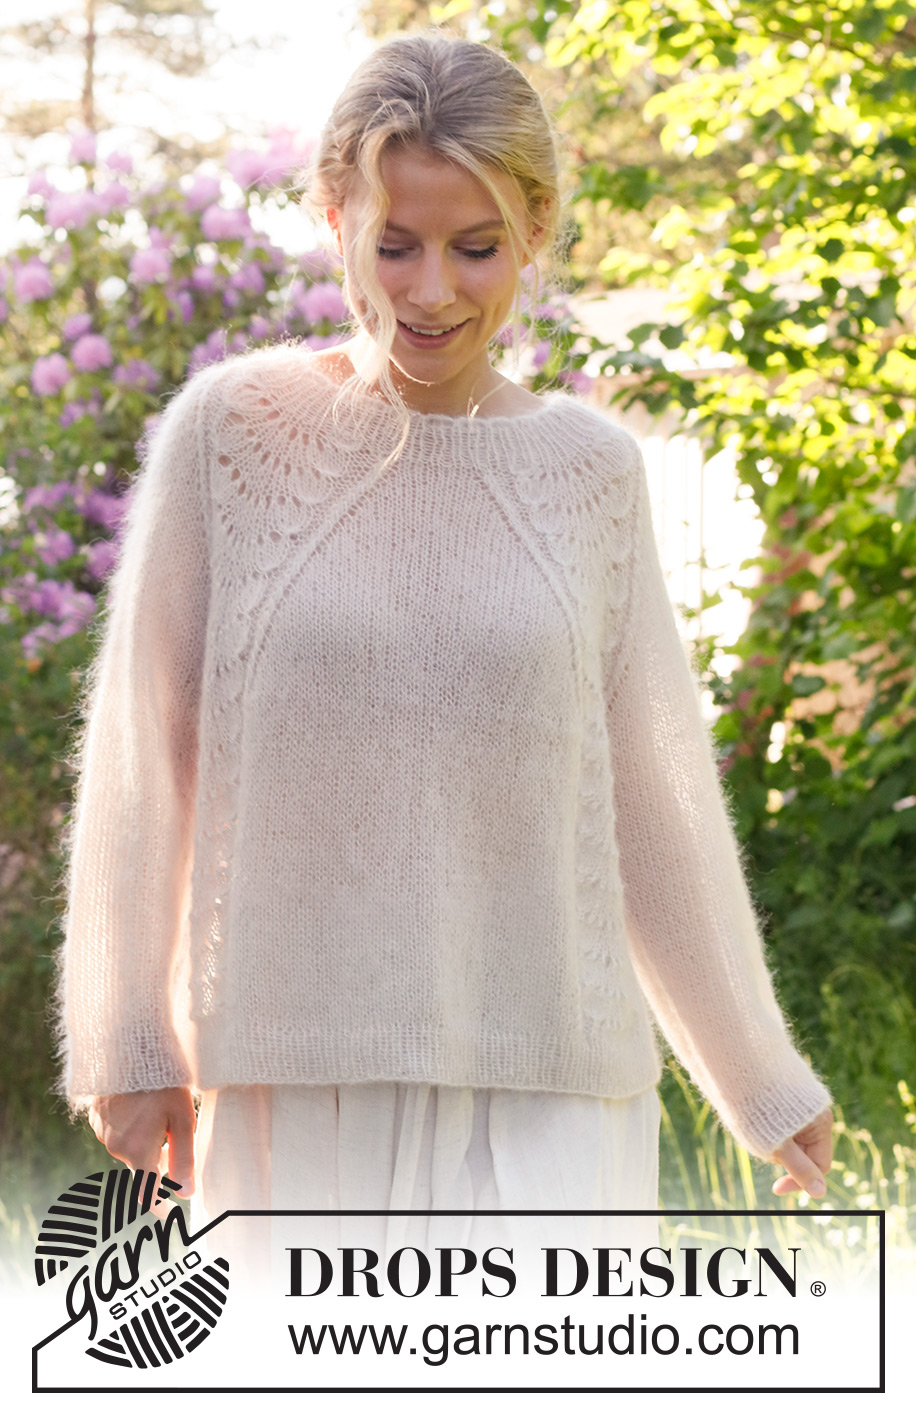
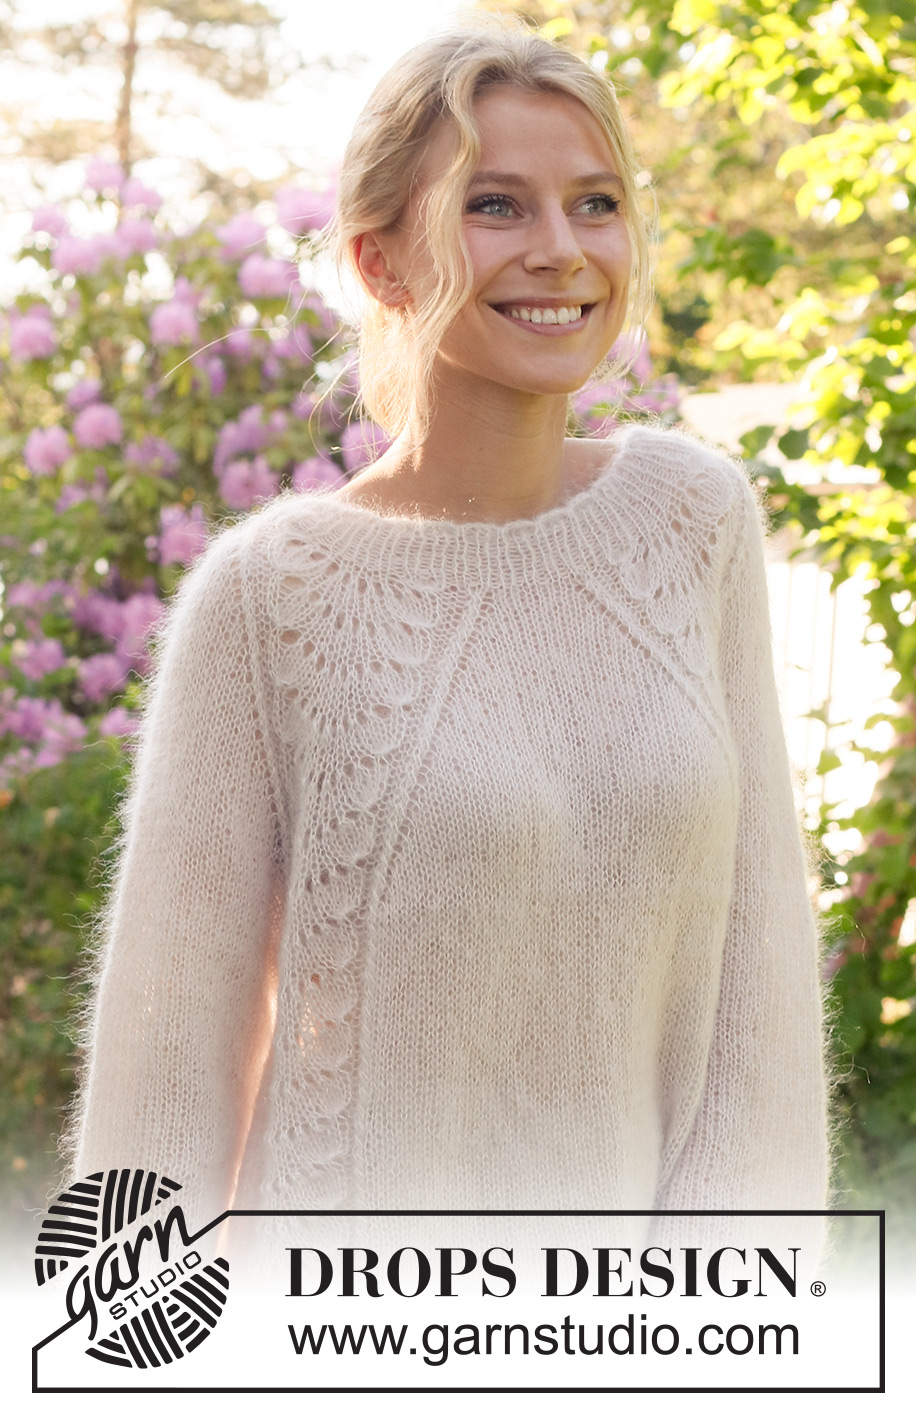
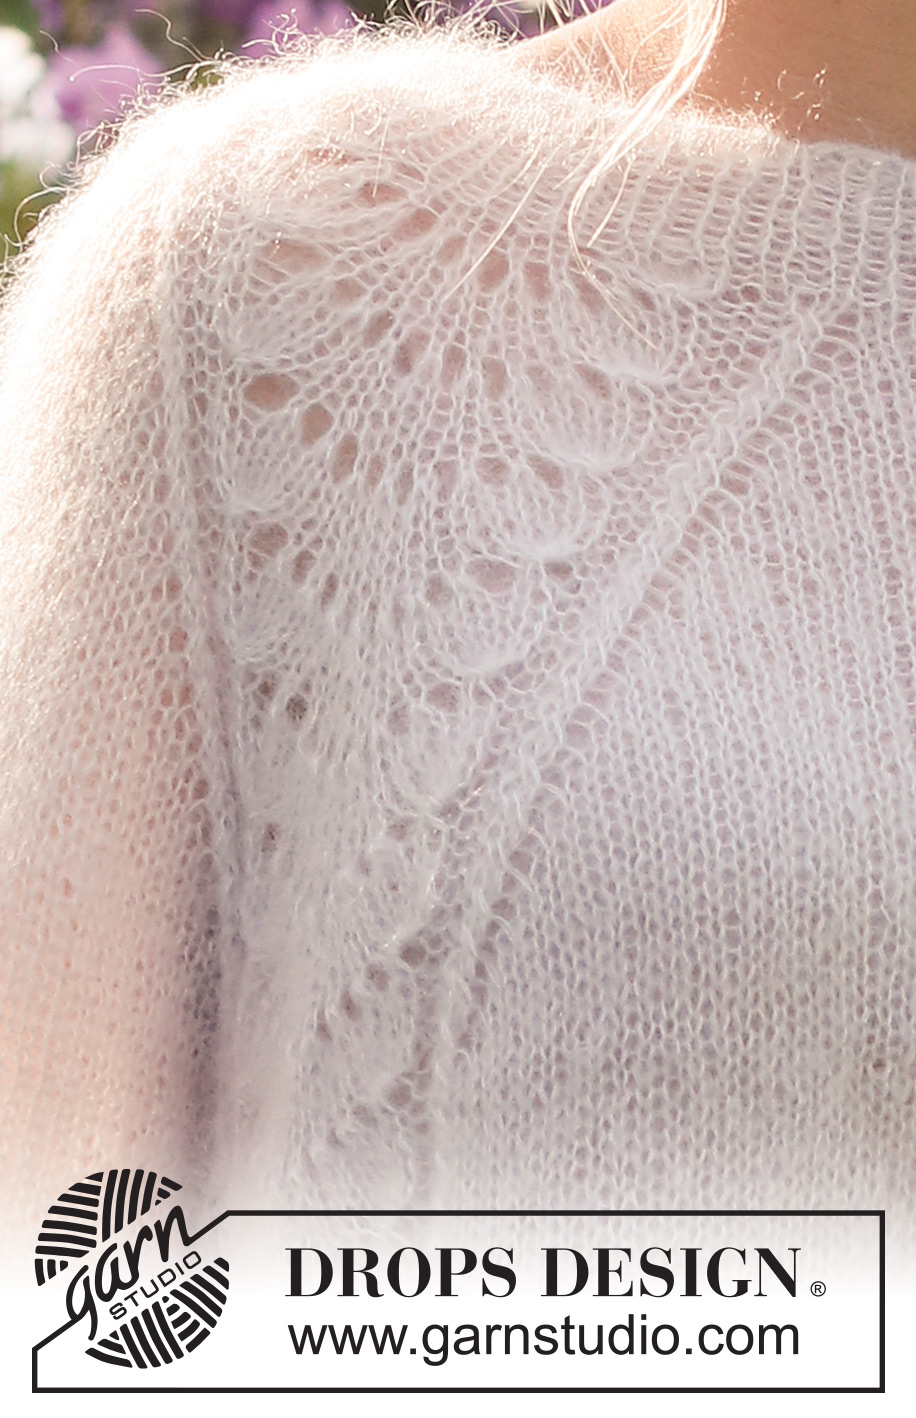
Knitted jumper in 2 strands DROPS Kid-Silk. The piece is worked top down with raglan and wave-pattern. Sizes S - XXXL.
DROPS 232-3 |
|||||||||||||||||||||||||
|
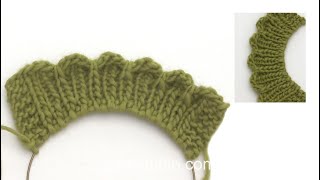
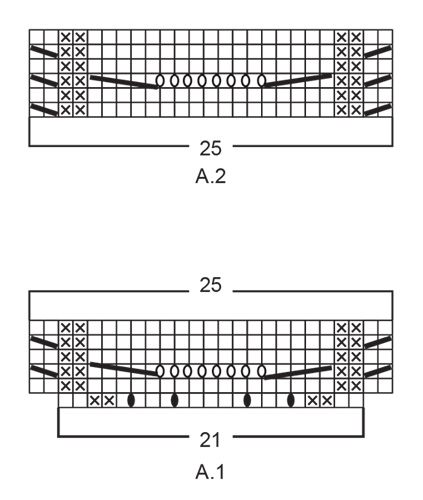
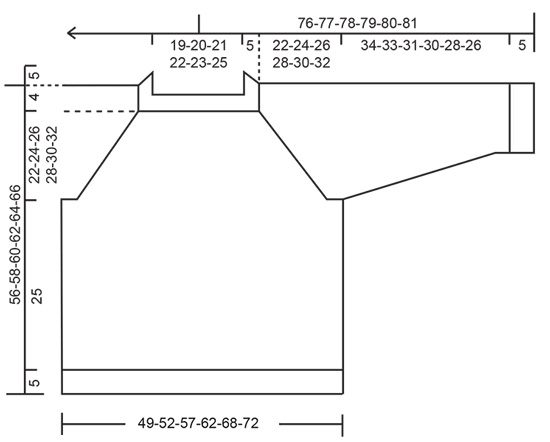
------------------------------------------------------- EXPLANATIONS FOR THE PATTERN: ------------------------------------------------------- PATTERN: See diagrams A.1 and A.2. RAGLAN: Increase in each transition between the body and sleeves by increasing before/after A.1/A.2. Increases are different on the body and sleeves, so sometimes you increase 8 stitches other times 4 stitches on the increase-round. Increase 1 stitch by making 1 yarn over. On the next round knit the yarns over twisted to avoid holes. Then work the new stitches in stocking stitch. DECREASE TIP (for sleeves): Work until there are 3 stitches left before the marker, knit 2 together, knit 2 (marker sits between these 2 stitches), slip 1 stitch as if to knit, knit 1 and pass the slipped stitch over the knitted stitch (2 stitches decreased). ------------------------------------------------------- START THE PIECE HERE: ------------------------------------------------------- JUMPER – SHORT OVERVIEW OF THE PIECE: The neck and yoke are worked in the round with circular needle, from the right shoulder and top down. The yoke is divided for body and sleeves and the body is continued in the round with circular needle. The sleeves are worked in the round with short circular needle/double pointed needles, top down. NECK WITH WAVY EDGE: Cast on 84-88-92-96-100-104 stitches with short circular needle size 4 mm and 2 strands DROPS Kid-Silk. Knit 1 round, then work rib (knit 1, purl 1). After 4 rounds of rib, work the next round as follows: Knit 1, * purl 1, knit 1, purl 1, take the right needle from the front of work and under the cast on edge, use right needle to lift the outermost stitch from left needle to the right needle, then take the right needle back around under the cast on edge (only the outermost stitch on the right needle is wrapped around the cast on edge), place this stitch back on left needle and knit the stitch (make sure the stitch is not twisted) *, work from *-* the whole round – NOTE: The last time the stitch «wrapped» will be the first stitch on the next round. The neck now has small waves along the cast-on edge. Continue the rib as before with knit 1, purl 1 until the rib (after the waves) measures 5 cm – AT THE SAME TIME on the last round increase 20-16-12-12-8-8 stitches evenly spaced = 104-104-104-108-108-112 stitches. When the rib is finished, insert 1 marker at the beginning of the round. The yoke is measured from this marker! YOKE: Change to circular needle size 5 mm. Work the first round as follows: * 1 yarn over, knit 1 *, work from *-* 3 times in total, 1 yarn over (sleeve), A.1, 7-7-7-9-9-11 stitches in stocking stitch, A.1 (front piece), * 1 yarn over, knit 1 *, work from *-* 3 times in total, 1 yarn over (sleeve), A.1, 7-7-7-9-9-11 stitches in stocking stitch, A.1 (back piece). There are 128-128-128-132-132-136 stitches. Work 1 more round of pattern as described above without increasing on the sleeves - the 4 increased stitches on each sleeve from the previous round are knitted twisted to avoid holes. REMEMBER THE KNITTING TENSION! OVERVIEW OF THE NEXT SECTION – read the whole section before continuing: Continue with the pattern. When A.1 has been worked 1 time in height, work A.2 over the 25 stitches in A.1. Repeat A.2 in height. AT THE SAME TIME on round 3 in A.1 start to increase to raglan as explained below. RAGLAN: Increase for RAGLAN by increasing 1 stitch before/after A.1/A.2 – read description above. The increases on the front/back pieces and sleeves differ as follows: FRONT/BACK PIECES: Increase every 2nd round a total of 7-11-14-17-23-27 times, then every 4th round 7-6-6-6-4-3 times. SLEEVES: Increase every 2nd round a total of 21-23-25-29-30-31 times. When all the increases are finished there are 268-288-308-340-360-380 stitches. Continue working without further increases until the piece measures 22-24-26-28-30-32 cm from the marker. Now divide for the body and sleeves: Place the first 49-53-57-65-67-69 stitches on a thread for the sleeve (the stitches between A.2 on the back and front pieces), cast on 6-6-8-8-10-10 stitches (in side under the sleeve), work the next 85-91-97-105-113-121 stitches (front piece), place the next 49-53-57-65-67-69 stitches on a thread for the sleeve (the stitches between A.2 on the back and front pieces), cast on 6-6-8-8-10-10 stitches (in side under the sleeve), work the remaining 85-91-97-105-113-121 stitches (back piece). The body and sleeves are finished separately. The piece is now measured from here! BODY: = 182-194-210-226-246-262 stitches. Continue in the round with A.2 and stocking stitch – the 6-6-8-8-10-10 stitches cast on under each sleeve are worked in stocking stitch. Work until the piece measures 25 cm from the division – make sure you have 3 or 5 rounds of stocking stitch after a round of yarn overs/decreases in A.2. Knit 1 round where you increase 18-18-20-22-24-26 stitches evenly spaced = 200-212-230-248-270-288 stitches. Change to circular needle size 4 mm. Work rib (knit 1, purl 1) for 5 cm. Cast off a little loosely. The jumper measures approx. 56-58-60-62-64-66 cm from the shoulder down. SLEEVES: Place the 49-53-57-65-67-69 stitches from the thread on the one side of the piece on short circular needle/double pointed needles size 5 mm and knit up 1 stitch in each of the 6-6-8-8-10-10 stitches cast on under the sleeve = 55-59-65-73-77-79 stitches. Insert a marker in the middle of the 6-6-8-8-10-10 stitches under the sleeve. Allow the marker to follow your work onwards; it will be used when decreasing under the sleeve. Start at the marker and work stocking stitch in the round for 4-4-3-3-2-2 cm. Now decrease 1 stitch on each side of the marker – read DECREASE TIP. Decrease like this every 5-4-3-2-2-1½ cm a total of 6-7-9-12-13-13 times = 43-45-47-49-51-53 stitches. Continue working until the sleeve measures 34-33-31-30-28-26 cm from the division. Knit 1 round where you increase 3 stitches evenly spaced = 46-48-50-52-54-56 stitches. Change to double pointed needles size 4 mm. Work rib (knit 1, purl 1) for 5 cm. Cast off a little loosely. The sleeve measures approx. 39-38-36-35-33-31 cm. Work the other sleeve in the same way. |
|||||||||||||||||||||||||
Diagram explanations |
|||||||||||||||||||||||||
|
|||||||||||||||||||||||||
 |
|||||||||||||||||||||||||
 |
|||||||||||||||||||||||||
Have you finished this pattern?Tag your pictures with #dropspattern #waveromancesweater or submit them to the #dropsfan gallery. Do you need help with this pattern?You'll find 31 tutorial videos, a Comments/Questions area and more by visiting the pattern on garnstudio.com. © 1982-2026 DROPS Design A/S. We reserve all rights. This document, including all its sub-sections, has copyrights. Read more about what you can do with our patterns at the bottom of each pattern on our site. |
|||||||||||||||||||||||||


With over 40 years in knitting and crochet design, DROPS Design offers one of the most extensive collections of free patterns on the internet - translated to 17 languages. As of today we count 325 catalogues and 12291 patterns translated into English (UK/cm). 12291
We work hard to bring you the best knitting and crochet have to offer, inspiration and advice as well as great quality yarns at incredible prices! Would you like to use our patterns for other than personal use? You can read what you are allowed to do in the Copyright text at the bottom of all our patterns. Happy crafting!
Post a comment to pattern DROPS 232-3
We would love to hear what you have to say about this pattern!
If you want to leave a question, please make sure you select the correct category in the form below, to speed up the answering process. Required fields are marked *.