
Popular categories
Looking for a yarn?


Comments / Questions (78)
![]() HERMAND wrote:
HERMAND wrote:
Bonjour Sur A2 je ne comprends pas le 5eme rang avec le symbole trait noir
12.04.2026 - 20:03DROPS Design answered:
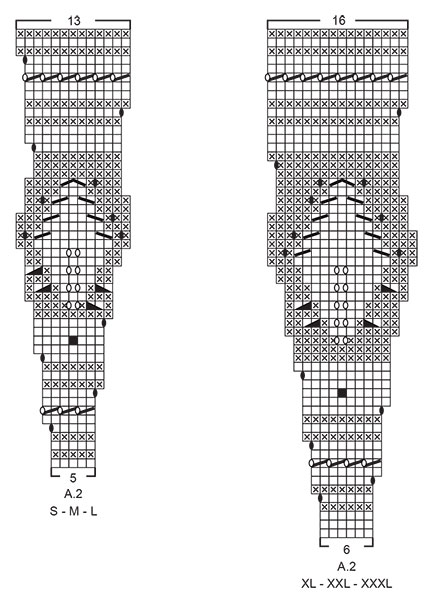
Bonjour Mme Hermand, à la fin du 5ème rang de A.2 (toutes les tailles) on va faire 1 jeté que l'on tricote torse au tour suivant pour éviter un trou. Ce symbole correspond au 4ème de la légende. Bon tricot!
13.04.2026 - 10:39
![]() Hyoneju wrote:
Hyoneju wrote:
Thanks you.
09.04.2026 - 12:18
![]() Sonja wrote:
Sonja wrote:
Hihan ohjeessa näyttää oleva virhe M-koon ohjeessa: Kun ottaa toisen sivun apulangalla odottavat 78 silmukkaa sukkapuikoille ja poimii hihan alapuolelle luodusta 8 silmukasta 1 silmukan jokaisesta, tulee yhteensä 86 silmukkaa. Ei siis 84, kuten ohjeessa sanotaan.
01.02.2026 - 13:29DROPS Design answered:
Hei, koossa M poimitaan 1 silmukka jokaisesta hihan alapuolelle luodusta 6 silmukasta, eli työhön tulee yhteensä 84 silmukkaa.
03.02.2026 - 18:04
![]() Line wrote:
Line wrote:
J'ai une laine très fine reçue de ma grand-mère. J'aimerais savoir comment trouver un modèle qui pourrait servir à créer un modèle dans votre catalogue. J'ai 32 mailles x 43 rangs avec aiguilles 2,5 cm. Je ne sais pas comment faire la recherche. Merci
11.01.2026 - 02:44DROPS Design answered:
Bonjour Line, choisissez ce que vous voulez tricoter, ex. un pull, ensuite a gauche vous trouverez les filtres, cliquez sur l'echantillon et choisissez 32 - 28 mailles. Votre tricot sera tres fin. Si cela ne vous convient pas, vous pouvez utliser ce fil en double (2 fils ensemble). Bon tricot!
12.01.2026 - 11:21
![]() Line wrote:
Line wrote:
J'aimerais savoir, lorsqu'il y a 2 grandeur d'aiguilles dans un patron, comment savoir sur quelle aiguille on doit faire l'échantillon. Merci de vos réponses toujours utiles
09.01.2026 - 18:09DROPS Design answered:
Bonjour Line, l'echantillon est fait sur les aiguilles plus grandes. Les plus petites sont pour les bordures. Bon tricot!
12.01.2026 - 07:54
![]() Ana Oliveira wrote:
Ana Oliveira wrote:
Bom dia, quando se começa a fazer as costas e as frentes, devemos começar a carreira a meio das malhas que adicionamos na zona das mangas. Porquê? A carreira não pode começar no marcador das costas? Se sim posso começar o esquema A4 no meio das costas? No esquema A4 tenho que começar com 4 ou 5 carrreiras de meia? Ou seja lê-se o esquema de baixo para cima ou de cima para baixo? Obrigada
27.11.2025 - 10:32DROPS Design answered:
Bom dia, Comea-se, por norma, a meio de uma das mangas para que não se note um desnivel de carreiras a meio das costas (por se estar a tricotar em redondo). Para tricotar a partir do meio das costas, seria necessário alterar a sequência de A.4 com o ponto meia. Quanto a A.4, lê-se de baixo para cima, o que significa que se deve tricotar 4 carreiras em ponto meia antes da 1..ª carreira de ajours. Bons tricôs!
27.11.2025 - 10:59
![]() Ana Oliveira wrote:
Ana Oliveira wrote:
Eu estou a dividir a peça e tenho que tricotar em liga 57 malhas, deslizo e coloco em espera 78 malhas para a manga e depois continuo a fazer o resto. As malhas que vou colocar em espera não são tricotadas em liga mas quando for começar a tricotar as mangas em circular tenho que trabalhar em meia mas vai faltar uma carreira de liga que deveria ser quando se desliza as malhas da manga para ficar em espera. Como faço para ter essa carreira em liga para ficar igual às costas e frente?
25.11.2025 - 10:31DROPS Design answered:
Bom dia, Deve tricotar essa última carreira liga de A.2 e só depois fazer a separação para as mangas,. Irá, então. tricotar um determinado número de malhas em meia antes e depois de A4. (motivo em ponto meia com ajours) nas mangas. Bons tricôs!
26.11.2025 - 11:54
![]() Ana Oliveira wrote:
Ana Oliveira wrote:
Eu tenho que tricotar A3 até ter 21cm e segundo a resposta que foi dada à minha pergunta anterior estes 21 cm incluem a elevação nas costas. No entanto enquanto estava à espera da vossa resposta, estive a ver perguntas de outras pessoas e no dia 06/01/2022 colocaram a mesma questão e a resposta foi diferente, ou seja, a medição não inclui a elevação das costas e que se for feita a elevação temos que medir pela frente. Afinal como devo fazer?
21.11.2025 - 15:35DROPS Design answered:
Bom dia, A indicação dada no modelo refere que deve medir a partir do marcador colocado na gola. "Tricotar A.3 até o encaixe medir cerca de 19-21-23-24-26-28 cm a partir do marcador da gola; ajustar a altura para depois de um motivo completo em altura." Tendo em conta de que a elevação é tricotada depois da gola, no nosso entender, a medida indicada inclui a elevação. É também referido que se deve ajustar a altura para terminar depois de um motivo completo de A.3,. No entanto, para melhor referência, pode sempre consultar o esquema de medidas que encontra ao fundo da página do modelo, para saber qual a altura da gola/elevação. Bons tricôs
24.11.2025 - 12:04
![]() Ana Oliveira wrote:
Ana Oliveira wrote:
Bom dia, eu estou a fazer o tamanho M e tenho que fazer o diagrama A3 até ter 21cm de altura. Estes 21 cm já incluí a elevação das costas? Se não incluir a elevação das costas que altura deverei ter desde a argola? Obrigada
20.11.2025 - 10:33DROPS Design answered:
Bom dia, Sim, o comprimento inclui a elevação nas costas. De outra forma, seria indicado que as medidas deveriam ser tiradas a meio da frente. Mas não é o caso, Bons tricôs! A equipa DROPS
21.11.2025 - 10:45
![]() Ana Oliveira wrote:
Ana Oliveira wrote:
Boa tarde, eu estou a começar a fazer o diagrama 1. Como a camisola começa na gola, a minha carreira número 6 vai começar com uma laçada e de seguida 2 malhas juntas em meia ou terei primeiro que fazer 2 malhas juntas em meia e depois a laçada? Obrigada
14.11.2025 - 19:56DROPS Design answered:
Bom dia, A carreira começa com 2 malhas tricotadas juntamente em meia, depois, 1 laçada, motivo que se repete até ao fim da carreira (ter em atenção para fazer a última laçada nesta carreira). Aconselha-se a colocar um marcador para marcar o princípio de cada carreira. Bons tricôs! A equipa DROPS
17.11.2025 - 10:01
|
|||||||||||||||||||||||||||||||
Sparrow Song#sparrowsongsweater |
|||||||||||||||||||||||||||||||
 |
 |
||||||||||||||||||||||||||||||
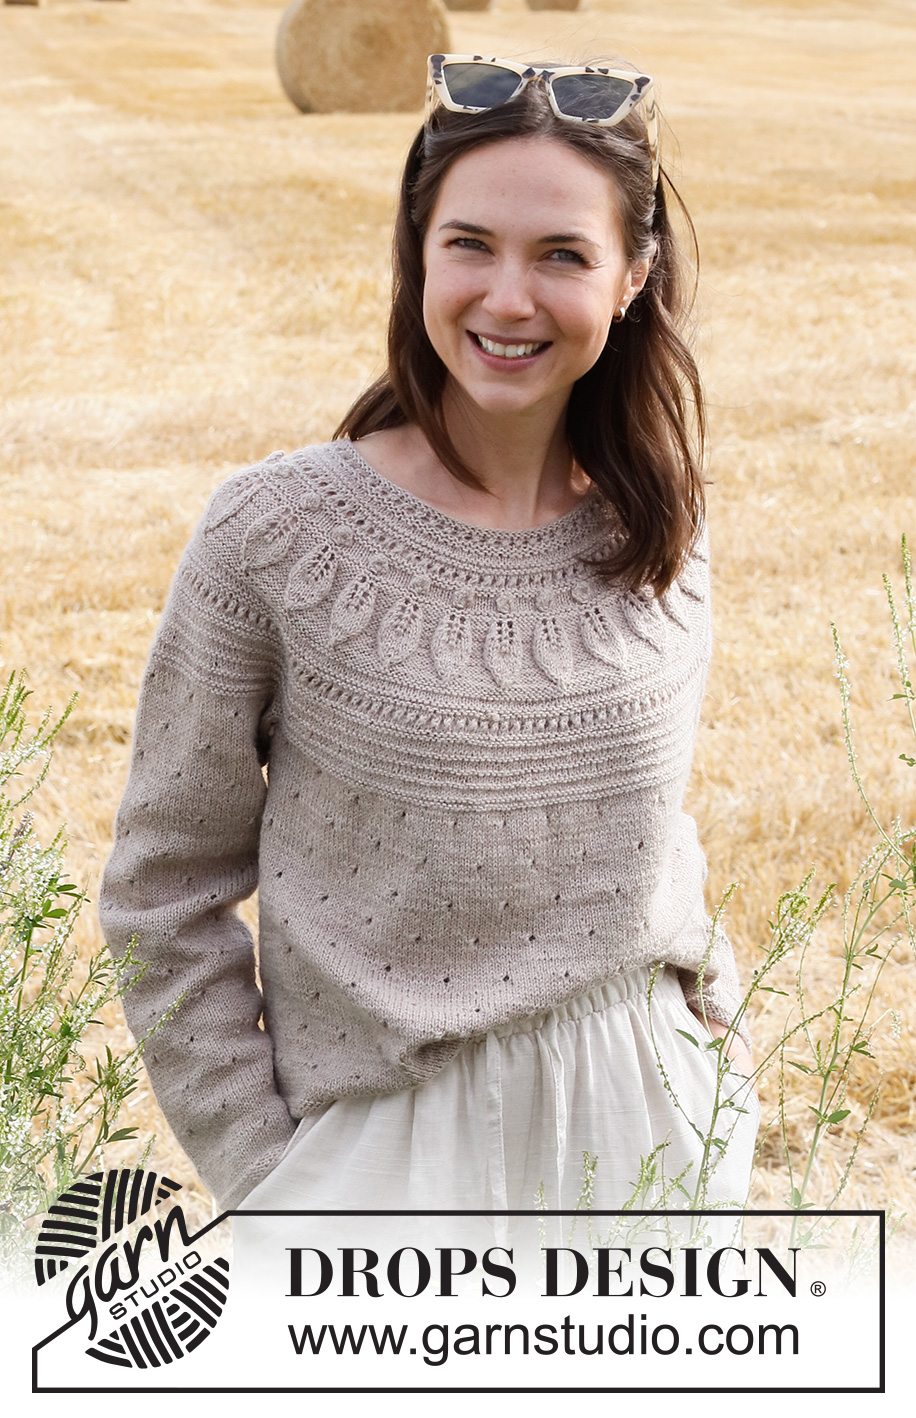
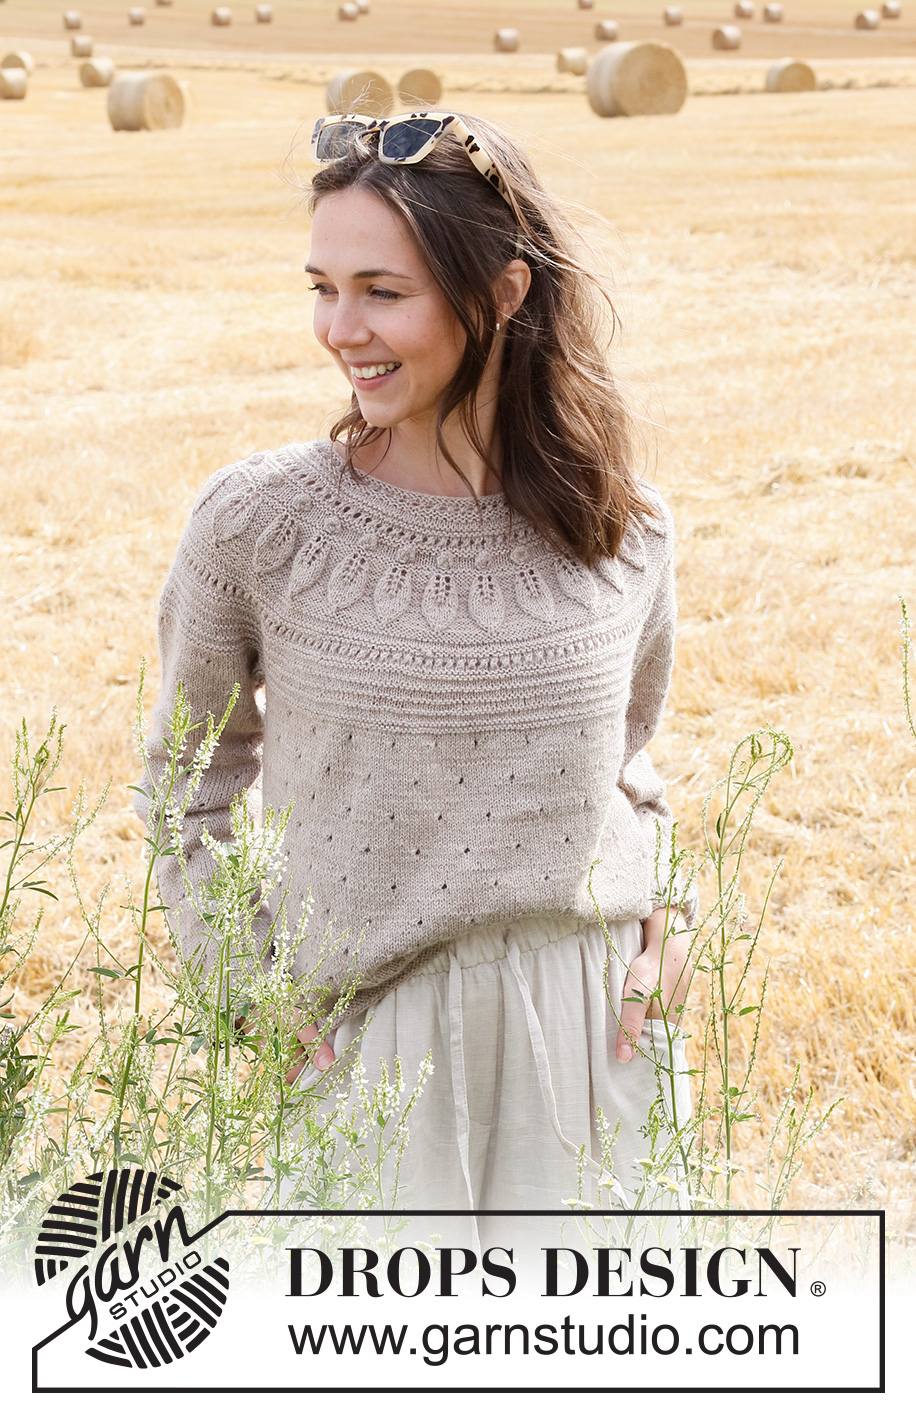
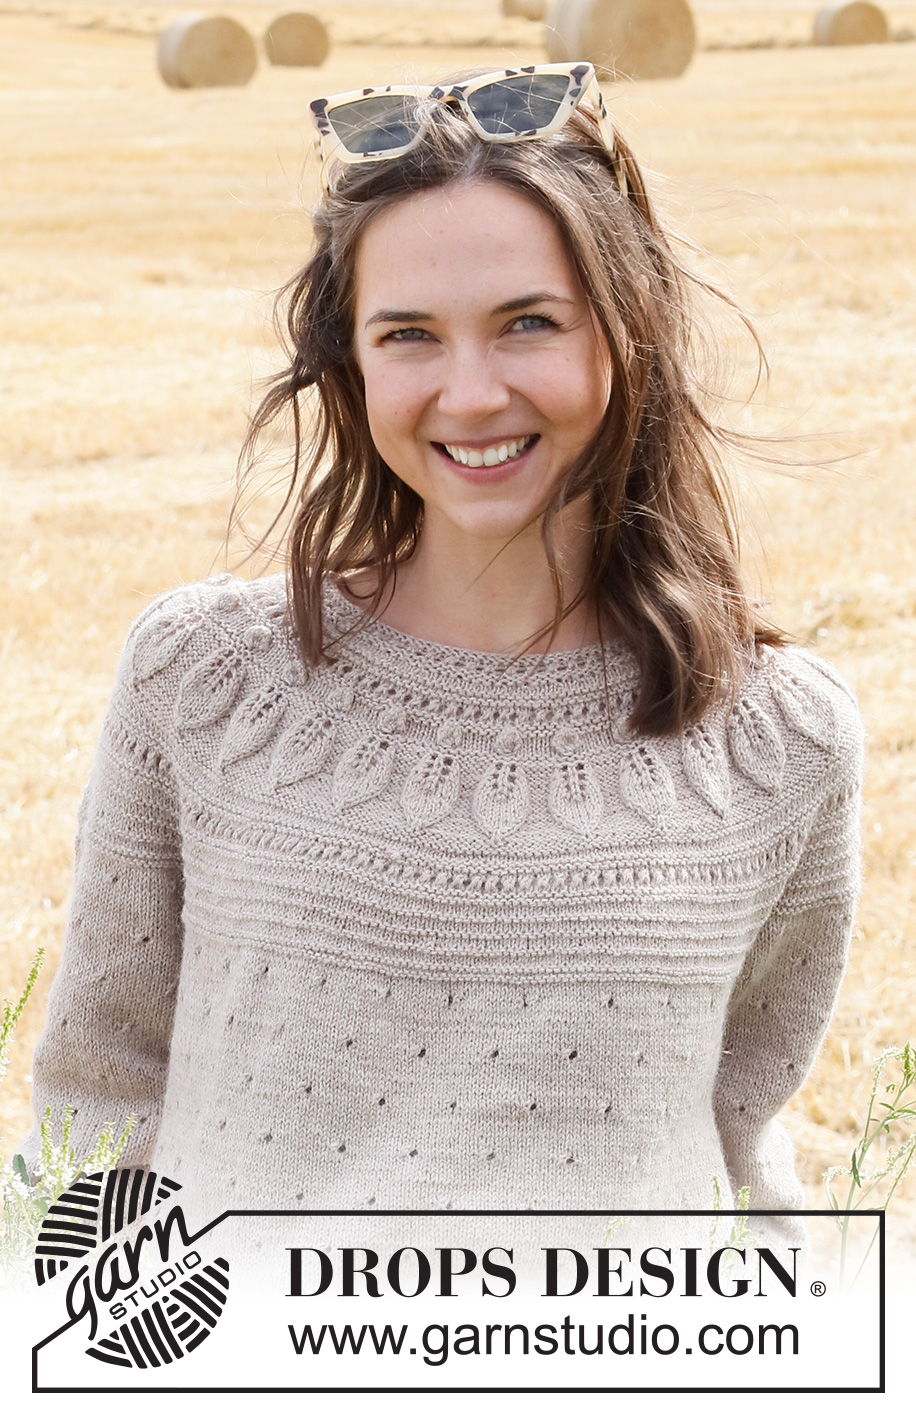
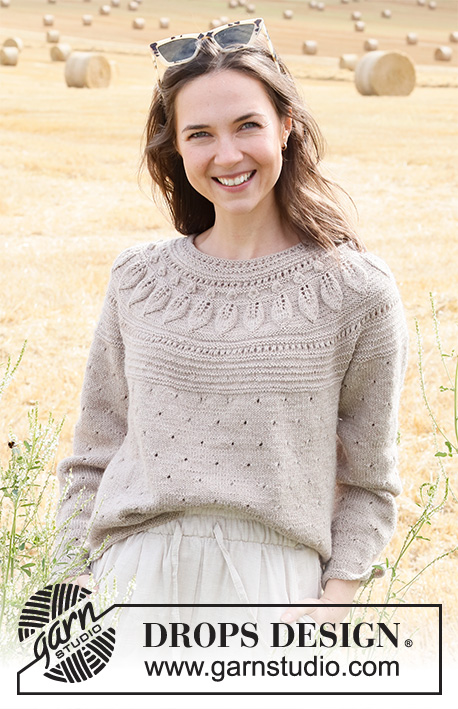
Knitted jumper in DROPS Nord. The piece is worked top down with round yoke, leaf pattern and lace pattern. Sizes S - XXXL.
DROPS 223-11 |
|||||||||||||||||||||||||||||||
|
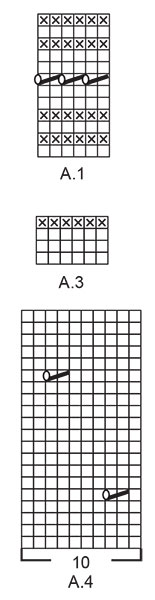
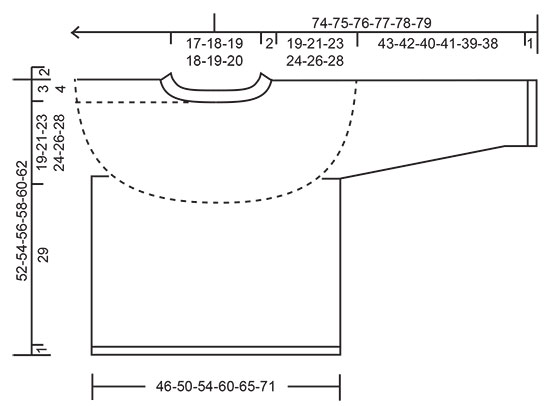
------------------------------------------------------- EXPLANATIONS FOR THE PATTERN: ------------------------------------------------------- RIDGE/GARTER STITCH (worked in the round): 1 ridge in height = 2 rounds; Knit 1 round and purl 1 round. PATTERN: See diagrams A.1 to A.4. Choose diagram for your size (applies to A.2). INCREASE TIP (evenly spaced): To work out how to increase evenly, count the total number of stitches on the needle (e.g. 110 stitches) and divide by the number of increases to be made (e.g. 25) = 4.4. In this example, increase by making 1 yarn over after alternately each 4th and 5th stitch. On the next round knit the yarn overs twisted to avoid holes. ELEVATION (back of neck): To make the back of the neck slightly higher when working a round yoke, work an elevation as described here. Skip this section if you do not want an elevation. Insert 1 marker at the beginning of the round (mid-back). Start from the right side and knit 16-17-18-20-21-22 stitches past the marker, turn, tighten the strand and purl 32-34-36-40-42-44 stitches back. Turn, tighten the strand and knit 48-51-54-60-63-66 stitches, turn, tighten the strand and purl 64-68-72-80-84-88 stitches back. Turn, tighten the strand and knit 80-85-90-100-105-110 stitches, turn, tighten the strand and purl 96-102-108-120-126-132 stitches. Turn, tighten the strand and knit to mid-back. Then work YOKE as described in the text. DECREASE TIP (for sleeves): Decrease 1 stitch on either side of the marker thread as follows: Work until there are 3 stitches left before the marker thread, knit 2 together, knit 2 (marker thread sits between these 2 stitches), slip 1 stitch as if to knit, knit 1 and pass the slipped stitch over the knitted stitch (2 stitches decreased). CASTING-OFF TIP: To avoid the cast-off edge being tight you can cast off with a larger size needle. If the edge is still tight, make 1 yarn over after approx. each 4th stitch at the same time as casting off; the yarn overs are cast off as normal stitches. ------------------------------------------------------- START THE PIECE HERE: ------------------------------------------------------- JUMPER – SHORT OVERVIEW OF THE PIECE: The neck and yoke are worked in the round with circular needle, top down from mid back. The yoke is divided for body and sleeves and the body continued in the round with circular needle. The sleeves are worked in the round with short circular needle/double pointed needles, top down. NECK: Cast on 110-116-120-124-130-134 stitches with short circular needle size 2.5 mm and Nord. Work A.1 in the round. When A.1 has been completed, knit 1 round where you increase 25-29-40-44-44-46 stitches evenly spaced – read INCREASE TIP = 135-145-160-168-174-180 stitches. Knit 1 round (yarn overs knitted twisted). Change to circular needle size 3 mm. Insert 1 marker in the middle of the round – the yoke is measured from this marker. You can now work an ELEVATION at the back of the neck – read description above. If you do not want an elevation, go straight to YOKE. YOKE: Work A.2 in the round (= 27-29-32-28-29-30 repeats of 5-5-5-6-6-6 stitches). Continue this pattern and increase as shown in the diagram. REMEMBER THE KNITTING TENSION! When A.2 has been completed in height, there are 351-377-416-448-464-480 stitches and the piece measures approx. 15-15-15-17-17-17 cm from the marker on the neck. Now work A.3 in the round – AT THE SAME TIME, on the first round in A.3, increase 5-7-0-18-22-36 stitches evenly spaced = 356-384-416-466-486-516 stitches. Work A.3 until the yoke measures approx. 19-21-23-24-26-28 cm from the marker on the neck; finishing after a complete repeat in height. Knit 1 round. Purl 1 round AT THE SAME TIME as the yoke is divided for the body and sleeves as follows: Purl the first 52-57-61-69-73-79 stitches (= ½ back piece), place the next 74-78-86-96-98-100 stitches on a thread for the sleeve, cast on 6-6-8-8-10-12 stitches (= in side under sleeve), purl 104-114-122-137-145-158 stitches (= front piece), place the next 74-78-86-96-98-100 stitches on a thread for the sleeve, cast on 6-6-8-8-10-12 stitches (= in side under sleeve) and purl the last 52-57-61-68-72-79 stitches (= ½ back piece). Body and sleeves are finished separately. THE PIECE IS NOW MEASURED FROM HERE! BODY: = 220-240-260-290-310-340 stitches. Start the round on one side – in the middle of the 6-6-8-8-10-12 stitches cast on under the sleeve, and work A.4 in the round (= 22-24-26-29-31-34 repeats of 10 stitches). Continue this pattern until the piece measures 29 cm from the division. There is approx. 1 cm left to finished length; try the jumper on and work to desired length. Change to circular needle size 2.5 mm and work 2 RIDGES over all stitches - read description above. Cast off with knit – read CASTING-OFF TIP! The jumper measures approx. 52-54-56-58-60-62 cm from the shoulder down. SLEEVES: Place the 74-78-86-96-98-100 stitches from the thread on the one side of the piece on double pointed needles/short circular needle size 3 mm and knit up 1 stitch in each of the stitches cast on under the sleeve = 80-84-94-104-108-112 stitches. Insert a marker thread in the middle of the 6-6-8-8-10-12 stitches under the sleeve. Allow the thread to follow your work onwards; it will be used when decreasing under the sleeve. Start at the marker thread and work in the round as follows: 0-2-2-2-4-1 stitches in stocking stitch, work A.4 over the next 80-80-90-100-100-110 stitches (= 8-8-9-10-10-11 repeats of 10 stitches) and 0-2-2-2-4-1 stitches in stocking stitch. Continue this pattern until the sleeve measures 3-3-3-2-2-2 cm from the division. Now decrease 2 stitches under the sleeve - read DECREASE TIP. Decrease like this every 2½-2-1½-1½-1-1 cm a total of 15-16-19-23-24-25 times = 50-52-56-58-60-62 stitches. Continue working until the sleeve measures 43-42-40-41-39-38 cm from the division (shorter measurements in larger sizes due to wider neck and longer yoke). There is approx. 1 cm left to finished length; try the jumper on and work to desired length. Change to double pointed needles size 2.5 mm. Work 2 RIDGES– read description above. Cast off with knit – remember CASTING-OFF TIP! The sleeve measures approx. 44-43-41-42-42-39 cm from the division. Work the other sleeve in the same way. |
|||||||||||||||||||||||||||||||
Diagram explanations |
|||||||||||||||||||||||||||||||
|
|||||||||||||||||||||||||||||||
 |
|||||||||||||||||||||||||||||||
 |
|||||||||||||||||||||||||||||||
 |
|||||||||||||||||||||||||||||||
Have you finished this pattern?Tag your pictures with #dropspattern #sparrowsongsweater or submit them to the #dropsfan gallery. Do you need help with this pattern?You'll find 35 tutorial videos, a Comments/Questions area and more by visiting the pattern on garnstudio.com. © 1982-2026 DROPS Design A/S. We reserve all rights. This document, including all its sub-sections, has copyrights. Read more about what you can do with our patterns at the bottom of each pattern on our site. |
|||||||||||||||||||||||||||||||


With over 40 years in knitting and crochet design, DROPS Design offers one of the most extensive collections of free patterns on the internet - translated to 17 languages. As of today we count 324 catalogues and 12290 patterns translated into English (UK/cm). 12290
We work hard to bring you the best knitting and crochet have to offer, inspiration and advice as well as great quality yarns at incredible prices! Would you like to use our patterns for other than personal use? You can read what you are allowed to do in the Copyright text at the bottom of all our patterns. Happy crafting!
Post a comment to pattern DROPS 223-11
We would love to hear what you have to say about this pattern!
If you want to leave a question, please make sure you select the correct category in the form below, to speed up the answering process. Required fields are marked *.