
Popular categories
Looking for a yarn?


Comments / Questions (61)
![]() ROUL wrote:
ROUL wrote:
Bonjour je voudrzis fzire le modele 218_4 je voudrais le fzire en 3 morceaux je voudrais savoir pour le dos il est comment di vous avez une photos car je suis un peut perdu je fait la taille xxl merci
18.08.2022 - 10:17DROPS Design answered:
Bonjour Mme Roul, nous ne sommes malheureusement pas en mesure d'adapter chacun de nos modèles à chaque demande, mais vous pouvez vous baser sur les explications pour faire vos ajustements en fonction de la taille, adaptez le nombre de mailles (mailles lisières à ajouter) et replacer les diagrammes si besoin. Bon tricot!
18.08.2022 - 14:55
![]() Brenda Baird wrote:
Brenda Baird wrote:
Wondering if you might be able to advise me on something: I am considering knitting this pattern but want to add about 12 inches to the length. How much more yarn, would you estimate that I need?
06.05.2022 - 14:50DROPS Design answered:
Dear Mrs Baird, we are unfortunately not able to adjust every pattern to every single request, but please contact your DROPS store - they will be able to help you, even per mail or telephone. Happy knitting!
06.05.2022 - 16:05
![]() Janet wrote:
Janet wrote:
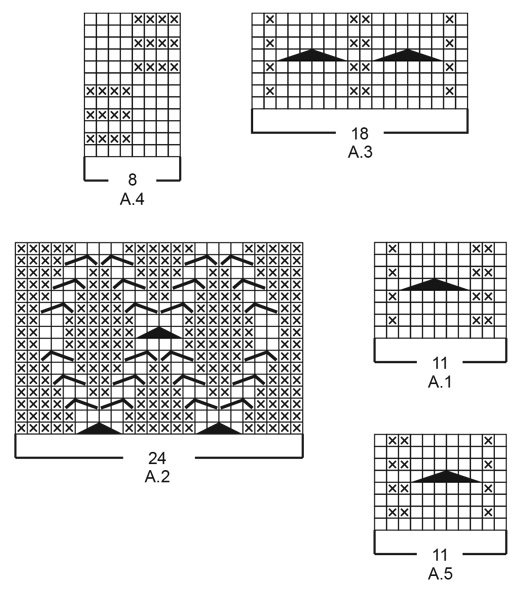
Hello, Could you please confirm if I am reading the diagrams correctly? Thank you very much for your kind help! A 1 - Row 2 (wrong side) P1, K2, P6, K1, P1 A 4 - Row 2 (wrong side) P4, K4
21.01.2022 - 16:41DROPS Design answered:
Hi Janet, read the diagrams from left to right on the wrong side. A.1 row 2: P1, K1, P6, K2, P1. A.4 row 2: K4, P4. Happy knitting!
21.01.2022 - 17:20
![]() Janet wrote:
Janet wrote:
Hello, I am stuck on the increase stitches on the body part. If i were to increase a stitch after the 3rd stitch (excluding the edge stitches), there will be total of 65 stitches increased instead of 61 stitches. Should I stop the increase after 61 stitches have been done? Thank you in advance for your kind help!
14.01.2022 - 16:57DROPS Design answered:
Dear Janet, you increase after each 3rd stitch until you have worked 61 stitches. Happy knitting!
17.01.2022 - 00:53
![]() Aleksandra wrote:
Aleksandra wrote:
Hi, I cannot go further back piece. I am not really sure in which order to decrease and cast off stitches in parts "diagonal shoulder" and "back of neck". Can you please explain it in more details or maybe order? I don't understand how to decrease evenly within middle sts and follow the pattern at the same time and how to continue decreasing stitches in diagonal shoulders if we casted off middle sts for neck.. finish them separately? Pls help, i really love this vest!
29.05.2021 - 13:30DROPS Design answered:
Dear Alexsandra,at the middle of the back, you simply decrease the amount of stitches,, and the next row cast off, so keeping in pattern needs only extend to keep the knit and purl stitches in order. And yes, the two shoulders needs to be finished separately. Happy Knitting!
29.05.2021 - 14:12
![]() Lotte Bjerregaard wrote:
Lotte Bjerregaard wrote:
Hej, Jag har stickat denna, men skulle vilja ha ärmar på. Kanin rekommenderar ett mönster så jag har rätt form mot skulderna? Jag kan nog anpassa mönstret själv, men hur får jag ett ärm som passar? Lotte
10.03.2021 - 13:50DROPS Design answered:
Hej Lotte. Du kan se på våra andra tröjor/ koftor i garngrupp B för att se om du hittar någon som du kan använda. Kanske att tex nr 216-38 kan fungera. Mvh DROPS Design
11.03.2021 - 06:42
![]() Ag Urquhart wrote:
Ag Urquhart wrote:
Are the wrong side rows shown on the diagram...or is the diagram all right side rows with doing purl in every other row...hope this makes sense
10.02.2021 - 20:23DROPS Design answered:
Dear Ag Urquhart , the diagrams show every row of the pattern. Every second row is knitted "as it seen" or "covered", that means from teh wrong side the stitches of the cables are purled, the other stitches are knitted. Happy Knitting!
11.02.2021 - 00:37
![]() Christine Pedersen wrote:
Christine Pedersen wrote:
Hej Når der i bagstykket skal skal lukkes af til halsudskæring og skrå skulder, skal arbejdet så deles med halsudskæring en i midten? Kan kun finde videoer hos jer, hvor maskerne sættes på tråd uden at blive lukket af. Har I en video, der passer denne opskrift?
05.02.2021 - 23:23DROPS Design answered:
Hei Christine. Vi har ingen video til akkurat denne halsfellingen. Men du skal på 1. pinne fra retten felle 10 masker jevnt fordelt over de midterste 42-42-44-44-46-46 maskene. Så strikkes det 1 pinne fra vrangen, neste pinne fra retten skal de de midterste 24-24-26-26-28-28 maskene felles av til hals og nå strikker du hver skulder for seg selv, SAMTIDIG som det felles til skrå skulder. mvh DROPS design
12.02.2021 - 10:42
![]() Denise Loup wrote:
Denise Loup wrote:
Muss ich die Schulter zuerst abnehmen und dann den Halsauschnitt am Rücken? Die 10 Maschen muss ich diese abmaschen oder 2 zusammenstellen ? Schulter abmaschen, paar Maschen stricken 10 abmaschen, wieder paar Maschen stricken, Schulter abmaschen? Ist das so gemeint?
22.12.2020 - 22:24DROPS Design answered:
Liebe Frau Loup, Beim Stricken von Zöpfen ziehen sich die Maschen mehr zusammen, als wenn Sie glatt rechts stricken, deshalb wird hier zuerst 10 Maschen über die Zöpfe abgenommen (= 10 Mal 2 Maschen zusammenstricken regelmäßig verteilt. ), und gleichzeitig sollen Sie bei dieser Reihe die ersten 8-9-10 M (siehe Größe) stillegen. und wenn die mittleren Maschen für den Hals abgekettet werden, wird jede Schulter separat gestrickt. Viel Spaß beim stricken!
23.12.2020 - 07:04
![]() Beate wrote:
Beate wrote:
Nice pattern. At first it looked huge but the cables draw in so much that the measurements came out exactly right. However, I m not used to the buttonholes on the left band, switched them to the right one.
15.12.2020 - 20:39
|
|||||||||||||||||||
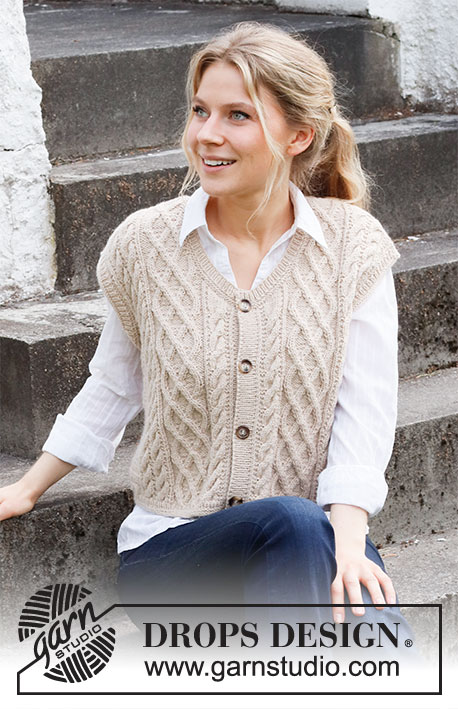
Poetry Reading#poetryreadingvest |
|||||||||||||||||||
 |
 |
||||||||||||||||||
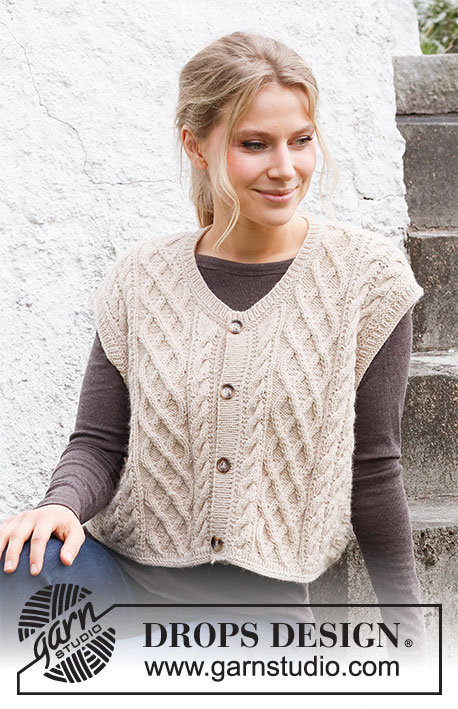
Knitted vest with cables and textured pattern in DROPS Lima. Sizes S - XXXL.
DROPS 218-4 |
|||||||||||||||||||
|
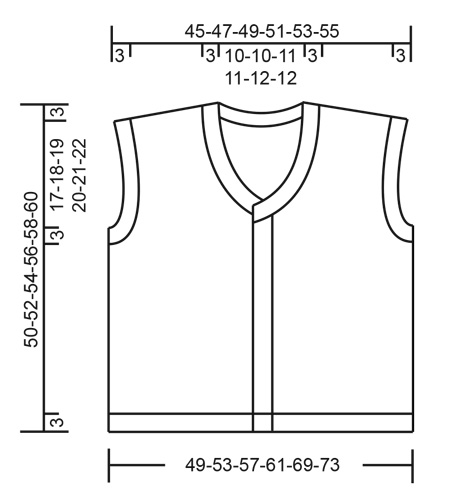
------------------------------------------------------- EXPLANATIONS FOR THE PATTERN: ------------------------------------------------------- RIDGE/GARTER STITCH (worked back and forth): Knit all rows. 1 ridge in height = Knit 2 rows. INCREASE TIP (evenly spaced): To work out how to increase evenly, count the total number of stitches on the needle (e.g. 197 stitches) minus edge stitches (e.g. 2 stitches) and divide the remaining stitches by the number of increases to be made (e.g. 61) = 3.2. In this example, increase by making 1 yarn over after approx. each 3rd stitch. Do not increase over the edge stitches. On the next row work the yarn overs twisted to avoid holes. PATTERN: See diagrams A.1 to A.5. The diagrams show all the rows in the pattern from the right side. BINDING-OFF TIP: To avoid the bind-off edge being tight you can bind off with a larger size needle. If the edge is still tight, make 1 yarn over after approx. each 8th stitch at the same time as binding off; the yarn overs are bind off as normal stitches. ------------------------------------------------------- START THE PIECE HERE: ------------------------------------------------------- VEST – SHORT OVERVIEW OF THE PIECE: The piece is worked back and forth with circular needle from mid front and bottom up. Stitches are bind off for the armholes and the front and back pieces finished separately. The piece is sewn together at the shoulders. Stitches are knitted up for the bands, neck and sleeve edges. BODY: Cast on 197-213-229-245-277-293 stitches (including 1 edge stitch on each side towards mid front) with circular needle size 3 mm = US 2,5 and Lima. Work 2 RIDGES back and forth – read description above. Knit 1 row from the right side. The next row is worked as follows from the wrong side: 1 edge stitch in garter stitch, * purl 1, knit 1 *, work from *-* until there are 2 stitches left on the row, purl 1 and finish with 1 edge stitch in garter stitch. Work a total of 4 rows of this rib, back and forth. Then purl 1 row (edge stitches knitted) AT THE SAME TIME as you increase 61 stitches evenly spaced in all sizes – read INCREASE TIP = 258-274-290-306-338-354 stitches. Change to circular needle size 4.5 mm = US 7 and insert a marker thread 66-70-74-78-86-90 stitches in from each side = 126-134-142-150-166-174 stitches between the threads on the back piece. Allow the threads to follow your work onwards; they will be used when binding off for the armholes. The next row is worked as follows from the right side: 1 edge stitch in garter stitch, work A.1 (= 11 stitches), A.2 (= 24 stitches), A.3 (= 18 stitches), A.4 over the next 24-32-40-48-64-72 stitches (the marker thread sits in the middle of these stitches), work A.3 (= 18 stitches), A.2 (= 24 stitches), A.3 (= 18 stitches), A.2 (= 24 stitches), A.3 (= 18 stitches), A.4 over the next 24-32-40-48-64-72 stitches (the marker thread sits in the middle of these stitches), work A.3 (= 18 stitches), A.2 (= 24 stitches), A.5 (= 11 stitches) and finish with 1 edge stitch in garter stitch. Continue this pattern back and forth. REMEMBER THE KNITTING GAUGE. When the piece measures 27-28-29-30-31-32 cm = 10⅝"-11"-11⅜"-11¾"-12¼"-12 172", bind off for the armholes on the next row from the right side as follows: Work the first 63-67-71-75-83-87 stitches as before (= right front piece) – place these stitches on a thread, bind off 6 stitches for the armhole (3 stitches on each side of the marker thread), work 120-128-136-144-160-168 stitches as before (= back piece) – place these stitches on a new thread, bind off 6 stitches for the armhole (3 stitches on each side of the marker thread) and work as before over the last 63-67-71-75-83-87 stitches (= left front piece). Do not cut the strand. The front and back pieces are finished separately. LEFT FRONT PIECE: = 63-67-71-75-83-87 stitches. Start from the wrong side and continue the pattern as before. AT THE SAME TIME bind off stitches for the armhole at the beginning of each row from the right side as follows: Bind off 3 stitches 0-0-0-1-1-1 time, 2 stitches 2-2-3-3-4-5 times and then 1 stitch 2-4-4-3-7-7 times. AT THE SAME TIME when the piece measures 32-33-34-35-36-37 cm = 12½"-13"-13⅜"-13¾"-14¼"-14½", bind off stitches for the neck at the beginning of each row from the wrong side as follows: Bind off 5 stitches 1 time, 3 stitches 1 time, 2 stitches 3-3-3-3-4-4 times and then 1 stitch 10-10-11-11-10-10 times. After all the decreases for armhole and neck there are 33-35-36-38-39-41 stitches on the shoulder. Continue working until the piece measures 47-49-51-53-55-57 cm = 18½"-19¼"-20"-21"-21⅝"-22½". Now work the diagonal shoulders by binding off stitches at the beginning of each row from the right side as follows: Bind off 8-9-9-10-10-10 stitches 3 times and then 9-8-9-8-9-11 stitches 1 time. All the stitches are now bind off and the piece measures approx. 50-52-54-56-58-60 cm = 19¾"-20½"-21¼"-22"-22¾"-23⅝" from the highest point on the shoulder. RIGHT FRONT PIECE: Place the 63-67-71-75-83-87 stitches from the thread back onto circular needle size 4.5 mm = US 7. Start from the wrong side and continue the pattern as before. AT THE SAME TIME bind off stitches for the armhole at the beginning of each row from the wrong side as follows: Bind off 3 stitches 0-0-0-1-1-1 time, 2 stitches 2-2-3-3-4-5 times and then 1 stitch 2-4-4-3-7-7 times. AT THE SAME TIME when the piece measures 32-33-34-35-36-37 cm = 12½"-13"-13⅜"-13¾"-14¼"-14½", bind off stitches for the neck at the beginning of each row from the right side as follows: Bind off 5 stitches 1 time, 3 stitches 1 time, 2 stitches 3-3-3-3-4-4 times and then 1 stitch 10-10-11-11-10-10 times. After all the decreases for armhole and neck there are 33-35-36-38-39-41 stitches on the shoulder. Continue working until the piece measures 47-49-51-53-55-57 cm = 18½"-19¼"-20"-21"-21⅝"-22½". Now work the diagonal shoulders by binding off stitches at the beginning of each row from the wrong side as follows: Bind off 8-9-9-10-10-10 stitches 3 times and then 9-8-9-8-9-11 stitches 1 time. All the stitches are now bind off and the piece measures approx. 50-52-54-56-58-60 cm = 19¾"-20½"-21¼"-22"-22¾"-23⅝" from the highest point on the shoulder. BACK PIECE: Place the 120-128-136-144-160-168 stitches from the thread back onto circular needle size 4.5 mm = US 7. Start from the wrong side and continue the pattern as before. AT THE SAME TIME bind off stitches for the armholes at the beginning of every row as follows: Bind off 3 stitches 0-0-0-1-1-1 time, 2 stitches 2-2-3-3-4-5 times and 1 stitch 2-4-4-3-7-7 times on each side = 108-112-116-120-124-128 stitches left. Continue working until the piece measures 47-49-51-53-55-57 cm = 18½"-19¼"-20"-21"-21⅝"-22½". Now bind off for the diagonal shoulders on each side AT THE SAME TIME as you bind off for the neck as described below. DIAGONAL SHOULDER: Bind off for the diagonal shoulders at the beginning of every row as follows: Bind off 8-9-9-10-10-10 stitches 3 times on each side and 9-8-9-8-9-11 stitches 1 time on each side. BACK OF NECK: AT THE SAME TIME on the first row from the right side decrease 10 stitches evenly spaced over the middle 42-42-44-44-46-46 stitches. On the next row bind off the middle 24-24-26-26-28-28 stitches for the neck. Then bind off stitches at the beginning of each row from the neck as follows: Bind off 2 stitches 2 times on each side. All the stitches are now bind off and the piece measures approx. 50-52-54-56-58-60 cm = 19¾"-20½"-21¼"-22"-22¾"-23⅝" from the highest point on the shoulder. ASSEMBLY: Sew the shoulder seams inside the bind-off edge. RIGHT BAND: Start on the right side, at the bottom of the right front piece, and knit up 97 to 111 stitches with circular needle size 3 mm = US 2,5 as far as the beginning of the neck (number of stitches divisible by 2 + 1). The first row is worked as follows from the wrong side: 1 edge stitch in garter stitch, * purl 1, knit 1 *, work from *-* until there are 2 stitches left, purl 1 and 1 edge stitch in garter stitch. Continue this rib back and forth for 2½ to 3 cm = ⅞" to 1⅛". Bind off with knit over knit and purl over purl – read BINDING-OFF TIP! LEFT BAND: Start on the right side, at the top of the left front piece below the neck, and knit up 97 to 111 stitches with circular needle size 3 mm = US 2,5 down the edge (number of stitches divisible by 2 + 1). The first row is worked as follows from the wrong side: 1 edge stitch in garter stitch, * purl 1, knit 1 *, work from *-* until there are 2 stitches left, purl 1 and 1 edge stitch in garter stitch. Continue this rib back and forth, but after approx. 1 cm = ⅜" work 3-3-4-4-4-4 buttonholes evenly spaced. The top buttonhole is approx. 10-10-8-8-8-8 cm = 4"-4"-3⅛"-3⅛"-3⅛"-3⅛" from the neck and the bottom buttonhole approx. 3 cm = 1⅛" from the bottom edge. 1 buttonhole = bind off 2 stitches and cast on 2 stitches over the bind-off stitches on the next row. When the band measures 2½ to 3 cm = ⅞"-1⅛", bind off with knit over knit and purl over purl – remember BINDING-OFF TIP! NECK: Start from the right side and knit up 139 to 175 stitches around the neck, inside the 1 edge stitch, with circular needle size 3 mm = US 2,5 (number of stitches divisible by 2 + 1). Knit 1 row from the wrong side – AT THE SAME TIME work 1 buttonhole over the others on the left band (worked in the same way as on the band; make sure it is positioned directly above the other buttonholes). Knit 1 row from the right side, knit 1 row from the wrong side and knit 1 more row from the right side. The next row is worked as follows from the wrong side: 1 edge stitch in garter stitch, * purl 1, knit 1 *, work from *-* until there are 2 stitches left, purl 1 and 1 edge stitch in garter stitch. Work a total of 4 rows of this rib. Bind off with knit over knit and purl over purl – remember BINDING-OFF TIP! SLEEVE EDGE: Start from the right side at the bottom of the armhole and knit up 110 to 138 stitches around the armhole, inside the 1 edge stitch, with short circular needle size 3 mm = US 2,5 (number of stitches divisible by 2). Purl 1 round, knit 1 round, purl 1 round and knit 1 round. Then work 4 rounds of rib (knit 1, purl 1). Knit 1 round and purl 1 round. Bind off with knit – remember BINDING-OFF TIP! Work a similar edge around the other armhole. ASSEMBLY: Sew the buttons onto the right band. |
|||||||||||||||||||
Diagram explanations |
|||||||||||||||||||
|
|||||||||||||||||||
 |
|||||||||||||||||||
 |
|||||||||||||||||||
Have you finished this pattern?Tag your pictures with #dropspattern #poetryreadingvest or submit them to the #dropsfan gallery. Do you need help with this pattern?You'll find 22 tutorial videos, a Comments/Questions area and more by visiting the pattern on garnstudio.com. © 1982-2026 DROPS Design A/S. We reserve all rights. This document, including all its sub-sections, has copyrights. Read more about what you can do with our patterns at the bottom of each pattern on our site. |
|||||||||||||||||||


With over 40 years in knitting and crochet design, DROPS Design offers one of the most extensive collections of free patterns on the internet - translated to 17 languages. As of today we count 324 catalogs and 12245 patterns - 12235 of which are translated into English (US/in).
We work hard to bring you the best knitting and crochet have to offer, inspiration and advice as well as great quality yarns at incredible prices! Would you like to use our patterns for other than personal use? You can read what you are allowed to do in the Copyright text at the bottom of all our patterns. Happy crafting!
Post a comment to pattern DROPS 218-4
We would love to hear what you have to say about this pattern!
If you want to leave a question, please make sure you select the correct category in the form below, to speed up the answering process. Required fields are marked *.