
Popular categories
Looking for a yarn?


Comments / Questions (60)
![]() Janny wrote:
Janny wrote:
Ik begrijp niet hoe het moet met de mouwen. Ik heb tot 46 cm in het rond gehaakt en dan moet ik het werk keren. Hoe werkt dit? Moet ik dan 8 lossen, 1 vaste in het eerste boogje doen? En aan het eind van de toer, hoe gaat dat? Eindig ik met een vaste in het laatste boogje, keren, 8 lossen etc.? Er ontstaat dus een opening, dat is de bedoeling? Jammer dat jullie geen instructie/patroonuitleg hebben.
27.06.2021 - 00:00DROPS Design answered:
Dag Janny,
Is inderdaad niet helder uitgelegd. Voordat je begint met heen en weer haken, zorg je dat je met een vaste eindigt midden onder de mouw. Dan keer je het werk en haak je halve vasten tot het midden van het eerste boogje. Dan maak je boogjes en je sluit de toer weer met een halve vaste in het midden onder de mouw. Keer het werk en haak weer halve vasten tot het midden van het eerste boogje. Haak boogjes en sluit de toer met een halve vaste waar het eerste boogje van de vorige toer begon (dus waar je tot het midden van het boogje halve vasten hebt gehaakt.) Zo gaa je verder heen en weer.
28.06.2021 - 12:40
![]() Jacqueline Vervelde wrote:
Jacqueline Vervelde wrote:
Hallo. Ik kom er niet uit met de mouwen. Je moet nu heen en weer haken ipv rond. Misschien kan er een video van gemaakt worden want heb al wel gezien dat er meerderen zijn die dit niet snappen. Van rond haken naar heen en weer met lossenbogen....ik wacht met spanning want wil het vest heel graag aan....
13.12.2020 - 22:28
![]() Jacqueline Vervelde wrote:
Jacqueline Vervelde wrote:
Hallo. Ik kom er niet uit met de mouwen. Je moet nu heen en weer haken ipv rond. Misschien kan er een video van gemaakt worden want heb al wel gezien dat er meerderen zijn die dit niet snappen. Van rond haken naar heen en weer met lossenbogen....ik wacht met spanning want wil het vest heel graag aan
13.12.2020 - 22:26DROPS Design answered:
Dag Jacqueline,
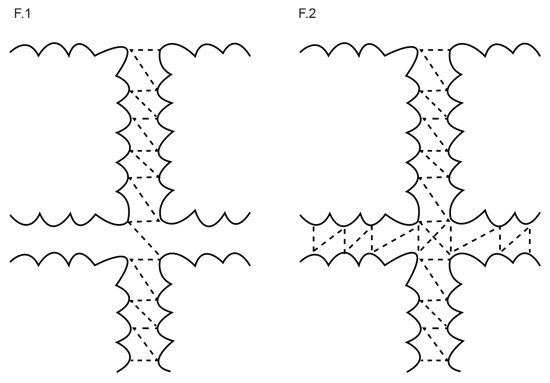
Ja, je haakt inderdaad de mouwen in de rondte. Eerst maak je 2 vierkanten, die aan elkaar gehaakt worden volgens figuur 1 en dan haak je de mouw verder in de rondte tot het armsgat. Daarna brei je de mouw weer heen en weer.
22.12.2020 - 11:54
![]() Jacqueline Vervelde wrote:
Jacqueline Vervelde wrote:
Hallo. Ik kom er niet uit met de mouwen. Je moet nu heen en weer haken ipv rond. Misschien kan er een video van gemaakt worden want heb al wel gezien dat er meerderen zijn die dit niet snappen. Van rond haken naar heen en weer met lossenbogen....ik wacht met spanning want wil het vest heel graag aan
13.12.2020 - 22:25
![]() HELENE wrote:
HELENE wrote:
Bonjour, je voudrais faire le modèle du gilet Drops 65/9. Mais je en comprends pas ni le explications qui parlent de "carré" alors que je vois des fleurs et je ne comprends pas les explications qui parlent d'assemblage de carré alors que je vois le gilet tricoté en bride et en fleurs. merci de m'eclaicir sur ce modèle. J'en profite pour vous vous dire que j'adore votre site. Bien cordialement
15.11.2020 - 19:29DROPS Design answered:
Bonjour Hélène, ce modèle se compose de carrés crochetés entre eux à la fin comme le montre le schéma - cette vidéo montre comment crocheter les 4 premiers tours de ces carrés - crochetez le dernier comme indiqué dans les explications. Bon crochet!
16.11.2020 - 09:29
![]() Leslie wrote:
Leslie wrote:
Need help with joining squares in vertical columns. Starting at the centre of the 1st bow ch2 across seems fine but the video show ch 4 vertically then 1 sc in the 3 rd space. I repeated this but the chain 4 are all bunched. I am looking at diagram but it doesn’t show how many to skip. The diagram shows 6 bows along the sides with 6 connections in centre of each bow. My crocheted flower only 5 bows so do I skip enough to connect in the centre of each bows and disregard the video?
10.03.2020 - 23:10DROPS Design answered:
Dear Leslie, the video is showing the technique, but the number of chains/ sc can vary depending on each pattern, ie you have here to crochet the squares together as shown in fig. 1 and Fig.2 = 3 /5 chains between the squares and along the 6 ch-spaces from first corner to last corner each square - you should have 6-ch-spaces along each side of each square at the end of round 5. Hope this helps. Happy crocheting!
11.03.2020 - 09:05
![]() Leslie wrote:
Leslie wrote:
Is there a right and wrong side to the squares? If so how do I tell which is which as I am about to weave i the tails of the squares.
02.03.2020 - 16:32DROPS Design answered:
Dear Leslie, you are working squares in the round, so that the side where you are crocheting is the right side and the side behind will be the wrong side. Happy crocheting!
03.03.2020 - 09:27
![]() Evy Kristine wrote:
Evy Kristine wrote:
Jeg har begynt på en egendesignet jumper med ananasmønster, og leter etter en fin måte å feste ermene. Her hadde dere en oppskrift som gjaldt jakke eller genser. Jeg prøver meg på rund felling, men som nevnt, nedenfra og opp.
17.02.2020 - 21:18DROPS Design answered:
Hej Evy, sådan her kan du søge på hæklet nedenfra og op dame - hekle - nedenfra og opp God fornøjelse!
18.02.2020 - 14:28
![]() Evy Kristine Fjerdingen wrote:
Evy Kristine Fjerdingen wrote:
Hei, jeg har begynt på en heklet topp med ananas-mønster, nedenfra og opp, og har kommet til under ermene. Jeg ser etter en lignende topp, med trekvart lange ermer. Det virker som om det er mest vanlig å hekle ovenfra og ned.
09.02.2020 - 03:27DROPS Design answered:
Hei Evy Kristine. Er det en topp fra oss med Ananas mønster du leter etter? Litt usikker på hva du leter etter, ettersom du har lagt ditt spørsmål under en jakke. mvh DROPS design
10.02.2020 - 14:48
![]() Leslie wrote:
Leslie wrote:
Hi there, thanks for alerting me to that. Now that I am reading the U.S, terminology for round two uses dc stitches however, when viewing the video it shows round two using treble crochets? Is this the right video for drops 65-9?
04.02.2020 - 23:35DROPS Design answered:
Dear Leslie, that's right on round 2 in this jacket you work double crochets, in the round 2 on the video (another similar pattern) you work trebles. The video is applying to another pattern but remember to follow the written instructions of the pattern you are working on. Happy crocheting!
05.02.2020 - 08:25
|
|||||||||||||
Garden Wedding Cardigan#gardenweddingcardigan |
|||||||||||||
|
|
|||||||||||||
DROPS Crocheted cardigan or pullover in Muskat.
DROPS 65-9 |
|||||||||||||
|
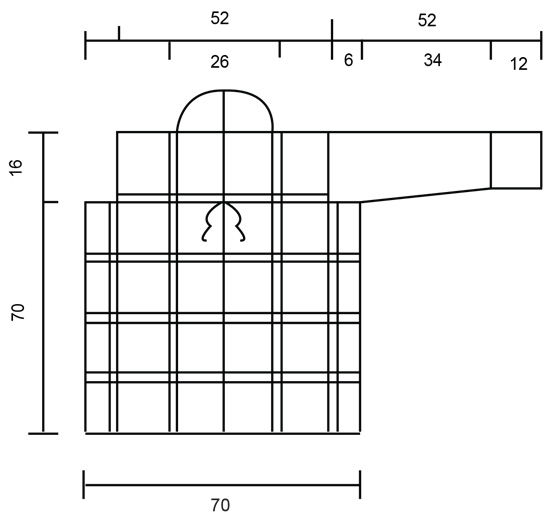
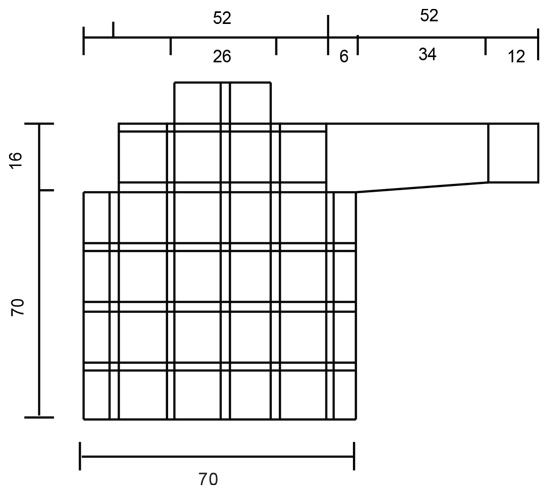
Crochet gauge: One square measures approx. 12 x 12 cm [4.75" x 4.75"] Pattern: See diagrams. Crocheted square: Chain 8 and join into a ring with a slip st. Round 1: * 1 double crochet (dc) (the first dc is replaced by ch 3), ch 2 *, repeat from * - * 8 times, join with 1 slip st in the first dc. Round 2: * 4 dc (the first dc is replaced by 3 slip sts) around the ch st bow, ch 2 *, repeat from * - * 8 times, join with 1 slip st in the first dc. Round 3: * 4 trebles in the 4 dc from the previous row (the first treble is replaced by ch 4) -- but keep the last loop of each on the hook until all trebles have been crocheted, then pull the yarn through all sts on the crochet hook (4 sts become 1), ch 6, 1 dc around the 2 ch sts from the previous row, ch 6, * repeat from * - * 8 times, join with 1 slip st in the first group of trebles. Round 4: Slip st to the center of the ch st bow, ch 1, 1 single crochet (sc) around the ch st bow, * ch 5, 1 sc around the next ch st bow, ch 5, 1 dc around the next ch st bow, ch 10, 1 dc around the next ch st bow (the corner), ch 5, 1 sc around the next ch st bow *, repeat from * - * a total of 3 times, then ch 5, 1 sc around the next ch st bow, ch 5, 1 dc around the next ch st bow, ch 10, 1 dc around the next ch st bow (the corner), ch 5, join with 1 slip st in the first sc. Round 5: Slip st to the center of the ch st bow, ch 1, 1 single crochet (sc) around the ch st bow, * ch 5, 1 sc around the next ch st bow, ch 5, 1 sc around the next ch st bow, ch 8, 1 sc around the same ch st bow approx. 1 cm [3/8"] away (= corner), ch 5, 1 sc around the next ch st bow, ch 5, 1 sc around the next ch st bow *, repeat from * - * a total of 3 times, then ch 5, 1 sc around the next ch st bow, ch 5, 1 sc around the next ch st bow, ch 8, 1 sc around the same ch st bow 1 cm [3/8"] away (= corner), ch 5, 1 sc around the next ch st bow, ch 5, join with 1 slip st in the first sc. Body: Either a cardigan or a pullover may be crocheted out of these squares; the difference is in how they are put together. The sleeves are the same length on both models. Cardigan - Body: Make 50 squares. Now join the squares in vertical columns as in Fig. 1 The columns contain the following number of squares: 1st column (center front): = 5 squares, 2nd column: = 5 squares 3rd column (side): = 4 squares, 4th column: = 5 squares, 5th column: = 6 squares (the center back is between the 5th and 6th column), 6th column: = 6 squares, 7th column: = 5 squares, 8th column (side): = 4 squares, 9th column: = 5 squares, 10th column (center front): = 5 squares. Now join the columns together as in Fig. 2. Join the shoulders in the same way as in Fig. 2 and then join the 2 squares from the center back and the 2 first columns of squares at the center front for the collar. Sweater - Body: Make 52 squares. Now join the squares in vertical columns as in Fig. 1. The columns contain the following number of squares: 1st column (center front): = 6 squares, 2nd column: = 6 squares, 3rd column: = 5 squares, 4th column (side): = 4 squares, 5th column: = 5 squares, 6th column: = 6 squares, 7th column: = 6 squares (the center back is between the 6th and 7th columns), 8th column (side): = 5 squares, 9th column: = 4 squares, 10th column (center front): = 5 squares. Now join the columns together as in Fig. 2. Join the shoulders and neck in the same way as in Fig. 2. Sleeve: Make 2 squares; join these into a ring as in Fig. 1. Continue crocheting the sleeve as follows: Row 1: 1 single crochet (sc) in the first ch st bow, * ch 5, 1 sc in the next ch st bow *, repeat from * - * around the entire sleeve = 13 ch st bows, fasten the last bow with 1 slip st in the first sc. Row 2: Slip st to the center of the first ch st bow, 1 sc around the bow, * ch 5, 1 sc in the next ch st bow *, repeat from * - *. Repeat row 2 until the sleeve measures 20 cm [7-⅞"]. Now inc each ch st bow to ch 6. Continue in this fashion until the sleeve measures 28 cm [11"]. Now inc each ch st bow to ch 7. When the sleeve measures 38 cm [14-⅞"], inc each ch st bow to ch 8. When the work measures 46 cm [18-⅛"], divide the work so that 1 square at the bottom of the sleeve is at the center of the hand and crochet back and forth. Finish when the sleeve measures 52 cm [20.5"]. Assembly: Set the sleeve into the body as in Fig. 1. Crochet around the bottom edge of the body: Row 1: * 1 sc, ch 1 *, repeat from * - *. Row 2: * 1 sc around the ch st from the previous row, ch 1 *, repeat from * - *. Crochet approx. 18 sc along the edge of 1 square. Assembly – cardigan: Repeat the 2 rows of crochet around the neck edge and at the center front on the cardigan. Make a cord as follows: ch 2 bands approx. 50 cm [19.75"] long with double yarn. Sew 1 cord onto each side at the center front, at the top of the fourth square from the bottom. Assembly – pullover: Repeat the 2 rows of crochet around the neck edge. |
|||||||||||||
Diagram explanations |
|||||||||||||
|
|||||||||||||
 |
|||||||||||||
 |
|||||||||||||
 |
|||||||||||||
Have you finished this pattern?Tag your pictures with #dropspattern #gardenweddingcardigan or submit them to the #dropsfan gallery. Do you need help with this pattern?You'll find 8 tutorial videos, a Comments/Questions area and more by visiting the pattern on garnstudio.com. © 1982-2026 DROPS Design A/S. We reserve all rights. This document, including all its sub-sections, has copyrights. Read more about what you can do with our patterns at the bottom of each pattern on our site. |
|||||||||||||


With over 40 years in knitting and crochet design, DROPS Design offers one of the most extensive collections of free patterns on the internet - translated to 17 languages. As of today we count 325 catalogs and 12298 patterns - 12288 of which are translated into English (US/in).
We work hard to bring you the best knitting and crochet have to offer, inspiration and advice as well as great quality yarns at incredible prices! Would you like to use our patterns for other than personal use? You can read what you are allowed to do in the Copyright text at the bottom of all our patterns. Happy crafting!
Post a comment to pattern DROPS 65-9
We would love to hear what you have to say about this pattern!
If you want to leave a question, please make sure you select the correct category in the form below, to speed up the answering process. Required fields are marked *.