
Categorías populares
¿Buscas un hilo?


Comentarios / Preguntas (58)
![]() Sylvia escribió:
Sylvia escribió:
Von der Anleitung sieht es für mich so aus, als ob die gesamte Jacke aus zusammengehäkelten Vierecken (52) besteht. Aber auf dem Photo sieht es so aus, also ob viel weniger Vierecke da sind und viel mehr Luftmaschenbögen zwischen den Vierecken. Könnten Sie das bitte erklären? Danke.
03.04.2025 - 02:43DROPS Design respondió:
Liebe Sylvia, so stimmen alle Foto mit Anleitung zusammen - wenn die Quadraten zusammengehäkelt sind, sieht es dann aus, wie es dann "mehr" Luftmaschenbogen gebe. Viel Spaß beim Häkeln!
03.04.2025 - 09:58
![]() Sylvia escribió:
Sylvia escribió:
Von der Anleitung sieht es für mich so aus, als ob die gesamte Jacke aus zusammengehäkelten Vierecken (52) besteht. Aber auf dem Photo sieht es so aus, also ob viel weniger Vierecke da sind und viel mehr Luftmaschenbögen zwischen den Vierecken. Könnten Sie das bitte erklären? Danke.
03.04.2025 - 02:42
![]() Ann Daeninck escribió:
Ann Daeninck escribió:
Hoeveel garen heb ik nodig om enkel de vest te maken?
23.05.2024 - 22:53DROPS Design respondió:
Dag Ann,
Je hebt 800 gram nodig van DROPS Muskat, dus 16 bollen.
26.05.2024 - 15:33
![]() Pernilla escribió:
Pernilla escribió:
Hej Jag får inte till monteringen och på vilket sätt jag ska virka ihop de två bakre rutorna i mitten med de två främre rutorna för att få en krage.
08.04.2024 - 21:10DROPS Design respondió:
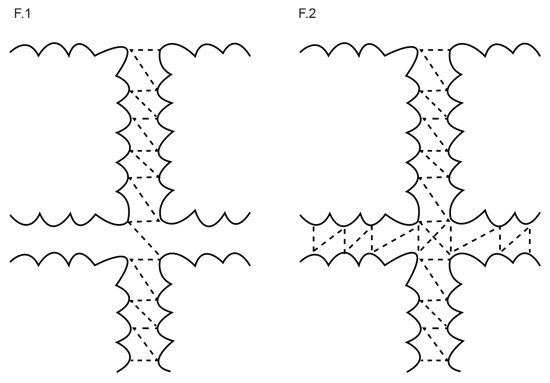
Hej Pernilla, har du set skitsen nederst i opskriften, her ser du hvordan ruderne skal lægges ud og sys sammen :)
09.04.2024 - 11:38
![]() Leslie escribió:
Leslie escribió:
So just to clarify. When I start back and forth on the sleeve- the chain 8 at the end of the row I turn and do a 1 sc in that chain stitch bow making that bow only 4 chain stitches? So at each end when you turn the chain stitch bows are long half the Length?
24.02.2022 - 22:45DROPS Design respondió:
Dear Leslie, turn with 8 chains and crochet 1 sc in the first ch-space = you have half a ch-space, continue with the 8-ch-spaces and to the last ch-space of the row = you will have 12 ch-spaces + the first one as half a ch-space; turn with 8 ch, crochet 1 sc in the first ch-space, and crochet as before = you will have 12 ch-spaces + the first one as half a ch-space. Continue like this. Happy crocheting!
25.02.2022 - 09:13
![]() Leslie escribió:
Leslie escribió:
Confused about sleeve instructions- I have worked in the round up to sleeve measuring 18-1/8 th The instructions now say “ When the work measures 46 cm [18-1/8"], divide the work so that 1 square at the bottom of the sleeve is at the center of the hand and crochet back and forth. Finish when the sleeve measures 52 cm [20.5"].“. Confused about divide the work? Would I not just continue until 20.5” then when I set the sleeve in make sure the squares are on top and bottom center?
21.02.2022 - 18:44DROPS Design respondió:
Dear Leslie, lay the sleeve flat placing one square on top of wrist edge, mark the opposite side, the rows should now start from here, that way, when the sleeve is crocheted to the armhole, you have a square on top of hand. And continue now from here back and forth (without decreasing, just working ch-spaces as before). Happy crocheting!
22.02.2022 - 09:26
![]() Leslie escribió:
Leslie escribió:
Confused about joining squares. Using fig 1 and legend ( using 5 chain stitches, 3 chain stitches and 1 double crochet). Are all the joins 5 chain stitches? Hard to see on diagram bold lines indicating 3 chain stitches, or a dot indicating 1 double crochet?
10.02.2022 - 22:18DROPS Design respondió:
Dear Leslie, this video shows how to crochet squares together (this applies to a blanket, but you will work the same way for the squares here). Happy crocheting!
11.02.2022 - 09:20
![]() Janny escribió:
Janny escribió:
Ik begrijp niet hoe het moet met de mouwen. Ik heb tot 46 cm in het rond gehaakt en dan moet ik het werk keren. Hoe werkt dit? Moet ik dan 8 lossen, 1 vaste in het eerste boogje doen? En aan het eind van de toer, hoe gaat dat? Eindig ik met een vaste in het laatste boogje, keren, 8 lossen etc.? Er ontstaat dus een opening, dat is de bedoeling? Jammer dat jullie geen instructie/patroonuitleg hebben.
27.06.2021 - 00:00DROPS Design respondió:
Dag Janny,
Is inderdaad niet helder uitgelegd. Voordat je begint met heen en weer haken, zorg je dat je met een vaste eindigt midden onder de mouw. Dan keer je het werk en haak je halve vasten tot het midden van het eerste boogje. Dan maak je boogjes en je sluit de toer weer met een halve vaste in het midden onder de mouw. Keer het werk en haak weer halve vasten tot het midden van het eerste boogje. Haak boogjes en sluit de toer met een halve vaste waar het eerste boogje van de vorige toer begon (dus waar je tot het midden van het boogje halve vasten hebt gehaakt.) Zo gaa je verder heen en weer.
28.06.2021 - 12:40
![]() Jacqueline Vervelde escribió:
Jacqueline Vervelde escribió:
Hallo. Ik kom er niet uit met de mouwen. Je moet nu heen en weer haken ipv rond. Misschien kan er een video van gemaakt worden want heb al wel gezien dat er meerderen zijn die dit niet snappen. Van rond haken naar heen en weer met lossenbogen....ik wacht met spanning want wil het vest heel graag aan....
13.12.2020 - 22:28
![]() Jacqueline Vervelde escribió:
Jacqueline Vervelde escribió:
Hallo. Ik kom er niet uit met de mouwen. Je moet nu heen en weer haken ipv rond. Misschien kan er een video van gemaakt worden want heb al wel gezien dat er meerderen zijn die dit niet snappen. Van rond haken naar heen en weer met lossenbogen....ik wacht met spanning want wil het vest heel graag aan
13.12.2020 - 22:26DROPS Design respondió:
Dag Jacqueline,
Ja, je haakt inderdaad de mouwen in de rondte. Eerst maak je 2 vierkanten, die aan elkaar gehaakt worden volgens figuur 1 en dan haak je de mouw verder in de rondte tot het armsgat. Daarna brei je de mouw weer heen en weer.
22.12.2020 - 11:54
|
|||||||||||||
Garden Wedding |
|||||||||||||
|
|
|||||||||||||
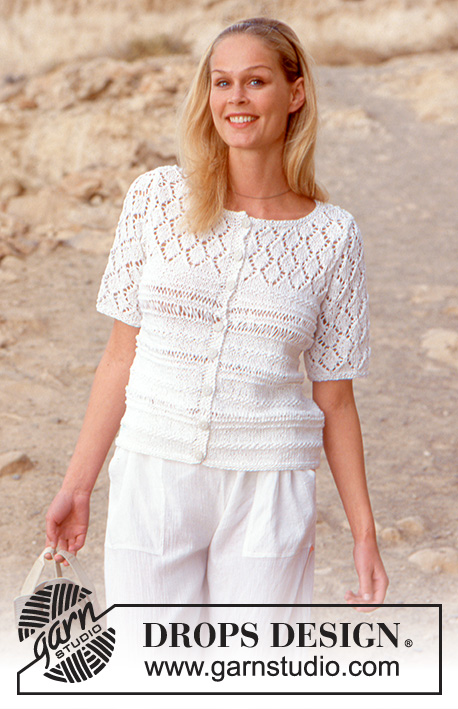
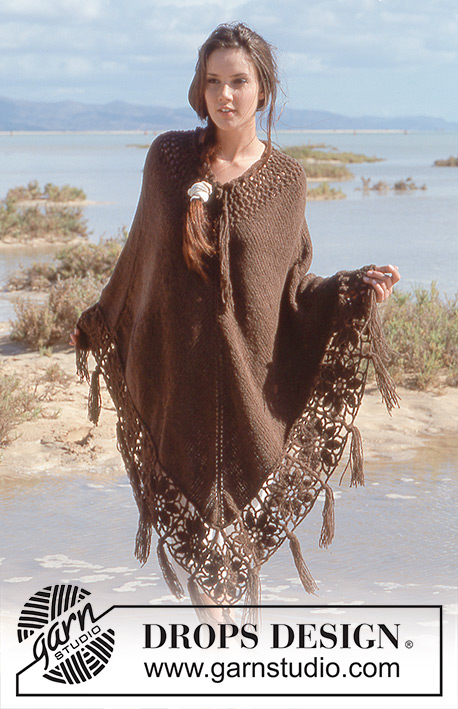
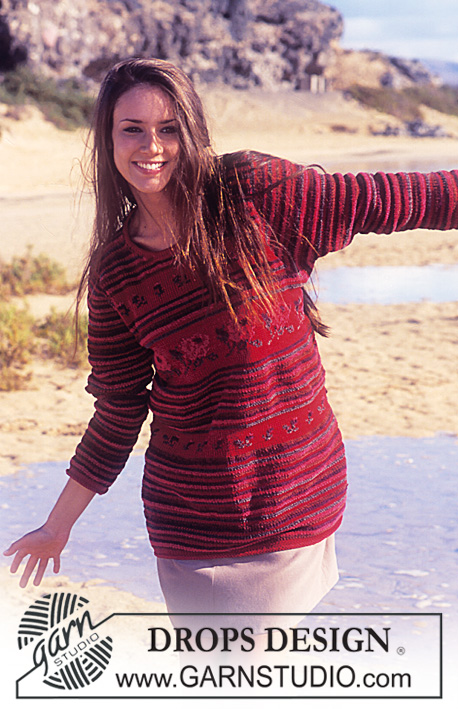
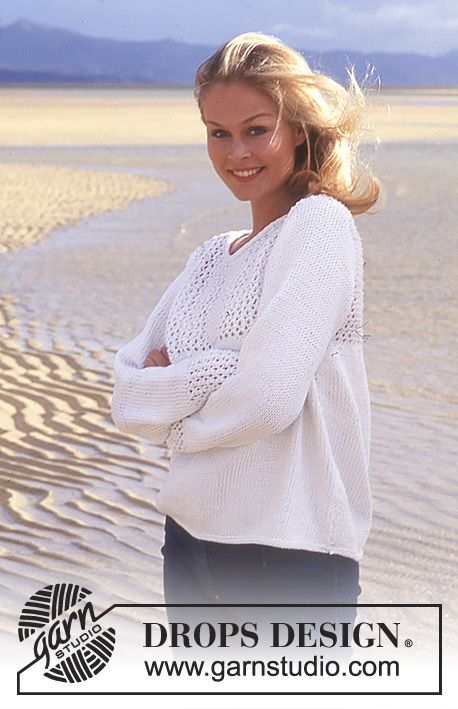
Chaqueta DROPS a ganchillo o túnica en Muskat
DROPS 65-9 |
|||||||||||||
|
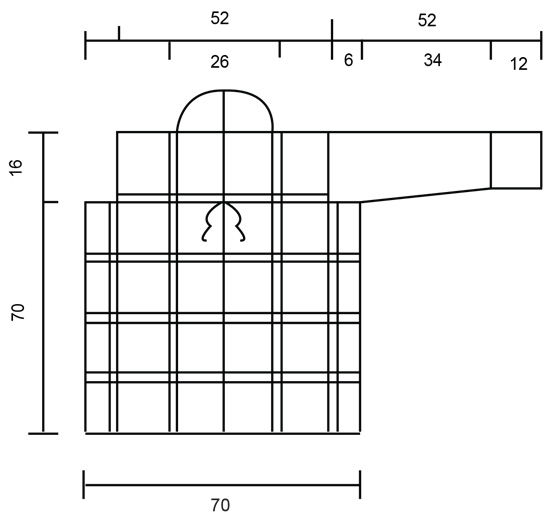
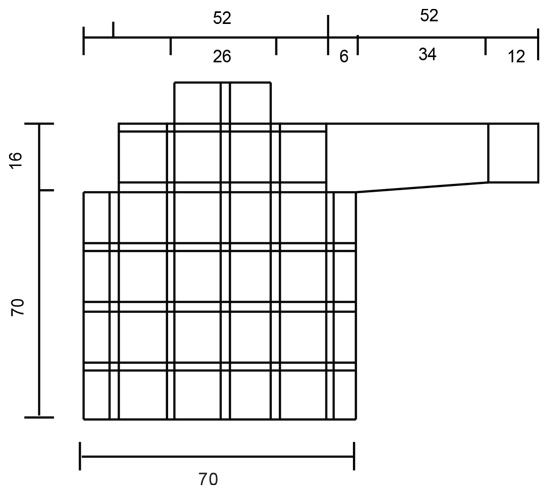
Tensión: Un cuadrado mide aprox. 12 x 12 cm Patrón: ver los diagramas. Cuadrado: Trabajar 8 p.de cad y formar un anillo con 1 p.e. Vuelta 1: *1 p.a. (el primer p.a. se sustituye por 3 p.de cad), 2 p.de cad*, repetir de *a* 8 vcs, unir con 1 p.e. en el 3er p.de cad del inicio de la vta. Vuelta 2: * 4 p.a. (el primer p.a. se sustituye por 3 p.de cad) dentro del arco, 2 p.de cad* repetir de *a* 8 vcs, unir con 1 p.e. en el 3er p.de cad del inicio de la vta. Vuelta 3: * trabajar 1 p.a.d. en cada uno de los 4 p.a. de la vta anterior (el primer p.a.d. se sustituye por 4 p.de cad) - pero sin pasar la última lazada hasta haber trabajado los 4 p.a.d., pasar el hilo por todos los pts del ganchillo (de 4 pts se pasa a 1 pt), 6 p.de cad, 1 p.a. alrededor del arco de 2 p.de cad de la vta anterior, 6 p.de cad*, repetir de *a* 8 vcs, unir con 1 p.e. en el 1er grupo de p.a.d. Vuelta 4: Trabajar p.e. hasta el centro del primer arco, 1 p.de cad, 1 p.b. dentro del arco, *5 p.de cad, 1 p.b. dentro del sig arco, 5 p.de cad, 1 p.a. dentro del sig arco, 10 p.de cad, 1 p.a. dentro del sig arco (esquina), 5 p.de cad, 1 p.b. dentro del sig arco*, repetir de *a* un total de 3 vcs, ahora trabajar 5 p.de cad, 1 p.b. dentro del sig arco, 5 p.de cad, 1 p.a. dentro del sig arco, 10 p.de cad, 1 p.a. dentro del sig arco (esquina), 5 p.de cad, unir con 1 p.e. en el primer p.b. de la vta. Vuelta 5: Trabajar p.e. hasta el centro del primer arco, 1 p.de cad, 1 p.b. dentro del arco, *5 p.de cad, 1 p.b. dentro del sig arco, 5 p.de cad, 1 p.b. dentro del sig arco, 8 p.de cad, 1 p.b. dentro del mismo arco a aprox 1 cm de distancia (esquina), 5 p.de cad, 1 p.b. dentro del sig arco, 5 p.de cad, 1 p.b. dentro del sig arco*, repetir de *a* un total de 3 vcs, ahora trabajar 5 p.de cad, 1 p.b. dentro del sig arco, 5 p.de cad, 1 p.b. dentro del sig arco, 8 p.de cad, 1 p.b. dentro del mismo arco, a aprox 1 cm de distancia (esquina), 5 p.de cad, 1 p.b. dentro del sig arco, 5 p.de cad, finalizar con 1 p.e. en el primer p.b. de la vta. ----------------------------------------------------------------------- Cuerpo: Se puede hacer tanto una chaqueta como una túnica con estos cuadrados; la diferencia está en cómo unirlos. Las mangas de ambos modelos son las mismas. Chaqueta - Cuerpo: Trabajar 50 cuadrados. Unir los cuadrados en columnas verticales como en la fig 1 Las columnas tienen el sig nº de cuadrados: Columna 1 (centro delantero): = 5 cuadrados, Columna 2 : = 5 cuadrados, Columna 3 (lado): = 4 cuadrados, Columna 4: = 5 cuadrados, Columna 5: = 6 cuadrados, El centro de la espalda queda entre las columnas 5 y 6 Columna 6: = 6 cuadrados, Columna 7: = 5 cuadrados, Columna 8 (lado): = 4 cuadrados, Columna 9: = 5 cuadrados, Columna 10 (centro delantero): = 5 cuadrados. Ahora unir todas las columnas según la fig 2. Unir los hombros de la misma manera y unir los 2 cuadrados del centro de la espalda y las 2 primeras columnas de cuadrados en el centro del delantero para el cuello. Túnica - Cuerpo: Trabajar 52 cuadrados. Unir los cuadrados en columnas verticales como en la fig 1 Las columnas tienen el sig nº de cuadrados: Columna 1 (centro delantero): = 6 cuadrados, Columna 2: = 6 cuadrados, Columna 3: = 5 cuadrados, Columna 4 (lado): = 4 cuadrados, Columna 5: = 5 cuadrados, Columna 6: = 6 cuadrados, Columna 7: = 6 cuadrados El centro de la espalda queda entre las columnas 6 y7, Columna 8: = 5 cuadrados, Columna 9 (lado): = 4 cuadrados, Columna 10: = 5 cuadrados. Ahora unir todas las columnas según la fig 2. Unir los hombros y el cuello de la misma manera. Manga: Trabajar 2 cuadrados; unirlos formando un anillo - ver fig 1. Continuar trabajando la manga como sigue: Vuelta 1: 1 p.b. en el primer arco, *5 p.de cad, 1 p.b. en el sig aco*, repetir de *a* alrededor de toda la manga = 13 arcos, asegurar el último arco con 1 p.e. en el primer p.b. Vuelta 2: trabajar p.e. hasta el centro del primer arco, 1 p.b. dentro del arco, *5 p.de cad, 1 p.b. en el sig arco*, repetir de *a*, repetir la fila 2 hasta que la manga mida 20 cm. Ahora aum cada arco de 5 p.de cad a 6 p.de cad. Continuar de esta manera hasta que la manga mida 28 cm. Ahora aum cada arco hasta 7 p.de cad en lugar de 6. Cuando la manga mida 38 cm aum cada arco a 8 p.de cad. Cuando la labor mida 46 cm, dividir la labor de modo que el cuadrado de la parte inferior de la manga quede centrado en la mano y trabajar de ida y vta. Finalizar cuando la manga mida 52 cm. Terminación: Montar las mangas al cuerpo según la Fig. 1. Trabajar a ganchillo alrededor del borde inferior del cuerpo como sigue: Vuelta 1: *1 p.b., 1 p.de cad*, repetir de * a *. Vuelta 2: *1 p.b. en el p.de cad de la fila anterior, 1 p.de cad*, repetir de *a*. Trabajar aprox. 18 p.b. a lo largo del borde de 1 cuadrado. Terminación – chaqueta: Repetir las 2 filas de remate alrededor del cuello y el centro del delantero de la chaqueta. Hacer un cordón como sigue: trabajar 2 cadenetas de aprox 50 cm de largo con doble hilo. Coser un cordón a cada lado del centro del delantero, en la parte de arriba del 4º cuadrado contando desde el borde inferior. Terminación – túnica: Repetir las 2 filas de remate alrededor del cuello. |
|||||||||||||
Explicaciones del diagrama |
|||||||||||||
|
|||||||||||||
|
|||||||||||||
|
|||||||||||||
|
|||||||||||||
¿Terminaste este patrón?Entonces, etiqueta tus fotos con #dropspattern o envíalas a la galería #dropsfan. ¿Necesitas ayuda con este patrón?Encontrarás 8 videos tutoriales, un espacio para comentarios/preguntas y más visitando la página del patrón en garnstudio.com © 1982-2025 DROPS Design A/S. Todos los derechos reservados. Este documento, incluyendo todas sus sub-secciones, está protegido por los derechos de autor (copyright). Lee más acerca de lo que puedes hacer con nuestros patrones en la parte de abajo de cada patrón de nuestro sitio. |
|||||||||||||


Con más de 40 años en el diseño de modelos de punto y de ganchillo, DROPS Design ofrece una de las más vastas colecciones de patrones gratuitos en el internet - traducidos en 17 idiomas. Al día de hoy, contamos con 314 catálogos y 11822 patrones - de los cuales 11158 están traducidos en español.
Nosotros trabajamos con mucho esmero para brindarte lo mejor que las labores de punto y ganchillo tienen para ofrecer,inspiración y consejos, así como hilos de magnífica calidad a precios increíbles! Te gustaría usar nuestros patrones para otro fin además del uso personal? Puedes leer acerca de lo que estás permitida a hacer en el texto de Copyright en la parte de abajo de todos nuestros patrones. Felices labores!
Escribe un comentario sobre DROPS 65-9
¡Nos encantaría saber qué piensas acerca de este patrón!
Si quieres escribir una pregunta referente al patrón, por favor asegúrate de elegir la categoría correcta en el formulario debajo, para acelerar el proceso de respuesta. Los campos obligatorios están marcados con un *.