
Popular categories
Looking for a yarn?


Comments / Questions (60)
![]() Anneke Van Smirren wrote:
Anneke Van Smirren wrote:
Ik kom niet helemaal uit her vastmaken van de kraag. Gaan de vierkanten van achter recht aan de voorpanden of schuin. Het kan allenei en ik weet niet wat het juiste is. Alvast bedankt voor de reactie.
14.10.2025 - 12:26DROPS Design answered:
Dag Anneke,
Je haakt alle vierkanten met de zijkanten tegen elkaar, ook bij de kraag.
20.10.2025 - 21:38
![]() Lotje wrote:
Lotje wrote:
Hoe kan ik de mouw 'erin' zetten. Ik weet met welke steek, maar de mouw heeft minder steken dan het mouwsgat, dus ik kom niet uit
07.08.2025 - 09:39DROPS Design answered:
Dag Lotje,
In dat geval kun je, verdeeld over de mouw, vaker in eenzelfde steek of lossenlus haken.
09.08.2025 - 18:13
![]() Stefanie wrote:
Stefanie wrote:
Hallo! Auf dem Foto der Jacke ist oben am Ärmel noch ein Viereck zu sehen und in der Anleitung, wie der Ärmel zu häkeln ist, ist nicht beschrieben, dass oben noch Vierecke reinzuhäkeln sind. Nur dass die Arbeit oben geteilt werden soll . Könnten Sie das bitte genauer beschreiben? Vielen Dank!
22.07.2025 - 14:54DROPS Design answered:
Liebe Stefanie, es sind keine Vierecke bei den Ärmeln, die Vierecke de man im Foto sieht sind die von den Schultern/Kragen = die 2 Vierecke oben bei jedem Schulter beim Vordeteil. Viel Spaß beim Häkeln!
24.07.2025 - 16:24
![]() Sylvia wrote:
Sylvia wrote:
Von der Anleitung sieht es für mich so aus, als ob die gesamte Jacke aus zusammengehäkelten Vierecken (52) besteht. Aber auf dem Photo sieht es so aus, also ob viel weniger Vierecke da sind und viel mehr Luftmaschenbögen zwischen den Vierecken. Könnten Sie das bitte erklären? Danke.
03.04.2025 - 02:43DROPS Design answered:
Liebe Sylvia, so stimmen alle Foto mit Anleitung zusammen - wenn die Quadraten zusammengehäkelt sind, sieht es dann aus, wie es dann "mehr" Luftmaschenbogen gebe. Viel Spaß beim Häkeln!
03.04.2025 - 09:58
![]() Sylvia wrote:
Sylvia wrote:
Von der Anleitung sieht es für mich so aus, als ob die gesamte Jacke aus zusammengehäkelten Vierecken (52) besteht. Aber auf dem Photo sieht es so aus, also ob viel weniger Vierecke da sind und viel mehr Luftmaschenbögen zwischen den Vierecken. Könnten Sie das bitte erklären? Danke.
03.04.2025 - 02:42
![]() Ann Daeninck wrote:
Ann Daeninck wrote:
Hoeveel garen heb ik nodig om enkel de vest te maken?
23.05.2024 - 22:53DROPS Design answered:
Dag Ann,
Je hebt 800 gram nodig van DROPS Muskat, dus 16 bollen.
26.05.2024 - 15:33
![]() Pernilla wrote:
Pernilla wrote:
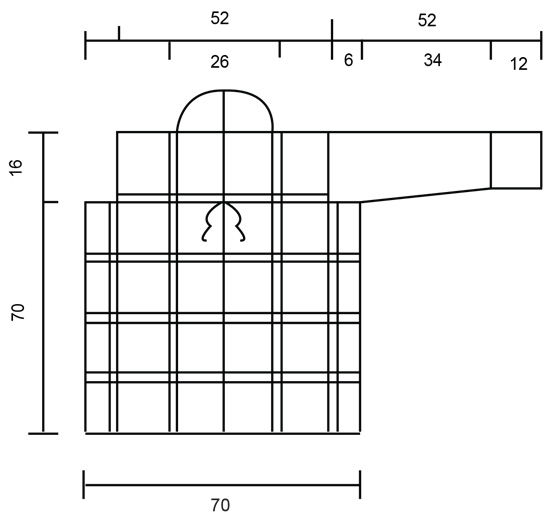
Hej Jag får inte till monteringen och på vilket sätt jag ska virka ihop de två bakre rutorna i mitten med de två främre rutorna för att få en krage.
08.04.2024 - 21:10DROPS Design answered:
Hej Pernilla, har du set skitsen nederst i opskriften, her ser du hvordan ruderne skal lægges ud og sys sammen :)
09.04.2024 - 11:38
![]() Leslie wrote:
Leslie wrote:
So just to clarify. When I start back and forth on the sleeve- the chain 8 at the end of the row I turn and do a 1 sc in that chain stitch bow making that bow only 4 chain stitches? So at each end when you turn the chain stitch bows are long half the Length?
24.02.2022 - 22:45DROPS Design answered:
Dear Leslie, turn with 8 chains and crochet 1 sc in the first ch-space = you have half a ch-space, continue with the 8-ch-spaces and to the last ch-space of the row = you will have 12 ch-spaces + the first one as half a ch-space; turn with 8 ch, crochet 1 sc in the first ch-space, and crochet as before = you will have 12 ch-spaces + the first one as half a ch-space. Continue like this. Happy crocheting!
25.02.2022 - 09:13
![]() Leslie wrote:
Leslie wrote:
Confused about sleeve instructions- I have worked in the round up to sleeve measuring 18-1/8 th The instructions now say “ When the work measures 46 cm [18-1/8"], divide the work so that 1 square at the bottom of the sleeve is at the center of the hand and crochet back and forth. Finish when the sleeve measures 52 cm [20.5"].“. Confused about divide the work? Would I not just continue until 20.5” then when I set the sleeve in make sure the squares are on top and bottom center?
21.02.2022 - 18:44DROPS Design answered:
Dear Leslie, lay the sleeve flat placing one square on top of wrist edge, mark the opposite side, the rows should now start from here, that way, when the sleeve is crocheted to the armhole, you have a square on top of hand. And continue now from here back and forth (without decreasing, just working ch-spaces as before). Happy crocheting!
22.02.2022 - 09:26
![]() Leslie wrote:
Leslie wrote:
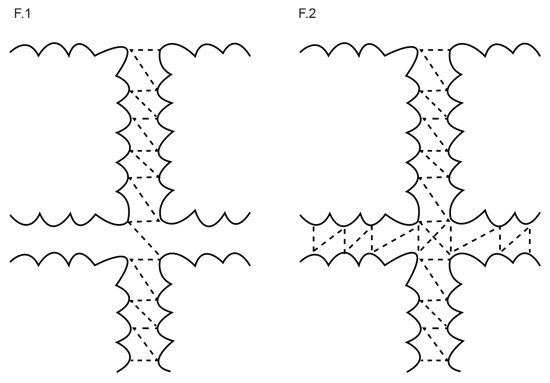
Confused about joining squares. Using fig 1 and legend ( using 5 chain stitches, 3 chain stitches and 1 double crochet). Are all the joins 5 chain stitches? Hard to see on diagram bold lines indicating 3 chain stitches, or a dot indicating 1 double crochet?
10.02.2022 - 22:18DROPS Design answered:
Dear Leslie, this video shows how to crochet squares together (this applies to a blanket, but you will work the same way for the squares here). Happy crocheting!
11.02.2022 - 09:20
|
|||||||||||||
Garden Wedding Cardigan#gardenweddingcardigan |
|||||||||||||
|
|
|||||||||||||
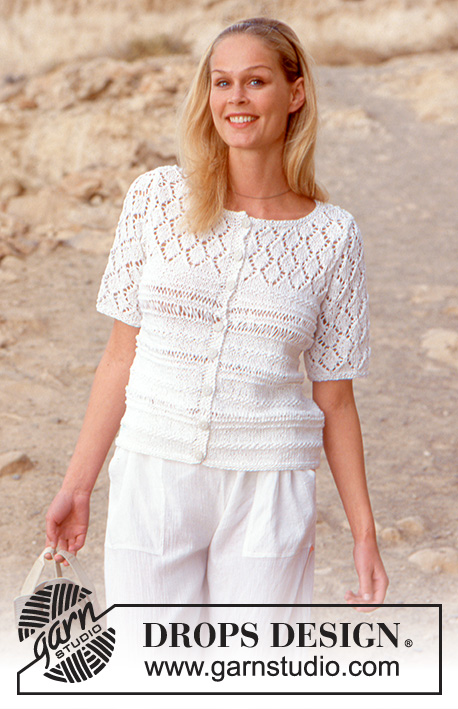
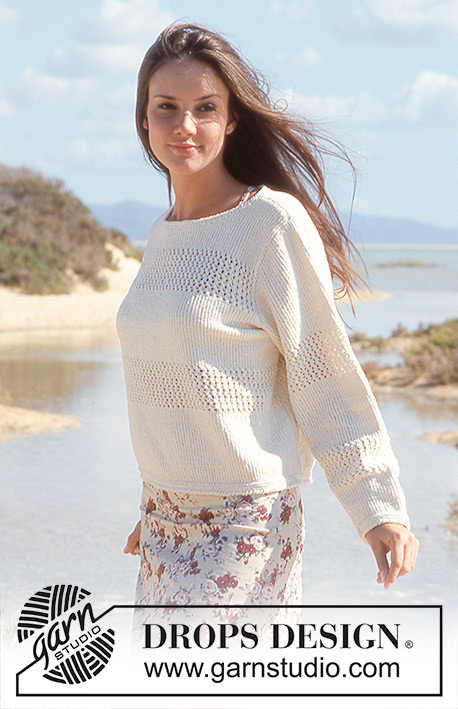
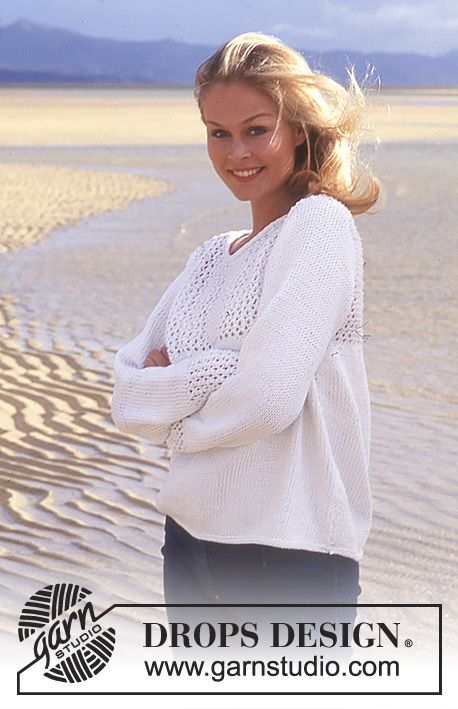
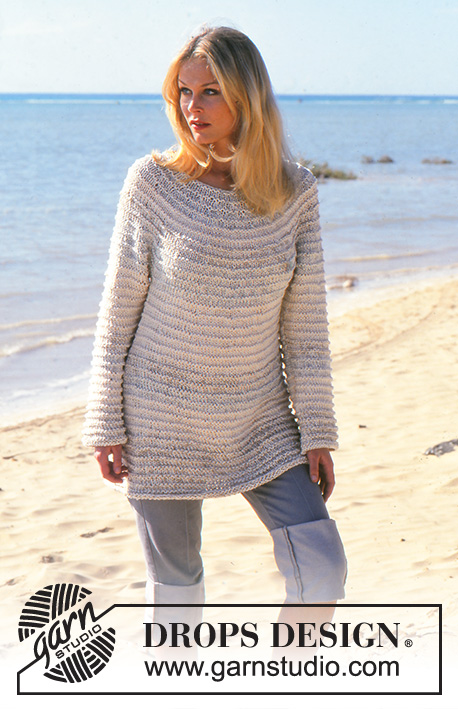
DROPS Crocheted cardigan or pullover in Muskat.
DROPS 65-9 |
|||||||||||||
|
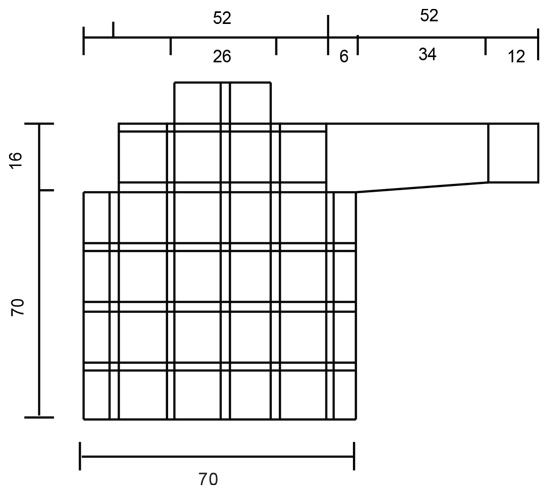
Crochet gauge: One square measures approx. 12 x 12 cm [4.75" x 4.75"] Pattern: See diagrams. Crocheted square: Chain 8 and join into a ring with a slip st. Round 1: * 1 double crochet (dc) (the first dc is replaced by ch 3), ch 2 *, repeat from * - * 8 times, join with 1 slip st in the first dc. Round 2: * 4 dc (the first dc is replaced by 3 slip sts) around the ch st bow, ch 2 *, repeat from * - * 8 times, join with 1 slip st in the first dc. Round 3: * 4 trebles in the 4 dc from the previous row (the first treble is replaced by ch 4) -- but keep the last loop of each on the hook until all trebles have been crocheted, then pull the yarn through all sts on the crochet hook (4 sts become 1), ch 6, 1 dc around the 2 ch sts from the previous row, ch 6, * repeat from * - * 8 times, join with 1 slip st in the first group of trebles. Round 4: Slip st to the center of the ch st bow, ch 1, 1 single crochet (sc) around the ch st bow, * ch 5, 1 sc around the next ch st bow, ch 5, 1 dc around the next ch st bow, ch 10, 1 dc around the next ch st bow (the corner), ch 5, 1 sc around the next ch st bow *, repeat from * - * a total of 3 times, then ch 5, 1 sc around the next ch st bow, ch 5, 1 dc around the next ch st bow, ch 10, 1 dc around the next ch st bow (the corner), ch 5, join with 1 slip st in the first sc. Round 5: Slip st to the center of the ch st bow, ch 1, 1 single crochet (sc) around the ch st bow, * ch 5, 1 sc around the next ch st bow, ch 5, 1 sc around the next ch st bow, ch 8, 1 sc around the same ch st bow approx. 1 cm [3/8"] away (= corner), ch 5, 1 sc around the next ch st bow, ch 5, 1 sc around the next ch st bow *, repeat from * - * a total of 3 times, then ch 5, 1 sc around the next ch st bow, ch 5, 1 sc around the next ch st bow, ch 8, 1 sc around the same ch st bow 1 cm [3/8"] away (= corner), ch 5, 1 sc around the next ch st bow, ch 5, join with 1 slip st in the first sc. Body: Either a cardigan or a pullover may be crocheted out of these squares; the difference is in how they are put together. The sleeves are the same length on both models. Cardigan - Body: Make 50 squares. Now join the squares in vertical columns as in Fig. 1 The columns contain the following number of squares: 1st column (center front): = 5 squares, 2nd column: = 5 squares 3rd column (side): = 4 squares, 4th column: = 5 squares, 5th column: = 6 squares (the center back is between the 5th and 6th column), 6th column: = 6 squares, 7th column: = 5 squares, 8th column (side): = 4 squares, 9th column: = 5 squares, 10th column (center front): = 5 squares. Now join the columns together as in Fig. 2. Join the shoulders in the same way as in Fig. 2 and then join the 2 squares from the center back and the 2 first columns of squares at the center front for the collar. Sweater - Body: Make 52 squares. Now join the squares in vertical columns as in Fig. 1. The columns contain the following number of squares: 1st column (center front): = 6 squares, 2nd column: = 6 squares, 3rd column: = 5 squares, 4th column (side): = 4 squares, 5th column: = 5 squares, 6th column: = 6 squares, 7th column: = 6 squares (the center back is between the 6th and 7th columns), 8th column (side): = 5 squares, 9th column: = 4 squares, 10th column (center front): = 5 squares. Now join the columns together as in Fig. 2. Join the shoulders and neck in the same way as in Fig. 2. Sleeve: Make 2 squares; join these into a ring as in Fig. 1. Continue crocheting the sleeve as follows: Row 1: 1 single crochet (sc) in the first ch st bow, * ch 5, 1 sc in the next ch st bow *, repeat from * - * around the entire sleeve = 13 ch st bows, fasten the last bow with 1 slip st in the first sc. Row 2: Slip st to the center of the first ch st bow, 1 sc around the bow, * ch 5, 1 sc in the next ch st bow *, repeat from * - *. Repeat row 2 until the sleeve measures 20 cm [7-⅞"]. Now inc each ch st bow to ch 6. Continue in this fashion until the sleeve measures 28 cm [11"]. Now inc each ch st bow to ch 7. When the sleeve measures 38 cm [14-⅞"], inc each ch st bow to ch 8. When the work measures 46 cm [18-⅛"], divide the work so that 1 square at the bottom of the sleeve is at the center of the hand and crochet back and forth. Finish when the sleeve measures 52 cm [20.5"]. Assembly: Set the sleeve into the body as in Fig. 1. Crochet around the bottom edge of the body: Row 1: * 1 sc, ch 1 *, repeat from * - *. Row 2: * 1 sc around the ch st from the previous row, ch 1 *, repeat from * - *. Crochet approx. 18 sc along the edge of 1 square. Assembly – cardigan: Repeat the 2 rows of crochet around the neck edge and at the center front on the cardigan. Make a cord as follows: ch 2 bands approx. 50 cm [19.75"] long with double yarn. Sew 1 cord onto each side at the center front, at the top of the fourth square from the bottom. Assembly – pullover: Repeat the 2 rows of crochet around the neck edge. |
|||||||||||||
Diagram explanations |
|||||||||||||
|
|||||||||||||
 |
|||||||||||||
 |
|||||||||||||
 |
|||||||||||||
Have you finished this pattern?Tag your pictures with #dropspattern #gardenweddingcardigan or submit them to the #dropsfan gallery. Do you need help with this pattern?You'll find 8 tutorial videos, a Comments/Questions area and more by visiting the pattern on garnstudio.com. © 1982-2026 DROPS Design A/S. We reserve all rights. This document, including all its sub-sections, has copyrights. Read more about what you can do with our patterns at the bottom of each pattern on our site. |
|||||||||||||


With over 40 years in knitting and crochet design, DROPS Design offers one of the most extensive collections of free patterns on the internet - translated to 17 languages. As of today we count 324 catalogs and 12290 patterns - 12280 of which are translated into English (US/in).
We work hard to bring you the best knitting and crochet have to offer, inspiration and advice as well as great quality yarns at incredible prices! Would you like to use our patterns for other than personal use? You can read what you are allowed to do in the Copyright text at the bottom of all our patterns. Happy crafting!
Post a comment to pattern DROPS 65-9
We would love to hear what you have to say about this pattern!
If you want to leave a question, please make sure you select the correct category in the form below, to speed up the answering process. Required fields are marked *.