
Popular categories
Looking for a yarn?


Comments / Questions (169)
DROPS Design wrote:
The pattern has been re-written and there are several new diagrams. Les explications ont été ré-écrites et il y a de nouveau diagrammes.
04.05.2017 - 15:36
![]() Katrin Hülsenbusch wrote:
Katrin Hülsenbusch wrote:
Haĺlo, bisher waren die Anleitungen von drops immer vollständig und gut zu verstehen. Danke dafür!! Hier fehlt aber die Erläuterung der gekreuzten beiden Maschen. Wie kommt man zu 20 Maschen in A2/A3 von den 18 Maschen in A1? Schade, schon so schnell ausgebremst ... :-(
16.04.2017 - 22:12DROPS Design answered:
Liebe Frau Hülsenbusch, unser Design Team wird die Anleitung noch mal schauen, herzlichen Dank im voraus für Ihren Geduld!
18.04.2017 - 10:56
![]() Hillevi wrote:
Hillevi wrote:
Förstår inte hur man ska kunna sticka både A.2 och A.3 samt två m slätstickning innan man ska öka 2 m mitt fram och bak enligt beskrivningen. Det har stickats två maskor för mycket. Jag har 90 m så det är inte det som är problemet och jag följer beskrivningen noga. (Markeringen är på den 42:a maskan och A.2 + A.3 + 2m slät = 42 maskor. När man skall öka ska man börja vid en maska före markeringen)
16.04.2017 - 14:56DROPS Design answered:
Hej Hillevi, har du skrivit ut det nya mönstret som vi la ut i mitten på mars?
28.04.2017 - 15:03
![]() Dorte wrote:
Dorte wrote:
Jeg kan se at der er flere diagrammer i den nye rettelse. Hvordan skal den lille ovale cirkel og stregen gennem to felter i forstås i A3 og hvordan får jeg 20 masker i A2 og A3 uden der bliver for mange masker i første udtagning, hvis jegbstrikker Medium og kun skal have 102 masker?
12.04.2017 - 18:35DROPS Design answered:
Hej Dorte, Det kan jeg godt se, det skal vi få rettet så hurtigt som muligt. Tak for info :)
26.04.2017 - 15:34
![]() Quashie wrote:
Quashie wrote:
Merci d'expliquer le début de A2 et fin de A3. Aucune explication sur le diagramme sur comment travailler ces deux mailles avant ou après le jeté non indiqué également sur le diagramme. Autre constat après A3 il ne reste pas assez de mailles pour les 2 augmentations de chaque côté de la maille centrale. Comment faire ? Première fois que je suis confrontée à autant de problèmes pour débuter un pull!
01.04.2017 - 17:54DROPS Design answered:
Bonjour Mme Quashie, les augmentations après A.2 et avant A.3 se font comme indiqué sous AUGMENTATIONS MANCHES au début des explications. En ce qui concerne le nombre de mailles au milieu devant et au milieu dos, nos stylistes vont vérifier à nouveau les explications. Merci d'avance pour votre patience.
03.04.2017 - 11:13
![]() Birgitte Illum wrote:
Birgitte Illum wrote:
Strikkefastheden passer ikke. Første strikkeprøve passede i bredden, men er for lav, anden strikkeprøve passede i højden men var for bred. Hvilken vælger jeg?
01.04.2017 - 08:06DROPS Design answered:
Hej Birgitte, Du er nødt til at vælge den strikkefasthed som passer i bredden og så følger du målene i højden. God fornøjelse!
03.04.2017 - 14:44
![]() Quashie wrote:
Quashie wrote:
S'agissant des torsades en A2/A3, la version italienne indique que les 3 mailles que l'on met en attente derrière/devant sont tricotés à l'envers alors qu'en français elles le sont à l'endroit. Quelle option retenir? Merci de votre réponse
27.03.2017 - 13:42DROPS Design answered:
Bonjour Mme Quashie, la version française correspond à l'original norvégien, la version italienne va être vérifiée, merci. Bon tricot!
27.03.2017 - 17:59
![]() Dorte Mone wrote:
Dorte Mone wrote:
Nu har jeg læst og læst igen på den nye opskrift, men jeg forstår stadig ikke hvordan ændringerne skulle ændre på modellens facon, som bliver alt for kort. Der er flyttet udtagninger fra siden/raglan på ryg og forstykke og hen til midt for, men så vidt jeg kan regne ud, bliver der udtaget samme maskeantal pr. omgang og med samme intervaller i den gamle og den reviderede opskrift. Er det ikke rigtigt? Eller er det muligt at forklare mig forskellen?
26.03.2017 - 23:17DROPS Design answered:
Hej Dorte, Ja det stemmer at vi har flyttet udtagningerne til midt foran og bagpå. Men det er vigtigt at du følger den nye opskrift uden at sammenligne den nye med den gamle. Nej den bliver ikke for kort hvis du overholder strikkefastheden både i bredden og i højden. Lav en lille strikkeprøve først så du er sikker på strikkefastheden. God fornøjelse!
29.03.2017 - 09:45
![]() Quashie wrote:
Quashie wrote:
J'en suis à ma 6ème tentative pour démarrer ce pull. Je n'arrive pas à comprendre d'où viennent les 2 mailles en début de A2 et fin de A3. Sans ces 2 mailles suppl.on a une correspondance parfaite entre A1 déployé et A2/A3. Je voudrais aussi savoir où l'entête insérés les marqueurs - devant et arrière - pour les manches. Ayant débuté depuis peu à tricoter en top down, j'ai besoin d'avoir ces repères. Merci d'avance
26.03.2017 - 21:12DROPS Design answered:
Bonjour Quashie, votre question a été transmise à nos stylistes, je vous remercie d'avance pour votre patience.
27.03.2017 - 09:49
![]() Lene wrote:
Lene wrote:
Hej jeg vil godt ha en forklaring på de 2 første m. i A.3 og A.5 og de sidste 2 m. i A.2 og A.4. På forhånd tak
22.03.2017 - 21:33DROPS Design answered:
Hej Lene. Du skal strikke de to förste m i A.3 og A.5 vrang fra retten og ret fra vrangen (omvendt glatstrik) - det samme gaelder for de to sidste masker i A.2 og A.4
23.03.2017 - 15:29
|
|||||||||||||||||||||||||
Emerald Queen#emeraldqueensweater |
|||||||||||||||||||||||||
 |
 |
||||||||||||||||||||||||
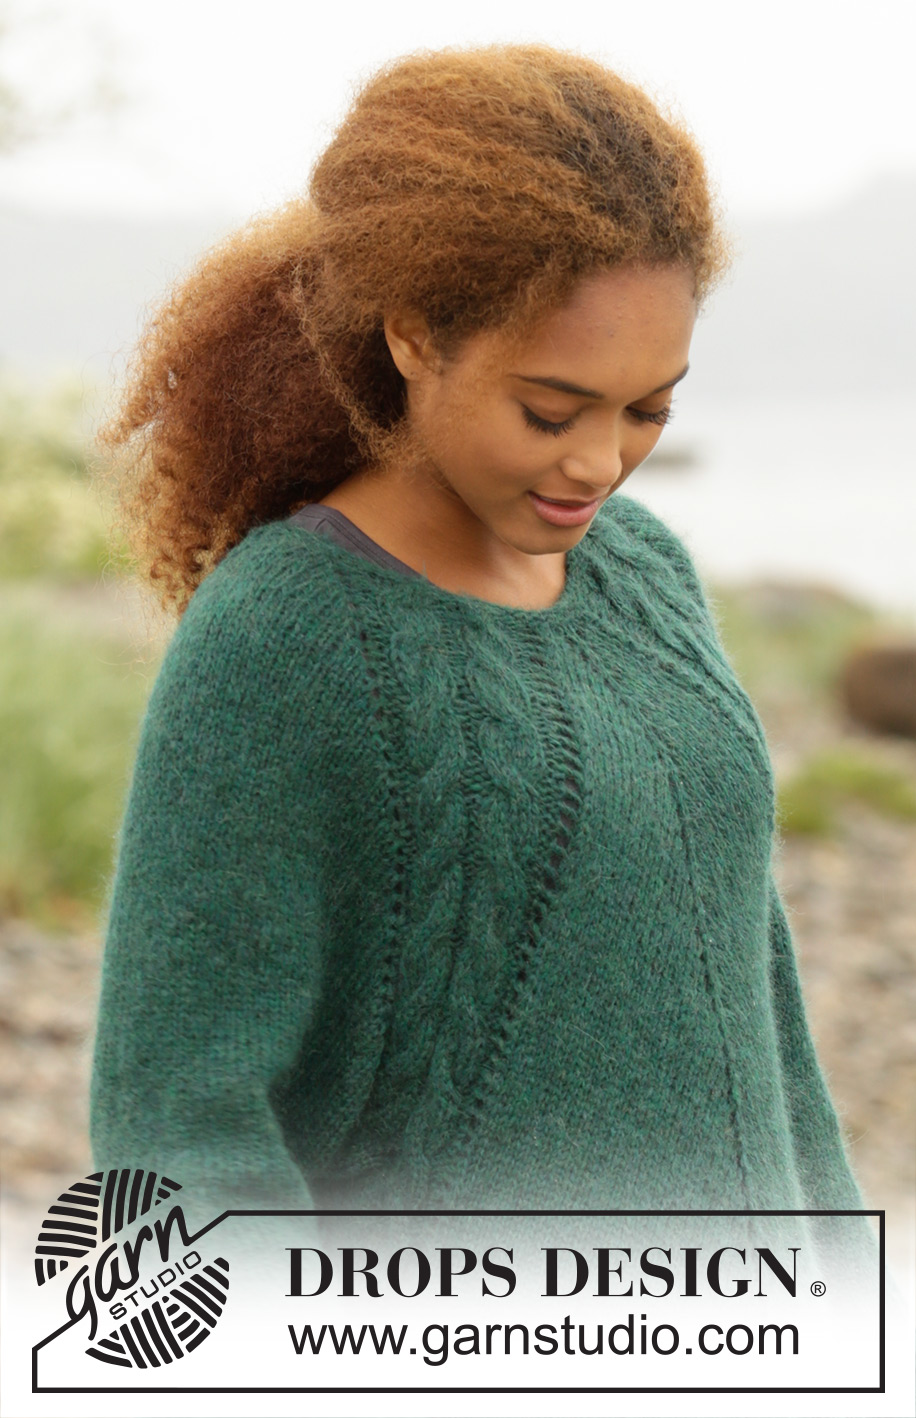
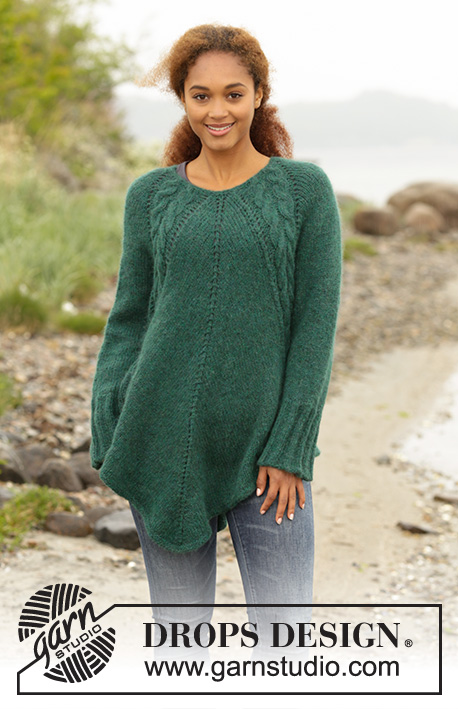
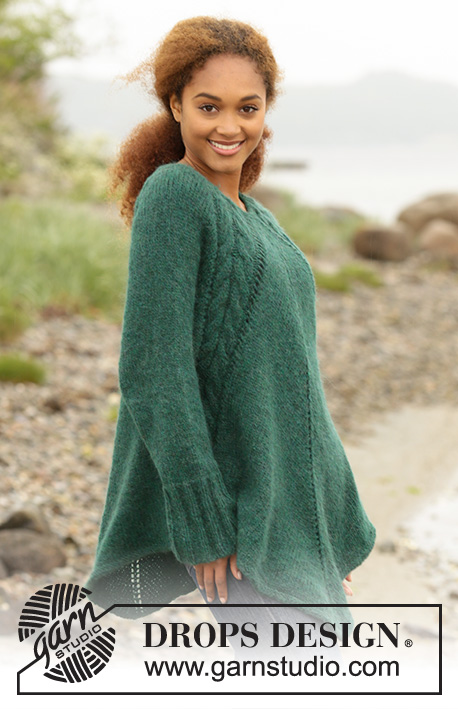
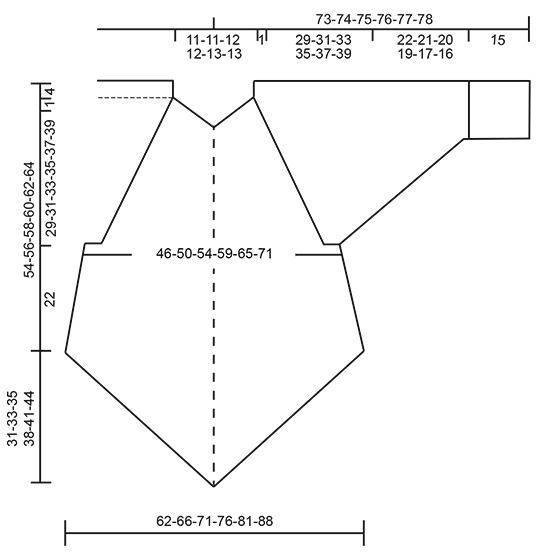
Knitted DROPS tunic with deep raglan and cables, worked top down in ”Air”. Size: S - XXXL.
DROPS 171-1 |
|||||||||||||||||||||||||
|
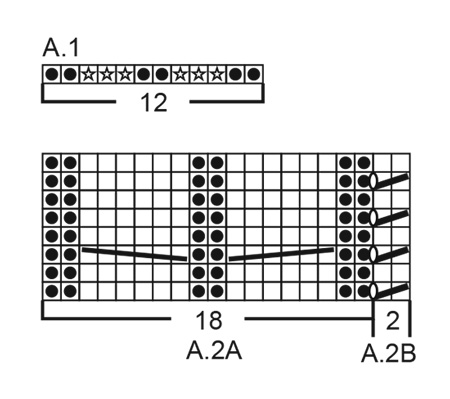
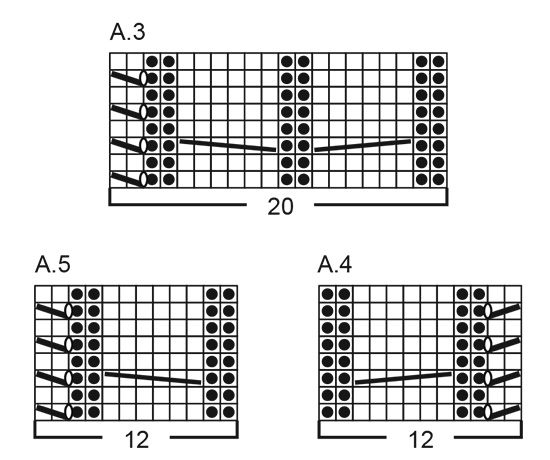
GARTER ST (worked in the round): 1 ridge = 2 rounds. * K 1 round and P 1 round *, repeat from *-*. PATTERN: See diagrams A.1 to A.5. INCREASE FOR SLEEVES: Increase 1 st in each side on each sleeve by increasing after A.2 and before A.3 (= 2 st inc on each sleeve and 4 sts in total on round). Inc 1 st by making 1 yarn over, on next round knit yarn over to make holes. INCREASE MID FRONT AND MID BACK: Increase 2 sts on each side of st with marker thread on mid front and mid back as follows: Knit until 1 st before st with marker thread, make 1 yarn over, knit 1, make 1 yarn over, knit st with marker thread, make 1 yarn over, knit 1, make 1 yarn over (= 4 sts inc mid front/mid back and 8 sts in total on round). On next round knit the 2 yarn overs closest to the st with mid-st to make holes, the outermost 2 sts should be knit twisted to avoid holes. Increase 1 st on each side of st with marker thread on mid front and mid back as follows: Work until st with maker thread, make 1 yarn over, knit st with maker thread (mid-st), make 1 yarn over (= 2 sts inc mid front/mid back and 4 sts in total on round).On next round knit yarn overs to make holes. KNITTING TIP-1: To avoid the eye let row being interrupted while increasing for sleeves on every 4th row and not on every 2nd row as before, work as follows on the rows that previously had increases: After A.2: Make 1 yarn over, slip 1 st knitvise, knit 1 and pass slipped st over the knit st. Before A.3: Knit until 2 sts before A.3, knit 2 st tog and make 1 yarn over. KNITTING TIP-2: If you want a little less volume on body, it is possible to make some adjustments after dividing for sleeves. Decrease 2 sts mid front and mid back on i.e every 8th round as follows (decrease on a round with increases): Knit until 2 sts before st with marker (= mid-st), knit 2 tog, make 1 yarn over, knit 1 (= mid-st), make 1 yarn over, slip 1 st knitvise, knit 1 and pass slipped st over the knit st (this decrease will give approx 8 cm / 3⅛" less width in total at the end of body). DECREASE TIP (applies to sleeves): Beg 3 sts before marker and dec as follows: K 2 tog, K 2 (marker is in the middle of these 2 sts), slip 1 st as if to K, K 1, psso. ---------------------------------------------------------- TUNIC: Worked in the round on circular needle, top down. YOKE: Cast on 66-66-70-70-74-74 sts on a short circular needle size 4 mm / US 6 with 2 strands Air. Remove 1 strand and continue with 1 strand Air as follows: Work 2 ridges in GARTER ST - see explanation above. Switch to a short circular needle size 5 mm / US 8, work next round as follows: Work A.1 (= 12 sts inc to 18 sts), 2 sts in stockinette st (= sleeve), A.1 (= 12 sts inc to 18 sts), 7-7-9-9-11-11 sts in stockinette st (insert 1 marker in the middle of these sts = mid front), A.1 (= 12 sts inc to 18 sts), 2 sts in stockinette st (= sleeve), A.1 (= 12 sts inc to 18 sts) and 7-7-9-9-11-11 sts in stockinette st (insert 1 marker in the middle of these sts = mid back) = 90-90-94-94-98-98 sts on needle. Next round work as follows: Work A.2 (= 18 sts), inc 1 st – READ INCREASE FOR SLEEVES, knit 2, inc 1 st for sleeve, work A.3 (= 20 sts), knit 0-0-1-1-2-2 s, inc 2 sts on each side of st with marker thread – READ INCREASE MID FRONT AND MID BACK, knit 0-0-1-1-2-2 sts, work A.2B (= 2 sts), work A.2A (=18 sts), inc 1 st for sleeve, knit 2 sts, inc 1 st for sleeve, work A.3 (= 20 sts), knit 0-0-1-1-2-2 sts, inc 2 sts on each side of st with marker thread (= mid back) and knit 0-0-1-1-2-2 sts and work A.2B (= 2 sts) = 102-102-106-106-110-110 sts on needle. Then work stockinette st in the round with A.2 and A.3 in every transition between body and sleeves. AT THE SAME TIME continue increase for sleeves and increase mid front and mid back as follows: SLEEVES: Increase on every 2nd round 10-13-15-21-23-27 times in total (including the increase explained on firste round), then increase on every 4th round 11-11-11-9-9-8 times in total - READ KNITTING TIP-1. MID FRONT AND MID BACK : Inc 2 sts on every side of st with marker in it on every 2nd round 11-14-15-18-21-25 times in total (including the increases explained on first round). Then increase 1 st on each side of st with marker in it on every 2nd round 21-20-21-21-20-18 times in total. REMEMBER THE GAUGE! After last increase on body and sleeves each side of st with marker thread there are 346-378-402-442-474-510 sts on needle. Work next round as follows: Work as before over the first111 sts (= until middle of 2 P sts in A.2), slip the next 62-68-72-80-84-90 sts on a stitch holder (= sleeve), cast on 6-6-8-8-10-12 new sts under sleeve, work as before over the next 111-121-129-141-153-165 sts on front piece(i.e 11 st in A.3, 89-99-107-119-131-143 knit sts, 11 sts in A.2)slip the next 62-68-72-80-84-90 sts on a stitch holder (= sleeve), cast on 6-6-8-8-10-12 new sts under sleeve and work the remaining 100-110-118-130-142-154 sts on back piece as before (i.e 11 sts in A.3 and 89-99-107-119-131-143 knit sts). Finish body and sleeves separately. BODY: = 234-254-274-298-326-354 sts. Insert 1 marker in the piece. Work next round as follows: Work A.4 (12 sts), knit 4-4-6-6-8-10 sts, A.5 (=11 sts), knit until mid-st, make 1 yarn over, knit 1 (= mid-st), make 1 yarn over, knit until A.2, work A.4 (= 12 sts), knit 4-4-6-6-8-10 sts, A.5 (= 12 sts), knit until mid-st, make 1 yarn over, knit 1 (= mid-st), make 1 yarn over and knit the rest of round (= 4 sts increased). Continue pattern like this while AT THE SAME TIME continuing to increase mid front and mid back on every 2nd round until inc has been done 20 times on each side of mid front/mid back from marker - READ KNITTING TIP-2 = 314-334-354-378-406-434 sts on needle (or work until desired length). On next round work sts in each cable K tog 2 by 2 (= 12 sts dec) = 302-322-342-366-394-422 sts. Switch to circular needle size 4 mm / US 6 and work 2 ridges in garter st in the round over all sts. Switch back to circular needle size 5 mm / US 8 and bind off (this is done to avoid a tight bind-off edge). SLEEVE: Worked in the round on a short circular needle, switch to double pointed needles when needed. Slip the sts from stitch holder in one side of piece on a short circular needle size 5 mm / US 8 and pick up 1 st in each of the 6-6-8-8-10-12 sts cast on under sleeve on body = 68-74-80-88-94-102 sts on needle. Insert 1 marker at beg of round (= mid under sleeve) - NOW MEASURE PIECE FROM HERE. Work in stockinette st in the round over all sts AT THE SAME TIME on first round dec over the two cables by working sts in each cable K tog 2 by 2 (= 6 sts dec) = 62-68-74-82-88-96 sts. When piece measures 2 cm / ¾", dec 2 sts mid under sleeve - READ DECREASE TIP. Dec a total of 12-14-17-20-22-25 times in Size S: On every 4th round, in size M: On every 3rd round, in size L: Alternately on every 2nd and 3rd round, in size XL: On every other round, in size XXL: Alternately on every and every other round and size XXXL. On every round = 38-40-40-42-44-46 sts on needle. Continue to work until piece measures 22-21-20-19-17-16 cm / 8¾"-8¼"-8"-7½"-6¾"-6¼" (NOTE: Shorter measurements in the larger sizes because of wider shoulders). K 1 round while AT THE SAME TIME inc 7-10-10-8-11-9 sts evenly = 45-50-50-50-55-55 sts. Switch to double pointed needles size 4 mm / US 6 and work rib in the round = K 2/P 3. When rib measures 15 cm / 6", switch back to double pointed needles size 5 mm / US 8 before binding off with K over K and P over P (this is done to avoid a tight bind-off edge). Work the other sleeve the same way. |
|||||||||||||||||||||||||
Diagram explanations |
|||||||||||||||||||||||||
|
|||||||||||||||||||||||||
 |
|||||||||||||||||||||||||
 |
|||||||||||||||||||||||||
 |
|||||||||||||||||||||||||
Have you finished this pattern?Tag your pictures with #dropspattern #emeraldqueensweater or submit them to the #dropsfan gallery. Do you need help with this pattern?You'll find 25 tutorial videos, a Comments/Questions area and more by visiting the pattern on garnstudio.com. © 1982-2026 DROPS Design A/S. We reserve all rights. This document, including all its sub-sections, has copyrights. Read more about what you can do with our patterns at the bottom of each pattern on our site. |
|||||||||||||||||||||||||


With over 40 years in knitting and crochet design, DROPS Design offers one of the most extensive collections of free patterns on the internet - translated to 17 languages. As of today we count 324 catalogs and 12290 patterns - 12280 of which are translated into English (US/in).
We work hard to bring you the best knitting and crochet have to offer, inspiration and advice as well as great quality yarns at incredible prices! Would you like to use our patterns for other than personal use? You can read what you are allowed to do in the Copyright text at the bottom of all our patterns. Happy crafting!
Post a comment to pattern DROPS 171-1
We would love to hear what you have to say about this pattern!
If you want to leave a question, please make sure you select the correct category in the form below, to speed up the answering process. Required fields are marked *.