
Popular categories
Looking for a yarn?


Comments / Questions (67)
![]() Kerstin wrote:
Kerstin wrote:
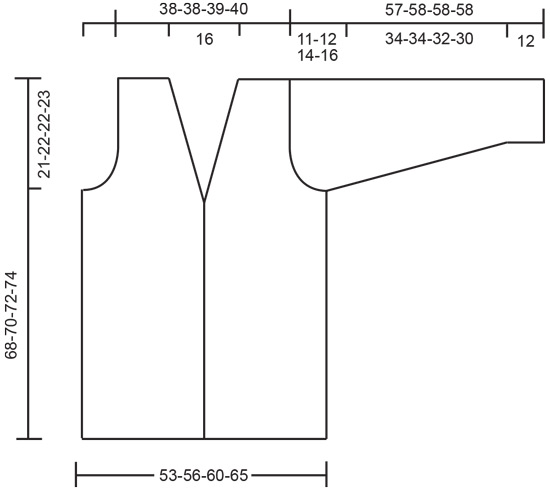
In der Größe M schlage ich 92 Maschen an (inklusive der Randmasche). Danach stricke ich 12 cm die Krausrippe. Nach 48 cm soll in jeder 2-ten Reihe für das Armloch abgekettet werden: 2x 3 Maschen 2x 2 Maschen 5x 1 Masche Am Ende sollen es 62 Maschen sein. Wie kommen sie auf diese Zahl, bei mir sind dann noch 77 Maschen übrig. Wo liegt mein Denkfehler?
26.09.2023 - 15:47DROPS Design answered:
Liebe Kerstin, in M werden Sie so abketten: 3 Maschen 2 Mal auf beiden Seiten (-= insgesamt 12 Maschen) dann 2 Maschen 2 Mal auf beiden Seiten (insgesamt 8 Maschen) und 1 Masche 5 Mal auf beiden Seiten (insgesamt 10 Maschen) so haben Sie: 92-12-8-10=62 Maschen übrig. Viel Spaß beim stricken!
29.09.2023 - 07:35
![]() Kerstin wrote:
Kerstin wrote:
Was ist eine Bordmasche? Ich höre das heute zum ersten mal.
22.09.2023 - 21:28DROPS Design answered:
Liebe Kerstin, mit Bordm sind hier die BlendenMaschen zu verstehen. Viel Spaß beim stricken!
25.09.2023 - 08:21
![]() Sandra wrote:
Sandra wrote:
Hallo Drops Team, leider stoße ich schon beim stricken des Rückenteils auf fragen….wenn ich anfange das Armloch abzuketten, jede 2. Runde, 3 Maschen, eine abketten oder zwei abketten, dann wieder 2 Maschen stricken und vier abketten?
30.08.2023 - 21:04DROPS Design answered:
Liebe Sandra, für die Armlöcher sollen Sie 3 Maschen am Anfang der 2 nächsten Reihen (in die 1. Größe = 3 M beidseitig) / am Anfang der 4 nächsten Reihen (in die anderen Größe = 3 Maschen 2 Mal beidseitig) abketten, dann - je nach der Größen auch 2 Maschen am Anfang der 4 nächsten Reihe (in die 2 ersten Größe)/der 6 nächsten Reihen (3. Größe) / der 8 nächsten Reihen (letzte Größe) = 2 Maschen 2-2-3-4 Mal beidseitig, usw. Viel Spaß beim stricken!
31.08.2023 - 09:09
![]() Simone Van Puijenbroek wrote:
Simone Van Puijenbroek wrote:
Ik vind het patroon van de vest niet?
13.11.2022 - 15:41DROPS Design answered:
Dag Simone,
Helaas begrijp ik je vraag niet goed. Als je naar beneden scrolt vind je de beschrijving van het patroon. Of bedoel je een ander vest?
13.11.2022 - 18:26
![]() Moira Munn wrote:
Moira Munn wrote:
How do you cast off at each side of same row?
26.06.2022 - 16:27DROPS Design answered:
Dear Moira, to cast off at each side you cast off at the beginning of each row on each side. You cast off 3 stitches, continue working until the end of the row, turn and cast off 3 stitches, then continue working until the end of the row and turn again, e.t.c. Happy knitting!
26.06.2022 - 19:39
![]() Gabi wrote:
Gabi wrote:
Wie genau muss ich die 20 Maschen vom Kragen stricken? Wenn ich verkürzte Reihen stricke wird das außen nicht doppelt so lang wie auf der Innenseite, sprich 8 cm und 16 cm, bin etwas ratlos! Wie muss ich das machen? Lg Gabi
16.01.2022 - 12:03DROPS Design answered:
Liebe Gabi, beim dem linken Vorderteil stricken Sie diese 20 Maschen mit verkürzten Reihen so, beginnen Sie mit einer Rückreihe: 2 Reihen rechts = 1 Krausrippe über die ersten 16 Maschen; 2 Reihen rechts = 1 Krausrippe über die 20 Maschen; diese 4 Reihen wiederholen, an der rechten Seite (von der Vorderseiten gesehen ) = beim aussen wird der Kragen 16 cm und gegen Schulter (= an der linken Seite) wird er nur 8 cm sein. Viel Spaß beim stricken!
17.01.2022 - 08:58
![]() Lisbeth Wildt Nielsen wrote:
Lisbeth Wildt Nielsen wrote:
Hej. Jeg forstår ikke mønstret, kan ikke få det til at passe. set fra retsiden, strikker jeg ret, vrang og vrang, og ender på vrangsiden. og kan ikke komme videre. skal jeg så strikke vrang, ret, vrang, men så bliver det glatstrik hele vejen op.
28.11.2021 - 21:20DROPS Design answered:
Hej Lisbeth, de første 6 pinde strikker du således: 1.p (retsiden) ret, 1p vrang, 1p vrang, 1p vrang, 1p ret, 1p ret, gentag disse 6 pinde :)
29.11.2021 - 14:27
![]() F Diemel wrote:
F Diemel wrote:
Hallo & Guten Tag! Wie oft werden bei den Zunahmen für den Kragen verkürzte Reihen gestrickt? Nut 1 mal? Liebe Grüße
31.10.2021 - 09:07DROPS Design answered:
Liebe Frau Diemel, die 2 Reihen über die 7 Maschen werden nur einmal gestrickt. Viel Spaß beim stricken!
03.11.2021 - 07:23
![]() Andrea Mattes wrote:
Andrea Mattes wrote:
Das hilft mir leider nicht weiter. Laut Anleitung ist die Gesamtlänge 68 cm. Laut Zeichnung jedoch 89 cm .
27.09.2021 - 14:49DROPS Design answered:
Liebe Frau Mattes, die gesamte Höhe bei der Maßskizze ist 68 cm (von ganz unten bis zum Schulter), die 47-48-50-51 cm bis zum Armloch sind nur nicht in der Skizze geschrieben. Viel Spaß beim stricken!
27.09.2021 - 16:56
![]() Andrea wrote:
Andrea wrote:
Stimmt die Anleitung bezüglich der Gesamtlänge? Lt Zeichnung beginnen die Abnahmen für das Armloch bei 68 .... cm, lt Anleitung bei 47 ... cm. Lt. Anleitung ist die Gesamtlänge 68 ..... cm. Hat dies eine Auswirkung auf den V- Ausschnitt des Vorderteils?
26.09.2021 - 20:17DROPS Design answered:
Liebe Andrea, das Armloch wird 47 cm sein dann stricken Sie noch 21 cm bis zur Schulter = 68 cm Gesamthöhe. Kann es Ihnen helfen?
27.09.2021 - 08:37
|
|
DROPS 69-8 |
|
 |
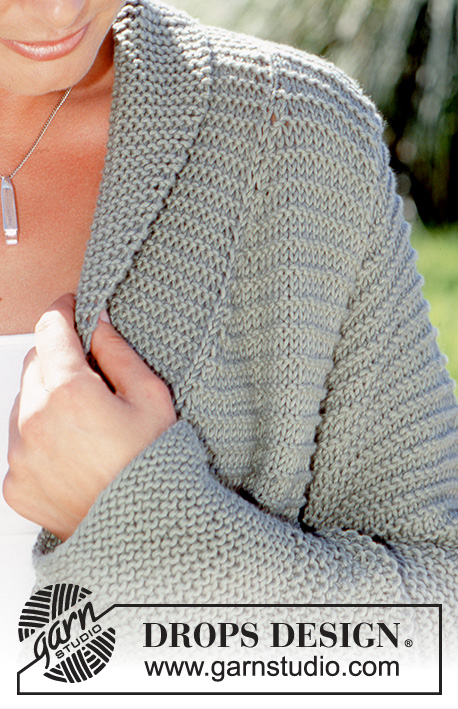 |
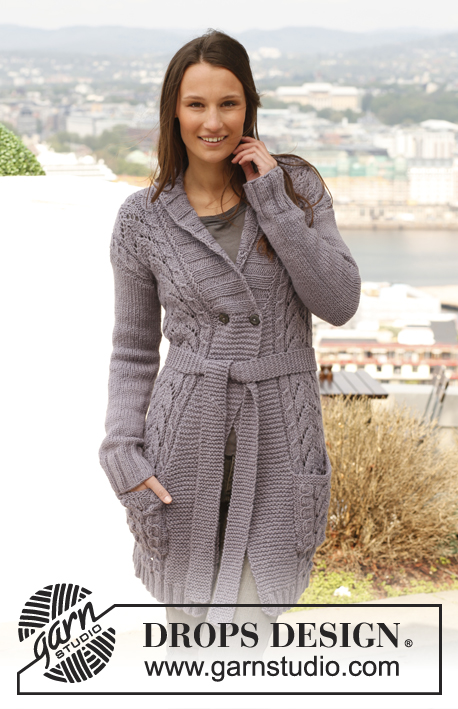
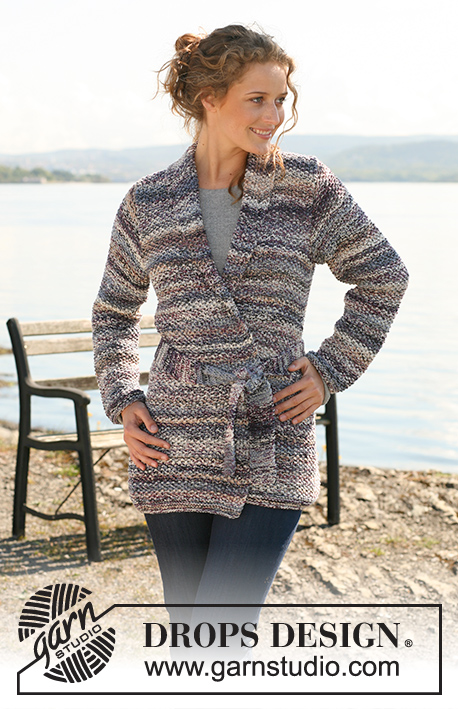
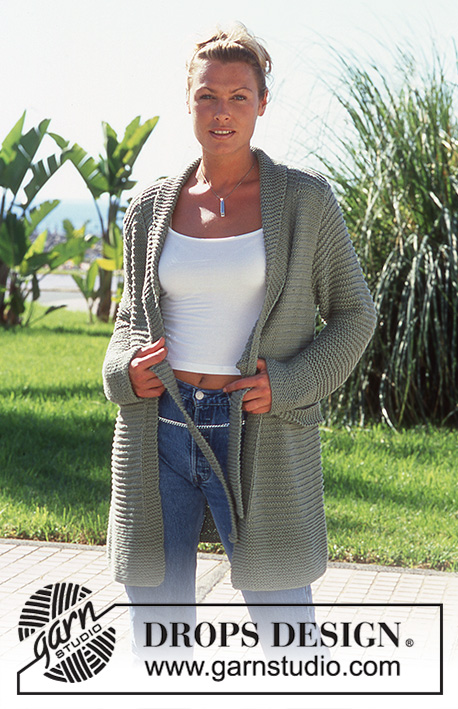
DROPS Cardigan in Paris
DROPS 69-8 |
|
|
Gauge: 16 sts x 20 rows = 10 x 10 cm [4" x 4"] in stockinette st. Garter st, when knitting flat: Knit all sts, all rows. Pattern: Row 1 (right side row): Knit Row 2: Purl Row 3: Purl Row 4: Purl Row 5: Knit Row 6: Knit Repeat these 6 rows. Knitting tips: Dec for the neck only on right side rows. Right front: dec 1 st as follows: sl 1, K 1, psso. Left front: dec 1 st as follows: K 2 tog. Back: Cast on 86-92-98-106 sts. Knit garter st for 12 cm [4.75"], then continue with pattern- see instructions above. When the piece measures 47-48-50-51 cm [18.5"-18⅞"-19.75"-20"] bind off for armhole at each side every other row: 3 sts 1-2-2-2 times, 2 sts 2-2-3-4 times, 1 st 5-5-5-7 times = 62-62-64-64 sts. When the piece measures 66-68-70-72 cm [26"-26.75"-27⅝"-28.25"] bind off the center 24 sts for the neck. On the next row dec 1 st at each neck edge = 18-18-19-19 sts remain on each shoulder. Bind off the remaining sts when the piece measures 68-70-72-74 cm [26.75"-27⅝"-28.25"-29⅛"]. Left front: Cast on 48-51-54-58 sts. Knit garter st for 12 cm [4.75"] over all sts. Continue with pattern, but knit the 6 edge sts at the center front as follows from edge (seen from the right side): 5 sts garter st, 1 st stockinette st. Read the entire next section before knitting. When the piece measures 46-47-49-50 cm [18⅛"-18.5"-19.25"-19.75"] inc 2 sts inside 1 edge st at the center front for collar - knit the increased sts for collar in garter st, keeping the 1 st in stockinette st between button bands and body. On the following 2 rows knit 2 rows garter st over only the 7 button band sts (short rows). Then inc 1 st inside 1 edge st 6 times every row, then 6 times every other row and then 6 times every 4th row = 20 sts increased for collar. At the same time when the piece measures 47-48-50-51 cm [18.5"-18⅞"-19.75"-20"] bind off for armhole at the side as on back. At the same time when the piece measures 50-51-53-54 cm [19.75"-20"-20⅞"-21.25"] dec for the neck shaping (while increasing for collar) as follows: make decs inside the 1 stockinette st + garter sts for collar. Dec 1 st 18 times every other row - see knitting tips. When the piece measures 68-70-72-74 cm [26.75"-27⅝"-28.25"-29⅛"] bind off shoulder sts + 6 button band sts = 18-18-19-19 sts bound off. There are now 20 garter sts on the needles (collar). Continue in garter st as follows: * 2 rows garter st over all sts, 2 rows garter st over only the outermost 16 sts *, repeat from * - * until the inner edge of collar measures approx. 8 cm [3⅛"] (the outer edge should measure 16 cm [6.25"]). Put sts on a holder. Right front: Cast on and knit the same as the left but reverse all shaping. Sleeve: Cast on 38-38-40-42 sts. Knit garter st for 12 cm [4.75"], then continue with pattern. When the piece measures 13-13-14-14 cm [5⅛"-5⅛"-5.5"-5.5"] inc 1 st at each side 13-14-13-14 times every 2.5-2-2-2 cm [1"-0.75"-0.75"-0.75"] = 64-66-66-70 sts. When sleeve measures approx. 46-46-44-42 cm [18⅛"-18⅛"-17.25"-16.5"] bind off for sleeve cap at each side every other row: 3 sts 1-1-1-0 time, 2 sts 3-3-2-2 times, 1 st 4-5-7-10 times, then bind off 2 sts at each side until the piece measures 56-57-57-57 cm [22"-22.5"-22.5"-22.5"] and then bind off 3 sts each side 1 time. The piece measures approx. 57-58-58-58 cm [22.5"-22⅞"-22⅞"-22⅞"]. Bind off the remaining sts. Belt: Cast on 9 sts and knit garter st to desired length or until the belt measures approx. 120-130-140-150 cm [47.25"-51⅛"-55⅛"-59"]. Bind off. Assembly: Sew shoulder seams. Join the collar at center back with Kitchener stitch. Sew the collar to back neckline with seam on right side of work. Sew in sleeves. Sew sleeve and side seams using edge sts as a seam allowance. |
|
 |
|
Have you finished this pattern?Tag your pictures with #dropspattern or submit them to the #dropsfan gallery. Do you need help with this pattern?You'll find 22 tutorial videos, a Comments/Questions area and more by visiting the pattern on garnstudio.com. © 1982-2026 DROPS Design A/S. We reserve all rights. This document, including all its sub-sections, has copyrights. Read more about what you can do with our patterns at the bottom of each pattern on our site. |
|


With over 40 years in knitting and crochet design, DROPS Design offers one of the most extensive collections of free patterns on the internet - translated to 17 languages. As of today we count 325 catalogs and 12298 patterns - 12288 of which are translated into English (US/in).
We work hard to bring you the best knitting and crochet have to offer, inspiration and advice as well as great quality yarns at incredible prices! Would you like to use our patterns for other than personal use? You can read what you are allowed to do in the Copyright text at the bottom of all our patterns. Happy crafting!
Post a comment to pattern DROPS 69-8
We would love to hear what you have to say about this pattern!
If you want to leave a question, please make sure you select the correct category in the form below, to speed up the answering process. Required fields are marked *.