
Popular categories
Looking for a yarn?


Comments / Questions (51)
![]() Britt wrote:
Britt wrote:
Patroon netjes gevolgd zonder problemen alleen de hoeveelheid wol die je moet aanschaffen klopt niet als je de afwerking nog wilt doen. Dan mis je toch zeker nog 1 bol voor maat S/M. Ben ervaren haakster.
03.05.2020 - 14:18
![]() GRETCHEN wrote:
GRETCHEN wrote:
Hello, This is a beautiful kimono, but it is very heavy in crochet. It would be wonderful to have a lighter, knitted version. The style is absolutely timeless! Thankyou Drops!
02.06.2019 - 14:23
![]() Léana wrote:
Léana wrote:
Il y a des erreurs dans le rédactionnel explicatif des carrés. Il serait judicieux d'ajouter un schéma.... Merci
27.05.2019 - 10:54DROPS Design answered:
Bonjour Léana, après vérification, les explications du carré correspondent à la version originale ainsi qu'au diagramme, où avez-vous repéré des erreurs? Merci! Bon crochet!
27.05.2019 - 13:08
![]() Andrea wrote:
Andrea wrote:
Para la vuelta 4-9, me dicen que debo terminar cada vuelta como me muestran en el diagrama pero no hacer el grupo de puntos altos de A.1. No entiendo muy bien a que se refieren con lo anterior Es decir debo terminar cada vuelta con 5cad, 1 p.b en arco de cad sig, 5 cad, 1 pb en arco de cad sig, 5 cad , 1 p.bjs en los 3 puntos siguientes?
23.06.2018 - 01:26DROPS Design answered:
Hola Andrea. Cuando tengas los 4 lados y las 4 esquinas trabajadas, para finalizar la vuelta trabajar como sigue: 1 punto enano en el 3º punto de cadeneta del inicio de la vuelta y después trabajar 3 puntos enanos en los tres puntos siguientes hasta llegar hasta la primera esquina del cuadrado.
23.06.2018 - 19:51
![]() Charlotte Bækdahl wrote:
Charlotte Bækdahl wrote:
Unfortunately, I didn't get an answer to my question. I kept crocheting and finished the cardigan but the result is very poor. I'm an experienced crocheter but never got to make a square nice and flat. The result is flappy, bulky and messy. I guess, I can steam it and get a better result but it's a major job - that has to be done after every wash. I definately can't recommend spending time on this design.
26.05.2018 - 11:47DROPS Design answered:
Hej Charlotte, Hvilket garn hækler du jakken i, hækler du i DROPS Safran? Hvilken omgang er det som bølger? Der er mange som har hæklet denne jakke så opskriften skal stemme. Mange damper gerne det færdige arbejde så bliver det endnu mere jævnt og pænt.
29.05.2018 - 13:06
![]() Anita Heimpel wrote:
Anita Heimpel wrote:
Ich komme ab der rund 4 nicht mehr weiter wird da weiter rundum gehäckelt ? und wir bei der strickanleitung von rehtsd nach links wenn das bild vor mir ist gehäckelt ich verzweifel gerade danke in vorraus
17.05.2018 - 16:09DROPS Design answered:
Liebe Frau Heimpel, bei der 4. Runde häkeln Sie so: Km bis 1. LmBogen, dann 3 Lm,2 Stb, 3 Lm, 3 Stb um den 1. Bogen, dann A.1 3 x wiederholen, bei dem letzten A.1 enden Sie mit 1 fm in den 3. Lm der Runde (und nicht mit 3 Stb,3 Lm, 3Stb um den nächsten 3-Lm-Bogen. Viel Spaß beim häkeln!
18.05.2018 - 08:50
![]() Femy wrote:
Femy wrote:
Dank! Wat betekenen die vertikale stippellijntjes op vierkant 20 en 21?
16.05.2018 - 11:50DROPS Design answered:
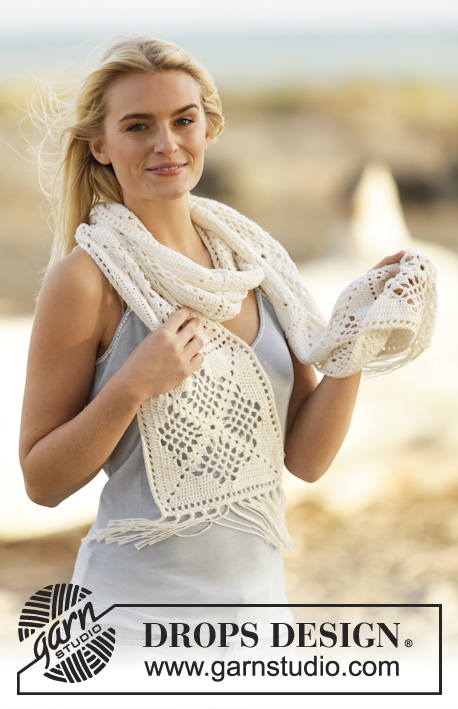
Hoi Femy, Die stippellijnen geven aan waar de zakken komen.
16.05.2018 - 16:20
![]() FEmy wrote:
FEmy wrote:
Ik kan niet helemaal zien waar ik de franjes aan moet maken. Aan de voorkant alleen boven?
14.05.2018 - 17:54DROPS Design answered:
Hallo FEmy, De franjes maak je tussen het 19e en 17e vierkant, aan bij het voorpand. Er staat om en om in de helft van de lossenlussen, maar tot hoever naar boven en beneden je de franjes plaatst kan je natuurlijk naar eigen inzicht doen.
14.05.2018 - 18:45
![]() Charlotte Bækdahl wrote:
Charlotte Bækdahl wrote:
Hej Mette Jeg fandt en video længere nede i feltet og syede firkanterne sammen på den måde. Mvh. Charlotte
06.05.2018 - 19:46
![]() Mette Jensen wrote:
Mette Jensen wrote:
Hvilke sting er der brugt til at sy felterne sammen...?
29.04.2018 - 10:47
|
||||||||||||||||||||||||||||||||||
Barcelona#barcelonajacket |
||||||||||||||||||||||||||||||||||
 |
 |
|||||||||||||||||||||||||||||||||
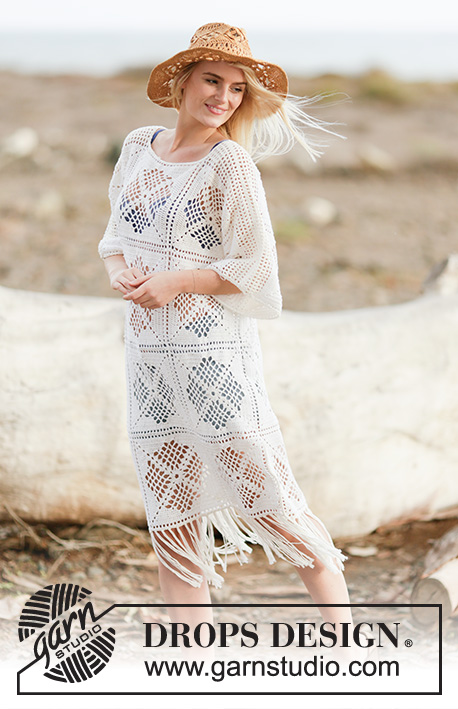
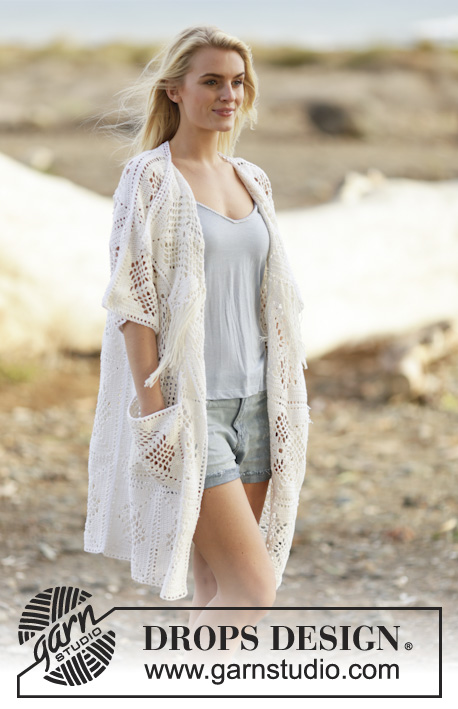
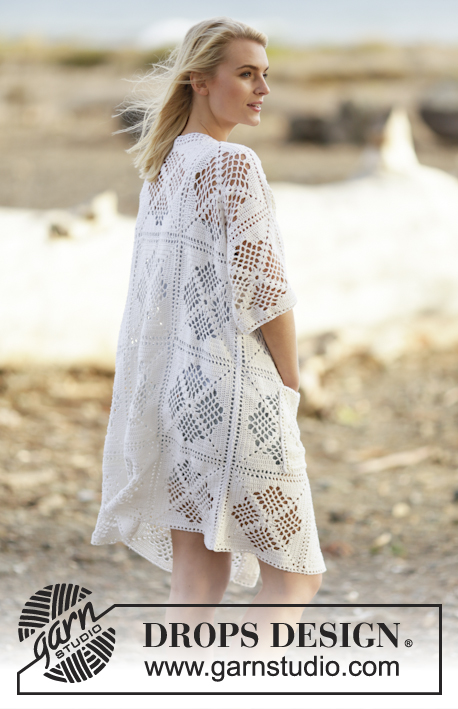
Crochet DROPS jacket with lace pattern and fringes in ”Safran”. Size S-XXXL.
DROPS 162-21 |
||||||||||||||||||||||||||||||||||
|
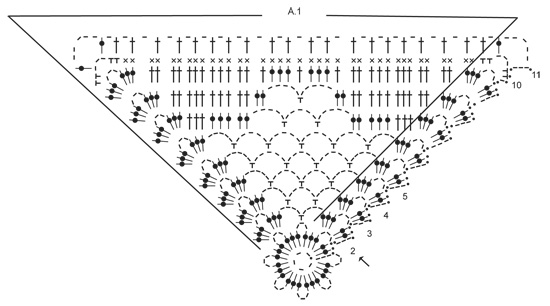
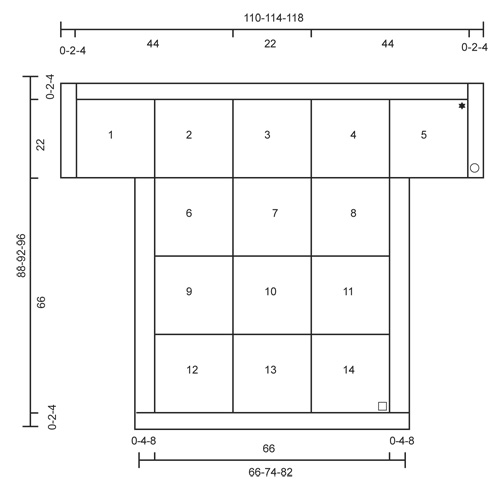
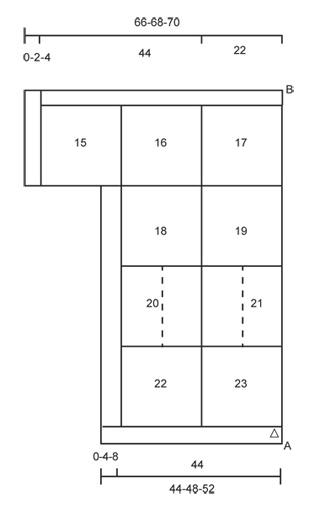
PATTERN: See diagram A.1. CROCHET INFO: Replace first sc at beg of every sc round with 1 ch. Finish every round with 1 sl st in ch from beg of round. Replace first dc at beg of every dc round with 3 ch. Finish round with 1 sl st in 3rd ch at beg of round. FRINGES: 1 FRINGE = Cut 2 lengths of 40 cm / 15 3/4'' each. Fold them double and pull loop through ch-space. Then pull yarn ends through the loop. Cut fringes to a length of approx. 19 cm / 7½". ---------------------------------------------------------- JACKET: Work 34 crochet squares before sewing them tog for front and back piece. Then work mesh pattern in the different sizes. CROCHET SQUARE: Work a crochet square as follows - see diagram A.1: Work 5 ch with Safran on hook size 3.5 mm/E/4 and form a ring with 1 sl st. ROUND 1: Work 3 ch (= 1 dc), then work 2 dc in ch-ring, * ch 3, 3 dc in ch-ring *, repeat from *-* 6 more times, ch 3, 1 sl st in 3rd ch at beg of round, 1 sl st in each of the next 3 sts (i.e. 1 sl st in the 2 next dc, 1 sl st in next ch). ROUND 2: 3 ch (= 1 dc), 2 dc in ch-space, ch 3, 3 dc in same ch-space, * ch 4, 1 sc in next ch-space, ch 4, 3 dc in ch-space, ch 3, 3 dc in same ch-space *, repeat from *-* (= A.1) 2 more times, ch 4, 1 sc in next ch-space, ch 4, 1 sl st in 3rd ch at beg of round, 1 sl st in each of the next 3 sts. ROUND 3: 3 ch (= 1 dc), 2 dc in ch-space, ch 3, 3 dc in same ch-space, * ch 5, 1 sc in next ch-space, ch 5, 1 sc in next ch-space, ch 5, 3 dc in ch-space, ch 3, 3 dc in same ch-space *, repeat from *-* (= A.1) 2 more times, ch 5, 1 sc in next ch-space, ch 5, 1 sc in next ch-space, ch 5, 1 sl st in 3rd ch at beg of round, 1 sl st in each of the next 3 sts. REMEMBER THE CROCHET GAUGE! ROUND 4-9: Continue as shown in diagram. Repeat A.1 4 times in total on round but finish as shown in diagram. I.e. do not work last dc-group in corner in A.1 the 4th time A.1 is repeated. Finish every round with 1 sl st in 3rd ch on round and 1 sl st in the next 3 sts. ROUND 10: Work ch 1, 2 sc in ch-space, ch 3, 2 sc in same ch-space, continue as shown in A.1. Finish with 1 sl st in first ch on round, 1 sl st in each of the next 2 sts. ROUND 11: 8 ch (= 1 dc + 5 ch), 1 dc in ch-space, continue as shown in A.1. Finish with 1 sl st in 3rd ch on round. Fasten off. Work another 33 squares the same way (= 34 squares). ASSEMBLY: Sew tog crochet squares as shown in chart. Make sure that to avoid a tight seam. You now have 1 back piece, 2 reversed front pieces and 2 loose squares for pockets. POCKETS: Work an edge around the square - READ CROCHET INFO: Beg with 1 sl st in corner on square and work (1 sc, ch 4, 1 sc) in ch-space. Continue as follows: * ch 1, 1 sc in next ch-space *, repeat from *-* until next corner and finish with 1 ch. Continue like this around the entire square and finish with 1 sl st in first st on round. Sew a pocket on to each front piece, placed on top of the seam between square 20 and 21 - see chart. Sew through both layers along both sides and bottom of square. SHOULDER: Beg with 1 sl st in ch-space in corner on 5th square - see chart. S/M: Work ch 1, * ch 1, 1 sc in next ch-space *, repeat from *-* over 5th-1st square. NOTE: Work 1 sc in seam between squares. Finish with 1 ch and 1 sc in last ch-space on 1st square. L/XL – XXL/XXXL: ROW 1: Work 3 ch (= 1 dc), * ch 1, 1 dc in next dc *, repeat from *-* over 5th -1st square. NOTE: Work 1 dc in seam between squares. Finish with 1 ch and 1 dc in last ch-space on 1st square. Turn and work like this back and forth until mesh pattern has been worked for 2-4 cm / 3/4"-1½". ALL SIZES: Work shoulder the same way on both front pieces, i.e. over 17th-15th square. Sew the shoulder seams. Sew the 2 outermost squares in each side on back piece tog with the 2 outermost squares on each front piece = 1 square for neck/overlap. SIDES: Beg with 1 sl st in ch-space in corner on 14th square - see chart. S/M: Work ch 1, * ch 1, 1 sc in next ch-space *, repeat from *-* over 14th, 11th and 8th square and continue under sleeve (= 5th square). L/XL – XXL/XXXL: Work ch 3, * ch 1, skip ch 1, 1 dc in next dc *, repeat over 14th, 11th and 8th square. Turn and work the same way back and forth until mesh pattern has been worked for 4-8 cm / 1 1/4"-3". ALL SIZES: Work the same way in the other side, repeat in the side on each front piece. ASSEMBLY: Sew side seams and underarm seams. Work an edge around the bands and neck. Beg in corner (A). Work ch 1, * ch 1, 1 sc in next ch-space *, repeat from *-* along the band and up to corner (B), work 4 ch in corner (B) and continue around the neck. Work the same way along the other band. Fasten off. Insert FRINGES - see explanation above, in every other ch-space on WS between 19th and 17th square. Repeat on the other front piece. EDGE AT THE BOTTOM: Work an edge at the bottom, beg from RS. Beg with 1 sl st in ch-space in corner of front piece, work along back piece and at the end along the other front piece. S/M: Work ch 1, * ch 1, 1 sc in next ch-space *, repeat along entire bottom edge. L/XL – XXL/XXXL: Work ch 3, * ch 1, 1 dc in next dc *, repeat from *-* along the entire bottom edge, turn and work the same way back and forth for 2-4 cm / 3/4"-1½". SLEEVE EDGE: Work an edge around the sleeve edge. Beg with 1 sl st mid under sleeve and work as follows from RS: S/M: ch 1, * ch 1, 1 sc in next ch-space *, repeat around the entire sleeve edge and finish with ch 1, 1 sl st in first ch at beg of round. Repeat around the other sleeve edge. L/XL - XXL/XXXL: ch 3, * ch 1, 1 dc in next dc *, repeat around the entire sleeve edge and finish with ch 1, 1 sl st in 3rd ch on round. Continue until edge measures 2-4 cm / 3/4"-1½". Repeat around the other sleeve edge. |
||||||||||||||||||||||||||||||||||
Diagram explanations |
||||||||||||||||||||||||||||||||||
|
||||||||||||||||||||||||||||||||||
 |
||||||||||||||||||||||||||||||||||
 |
||||||||||||||||||||||||||||||||||
 |
||||||||||||||||||||||||||||||||||
Have you finished this pattern?Tag your pictures with #dropspattern #barcelonajacket or submit them to the #dropsfan gallery. Do you need help with this pattern?You'll find 9 tutorial videos, a Comments/Questions area and more by visiting the pattern on garnstudio.com. © 1982-2026 DROPS Design A/S. We reserve all rights. This document, including all its sub-sections, has copyrights. Read more about what you can do with our patterns at the bottom of each pattern on our site. |
||||||||||||||||||||||||||||||||||


With over 40 years in knitting and crochet design, DROPS Design offers one of the most extensive collections of free patterns on the internet - translated to 17 languages. As of today we count 325 catalogs and 12298 patterns - 12288 of which are translated into English (US/in).
We work hard to bring you the best knitting and crochet have to offer, inspiration and advice as well as great quality yarns at incredible prices! Would you like to use our patterns for other than personal use? You can read what you are allowed to do in the Copyright text at the bottom of all our patterns. Happy crafting!
Post a comment to pattern DROPS 162-21
We would love to hear what you have to say about this pattern!
If you want to leave a question, please make sure you select the correct category in the form below, to speed up the answering process. Required fields are marked *.