
Popular categories
Looking for a yarn?


Comments / Questions (30)
Moreau Annie Angele wrote:
Bonjour,je viens de commencer le tricot Du gilet "brume"avec de la laine"big merino"et je m'aperçois qu'en tricotant le dos pour une taille M,j'en suis déjà à ma 5 pelote,combien de pelotes ai-je besoin en tout?Merci pour la réponse.A.Moreau
06.11.2014 - 17:08DROPS Design answered:
Bonjour Mme Moreau, vous trouverez ici la technique pour calculer le nombre total de pelotes nécessaire lorsque vous utilisez une équivalence. Pensez toujours à bien vérifier aussi votre échantillon. Bon tricot!
07.11.2014 - 10:08
![]() Miriam Anthun wrote:
Miriam Anthun wrote:
Jeg skal begynne å felle til hals på forstykket. Feller jeg da de ytterste maskene? Eller feller jeg jevnt på hele pinnen?
19.10.2014 - 20:23DROPS Design answered:
Hej Miriam, Når du feller til hals, feller du de masker som er nærmest halsen. God fornøjelse!
20.10.2014 - 14:48
![]() Ingunn Omland wrote:
Ingunn Omland wrote:
Strikker str S. Skal felle 31 m for nakken så vil det bli som i oppskriften på skuldrene. Tror det blir bra.
18.09.2014 - 20:53
![]() Ingunn Omland wrote:
Ingunn Omland wrote:
Får ikke maskeantallet på ryggen til å stemme etter arm felling og legge til en maske i kvar side. Får 85 masker?
17.09.2014 - 20:35DROPS Design answered:
Hvilken størrelse strikker du efter?
18.09.2014 - 10:57
![]() Linn wrote:
Linn wrote:
Nydelig jakke! Er modellen på bildet strikket i Brushed Alpacka Silk eller Air?
14.08.2014 - 18:58DROPS Design answered:
Hei Linn. Modellen paa billedet er strikke i Air.
15.08.2014 - 14:34
![]() Jeanette wrote:
Jeanette wrote:
Vil meget gerne lave denne her i sommer, så den er klar til sensommeren!
02.07.2014 - 11:49
![]() Jeanette Braagaard wrote:
Jeanette Braagaard wrote:
Den er super lækker - oversize og rå
02.07.2014 - 11:44
![]() Müller wrote:
Müller wrote:
Da freut man sich wieder aus die kühleren Tage.
01.07.2014 - 13:57
![]() Dagmar Kordoff wrote:
Dagmar Kordoff wrote:
Håber at den kommer med den kan også beuges af xxxxxl typer
02.06.2014 - 17:20
![]() Dagmar Kordoff wrote:
Dagmar Kordoff wrote:
Håber virkelig den kommer med den kan også bruges af xxxxxxltyper
02.06.2014 - 17:19
|
|
Brume Cardigan#brumecardigan |
|
|
|
|
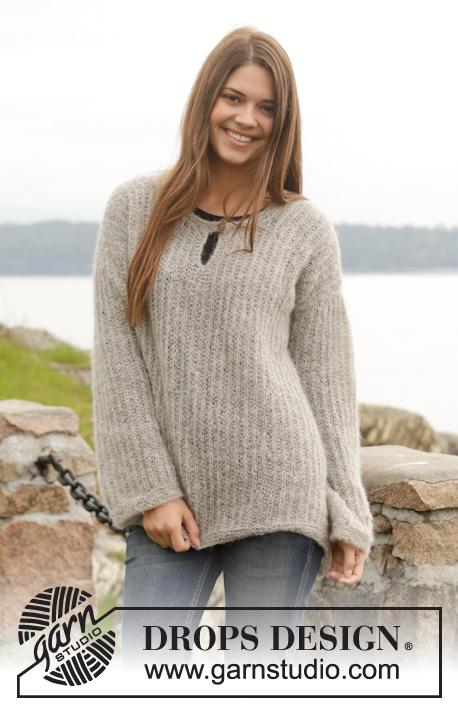
Knitted DROPS jacket with false English rib in "Air" or "Brushed Alpaca Silk". Size: S - XXXL.
DROPS 158-24 |
|
|
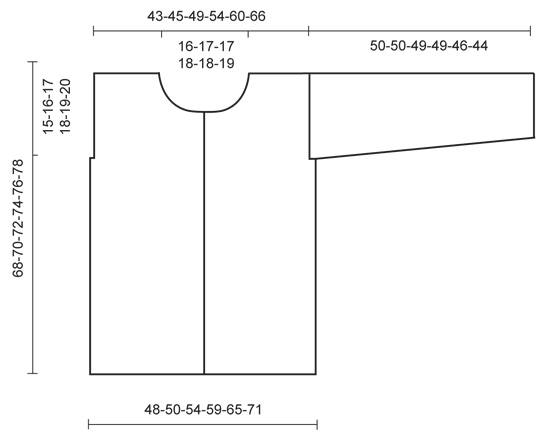
GARTER ST (back and forth on needle): K all rows. 1 ridge = K2 rows. MEASURING TIP: All measurements must be done when piece is held up because the texture makes the piece elastic. FALSE ENGLISH RIB: Row 1: 1 edge st in garter st, * K 1, 1 YO, slip 1 st as if to P (with yarn behind piece) *, repeat from *-* until 2 sts remain, finish with K 1 and 1 edge st in garter st. Row 2: 1 edge st in garter st, * K 1, P tog YO and slipped st *, repeat from *-* until 2 sts remain, finish with K 1 and 1 edge st in garter st. Repeat 1st and 2nd row upwards. DECREASE TIP (applies to sleeve): Dec 1 st in each side by K 2 tog inside 1 edge st in garter st. Work sts in the side that do not fit the pattern in stockinette st. BUTTONHOLES: Dec for buttonhole by K tog 3rd and 4th st in garter st in band and make a YO, K YO on next row. Dec for buttonholes when piece measures: SIZE S: 24, 33, 42, 51 and 60 cm / 9½",13",16½",20",23½" SIZE M: 26, 35, 44, 53 and 62 cm / 10¼",13¾",17¼",21",24½" SIZE L: 28, 37, 46, 55 and 64 cm / 11",14½",18",21½",25¼" SIZE XL: 21, 30, 39, 48, 57 and 66 cm / 8¼",11¾",15¼",19",22½" SIZE XXL: 23, 32, 41, 50, 59 and 68 cm / 9",12½",16⅛",19¾",23¼",26¾" SIZE XXL: 25, 34, 43, 52, 61 and 70 cm / 9¾",13½",17",20½",24",27½" -------------------------------------------------------- JACKET: Worked back and forth on circular needle. BACK PIECE: Cast on 93-97-105-113-125-137 sts on circular needle size 4 mm / US 6 with 2 strands Air or Brushed Alpaca Silk. Then continue piece with 1 strand. Work in GARTER ST – see explanation above – until piece measures 2 cm / ¾". REMEMBER THE GAUGE! Then work FALSE ENGLISH RIB - see explanation above. READ MEASURING TIP! When piece measures 53-54-55-56-57-58 cm / 21"-21¼"-21⅝"-22"-22½"-22¾", bind off 5 sts in each side. On next row cast on 1 edge st in each side which is worked in garter st until finished measurements = 85-89-97-105-117-129 sts. Continue to work until piece measures 64-66-68-70-72-74 cm / 25¼"-26"-26¾"-27½"-28⅜"-29⅛". Work the first 27-29-32-36-41-47 sts, bind off the next 31-31-33-33-35-35 sts and work the rest of row. Then finish each shoulder separately. On next row dec 1 more st towards the neck = 26-28-31-35-40-46 sts. Work until piece measures 68-70-72-74-76-78 cm / 26¾"-27½"-28⅜"-29⅛"-30"-30¾". K 1 row from WS and bind off with K on next row. Work the same way on the other side. RIGHT FRONT PIECE: Cast on 50-52-56-60-66-72 sts on circular needle size 4 mm / US 6 with 2 strands Air or Brushed Alpaca Silk. Then continue piece with 1 strand. Work back and forth in garter st until piece measures 2 cm / ¾". Then work false English rib with 4 band sts in garter st in towards mid front. When piece measures 24-26-28-21-23-25 cm / 9½"-10¼"-11"-8¼"-9"-9¾", dec for BUTTONHOLE - see explanation above! When piece measures 53-54-55-56-57-58 cm / 21"-21¼"-21⅝"-22"-22½"-22¾", bind off 5 sts in the side for armhole. On next row cast on 1 edge st in the side which is worked in garter st until finished measurements = 46-48-52-56-62-68 sts. Continue to work until piece measures 58-60-62-64-66-68 cm / 22¾"-23⅝"-24⅜"-25¼"-26"-26¾". Now dec in every row from RS for neck towards mid front as follows: 10-10-11-11-12-12 sts 1 time, 3 sts 1 time and 2 sts 3 times and 1 st 1 time = 26-28-31-35-40-46 sts. Continue to work until piece measures 68-70-72-74-76-78 cm / 26¾"-27½"-28⅜"-29⅛"-30"-30¾". K 1 row from WS and bind off with K from RS. LEFT FRONT PIECE: Work as right front piece but reversed. Do not dec for buttonholes on left band. ASSEMBLY: Sew tog shoulder seams inside bind-off edges. SLEEVES: Worked back and forth on circular needle, top down. Beg from RS and pick up 60-80 sts with circular needle size 4 mm / US 6 and Air or Brushed Alpaca Silk. Pick up sts between where sts were bind off for armhole (NOTE: Do not work over sts bind off for armhole). P 1 row - AT THE SAME TIME adjust no of sts to 57-61-65-69-73-77 and cast on 5 new sts in each side of piece = 67-71-75-79-83-87 sts. Then work piece in false English rib with 1 edge st in garter st in each side - AT THE SAME TIME when piece measures 3 cm / 1", dec 1 st in each side - READ DECREASE TIP. Repeat dec every 4-4-3-3-3-2 cm / 1½"-1½"-1"-1"-1"-¾" 9-10-11-12-13-14 times in total = 49-51-53-55-57-59 sts. Work until sleeve measures 48-48-47-47-44-42 cm / 19"-19"-18½"-18½"-17¼"-16½". Work in garter st over all sts for 2 cm / ¾" and bind off 2 strands. Make another sleeve the same way. NECK EDGE: Worked back and forth on circular needle with Air or Brushed Alpaca Silk. Pick up approx. 64-72 sts with circular needle size 4 mm / US 6 along neck edge, beg in right side of front piece from RS. K 1 row from WS. On next row dec for a buttonhole by K tog 3rd and 4th st and making a YO. K from WS, K YO to make a hole. Work 1 ridge. Bind off with 2 strands from RS. ASSEMBLY: Sew sleeves tog inside 1 edge st, sew sts cast on on sleeve to sts bind off for armhole on body. Finally sew down along the side of front piece and back piece. Sew on buttons. |
|
 |
|
Have you finished this pattern?Tag your pictures with #dropspattern #brumecardigan or submit them to the #dropsfan gallery. Do you need help with this pattern?You'll find 19 tutorial videos, a Comments/Questions area and more by visiting the pattern on garnstudio.com. © 1982-2026 DROPS Design A/S. We reserve all rights. This document, including all its sub-sections, has copyrights. Read more about what you can do with our patterns at the bottom of each pattern on our site. |


With over 40 years in knitting and crochet design, DROPS Design offers one of the most extensive collections of free patterns on the internet - translated to 17 languages. As of today we count 324 catalogs and 12284 patterns - 12274 of which are translated into English (US/in).
We work hard to bring you the best knitting and crochet have to offer, inspiration and advice as well as great quality yarns at incredible prices! Would you like to use our patterns for other than personal use? You can read what you are allowed to do in the Copyright text at the bottom of all our patterns. Happy crafting!
Post a comment to pattern DROPS 158-24
We would love to hear what you have to say about this pattern!
If you want to leave a question, please make sure you select the correct category in the form below, to speed up the answering process. Required fields are marked *.