
Popular categories
Looking for a yarn?


Comments / Questions (317)
![]() Anna wrote:
Anna wrote:
Wenn ich die Jacke fertig habe, möchte ich sie auf Instagram posten. Soll ich dazu schreiben von wem ich die Anleitung habe? Wenn ja was soll ich dazu schreiben?
20.05.2025 - 22:16DROPS Design answered:
Liebe Anna, ja bitte, gerne schreiben Sie, daß die Anleitung @dropsdesign ist und gerne könnnen Sie uns auch mal taggen, damit wir sie auch sehen können. Wir freuen uns schon!
22.05.2025 - 15:06
![]() Anna wrote:
Anna wrote:
Wie viel Meter Wolle braucht man dafür?
20.05.2025 - 21:13DROPS Design answered:
Liebe Anna, die gesamte Garnmenge finden Sie unter Tab "Anleitung" oben der Seite, je nach der Größe - teilen Sie das Gewicht durch 50 g = 1 Knäuel DROPS Alpaca, so haben Sie die Anzahl von Knäuel, dann multiplizieren diese Anzahl mit der Lauflänge von einem Knäuel Alpaca (167 m - siehe Farbkarte), so wissen Sie wieviele Meter Sie für die gewählte Größe brauchen. Viel Spaß beim Häkeln!
21.05.2025 - 08:30
![]() Anna wrote:
Anna wrote:
Es wäre gut wenn es dafür noch eine Bilder Anleitung gäbe, damit man die Anleitung besser verstehen kann. Ohne ist es schwer zu verstehen.
19.05.2025 - 15:48DROPS Design answered:
Liebe Anna, weitere Bilder haben wir leider nicht, aber gerne können Sie Ihre Frage hier stellen, wir versuchen, Ihnen zu helfen. Viel Spaß beim Häkeln!
19.05.2025 - 16:18
![]() Helga Embrechts wrote:
Helga Embrechts wrote:
Goedemiddag, ik begin aan het rechtervoorpand, markeerder 1 - 2. Ik begriip hier het systeem van meerderen niet. Meerderen als in de vorige stekengroep betekent dan zoals in toer 27-50 voor maar S/M? Is dat dan ook enkel in de even toeren? Daarnaast wordt er gezegd : MAAR meerder niet in de stk-groepen aan elke zijkant van het voorpand - minder TEGELIJKERTIJD 2 stk aan het begin van elke toer . Waar moet ik nu precies meerdere en minderen? Bedankt
26.03.2025 - 16:29
![]() Lisa Wilson wrote:
Lisa Wilson wrote:
Good morning, I'm getting so close! On the sleeves where I start the row 1 pattern group. "2 DC TOG, 1 CH" Where the CH 1 is, do I skip the DC underneath of it, leaving a DC space between the pattern group?
23.03.2025 - 14:39DROPS Design answered:
Dear Lisa, no, you don't skip the dc. The chain stitches helps keep the space corresponding to the width of the decreased dc. Happy crochetting!
23.03.2025 - 20:03
![]() Lisa Wilson wrote:
Lisa Wilson wrote:
I'm confused on joining and how to decrease for the sleeves. 1. For the first 4 rows, working back and forth .. I slip stitch to first stitch and turn. Do I chain 2 or anything before DC in the first DC? 2. I don't understand the Dec and the Decrease tip at all.
09.03.2025 - 18:42DROPS Design answered:
Dear Lisa, you work chain 3 at the beginning of each tr round. These chain 3 substitute the 1st dc. Dec = Decrease. So you decrease 1 stitch at each side (that is, at the beginning and the end of the row). You decrease at the beginning of the row by working 1 slip stitch in the first dc (so this stitch is decreased). You decrease at the end of the row by turning the piece when 1 stitch is left (so you skip the last dc and decrease it). Happy crochetting!
09.03.2025 - 20:35
![]() Rachel wrote:
Rachel wrote:
Bonjour, Je suis à la fin de ce beau gilet ... mais je ne comprend pas comment faire la bordure. Pouvez vous m'expliquer ? Merci
26.02.2025 - 14:20DROPS Design answered:
Bonjour Rachel, vous allez simplement crocheter un groupe de motif (1 ml, 2 brides écoulées ensemble, 2 ml, 2 brides écoulées ensemble dans la même maille, 1 ml) toutes les 3 brides (lorsque vous crochetez dans les mailles des derniers tours/rangs) ou bien tous les 2 rangs (lorsque vous crochetez le long des rangs, de chaque côté des devants par exemple). Bon crochet!
26.02.2025 - 17:46
![]() Morag Dalton wrote:
Morag Dalton wrote:
Hi. Please help......I am on row 18 ( including first circle rounds). I have 13 trebles between rows. My measurement from middle to edge is 20.5 cm already . Xx
15.01.2025 - 19:07
![]() Sonja wrote:
Sonja wrote:
Hallo, ich glaube es muss heißen: "GR. L/XL: 27. R (= Rück-R): Es wird in jeder Gruppe mit Stb wie zuvor zugenommen. 22 Stb häkeln, 1 Muster-Gruppe, 22 Stb, 54 lockere Lm (= rechter Armausschnitt), 2 Stb-Gruppen + 2 Muster-Gruppen überspringen. Im Muster wie zuvor über die nächsten 132!!! Stb häkeln, usw" weil ja 6 Felder mit je 22 Stb übersprungen werden, sonst macht die Anleitung keinen Sinn, kann das sein? Bitte um kurze Rückantwort, vielen Dank!
15.12.2024 - 14:54
![]() Sonja wrote:
Sonja wrote:
Hallo, ich glaube es muss heißen: "GR. L/XL: 27. R (= Rück-R): Es wird in jeder Gruppe mit Stb wie zuvor zugenommen. 22 Stb häkeln, 1 Muster-Gruppe, 22 Stb, 54 lockere Lm (= rechter Armausschnitt), 2 Stb-Gruppen + 2 Muster-Gruppen überspringen. Im Muster wie zuvor über die nächsten !!132!!! Stb häkeln, usw" weil ja 6 Felder mit je 22 Stb übersprungen werden, sonst macht die Anleitung keinen Sinn, kann das sein? Bitte um kurze Rückantwort, vielen Dank!
15.12.2024 - 14:53Sonja answered:
Sorry, Denkfehler... Ja es stimmt so wie es da steht: in die nächsten 126 Stäbchen häkeln (=6 Felder)... Es ist nur verwirrend weil 132 Stäbchen in die nächsten 126 Stäbchen gehäkelt werden, eindeutiger wäre es wenn dort stehen würde 6*22 Stäbchen und 5 Mustergruppen häkeln (bevor der nächste Armausschnitt kommt)
15.12.2024 - 15:02
|
|
Winter Solstice#wintersolsticecardigan |
|
 |
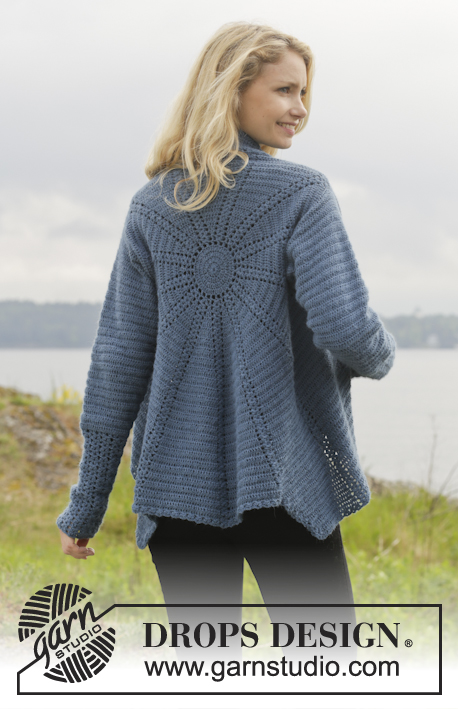 |
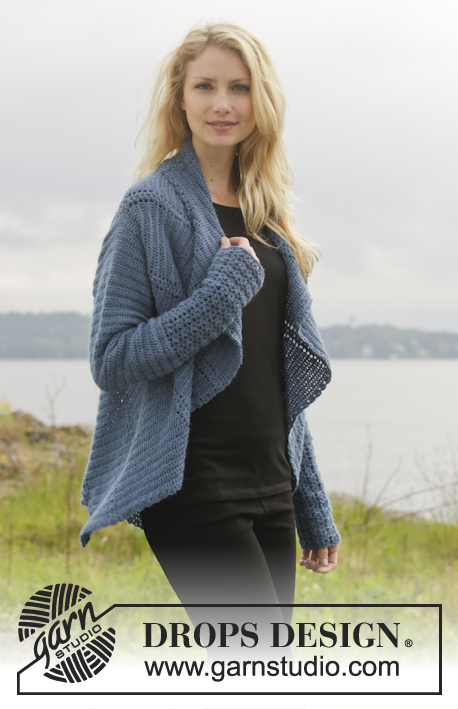
Crochet DROPS jacket worked in a circle in "Alpaca". Size: S - XXXL.
DROPS 158-10 |
|
|
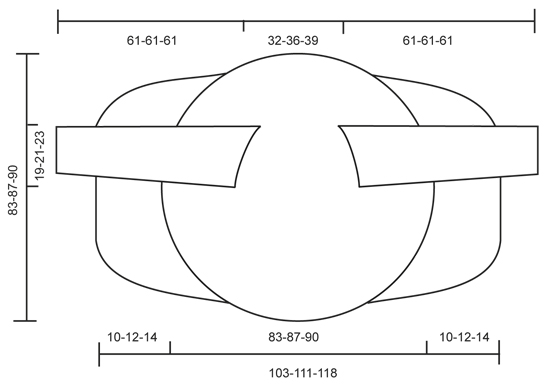
CROCHET INFO: Beg every round/row with 3 ch that replace 1st dc and finish every round/row with 1 sl st in 3rd ch from beg of round/row. PATTERN GROUP: Each pattern group consists of: ch 1, 2 dc WORKED TOG - see explanation below, ch 2, 2 dc worked tog and 1 ch. DC WORKED TOG: * Make 1 YO, insert hook in ch-space, get yarn, make a YO, pull through 2 of the sts on hook *, repeat from *-* one more time, make 1 YO and pull yarn through all 3 sts on hook. CROCHET 3 dc TOG: Work 3 dc into 1 dc at beg of row as follows: Work 2 ch (= replace 1 dc), work 1 dc, but wait with last pull through (= 2 strands on hook), then work next dc but on last pull through, pull yarn through all sts on hook. DECREASE TIP (applies to sleeves): Dec at beg of row by working 1 sl st over the dc to be dec. Dec at end of row by working until 1 dc to be dec remains, turn piece. -------------------------------------------------------- CIRCLE: Work 5 ch on hook size 3.5 mm/E with Alpaca and form a ring with 1 sl st in first ch. READ CROCHET INFO. ROUND 1: Work 13 dc in ch-ring. ROUND 2: Work * 2 dc in every dc*, repeat from *-* the entire round = 26 dc. ROUND 3: Work * 2 dc in first dc, then 1 dc in next dc *, repeat from *-* the entire round = 39 dc. ROUND 4: Work * 2 dc in first dc, then 1 dc in each of the next 2 dc *, repeat from *-* the entire round = 52 dc. ROUND 5: Work * 1 dc in next dc, then ch 2, skip 1 dc *, repeat from *-* the entire round = 26 ch-spaces and 26 dc. REMEMBER THE CROCHET GAUGE! ROUND 6: In first dc work PATTERN GROUP - see explanation above, * 1 dc in next dc, 1 pattern group in next dc *, repeat from *-* until 1 dc remains, 1 dc in last dc = 13 pattern groups with 1 dc between each. Then work piece back and forth. Work every row tog at the end of row with 1 sl st in first st on row. Turn piece. ROW 7 (= from WS): 2 dc in first dc, * 1 pattern group in next pattern group, 2 dc in next dc (= dc-group) *, repeat from *-* until 1 pattern group from previous row remains, 1 pattern group = 13 pattern groups with 13 dc-groups between each. Turn piece. ROW 8: 1 pattern groups in first pattern group, * 2 dc in first dc, 1 dc in each of the next dc in dc-group, 1 pattern group in next pattern group *, repeat from *-* until 1 dc-group remains, 2 dc in first dc, 1 dc in each of the next dc in dc-group = 13 groups with 3 dc between each. Turn piece. ROW 9: 2 dc in first dc, 1 dc in each of the next dc in dc-group, * 1 pattern group in pattern group, 2 dc in first dc of dc-group, 1 dc in each of the next dc *, repeat from *-* until 1 pattern group from previous row remains, 1 pattern group = 13 groups with 4 dc between each. Turn piece. Then repeat 8th and 9th row until 6 rounds + 18-20-22 rows have been worked (= 19-21-23 dc between every pattern group) = 247-273-299 dc and 13 pattern group. Piece measures approx. 20-22-23 cm / 8"-8¾"-9" from middle and outwards. Now work armholes as follows in the different sizes: SIZE S/M: ROW 25 (= from WS): Inc in every groups with dc as before. Work 20 dc, 1 pattern group, 20 dc, work 50 loose ch (= right armhole), skip 2 dc-groups and 2 pattern groups. Then work dc-groups and pattern groups as before over the next 114 dc, work 50 loose ch (= left armhole), skip 2 dc-groups and 2 pattern groups, work as before the rest of row, finish with 1 sl st in first dc on row = 180 dc and 100 ch. Turn piece. ROW 26: Continue with pattern and inc as before but work first ch-row (= left armhole) as follows: 10 dc, skip ch 1, 11 dc, skip ch 1, 1 pattern group, skip ch 1, 11 dc, skip ch 1, 10 dc, skip ch 1, 1 pattern group and skip 1 ch. I next ch-row (= right armhole) work the same way but in opposite order, i.e. beg by skipping ch 1, 1 pattern group and finish with dc = 273 dc. ROW 27-50: Work pattern as before but now inc only on even numbered rows until 50 rows have been worked in total = 429 dc (33 dc in every dc-group). Piece measures approx. 42 cm / 16½" from middle and outwards. Fasten off. SIZE L/XL: ROW 27 (= from WS): Inc in every groups with dc as before. Work 22 dc, 1 pattern group, 22 dc, work 54 loose ch (= right armhole), skip 2 dc-groups and 2 pattern groups. Then work pattern as before over the next 126 dc, work 54 loose ch (= left armhole), skip 2 dc-groups and 2 pattern groups, work as before the rest of row, finish with 1 sl st in first dc on row = 198 dc and 108 ch. Turn piece. ROW 28: Continue with pattern and inc as before but work first ch-row (= left armhole) as follows: 11 dc, skip ch 1, 12 dc, skip ch 1, 1 pattern group, skip ch 1, 12 dc, skip ch 1, 11 dc, skip ch 1, 1 pattern group and skip 1 ch. I second ch-row (= right armhole) work the same way but in opposite order, i.e. beg by skipping ch 1, 1 pattern group and finish with dc = 299 dc. ROW 29-52: Work pattern as before but now inc only on even numbered rows until 52 rows have been worked in total = 455 dc (35 dc in every dc-group). Piece measures approx. 43 cm / 17" from middle and outwards. Fasten off. SIZE XXL/XXXL: ROW 29 (= from WS): Inc in every groups with dc as before. Work 24 dc, 1 pattern group, 24 dc, work 58 loose ch (= right armhole), skip 2 dc-groups and 2 pattern groups. Then work pattern as before over the next 138 dc, work 58 loose ch (= left armhole), skip 2 dc-groups and 2 pattern groups, work as before the rest of row, finish with 1 sl st in first pattern group on row = 216 dc and 116 ch. Turn piece. ROW 30: Continue with pattern and inc as before but work first ch-row (= left armhole) as follows: 12 dc, skip ch 1, 13 dc, skip ch 1, 1 pattern group, skip ch 1, 13 dc, skip ch 1, 12 dc, skip ch 1, 1 pattern group and skip 1 ch. I second ch-row (= right armhole) work the same way but in opposite order, i.e. beg by skipping ch 1, 1 pattern group and finish with dc = 325 dc. ROW 31-54: Work pattern as before but now inc only on even numbered rows until 54 rows have been worked in total = 481 dc and 37 dc in every dc-group. Piece measures approx. 45 cm / 17¾" from middle and outwards. Fasten off. ALL SIZES: Insert 4 markers in the piece as follows from WS: Work 16-17-18, insert 1st marker here, work 17-18-19 dc, * 1 pattern group, 33-35-37 dc *, repeat from *-* 3 more times, insert 2nd marker here (1st-2nd marker = right front piece). Work 1 pattern group, 33-35-37 dc, 1 pattern group, 33-35-37 dc and 1 pattern group, insert 3rd marker here. * Work 33-35-37 dc, 1 pattern group *, repeat from *-* 3 more times, 17-18-19 dc, insert 4th marker. (3rd-4th marker = left front piece). Work the rest of row. Sts between 1st and 4th marker are up towards neck. Cut the yarn and fasten. RIGHT FRONT PIECE: Now work right front piece between 1st and 2nd marker, beg from 2nd marker (i.e. from RS) = 149-158-167 dc and 4 pattern groups. Continue inc on every row in dc-groups as before BUT do not inc in dc-groups in each side of front piece - AT THE SAME TIME dec 2 dc at beg of every row by CROCHET 3 dc TOG - see explanation above. Continue to work until 12-14-16 rows have been worked over front piece. Cut the yarn and fasten. LEFT FRONT PIECE: Work left front piece between 3rd and 4th marker the same way as right front piece, beg from 4th marker (i.e. from RS). SLEEVES: Work back and forth from armhole and down, work every row tog with 1 sl st at the end of row. Use hook size 3.5 mm and Alpaca. Beg by working 86-94-102 dc around the opening for sleeve, beg of row should be under sleeve. Then work 3 rows with 1 dc in every dc. Continue with 1 dc in every dc - AT THE SAME TIME dec in the different sizes as follows: READ DECREASE TIP! SIZE S/M: Dec 1 st in each side of piece every other row 4 times and then every 3rd row 12 times (= 16 times in total) = 54 dc. SIZE L/XL: Dec 1 st in each side of piece alternately every 3rd and 2nd row 18 times in total = 58 dc. SIZE XXL/XXXL: Dec 1 st in each side of piece every other row 17 times and then every 3rd row 4 times (= 21 times in total) = 60 dc. Then work pattern groups as follows: ROW 1: 2 dc, 1 ch * work the next 2 dc tog, 1 ch *, repeat from *-* and finish with 2 dc. ROW 2: Work 2 dc, * in next ch work 1 pattern group, skip 1 ch *, repeat from *-*, and finish with 1 dc in each of the last 2 dc. Turn piece. ROW 3: Work 2 dc, 1 pattern group in each of the next pattern groups until 2 dc remain, work 1 dc in each of these. Turn piece. Repeat 3rd row until piece measures approx. 61 cm / 24" in all sizes. Fasten off. CROCHET EDGE: Work 1 round with around the entire jacket as follows: * 1 pattern group, skip 2 dc/1 row *, repeat from *-* the entire round. |
|
 |
|
Have you finished this pattern?Tag your pictures with #dropspattern #wintersolsticecardigan or submit them to the #dropsfan gallery. Do you need help with this pattern?You'll find 8 tutorial videos, a Comments/Questions area and more by visiting the pattern on garnstudio.com. © 1982-2026 DROPS Design A/S. We reserve all rights. This document, including all its sub-sections, has copyrights. Read more about what you can do with our patterns at the bottom of each pattern on our site. |
|


With over 40 years in knitting and crochet design, DROPS Design offers one of the most extensive collections of free patterns on the internet - translated to 17 languages. As of today we count 324 catalogs and 12290 patterns - 12280 of which are translated into English (US/in).
We work hard to bring you the best knitting and crochet have to offer, inspiration and advice as well as great quality yarns at incredible prices! Would you like to use our patterns for other than personal use? You can read what you are allowed to do in the Copyright text at the bottom of all our patterns. Happy crafting!
Post a comment to pattern DROPS 158-10
We would love to hear what you have to say about this pattern!
If you want to leave a question, please make sure you select the correct category in the form below, to speed up the answering process. Required fields are marked *.