DROPS Alpaca
DROPS Alpaca
100% Alpaca
from 4.85 $ /50g
DROPS Kid-Silk
DROPS Kid-Silk
75% Mohair, 25% Silk
from 6.75 $ /25g
Get the yarn to make this pattern from 62.85$.

The yarn cost is calculated from the pattern’s smallest size and the yarn’s cheapest product type. Looking for an even better price? You might find it on the DROPS Deals!

DROPS SS24

Blue For You

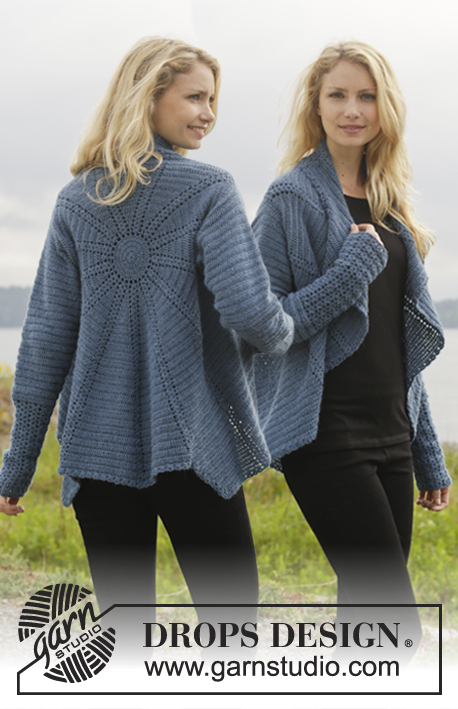
Knitted DROPS jacket with cables, lace pattern and raglan in ”Alpaca” and ”Kid-Silk”. Size: S - XXXL.

DROPS 158-4
DROPS design: Pattern no z-683
Yarn group A + A or C
----------------------------------------------------------
Size: S - M - L - XL - XXL - XXXL
Finished measurements:
Bust: 88-96-104-114-124-136 cm / 34½"-37 3/4"-41"-45"-48 3/4"-53½"
Full length: 66-68-70-72-74-76 cm / 26''-26¾''-27½''-28 3/8''-29 1/8''-30''

Materials:
DROPS ALPACA from Garnstudio
300-350-400-450-450-500 g color no 6309, medium petrol
and use:
DROPS KID-SILK from Garnstudio
125-150-175-175-200-225 g color no 24, petrol

DROPS DOUBLE POINTED NEEDLES AND CIRCULAR Needle size 5 mm / US 8 (80 cm / 32'') - or size needed to get 17 sts x 22 rows in stockinette st with 1 strand of each yarn = 4'' x 4'' (10 x 10 cm).
DROPS DOUBLE POINTED NEEDLES and CIRCULAR NEEDLE (80 cm / 32'') SIZE 4.5 mm /US 7 - for edge in garter st.
DROPS SEASHELL BUTTON, NO 526: 7-7-8-8-8-8 pieces

-------------------------------------------------------

Alternative Yarn – See how to change yarns here
Yarn Groups A to F – Use the same pattern and change the yarn here
Yarn usage using an alternative yarn – Use our yarn converter here

-------------------------------------------------------

DROPS Alpaca
DROPS Alpaca
100% Alpaca
from 4.85 $ /50g
DROPS Kid-Silk
DROPS Kid-Silk
75% Mohair, 25% Silk
from 6.75 $ /25g
Get the yarn to make this pattern from 62.85$.

The yarn cost is calculated from the pattern’s smallest size and the yarn’s cheapest product type. Looking for an even better price? You might find it on the DROPS Deals!

Pattern instructions

NOTE: This pattern is written in American English. All measurements in charts are in cm. For conversion from inches to cm - click here. There are different terms for crocheting in American and British English. If this pattern includes crochet, click for "crochet terms" here. For this pattern in British English, please click here.
GARTER ST (in the round on circular needle):
* K 1 round and P 1 round *, repeat from *-*. 1 ridge = 2 rounds.

GARTER ST (back and forth on needle):
K all rows. 1 ridge = K2 rows.

PATTERN:
See diagrams A.1 to A.6. The diagrams show all rows in pattern seen from RS.

DECREASE TIP:
All dec are done from RS!
Dec 1 st on each side of markers as follows: Work until 2 sts remain before marker, slip 1 st as if to K, K 1, psso, K tog the next 2 sts.

INCREASE TIP (applies to sleeve):
Work until 1 st remains before marker, 1 YO, 2 sts in stockinette st (marker is in the middle of these), 1 YO = 2 sts inc. On next round K YO twisted (i.e. work in back loop of st instead of front) to avoid holes.

RAGLAN:
All dec are done from RS!
Dec on each side of marker, until P sts in A.5a/A.5b towards sleeve meet marker. Then dec on each side of cable and 2 P sts towards mid front and mid back. Dec on every row from RS as follows:

Dec 1 st on each side of every raglan (i.e. 8 sts dec on row):
Dec as follows BEFORE marker and cable: Beg 2 sts before marker, K 2 tog.
Dec as follows AFTER marker, cable and 2 P sts: Slip 1 st as if to K, K 1, psso

Then dec 2 sts on each side of every raglan (i.e. 16 sts dec on row):
Dec as follows BEFORE marker and cable: Beg 3 sts before marker, K 3 tog = 2 sts dec.
Dec as follows AFTER marker, cable and 2 P sts: Slip 1 st as if to K, K 2 tog, psso.

BUTTONHOLES:
Dec for buttonholes on right band. 1 buttonhole = K tog third and fourth st from edge and make 1 YO.
Dec for buttonholes when piece measures:
SIZE S: 4, 14, 24, 34, 44, 53 and 62 cm / 1½",5½",9½",13½",17 1/4",21",24½"
SIZE M: 4, 14, 24, 34, 44, 54 and 64 cm / 1½",5½",9½",13½",17 1/4",21 1/4",25 1/4"
SIZE L: 3, 12, 21, 30, 39, 48, 57 and 66 cm / 1 1/8",4 3/4",8 1/4",11 3/4",15 1/4",19",22½",26"
SIZE XL: 3, 13, 23, 32, 41, 50, 59 and 68 cm / 1 1/8",5 1/8",9",12½",16",19 3/4",23 1/4",26 3/4".
SIZE XXL: 3, 13, 23, 33, 43, 52, 61 and 70 cm / 1 1/8",5 1/8",9",13",17", 20½",24",27½"
SIZE XXXL: 3, 13, 23, 33, 43, 53, 63 and 72 cm / 1 1/8",5 1/8",9",13",17",21",24 3/4",28½"
----------------------------------------------------------

JACKET:
Work back and forth on circular needle from bottom up. Work sleeves on double pointed needles before working on circular needle on yoke.

BODY:
Cast on 219-231-259-280-307-323 sts on circular needle size 4.5 mm / US 7 with 1 strand Alpaca and 1 strand Kid-Silk (= 2 strands). Work in GARTER ST – see explanation above - for 3 cm / 1'', AT THE SAME TIME on last row from RS in last ridge, inc 11-11-11-14-15-15 sts evenly = 230-242-270-294-322-338 sts. REMEMBER BUTTONHOLES! Switch to circular needle size 5 mm / US 8 and work pattern as follows:

S/M/L: 5 band sts in garter st, A.5a, A.1, A.5, A.1, A.5b, 7-10-17 sts in stockinette st, insert a marker here, 7-10-17 sts in stockinette st, A.5a, * A.1, A.5 *, repeat from *-* 2 more times, A.1, A.5b, 7-10-17 sts in stockinette st, insert a marker here, 7-10-17 sts in stockinette st, A.5a, A.1, A.5, A.1, A.5b, 5 band sts in garter st (= 8-8-8 repetitions A.1)

XL: 5 band sts in garter st, A.5a, A.1, A.5, A.5a, A.1, A.5b 2 times in width, 11 sts in stockinette st, insert a marker here, 11 sts in stockinette st, A.5a 2 times in width, A.1, A.5, A.5a, A.1, A.5, A.1, A.5, A.5a, A.1, A.5b 2 times in width, 11 sts in stockinette st, insert a marker here, 11 sts in stockinette st, A.5a 2 times in width, A.1, A.5, A.5a, A.1, A.5b, 5 band sts in garter st (= 8 repetitions A.1).

XXL/XXXL: 5 band sts in garter st, A.5a, * A.1, A.5 *, repeat from *-* 1 more time, A.1, A.5b, 9-13 sts in stockinette st, insert a marker here, 9-13 sts in stockinette st, A.5a, * A.1, A.5 *, repeat from *-* 4 more times, A.1, A.5b, 9-13 sts in stockinette st, insert a marker here, 9-13 sts in stockinette st, A.5a, * A.1, A.5 *, repeat from *-* 1 more time, A.1, A.5b, 5 band sts in garter st (= 12-12 repetitions A.1).

Continue like this until A.1 has been worked 3 times vertically, AT THE SAME TIME on last row from RS dec 1 st in each side of every repetition A.1 by working the 2 first and the 2 last sts in every repetition P tog (= 15 sts remain in every A.1. There are 8-8-8-8-12-12 repetitions A.1). NOTE: In L and XL dec another 2 sts in each side, i.e. 1 st on each side of every marker, when piece measures 10 cm / 4'' – READ DECREASE TIP! Repeat dec every 8 cm / 3 1/8'' 3 times in total (= 12 sts dec in total) AT THE SAME TIME continue with pattern as explained below. REMEMBER THE GAUGE!
Continue with A.2 over A.1 until 2 repetitions of A.2 have been worked, AT THE SAME TIME on last row from RS, dec 1 st in each side of every repetition A.2 by working the 2 first and the 2 last sts in every repetition P tog (= 13 sts remain in every A.2).
Now work A.3 over A.2 2-2-2-3-3-3 times vertically, AT THE SAME TIME on last row from RS dec 1 st in each side of every repetition A.3 by working the 2 first and the 2 last sts in every repetition P tog (= 11 sts remain in every A.3). There are now 182-194-210-234-250-266 sts on needle. Now work A.4 over every repetition A.3 until piece measures 41-42-43-44-45-46 cm / 16 1/8''-16½''-17''-17¼''-17¾''-18'' (adjust so that the next row is worked from WS). Bind off for armholes in each side of piece as follows: Work until 5 sts remain before first marker, bind off the next 10 sts, work until 5 sts remain before next marker, bind off the next 10 sts. 162-174-190-214-230-246 sts remain. Put piece aside and knit the sleeves.

SLEEVES:
Worked in the round on double pointed needles.
Cast on 38-38-38-42-42-42 sts on double pointed needles size 4.5 mm / US 7 with 1 strand Alpaca and 1 strand Kid-Silk (= 2 strands). Work in GARTER ST – see explanation above – until piece measures 3 cm / 1''. Insert a marker at the beg of the round. Switch to double pointed needles size 5 mm / US 8. Work 1 round in stockinette st while AT THE SAME TIME inc 10-10-10-14-14-14 sts evenly = 48-48-48-56-56-56 sts. Continue with A.6 over all sts. When piece measures 12 cm / 4¾'' in total, continue in stockinette st AT THE SAME TIME on 1st round dec 10-10-10-14-14-14 sts evenly = 38-38-38-42-42-42 sts. Now beg inc for sleeve – READ INCREASE TIP! Repeat inc every 2½-2-1½-1-1-1 cm / 7/8"-3/4"-½"-3/8"-3/8"-3/8" 8-10-15-16-19-22 more times = 56-60-70-76-82-88 sts. Then inc every other round 8 times = 72-76-86-92-98-104 sts. On next round dec 5 sts on each side of marker (= 10 sts bind off) = 62-66-76-82-88-94 sts. Slip sts on a stitch holder and Make another sleeve.

YOKE:
Worked back and forth in pattern as before on circular needle size 5 mm / US 8. Now insert 4 markers in the piece as follows (1st row = RS):
Work the first 45-48-52-58-62-66 sts on right front piece, insert 1st marker, work 62-66-76-82-88-94 sts from sleeve, insert 2nd marker, work 72-78-86-98-106-114 sts over back piece, insert 3rd marker, work 62-66-76-82-88-94 sts from sleeve, insert 4th marker, work the remaining 45-48-52-58-62-66 sts on left front piece. There are now 286-306-342-378-406-434 sts for yoke. Now start dec for RAGLAN – see explanation above! Dec on every row from RS until raglan dec is done. Repeat dec with 1 st on each side of every marker 21-22-20-19-18-18 times, then 2 sts on each side of every marker 0-0-3-5-7-8 times = 118-130-134-146-150-162 sts. Switch to circular needle size 4.5 mm / US 7. Now work an elevation in the back of neck in garter st as follows: Work until 23-25-25-28-29-31 sts remain, turn, work until 23-25-25-28-29-31 sts remain, turn, work until 33-35-35-38-39-41 sts remain, turn, work until 33-35-35-38-39-41 sts remain, turn, work until 43-45-45-48-49-51 sts remain, turn, work until 43-45-45-48-49-51 sts remain, turn, work the rest of row. Work 1 row. Now work 3 ridges, AT THE SAME TIME on the first 2 rows from RS dec 16-20-20-24-24-28 sts evenly (but not over the 5 band sts in each side) = 86-90-94-98-102-106 sts. Bind off.

ASSEMBLY:
Sew the holes under the sleeves. Sew the buttons on to left band.

Diagram

All measurements in charts are in cm.

symbols = K from RS, P from WS
symbols = P from RS, K from WS
symbols = 1 YO, slip 1 st as if to K, K 2 tog, psso, 1 YO
symbols = K 2 tog, 1 YO
symbols = 1 YO, slip 1 st as if to K, K 1, psso
symbols = slip 2 sts on cable needle in front of piece, K 2, K 2 from cable needle
diagram
diagram
diagram

Each of our patterns has specific tutorial videos to help you.

Do you have a question? See a list of frequently asked questions (FAQ)

Knitting tension is what determines the final measurements of your work, and is usually measured per 10 x 10 cm. It is provided like so: number of stitches in width x number of rows in height - eg: 19 stitches x 26 rows = 10 x 10 cm.

The knitting tension is very individual; some people knit/crochet loosely while others work tightly. You adjust the knitting tension with the needle size, which is why the suggested needle size only serve as a guide! You need to adjust this (up or down) to ensure that YOUR knitting tension matches the knitting tension provided in the pattern. If you work with a different knitting tension than provided you will have a different yarn consumption, and your work will have different measurements than what the pattern suggests.

The knitting tension also determines which yarns can replace each other. As long as you achieve the same knitting tension you can replace one yarn with another.

See DROPS lesson: How to measure your tension/gauge

See DROPS video: How to make a gauge tension swatch

The required amount of yarn is provided in grams, eg: 450 g. To calculate how many balls you’ll need you first need to know how many grams are in 1 ball (25g, 50g or 100g). This information is available if you click on the individual yarn quality on our pages. Divide the amount required with the amount of each ball. For example, if each ball is 50g (the most common amount), the calculation will be as follows: 450 / 50 = 9 balls.

The important thing when changing from one yarn to another is that the knitting/crochet tension remains the same. This is so that the measurements of the finished piece will be the same as on the sketch provided. It is easier to achieve the same knitting tension using yarns from the same yarn group. It is also possible to work with multiple strands of a thinner yarn to achieve the knitting tension of a thicker one. Please try our yarn converter. We recommend you to always work a test swatch.

Please NOTE: when changing yarn the garment might have a different look and feel to the garment in the photo, due to individual properties and qualities of each yarn.

See DROPS lesson: Can I use a different yarn than the one mentioned in the pattern?

All our yarns are categorised into yarn groups (from A to F) according to thickness and knitting tension – group A contains the thinnest yarns and group F the thickest. This makes it easier for you to find alternative yarns to our patterns, should you wish to switch yarn. All yarns within the same group have a similar knitting tension and can easily replace each other. However, different yarn qualities have different structures and properties which will give the finished work a unique look and feel.

Click here for an overview of the yarns in each yarn group

At the top of all our patterns you’ll find a link to our yarn converter, which is a helpful tool should you wish to use a different yarn than suggested. By filling in the yarn quality you wish to replace, the amount (in your size) and number of strands, the converter will present good alternative yarns with the same knitting tension. Additionally it will tell you how much you’ll require in the new qualities and whether you’ll need to work with multiple strands. Most skeins are 50g (some are 25g or 100g).

If the pattern is worked with multiple colours, every colour will have to be converted separately. Similarly, if the pattern is worked with several strands of different yarns (for example 1 strand Alpaca and 1 strand Kid-Silk) you will have to find alternatives for each, individually.

Click here to see our yarn converter

Since different yarns have different qualities and textures we have chosen to keep the original yarn in our patterns. However, you can easily find options among our available qualities by using our yarn converter, or simply pick a yarn from the same yarn group.

It is possible that some retailers still have discontinued yarns in stock, or that someone has a few skeins at home that they would like to find patterns for.

The yarn converter will provide both alternative yarn as well as required amount in the new quality.

If you think it's hard to decide what size to make, it can be a good idea to measure a garment you own already and like the size of. Then you can pick the size by comparing those measures with the ones available in the pattern's size chart.

You'll find the size chart at the bottom of the pattern.

See DROPS lesson: How to read size chart

The needle size provided in the pattern serves only as a guide, the important thing is to follow the knitting tension. And since knitting tension is very individual, you will have to adjust the needle size to ensure that YOUR tension is the same as in the pattern – maybe you’ll have to adjust 1, or even 2 needle sizes, up or down to achieve the correct tension. For this, we recommend that you work test swatches.

Should you work with a different knitting tension than the one provided, the measurements of the finished garment might deviate from the measurement sketch.

See DROPS lesson: How to measure your tension/gauge

See DROPS video: How to make a gauge tension swatch

Working a garment top-down provides more flexibility and room for personal adjustment. For example it is easier to try the garment on while working, as well as making adjustments to length of yoke and shoulder caps.

The instructions are carefully explaining every step, in the correct order. Diagrams are adjusted to the knitting direction and are worked as usual.

The diagram depicts all rows/rounds, and every stitch seen from the right side. It is read from bottom to top, from right to left. 1 square = 1 stitch.

When working back and forth, every other row is worked from the right side and every other row is worked from the wrong side. When working from the wrong side, the diagram will have to be worked reversed: from left to right, knit stitches are purled, purl stitches are knit etc.

When working in the round every round is worked from the right side and the diagram are worked from right to left on all rounds.

See DROPS lesson: How to read knitting diagrams

The diagram depicts all rows/rounds, and every stitch seen from the right side. It is worked from bottom to top, from right to left.

When working back and forth every other row is worked from the right side: from right to left and every other row is worked from the wrong side: from left to right.

When working in the round, every row in the diagram are worked from the right side, from right to left.

When working a circular diagram you start in the middle and work your way outwards, counter clockwise, row by row.

The rows usually start with a given number of chain stitches (equivalent to the height of the following stitch), this will either be depicted in the diagram or explained in the pattern.

See DROPS lesson: How to read crochet diagrams

Instructions for working several diagrams after each other on the same row/round, will often be written like so: “work A.1, A.2, A.3 a total of 0-0-2-3-4 times". This means you work A.1 once, then A.2 is worked once, and A.3 is repeated (in width) the number of times provided for your size – in this case like so: S = 0 times, M = 0 times, L=2 times, XL= 3 times and XXL = 4 times.

The diagrams are worked as usual: begin with the first row in A.1, then work the first row in A.2 etc.

See DROPS lesson: How to read knitting diagrams

See DROPS lesson: How to read crochet diagrams

The total width of the garment (from wrist-to-wrist) will be larger in the larger sizes, despite the actual sleeves being shorter. The larger sizes have longer sleeve caps and wider shoulders, so there will be a good fit in all sizes.

The measurement sketch/schematic drawing provides information regarding the full length of the garment. If it’s a jumper or a jacket the length is measured from the highest point on the shoulder (usually closest to the neckline), and straight down to the bottom of the garment. It is NOT measured from the tip of shoulder. Similarly, the length of yoke is measured from the highest point on the shoulder and down to where yoke is split into body and sleeves.

See DROPS lesson: How to read a schematic drawing

Diagrams are often repeated on the round or in height. 1 repeat is the diagram the way it appears in the pattern. If it says to work 5 repeats of A.1 in the round, then you work A.1 a total of 5 times after/next to each other in the round. If it says to work 2 repeats of A.1 vertically/in height you work the entire diagram once, then begin again at the start and work the entire diagram one more time.

Chain stitches are slightly narrower than other stitches and to avoid working the cast-on edge too tight, we simply chain more stitches to begin with. The stitch count will be adjusted on the following row to fit the pattern and measurement sketch.

The rib edge is more elastic and will contract slightly compared to, for example, stocking stitch. By increasing before the rib edge, you avoid a visible difference in width between the rib edge and the rest of the body.

It’s very easy to cast off too tightly, and by making yarn overs while casting off (and simultaneously casting these off) you avoid a too tight cast off edge.

See DROPS video: How to bind off with yarn overs (yo)

To achieve an even increase (or decrease) you can increase on, for example: every 3rd and 4th row alternately, like so: work 2 rows and increase on the 3rd row, work 3 rows and increase on the 4th. Repeat this until the increase is complete.

See DROPS lesson: Increase or decrease 1 st on every 3rd and 4th row alternately

Should you prefer to work in the round instead of back and forth, you may of course adjust the pattern. You’ll need to add steeks mid-front (usually 5 stitches), and follow the instructions. When you would normally turn and work from the wrong side, simply work across the steek and continue in the round. At the end you’ll cut the piece open, pick up stitches to work bands, and cover the cut edges.

See DROPS video: How to knit steeks and cut open

Should you prefer to work back and forth instead of in the round, you may of course adjust the pattern so you work the pieces separately and then assemble them at the end. Divide the stitches for the body in 2, add 1 edge stitch in each side (for sewing) and work the front and back pieces separately.

See DROPS lesson: Can I adapt a pattern for circular needles into straight needles?

Pattern repeats can vary slightly in the different sizes, in order to get the correct proportions. If you’re not working the exact same size as the garment in the photo, yours might deviate slightly. This has been carefully developed and adjusted so that the complete impression of the garment is the same in all sizes.

Make sure to follow instructions and diagrams for your size!

If you have found a pattern you like which is available in women’s size it’s not very difficult to convert it to men’s size. The biggest difference will be the length of sleeves and body. Start working on the women size that you think would fit across the chest. The additional length will be worked right before you cast off for the armhole/sleeve cap. If the pattern is worked top-down you can add the length right after the armhole or before the first decrease on sleeve.

Regarding additional yarn amount, this will depend on how much length you add, but it is better with a skein too many than too few.

All yarns will have excess fibres (from production) that might come off as lint or shedding. Brushed yarns (ie hairier yarns) have more of these loose, excess fibres, causing more shedding.

Shedding also depends on what is worn under or over the garment, and whether this pulls at the yarn fibres. It’s therefore not possible to guarantee that there will be no shedding

Below are some tips on how to get the best result when working with hairier yarns:

1. When the garment is finished (before you wash it) shake it vigorously so the looser hairs come off. NOTE: do NOT use a lint roller, brush or any method that pulls at the yarn.

2. Place the garment in a plastic bag and put it in your freezer - the temperature will cause the fibres to become less attached to each other, and excess fibres will come off easier.

3. Leave in the freezer for a few hours before taking it out and shaking it again.

4. Wash the garment according to the instructions on the yarn label.

Pilling is a natural process that happens to even the most exclusive of fibers. It's a natural sign of wear and tear that is hard to avoid, and that is most visible in high friction areas of your garment like a sweater's arms and cuffs.

You can make your garment look as new by removing the pilling, using a fabric comb or a pill/lint remover.

Still can't find the answer you need? Then scroll down and leave your question so one of our experts can try to help you. This will be done normally within 5 to 10 working days.
In the meantime, you can read the questions and answers that others have left to this pattern or join the DROPS Workshop on Facebook to get help from fellow knitters/crocheters!

You might also like...

Post a comment to pattern DROPS 158-4

We would love to hear what you have to say about this pattern!

If you want to leave a question, please make sure you select the correct category in the form below, to speed up the answering process. Required fields are marked *.

Comments / Questions (73)

country flag Gisela Lauterbach wrote:

Hallo, ich finde diese Jacke super. Leider komme ich mit der Anleitung ab Passe bzw. Raglanabnahme nicht zurecht. Es sind 342 M.auf der Nadel, Raglanabnahme beginnt. Beidseitig des Makierers je 1 M 20x abnehmen. Allerdings habe ich zwischen Makierer und Mustersatz keine 20 Maschen zum Abnehmen. Die Annahme bei der Passe und beim Raglan sind meines Erachtens unterschiedlich. Bisher hatte ich keine Probleme mit ihren Anleitungen nur dieses Mal verstehe ich es nicht. Vielen Dank!

15.11.2022 - 21:12

DROPS Design answered:

Liebe Frau Lauterbach, die ersten Raglanabnahmen werden beidseitig von jeder Markierung gestrickt, bis die äußere Links-M in A.5a/A.5b in Richtung Ärmel auf den Markierer trifft, dann nehmen Sie beidseitig von dem Zopf + 2 Maschen links (8 Maschen für Raglanlinie) - siehe auch RAGLANABNAHMEN: am Anfang der Anleitung. Viel Spaß beim stricken!

16.11.2022 - 09:36

country flag Anne-Christine Nilsson wrote:

Jag stickar koftan blue for you stl L men fick klura ett bra tag. jag har rätt antal maskor men fick inte mönstret att fungera, det fattades maskor. enligt mönstret så ska det vara 270 m på stickan när jag börjar men till mönstret, så som det är skrivet behövs 282 m. efter många om och men så har jag ändrat så att istället för 17 m slätstickning på var sida om sidomarkeringen så har jag 14 m . NU fungerar det. ni ska kanske räkna igenom mönstret /Anne-Christine

23.01.2022 - 15:11

country flag Ina Andersen wrote:

Er det korrekt forstået at jeg skal strikke 3 A1 og så tage ind i sidste A1 og derefter fortsætte med 2 A2 osv. Altså ikke tage ind i alle A1 Mvh. Ina

06.11.2019 - 20:37

DROPS Design answered:

Hei Ina. Du skal ta inn i alle A.1 - i hver side (ved å strikkes de 2 første og 2 siste maskene vrang sammen), slik at hver rapport av A.1 = 15 masker. God Fornøyelse!

11.11.2019 - 10:58

country flag Jette Nissen wrote:

Hej. Kan jeg strikke trøjen i drops air, der er garngruppe C istedet for det der er beskrevet? På forhånd tak.

14.01.2018 - 15:32

DROPS Design answered:

Hei Jette. Ja, det kan du. Alpaca og Kid-Silk tilhører garngruppe A, mens Air tilhører garngruppe C. Strikker man med 2 tråder fra garngruppe A, blir det samme tykkelse som 1 tråd fra garngruppe C. Bare husk å sjekke strikkefastheten din med Air stemmer med det som er oppgitt i oppskriften. God Fornøyelse!

17.01.2018 - 08:20

country flag Evy wrote:

Skal til med raglanfelling og forstår så langt fellingen til der de vrange maskene ved siden av fletten møter fellingen ved merket og at det da skal felles på begge sider av fletten videre, men hva betyr "...og 2 m vr mot midt foran og midt bak"? Hvor er midt bak og midt foran? Skal det feller noe her også?

16.08.2016 - 23:28

DROPS Design answered:

Hej Evy. Midt foran er langs stolpen og midt bag er midt paa bagstyk. Naar du er naaet frem til maerket skal du tage ind paa hver side af fletten med de 2 vr midt foran i begge sider (altsaa paa forstk) og midt bag = fletten midt paa rygstk.

08.09.2016 - 13:12

country flag Marita wrote:

OK. Det er det som er problemet. Jeg måtte gå opp på pinne fordi jeg strikker så hardt. Da ble det litt for løst. Men det største problemet er at jeg har så korte armer i forhold til min størrelse. L. Kan ikke se på bildet hvor langt ned raglanen blir. Om den er veldig vid i raglanen må jeg ha veldig korte ermer. Men da får jeg bare prøve og feile! Takk!

18.04.2016 - 21:13

country flag Marita wrote:

Finner ikke noe sted hvor langt ermet skal være når det er ferdig med alle økningene. Har det falt ut?

15.04.2016 - 21:45

DROPS Design answered:

Hej Marita. Det staar ikke i mönstret. Holder du strikkefastheden og opskriften skulle maalene overholde dem som staar i maalskitsen nederst.

18.04.2016 - 13:41

country flag Jutta Winkler wrote:

Hallo, ich möchte diese schöne Jacke in klaren Rot oder Rosatönen stricken. Welche Farben kombiniere ich dann am besten? Passt das rot von der Alpaca Wolle zu der roten Wolle von Kid silk? Wie sieht das bei den klaren hellen Rosatönen aus? Können Sie mir Kombinationstipps geben? Vielen Dank Jutta

09.03.2016 - 19:05

DROPS Design answered:

Liebe Jutta, es gibt sowohl für Rot als auch für Rosa Kombinationsmöglichkeiten der beiden Garne. Ihr DROPS Laden oder Onlineshop berät Sie gerne.

10.03.2016 - 08:29

country flag Roberta wrote:

Nella manica è corretto diminuire 10 maglie il giro successsivo agli aumenti o devo continuare fino a cm.... vi ringrazio e vi saluto roberta

24.12.2015 - 23:38

DROPS Design answered:

Buonasera Roberta, le diminuzioni sulle maniche vengono fatte dopo quando il lavoro misura 12 cm in totale, e dopo il giro di diminuzioni iniziano gli aumenti come indicato. Buon lavoro!

28.12.2015 - 18:00

country flag Denise Col wrote:

Bonjour, J'aimerais tricoter la veste 158-4 modèle z-683 dans la qualité "big merino à la place des laines préconisées. Combien de pelotes me faudrait-il pour la taille "S". Merci de votre réponse.

30.09.2015 - 15:06

DROPS Design answered:

Chère Madame Col, vous trouverez ici toutes les informations relatives à l'utilisation d'une alternative, ainsi que le calcul de la nouvelle quantité. Bon tricot!

30.09.2015 - 15:38