Comments / Questions (206)
![]() Ivy wrote:
Ivy wrote:
Het staat niet aangegeven in pagroonbeschrijving; maar wordt het patroon gebreid in 2 draden A (of 1 draad C categorie)?
08.02.2014 - 08:51DROPS Design answered:
Hoi Ivy. Het gebruikte garen staat bovenaan het patroon (DROPS Alpaca Silk) en aan het begin van het patroon staat: "Zet losjes 106-111-115-119-123-126 st op met Alpaca Silk en rondbreinld 7 mm." Dus je breit met 1 draad van Alpaca Silk (categorie C) maar je kan ook 2 draden van categorie A gebruiken. Zie ook begin van het patroon: Garengroep C of A en A
12.02.2014 - 13:54
![]() Marie wrote:
Marie wrote:
V návodu je chyba . Začíná se na strašně moc ok. Podle zkušebního vzorku neodpovídají oka na začátek práce a i přidávání ok je nějak v nepořádku.Neshodují se počet ok a míry na střihu.Vypletla jsem 50 gr. než jsem na to přišla bohužel.
07.02.2014 - 23:32DROPS Design answered:
Milá Marie, děkujeme za připomínku. Počáteční počet ok odpovídá zkušebnímu vzorku i uvedeným rozměrům - pončo začínáme jako jeden celistvý díl, dlouhý 2x 38 cm (viz údaje pro vel.S) = 76 cm. Podle zkušebního vzorku vychází na 1 cm cca 1,4 oka (14 ok : 10 cm), proto nahazujeme 76 x 1,4 = 106 ok. Je-li Váš úplet příliš široký, zvolte užší jehlice, ppř. upravte počet ok dle potřeby. Hodně zdaru!
08.02.2014 - 00:39
![]() Charo wrote:
Charo wrote:
Delicado,y tierno
07.02.2014 - 00:17
![]() Agata wrote:
Agata wrote:
Io non sono molto brava faccio fatica a capire le spiegazioni e il disegno del modello non mi aiuta molto si possono avere spiegazioni più semplici per i principianti?grazie
05.02.2014 - 17:40DROPS Design answered:
Buonasera Agata, i modelli DROPS sono solitamente spiegati in modo molto dettagliato. In particolare questo modello si lavora avanti e indietro sui f, non in tondo; deve iniziare montando il n° di m indicato, lavorare 2 f a m legaccio e sul f successivo aumentare in modo uniforme come indicato, poi proseguire a m legaccio seguendo le istruzioni per gli aumenti e le asole. Ci riscriva se ha bisogno per un particolare passaggio. Buon lavoro!!
05.02.2014 - 21:31
![]() Simona wrote:
Simona wrote:
Ho già scritto ma probabilmente sbagliando dato che è la prima volta. sto avviando il lavoro per realizzare questo poncho che mi sembra semplice ma molto carino. non ho dimestichezza con i ferri circolari ma leggo che il lavoro si comincia lavorando "avanti e indietro". Posso quindi utilizzare ferri dritti e eventualmente se necessario successivamente passare ai circolari? quando si uniscono le maglie a cerchio? Ho letto più volte le istruzioni ma non mi è chiaro. Grazie
04.02.2014 - 16:52DROPS Design answered:
Buongiorno Simona. Si lavora sempre avanti e indietro sui ferri, non si unisce mai in cerchio. Viene consigliato di usare i ferri circolari per via del numero elevato di m. Il capo non ha cuciture, ma viene semplicemente abbottonato su un lato. Ci riscriva se ha altri dubbi. Buon lavoro!
04.02.2014 - 17:43
![]() Simona wrote:
Simona wrote:
Buongiorno, mi accingo ad iniziare il lavoro. premetto che ho scelto questo modello per il mio primo capo top-down con ferri circolari. Vi chiedo scusa per la domanda forse banale. leggo che gran parte del lavoro di fa "lavorando avanti e indietro" con ferri circolari. Ma dunque posso utilizzare anche ferri dritti e poi cambiare quando e se necessario? Il lavoro non si unisce mai?
04.02.2014 - 16:29DROPS Design answered:
Buongiorno Simona. Si lavora sempre avanti e indietro sui ferri, non si unisce mai in cerchio. Viene consigliato di usare i ferri circolari per via del numero elevato di m. Il capo non ha cuciture, ma viene semplicemente abbottonato su un lato. Ci riscriva se ha altri dubbi. Buon lavoro!
04.02.2014 - 17:43
![]() Maryline DESCLAUD wrote:
Maryline DESCLAUD wrote:
Simple mais chic
01.02.2014 - 20:25
![]() Marja wrote:
Marja wrote:
Wat een enig patroon. Ik ga het meteen maken.
01.02.2014 - 09:57
![]() Danielle wrote:
Danielle wrote:
Bonjour je voudrais savoir si y a couture sur les cotés . merci
31.01.2014 - 14:11DROPS Design answered:
Bonjour Danielle, il n'y a pas de couture, on tricote à partir de l'encolure en une seule pièce, puis pour créer la fente côté, on divise en 2 parties que l'on termine séparément. Bon tricot!
31.01.2014 - 18:04
![]() Scilla wrote:
Scilla wrote:
It seems like when splitting the back from the front the back should have more stitches on it so that the vents are both towards the front.
31.01.2014 - 02:23
First date#firstdateponcho |
|
|
|
|
Knitted DROPS poncho in garter st with vent in ”Brushed Alpaca Silk”. Size S-XXXL.
DROPS 154-4 |
|
|
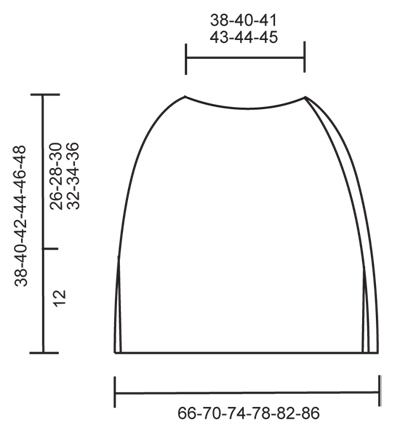
GARTER ST (back and forth on needle): K all rows. 1 ridge = K2 rows. INCREASE TIP: Inc 1 st by getting yarn between 2 sts from previous row - K this st twisted, i.e. work in back loop of st instead of front to avoid holes. BUTTONHOLES: Dec for buttonholes in right side of piece, seen from RS. 1 buttonhole = K tog third and fourth st from edge and make 1 YO. Measure from neck edge and dec for buttonholes when piece measures: SIZE S: 2, 10, 18 and 26 cm / ¾", 4", 7", 10¼" SIZE M: 2, 10, 18 and 26 cm / ¾", 4", 7", 10¼" SIZE L: 2, 10, 18 and 26 cm / ¾", 4", 7", 10¼" SIZE XL: 2, 11, 20 and 29 cm / ¾", 4⅜", 8", 11⅜" SIZE XXL: 2, 11, 20 and 29 cm / ¾", 4⅜", 8", 11⅜" SIZE XXXL: 2, 11, 20 and 29 cm / ¾", 4⅜", 8", 11⅜" ---------------------------------------------------------- PONCHO: Worked back and forth on circular needle, top down. Loosely cast on 106-111-115-119-123-126 sts with Brushed Alpaca Silk on circular needle size 7 mm / US 10.75. Work 1 ridge in GARTER ST - see explanation above. On next row from RS, inc 20-21-23-23-25-24 sts evenly = 126-132-138-142-148-150 sts - READ INCREASE TIP. Continue back and forth in garter st until finished measurements. AT THE SAME TIME dec for BUTTONHOLE and inc evenly as follows: Inc 8-9-10-10-10-10 sts every 2 cm / ¾" 5-5-6-6-6-7 times in total, 8-8-6-7-9-9 sts every 4 cm / 1½" 2 times in total for all sizes and 8-7-0-6-8-8 sts after another 5 cm / 2" 1 time (= 64-68-72-80-86-96 sts inc) = 190-200-210-222-234-246 sts. Continue to work until piece measures 26-28-30-32-34-36 cm / 10¼"-11"-11¾"-12½"-13⅜"-14¼" in total. Then insert a marker in the side for vent so that there are 95-100-105-111-117-123 sts on each side of marker. Then finish front and back piece separately. FRONT PIECE: Continue back and forth in garter st over the 95-100-105-111-117-123 sts on front piece. Loosely bind off all sts from WS when piece measures 38-40-42-44-46-48 cm / 15"-15¾"-16½"-17¼"-18"-19" in total. BACK PIECE: Work as front piece and loosely bind off from WS. ASSEMBLY: Fasten all strands and sew buttons on to left band, i.e. in left side of piece seen from RS. |
|
 |
|
Have you finished this pattern?Tag your pictures with #dropspattern #firstdateponcho or submit them to the #dropsfan gallery. Do you need help with this pattern?You'll find 12 tutorial videos, a Comments/Questions area and more by visiting the pattern on garnstudio.com. © 1982-2025 DROPS Design A/S. We reserve all rights. This document, including all its sub-sections, has copyrights. Read more about what you can do with our patterns at the bottom of each pattern on our site. |



Post a comment to pattern DROPS 154-4
We would love to hear what you have to say about this pattern!
If you want to leave a question, please make sure you select the correct category in the form below, to speed up the answering process. Required fields are marked *.