
Popular categories
Looking for a yarn?


Comments / Questions (71)
![]() Ava wrote:
Ava wrote:
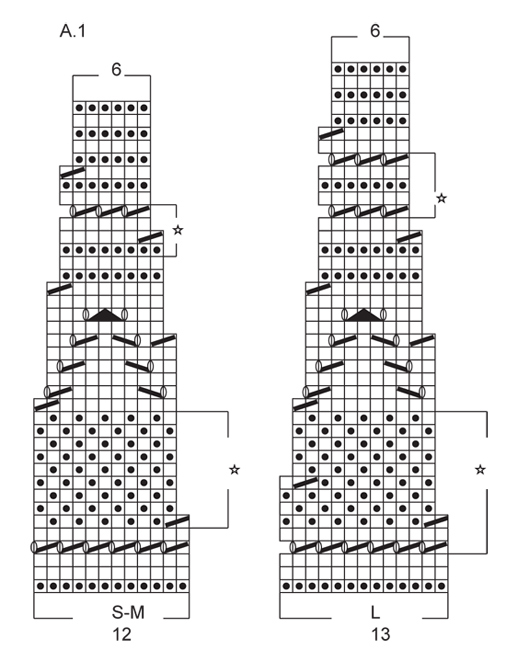
When doing the seed stitch (K1,P1), in A1 the stitches don’t match, meaning they are off due to the beginning and the end of the stitch count. Do it knit or purl 2 together to get them to match? I’m doing the small size.
24.05.2022 - 01:20DROPS Design answered:
Hi Ava, With seed stitch, the knitted and purled stitches are above each other. You have 252 stitches on the yoke before starting A.1 and each A.1 is 12 stitches, so A.1 is repeated 21 times in size S. On the first row of seed stitch (row 6 in the diagram) the first 2 stitches are knitted together in each repeat of A.1. Hope this helps and happy knitting!
24.05.2022 - 06:54
![]() Denise wrote:
Denise wrote:
Bonjour, je n’arrive pas à comprendre quand il faut rabattre les 4 premières mailles et rabattre les 4 dernières mailles. Quand je termine il me reste alors une maille qui se situe au milieu. Je fais quoi avec cette maille ou est-ce que je m’y prends pas de la bonne façon pour rabattre. Merci
11.05.2022 - 02:33DROPS Design answered:
Bonjour Denise, rabattez les 4 premières mailles du tour, la maille restant sur l'aiguille compte pour la 1ère des mailles endroit à tricoter, autrement dit, en S, on va tricoter 79 mailles = vous avez 80 mailles pour le devant, vous rabattez les 8 mailles suivantes et tricotez les 79 mailles suivantes (= + la maille sur l'aiguille = 80), rabattez les 4 dernières mailles, coupez le fil et passez le dans cette dernière maille. Vous avez ainsi bien 80 mailles pour le devant et autant pour le dos. Bon tricot!
11.05.2022 - 08:44
![]() Evelyn Morrell wrote:
Evelyn Morrell wrote:
I don’t understand. I am not a spammer nor have I made other comments before tonight.
26.04.2022 - 01:28
![]() Evelyn Morrell wrote:
Evelyn Morrell wrote:
I am confused on rows 11 & 12. If I do exactly as the chart A-1 says I will be having 2 purl stitches together every 13 and first stitch of the repeat. This doesn’t seem right to me. Hope you can straighten me out before I go any further. Evelyn
26.04.2022 - 00:22DROPS Design answered:
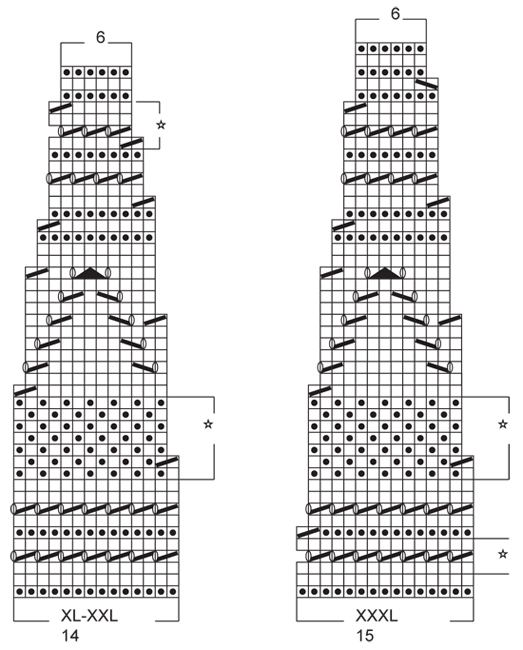
Dear Mrs Morell, you might have to purl 2 sts together to fit the moss stitch pattern, just continue working in moss stitch and decrease 1 stitch (by K or P 2 tog) at the beg of each A.1 (size XL-XXL + XXXL). Happy knitting!
26.04.2022 - 10:05
![]() Jacqueline wrote:
Jacqueline wrote:
I’m making the XL size and at the end of the body section it says to decrease 4 stitches evenly. Does c that mean 2 stitches at the front and 2 at the back?
27.04.2021 - 15:20DROPS Design answered:
Dear Jacqueline, at the end of the pattern says "Cast off the first 4 sts, K 80-86-98-106-116-130, cast off the next 8 sts, K 80-86-98-106-116-130, cast off the last 4 sts AT THE SAME TIME dec 8-16-13-4-32-29 sts evenly in K sts" so accordingly, you need to cast off stitches (4 on each side of both marker), and decrease the 4 stitches (for size XL) evenly divided on the knit stitches in the round. Thus, yes, about 2 in fron, 2 in the back. Happy Knitting.
27.04.2021 - 21:38
![]() Renate wrote:
Renate wrote:
Frage wegen der Abnahmen im Rumpf: Ist der Rundenbeginn die hintere Mitte oder eine der Seiten? Ich weiß nämlich nicht, ob die 60M für Größe M die Vorder- bzw Rückseite darstellen oder die 40M. Wie immer freu ich mich auf Ihre Antwort.
27.03.2021 - 17:42DROPS Design answered:
Liebe Renate, die 40 Maschen sind die Mitte von Vorder- und Rückenteil und die 60 Maschen die Seiten, d.h. der Rundenbeginn ist mittig an der einen Seite. Die Abnahmen und Zunahmen werden dadurch an Vorder- und Rückenteil durch dezente dekorative Linien sichtbar. Gutes Gelingen weiterhin!
04.04.2021 - 23:21
![]() Angela Ede wrote:
Angela Ede wrote:
In size M, I am wondering about the best way to make the top shorter by quite a bit. The graphic suggests that it will be 62cm from cast on to shoulder but since I am quite short I would like to make it more like 50cm long. Please could you suggest where I should alter the pattern for it to come out shorter?
25.06.2020 - 13:19DROPS Design answered:
Dear Mrs Ede, we are unfortunately not able to adjust every pattern to every single request, you are welcome to contact your DROPS store for any individual assistance - they will help you even per mail or telephone. Happy knitting!
25.06.2020 - 17:05
![]() Anita wrote:
Anita wrote:
Salve, volevo segnalare un'imprecisione nel pattern. Per le diminuzioni viene espressamente indicato di diminuire sui fianchi e lasciare invariate le maglie del davanti e del dietro. Però seguendo il suggerimento per le diminuzioni avviene proprio il contrario, sono il davanti e il dietro a diminuire il numero di maglie. Magari potete correggere per i principianti come me che seguono il pattern pedissequamente :)
12.06.2019 - 22:07DROPS Design answered:
Buongiorno Anita. Il giro inizia sul lato. Le 40-40-50-50-60-60 m (a seconda della taglia) che ha tra il 1° ed il 2° segno e tra il 3° e il 4° segno, sono le maglie della parte centrale del davanti e del dietro. Le maglie tra il 2° e il 3° segno e quelle tra il 4° e il 1° segno, sono le maglie dei lati. Deve diminuire prima del 1° e del 3° segno e dopo il 2° e il 4°, quindi nelle maglie dei lati e non nelle maglie delle parti centrali del davanti/dietro. Buon lavoro!
13.06.2019 - 09:29
![]() Lola wrote:
Lola wrote:
Hola voy a empezar el borde de las mangas y entiendo luego los tengo que deslizar en el sitio correcto del jersey para empezar el canesu, sin tejer los puntos, pero el video que habéis subido en respuesta a Nicole el 06-08-2017 me ha despistado puesto que en él se ve como va tejiendo los puntos. ¿Cómo debe hacerlo? Gracias LOLA
28.05.2019 - 22:09DROPS Design answered:
Hola Lola. Para facilitar el trabajo, primero recomendamos pasar todos los puntos ( es decir, del cuerpo y las cenefas de las mangas, en orden, en una sola aguja circular) antes de comenzar a trabajar el canesú.
28.05.2019 - 22:26
![]() Olga wrote:
Olga wrote:
Buenos días. Donde dice rematar, es cerrar los puntos?. Si luego tengo que deslizar los puntos no es mejor dejarlos en espera?
09.05.2019 - 15:10DROPS Design answered:
Hola Olga. En este modelo rematar significa cortar el hilo, no cerrar los puntos. A veces se usa el mismo termino para ambas cosas. Ya está cambiado en el patrón para que no haya confusiones.
13.05.2019 - 00:23
|
||||||||||||||||||||||
Sunny Side#sunnysidetop |
||||||||||||||||||||||
|
|
||||||||||||||||||||||
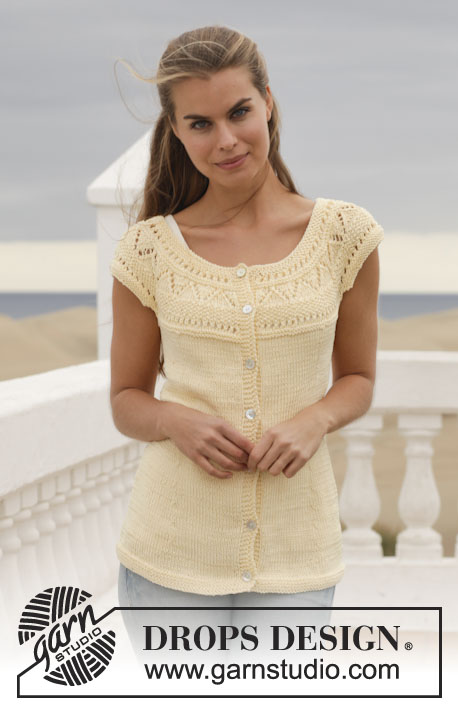
Knitted DROPS top with lace pattern and round yoke in ”Muskat” or "Belle". Size: S - XXXL.
DROPS 152-9 |
||||||||||||||||||||||
|
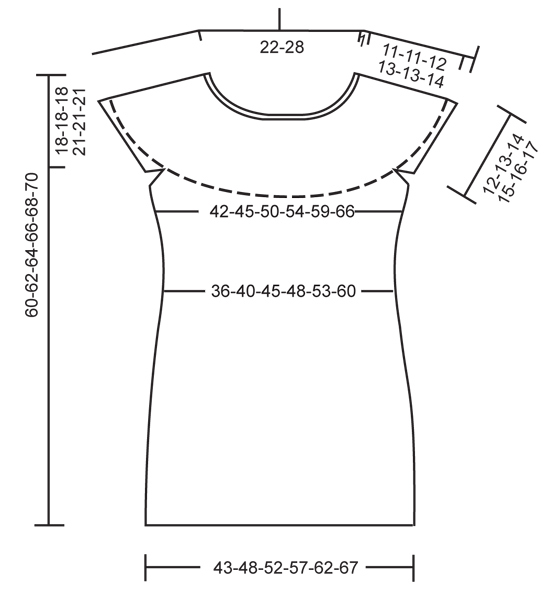
GARTER ST (back and forth on needle): K all rows. 1 ridge = K2 rows. GARTER ST (in the round on circular needle): * K 1 round and P 1 round *, repeat from *-*. 1 ridge = 2 rounds. PATTERN: See diagram A.1. See diagram for correct size. DECREASE TIP: Dec 1 st after 2nd and 4th marker as follows: K 2 tog. Dec 1 st before 1st and 3rd marker as follows: Work until 2 sts remain before marker, slip 1 st as if to K, K 1, psso. INCREASE TIP: Inc 1 st after 2nd and 4th marker as follows: Make 1 YO. Inc 1 st before 1st and 3rd marker as follows: Make 1 YO. On next round K YO twisted (i.e. work in back loop of YO instead of front) to avoid holes. ---------------------------------------------------------- BODY: Worked in the round on circular needle. Cast on 180-200-220-240-260-280 sts on circular needle size 3.5 mm / US 4 with Muskat or "Belle". Work 4 ridges in GARTER ST - see explanation above. Switch to circular needle size 4 mm / US 6. Work in stockinette st until piece measures 7 cm / 2¾". REMEMBER THE GAUGE! Now insert 4 markers in the piece as follows: K 25-30-30-35-35-40, insert 1 marker (= 1st marker), K 40-40-50-50-60-60, insert 1 marker (= 2nd marker), K 50-60-60-70-70-80, insert 1 marker (= 3rd marker), K 40-40-50-50-60-60, insert 1 marker (= 4th marker), finish with K 25-30-30-35-35-40. Move the markers upwards when working. On next round, dec 1 st at every marker – Read DECREASE TIP = 4 sts dec. NOTE! No of sts mid front and mid back is the same, dec in side sts. Repeat dec every 8th-8th-8th-6th-6th-8th round 6-7-7-9-8-6 more times (= 7-8-8-10-9-7 dec in total) = 152-168-188-200-224-252 sts on needle. Continue in stockinette st until piece measures 32 cm / 12½". On next round, inc 1 st at every marker – Read INCREASE TIP = 4 sts inc. NOTE! No of sts mid front and mid back is the same, inc in side sts. Repeat inc every 4th-6th-6th-4th-6th-8th round 5-4-5-6-5-5 more times (= 6-5-6-7-6-6 times in total) = 176-188-212-228-248-276 sts on needle. Continue in stockinette st until piece measures 41-43-45-44-46-48 cm / 16"-17"-17¾"-17¼"-18"-19". Then work 1 ridge in garter st over all sts. READ ALL OF THE FOLLOWING SECTION BEFORE CONTINUING! Now bind off for sleeve on next round as follows: bind off the first 4 sts, K 80-86-98-106-116-130, bind off the next 8 sts, K 80-86-98-106-116-130, bind off the last 4 sts AT THE SAME TIME dec 8-16-13-4-32-29 sts evenly in K sts = 152-156-183-208-200-231 sts on needle. Fasten off. Put piece aside and knit the sleeve edges. SLEEVE EDGE: Worked back and forth on circular needle. Cast on 54-58-62-68-72-76 sts on circular needle size 3.5 mm / US 4 with Muskat or "Belle". Work 2 ridges in GARTER ST – see explanation above, AT THE SAME TIME on 1st row dec 4 sts evenly (this is done to avoid a tight edge on sleeve) = 50-54-58-64-68-72 sts on needle. Fasten off. Put piece aside and Make another sleeve edge. YOKE: Slip sleeve edges on to same circular needle size 4 mm / US 6 as body where armholes were bind off = 252-264-299-336-336-375 sts on needle (do not work sts when slipping them on same needle). Work diagram A.1(= 12-12-13-14-14-15 sts) – see explanation above – over all sts (= 21-22-23-24-24-25 repetitions in width). Continue pattern like this. After all dec are done, 126-132-138-144-144-150 sts remain on needle. Bind off. ASSEMBLY: Sew sleeve edges (i.e. the 2 ridges) to the first 2 sts on body where bound off for sleeve in each side. |
||||||||||||||||||||||
Diagram explanations |
||||||||||||||||||||||
|
||||||||||||||||||||||
 |
||||||||||||||||||||||
 |
||||||||||||||||||||||
 |
||||||||||||||||||||||
Have you finished this pattern?Tag your pictures with #dropspattern #sunnysidetop or submit them to the #dropsfan gallery. Do you need help with this pattern?You'll find 19 tutorial videos, a Comments/Questions area and more by visiting the pattern on garnstudio.com. © 1982-2026 DROPS Design A/S. We reserve all rights. This document, including all its sub-sections, has copyrights. Read more about what you can do with our patterns at the bottom of each pattern on our site. |
||||||||||||||||||||||


With over 40 years in knitting and crochet design, DROPS Design offers one of the most extensive collections of free patterns on the internet - translated to 17 languages. As of today we count 324 catalogs and 12285 patterns - 12275 of which are translated into English (US/in).
We work hard to bring you the best knitting and crochet have to offer, inspiration and advice as well as great quality yarns at incredible prices! Would you like to use our patterns for other than personal use? You can read what you are allowed to do in the Copyright text at the bottom of all our patterns. Happy crafting!
Post a comment to pattern DROPS 152-9
We would love to hear what you have to say about this pattern!
If you want to leave a question, please make sure you select the correct category in the form below, to speed up the answering process. Required fields are marked *.