
Popular categories
Looking for a yarn?


Comments / Questions (85)
![]() Marcia Gilliam wrote:
Marcia Gilliam wrote:
Is there a way to import this pattern into Knit Companion? Your web interface informs me I'm using a forbidden word and I can't post the complete question.
30.11.2018 - 17:09DROPS Design answered:
Dear Mrs Gilliam, our pattern can only be printed or saved as a .pdf with a virtual printer, this maybe the reason why you cannot import them into Knit Companion. Happy knitting!
03.12.2018 - 10:56
![]() Linda Medvic wrote:
Linda Medvic wrote:
Wondering if there’s a printable version somewhere?
25.10.2018 - 15:28DROPS Design answered:
Dear Mrs Medvic, you just have to click on the icon with the printer to launch printing. Happy knitting!
25.10.2018 - 15:44
![]() MEAGHAN MORIARTY wrote:
MEAGHAN MORIARTY wrote:
Thank you for the clarification! The instructions "Now work A.2, but continue with K and P as in A.1 in the orange section." confused me - I read that as knit A2 but using the A1 pattern when working in the orange.
10.10.2018 - 02:33DROPS Design answered:
Dear Mrs Moriary, you are right, I missed that part from the pattern, work A.2 as explained previously but continue working the st in garter st from A.1 as before (alternately K and P every other round). Happy knitting!
10.10.2018 - 09:54
![]() MEAGHAN MORIARTY wrote:
MEAGHAN MORIARTY wrote:
I\'m struggling with the A2 pattern. Is the green stitch in addition to the orange or take the place of one it? In other words, in the first line, for example, does it start green K, then orange KKKPKK, OR is it green K, then orange KKPKK with the green taking the place of the first orange K? Thanks!
09.10.2018 - 02:50DROPS Design answered:
Dear Mrs Moriarty, A.2 is a stranded chart, ie you will alternately work with orange and green, on first row for example work: (K1 with green, K8 with orange) and repeat from (to) the whole round. On round 2, work (K2 with greeen, K5 with orange, K1 with green) and repeat from (to) the whole round. Happy knitting!
09.10.2018 - 09:55
![]() Cindy wrote:
Cindy wrote:
So when starting A1 is it knitt three then purl one then knitting 5 purl one knit 5 and continue that until you finish all the way around. Then next round is straight knit all the way around?
18.09.2018 - 02:50DROPS Design answered:
Dear Cindy, when repeating A.1 in the round you will work: (K3, P1, K2), ie it will look at: K3 at the beg of round, repeat (P1, K5) and finish with K2. On round 2, knit all sts. Happy knitting!
18.09.2018 - 09:22
![]() Lorelei Schnabler wrote:
Lorelei Schnabler wrote:
Are the instructions for both A1 and A2 per row, or are they to be repeated over and over within one row? This pattern is beautiful, but I'm unclear on this point. Thank you for your quick response.
25.08.2018 - 20:44DROPS Design answered:
Hi Lorelei, You repeat A.1 both within the round and in height to the reqired length, then you work A.2, repeated within the round, but only once in height. Happy knitting!
26.08.2018 - 07:58
![]() Giulia wrote:
Giulia wrote:
Grazie per l’immediata risposta, sempre nel diagramma ogni riga corrisponde a 1 ferro interamente lavorato vero? Esempio per il primo ferro farò 3 dritti, 1 rovescio e 2 dritti a ripetizione per tutto il ferro mentre nel secondo ferro lavorerò tutto a diritto?
09.02.2018 - 14:43DROPS Design answered:
Buongiorno Giulia, esattamente così, una riga un ferro/giro. I diagrammi mostrano semprd tutti i ferri/giri. Buon lavoro!
09.02.2018 - 16:11
![]() Giulia wrote:
Giulia wrote:
Buongiorno, Chiedo scusa ma sono alle prime armi e non so come si legge lo schema A1 della cuffia sweet pumpkin. So che di solito si parte dall’angolo in basso a dx e sotto vedo un 6 che non so che significa, significano ripetizioni da 6? Ogni riga va ripetuta per tutto il ferro? Chiedo consiglio su come leggerlo grazie.
08.02.2018 - 16:12DROPS Design answered:
Buongiorno Giulia, 6 è il numero delle maglie del motivo, e il motivo va ripetuto per tutto il giro. Buon lavoro!
08.02.2018 - 16:34
![]() Giulia wrote:
Giulia wrote:
Buongiorno, Chiedo scusa ma sono alle prime armi e non so come si legge lo schema A1 della cuffia sweet pumpkin. So che di solito si parte dall’angolo in basso a dx e sotto vedo un 6 che non so che significa, significano ripetizioni da 6? Ogni riga va ripetuta per tutto il ferro? Chiedo consiglio su come leggerlo grazie.
08.02.2018 - 08:21DROPS Design answered:
Buongiorno Giulia. I diagrammi si leggono dal basso verso l'alto e da destra verso sinistra. Il numero indicato, in questo caso 6, indica che ogni ripetizione del motivo è di 6 maglie. Ripete queste sei maglie su tutte le maglie presenti sui ferri. Ci riscriva se ancora in difficltà. Buon lavoro!
08.02.2018 - 08:48
![]() Edie McRoberts wrote:
Edie McRoberts wrote:
Dear Jeanette; I have to let you know how much I enjoyed making this delightful Pumpkin cap. We haven't had a baby in the family for quite some time, so it was a treat to be able to get back into the baby knitting. The instructions were very clear and easy to follow. I found the trick was to use the markers rather than just to try counting! Thank you so much for making this available over the internet. It is very much appreciated. Sincerely, Edie McRoberts.
07.10.2017 - 17:50
|
||||||||||
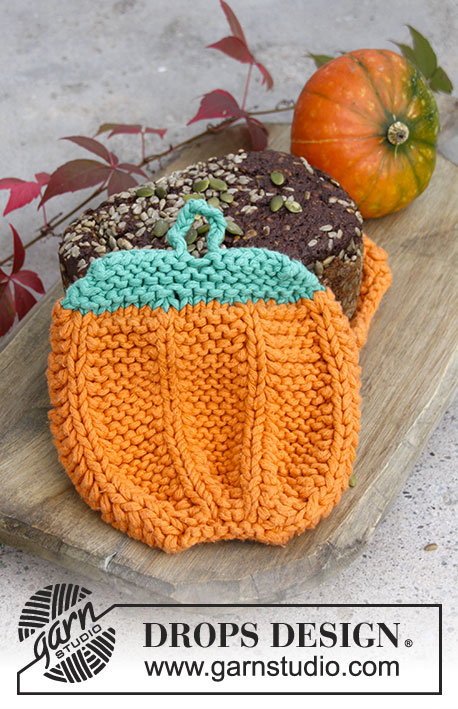
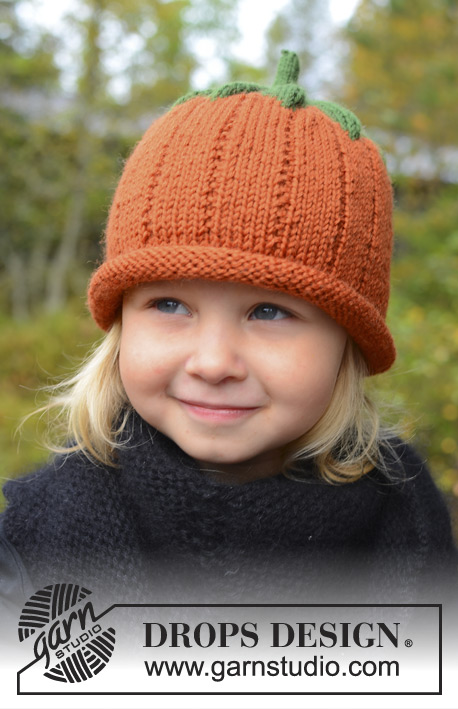
Sweet Pumpkin#sweetpumpkinhat |
||||||||||
 |
 |
|||||||||
Knitted hat for baby and children in DROPS Karisma. Sizes 0 - 8 years. Theme: Halloween
DROPS Extra 0-966 |
||||||||||
|
PATTERN: See diagrams A.1 and A.2. Pattern in diagrams are seen from RS. ---------------------------------------------------------- HAT: Cast on 84-90-96-102-108 sts with orange on double pointed or circular needles size 3.5 mm / US 4. P 1 round, then work in stockinette st. REMEMBER THE GAUGE! When piece measures 6 cm / 2½", insert 1 marker (= rolling edge), now measure the piece from here and work according to diagram A.1. When piece measures 7-8-9-10-12 cm / 2¾"-3"-3½"-4"-4¾", dec 3-0-6-3-0 sts evenly = 81-90-90-99-108 sts. Then insert 9-10-10-11-12 markers in the piece 9 sts apart. First st after first marker = first st in A.2. Now work A.2, but continue with K and P as in A.1 in the orange section. After A.2 work with forest green until finished - AT THE SAME TIME dec every other round: 1 st on right side of all markers until 9-10-10-11-12 sts remain on needle. Switch to double pointed needles size 2 mm and work 3 cm / 1" over these sts for stem. Pull yarn through the remaining sts and fasten. |
||||||||||
Diagram explanations |
||||||||||
|
||||||||||
 |
||||||||||
Have you finished this pattern?Tag your pictures with #dropspattern #sweetpumpkinhat or submit them to the #dropsfan gallery. Do you need help with this pattern?You'll find 10 tutorial videos, a Comments/Questions area and more by visiting the pattern on garnstudio.com. © 1982-2026 DROPS Design A/S. We reserve all rights. This document, including all its sub-sections, has copyrights. Read more about what you can do with our patterns at the bottom of each pattern on our site. |
||||||||||


With over 40 years in knitting and crochet design, DROPS Design offers one of the most extensive collections of free patterns on the internet - translated to 17 languages. As of today we count 324 catalogs and 12285 patterns - 12275 of which are translated into English (US/in).
We work hard to bring you the best knitting and crochet have to offer, inspiration and advice as well as great quality yarns at incredible prices! Would you like to use our patterns for other than personal use? You can read what you are allowed to do in the Copyright text at the bottom of all our patterns. Happy crafting!
Post a comment to pattern DROPS Extra 0-966
We would love to hear what you have to say about this pattern!
If you want to leave a question, please make sure you select the correct category in the form below, to speed up the answering process. Required fields are marked *.