
Popular categories
Looking for a yarn?


Comments / Questions (90)
![]() Kempkensteffen Helga wrote:
Kempkensteffen Helga wrote:
Ich habe bei Lanada Fabel 804 nur noch die letzten 8 Kneuel bekommen, In welchem Laden bekomme ich wohl noch ein Kneuel - 50g. Fabel 804. H. Kempkensteffen
13.01.2015 - 10:49DROPS Design answered:
Läden finden Sie, wenn Sie oben in der Leiste auf "Händler" klicken, dort können Sie Deutschland auswählen und dann am besten einfach bei den Händlern anrufen und fragen, ob sie die Farbe noch vorrätig haben.
14.01.2015 - 23:46
![]() Annamária wrote:
Annamária wrote:
AMIKOR az ujja a jelölőtől mérve 7 cm-es, fogyasszunk mindkét oldalon egy-egy szemet. Ismételjük meg a fogyasztást 3-3-2½-2-2-1½ cm-ként, még 12-12-13-15-15-16 alkalommal (= összesen 13-13-14-16-16-17 alkalommal szaporítottunk, = 38-38-40-40-44-46 szem). Helyes fordítás: összesen 13-13-14-16-16-17 alkalommal apasztottunk!
11.01.2015 - 21:03
![]() Helga Kempkensteffen wrote:
Helga Kempkensteffen wrote:
Stricke dieses Modell nach, trage Gr. XL habe 115M angeschlagen, stimmt es, dann 52mal 4M. in jeder Hin R. zunehmen? Erbitte Hilfe Am Ende hätte ich ja über 300M. auf meiner Nadel!! Ist das richtig? viele Grüße Helga Kempkensteffen
08.01.2015 - 11:53DROPS Design answered:
Ja, das ist richtig so, beim Stricken werden Sie die Formgebung durch die Zunahmen erkennen.
08.01.2015 - 22:41
![]() Helga Kempkensteffen wrote:
Helga Kempkensteffen wrote:
Inzwischen möchte ich dieses Modell vielleicht doch in Baby-Merino rot und hellgrau arbeiten,( da ich mit Fabel schon ein Modell nach geschrickt habe), gilt da die gleichen Anleitung? Haben Sie evt. einen besseren Vorschlag? Danke H. Kempkensteffen
30.12.2014 - 14:26DROPS Design answered:
Was die Farben betrifft, ist das Geschmackssache, nehmen Sie die Kombination, die Ihnen gut gefällt. Da Baby Merino jeweils einfarbig ist, erhalten Sie über die ganze Jacke in der gewählten Mischung einen einheitlicheren Effekt. Sie können Baby Merino verwenden, müssen aber anhand der Lauflänge die Garnmenge für Ihre Gr. neu berechnen, da Fabel eine längere Lauflänge hat - Sie benötigen also mehr Knäuel von Baby Merino. Es ist sehr wichtig, die Maschenprobe einzuhalten.
30.12.2014 - 20:36
![]() Helga Kempkensteffen wrote:
Helga Kempkensteffen wrote:
Inzwischen denke ich daran, dieses Modell in Baby- Merino hellgrau-rot zu arbeiten wie ist da ihre Empfehlung.
30.12.2014 - 13:54DROPS Design answered:
Antwort siehe oben! :-)
30.12.2014 - 20:36
![]() Helga Kempkensteffen wrote:
Helga Kempkensteffen wrote:
Möchte diese Jacken stricken mit Fabel Nr.914 und evt. Nr. 604 würde diese Kombination passen, erbitte besseren Vorschlag. Es sollte aber schon zur Jens blau gut passen, darf aber auch Grau-blau -schwarz mit passender Farbe sein. Erbitte mir Vorschläge. Danke Helga Kempkensteffen
14.12.2014 - 18:57DROPS Design answered:
Letztendlich ist die Farbwahl immer Geschmackssache. Ihre Kombination klingt aber schon nicht schlecht, wobei die Jacke dann eher hell ausfällt. Wenn Sie es etwas kräftger und dunkler mögen, könnten Sie statt 914 z.B. 522 wählen.
15.12.2014 - 14:32
![]() Lis Fredborg wrote:
Lis Fredborg wrote:
Kan jeg strikke den ,med blot en tråd faber print?
13.12.2014 - 10:53DROPS Design answered:
Hej Lis. Jeg vil ikke tilraade at strikke den her med 1 traad. Det er meget vigtigt at strikkefastheden til den her holdes og med 1 traad tror jeg det bliver for löst - og eventuelt vil haenge / komme ud form naar du er faerdig, og det ville jo vaere aergeligt med alt dit arbejde.
15.12.2014 - 16:07
![]() Kempkensteffen Helga wrote:
Kempkensteffen Helga wrote:
Ich möchte diese besondere Jacke gerne nachstricken. Möchte auch gerne das Garn dazu bestellen, komme aber nicht ganz klar mit den Angaben. Ich gebrauche die Größe XL Diese Jacke ist ein ganz besonders schönes Modell
10.12.2014 - 13:16DROPS Design answered:
Erst einmal lieben Dank für Ihr Lob! Für Größe XL gilt immer die 4. Zahl bei allen Zahlenangaben, also auch bei der Mengenangabe. Sie benötigen somit 400 g pro Farbe, also 800 g insgesamt von Fabel. Sie stricken mit doppeltem Faden, also stets mit beiden Farben zusammen. Wenn Sie weitere Fragen haben, melden Sie sich gerne wieder.
10.12.2014 - 23:01
![]() Irene Ek wrote:
Irene Ek wrote:
Har någon stickat modell 151-44 och kan hjälpa oss med bakstycket. Ring gärna 0370-10302. Mycket tacksam.
10.06.2014 - 15:03Maia wrote:
Right. Having looked at the dotted line in the measurement chart is what made me question the instructions. Does the 2nd stitch, which we increase each side of, remain the 2nd stitch? When I knit on either side of the 2nd stitch all the way, the result is not what is shown in the chart. The marker will surely need to be moved as I knit. Must say that I love the result so far having done the back.
12.04.2014 - 10:26DROPS Design answered:
Dear Maia, you first put marker in 2nd st, but when you will inc each side, this will be then not the 2nd st anymore but marker has to be kept in that st. Happy knitting!
14.04.2014 - 08:55
|
|
Oseberg#osebergcardigan |
|
 |
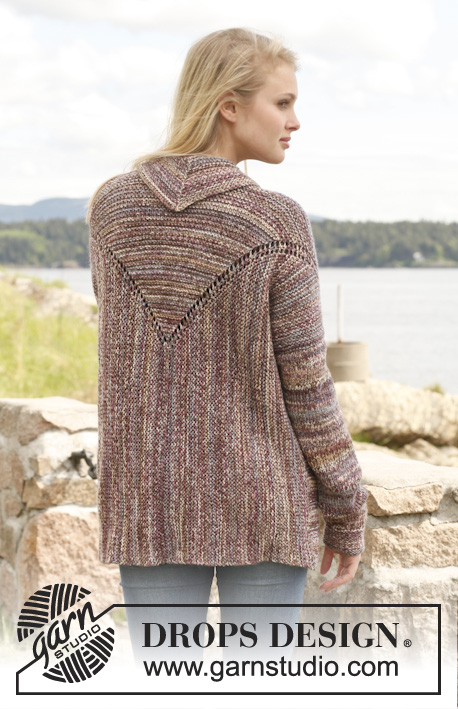 |
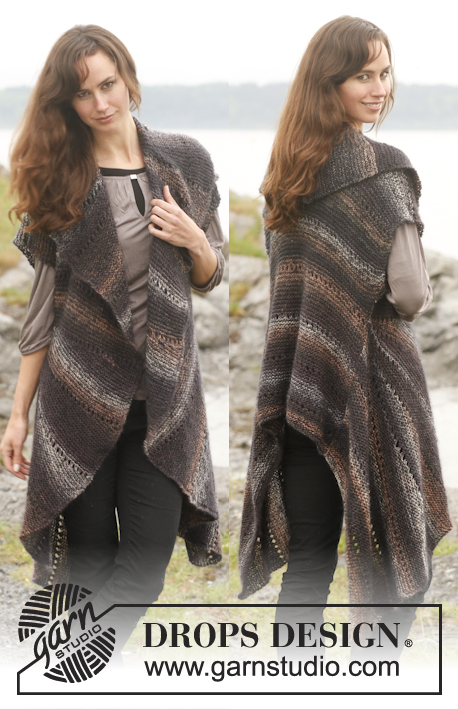
Knitted DROPS jacket in garter st in 2 strands "Fabel". Size: S - XXXL.
DROPS 151-44 |
|
|
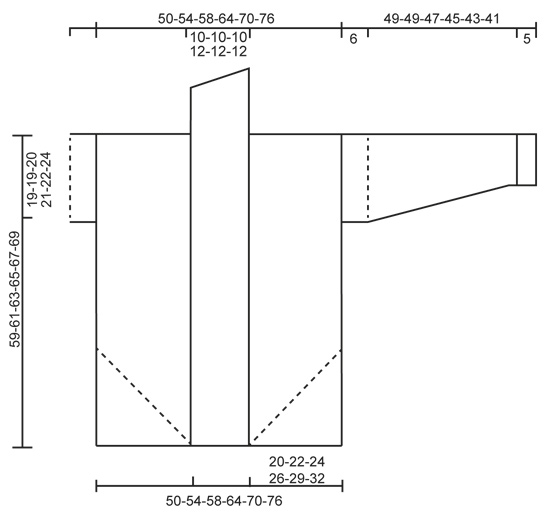
GARTER ST (back and forth on needle): K all rows. 1 ridge = K 2 rows. INCREASE TIP: Inc 1 st by making 1 YO. K YOs on next row to make holes. ---------------------------------------------------------- BACK PIECE: The piece is worked back and forth on circular needle because of no of sts. Work from mid back on back piece, out towards the sides and up towards the shoulder. Cast on 119-119-119-115-113-109 sts on circular needle size 5 mm / US 8 with 1 strand of each color (= 2 strands). Work first row as follows from RS: K 58-58-58-56-55-53, K 2 sts in next st, K 1, K 2 sts in next st and K 58-58-58-56-55-53 = 121-121-121-117-115-111 sts on needle. Insert 1 marker in the 60th-60th-60th-58th-57th-55th st on needle and 1 marker in the 2nd st after 1st marker. There are now 59-59-59-57-56-54 sts after last marker and 1 st between the 2 sts with markers in the middle on row. Turn and K row from WS. Then work in garter st back and forth while AT THE SAME TIME inc 1 st on each side of both sts with markers – READ INCREASE TIP (= 4 sts inc). Repeat inc every other row (i.e. every row from RS), 40-43-47-52-57-62 more times (= 41-44-48-53-58-63 inc in total on each side of both markers). AT THE SAME TIME when piece measures 58-60-62-64-66-68 cm / 22¾"-23⅝"-24⅜"-25¼"-26"-26¾" from bottom edge and up (piece measures approx. 23-25-27-30-33-36 cm / 9"-9¾"-10½"-11¾"-13"-14¼" from the middle and outwards and 3 inc remain on each side of both markers), bind off the middle 13-13-13-17-17-17 sts on needle for neck (i.e. between the 2 markers) and finish each part separately. 1ST PART (left side of piece seen from RS): Continue with garter st and inc as before. AT THE SAME TIME bind off 1 st at beg of the next 2 rows from neck. After last inc by marker and after neck dec, piece measures approx. 59-61-63-65-67-69 cm / 23¼"-24"-24¾"-25½"-26⅜"-27⅛" from the shoulder and down, approx. 25-27-29-32-35-38 cm / 9¾"-10⅝"-11⅜'-12½"-13¾"-15" from the middle and outwards and 134-140-148-154-163-171 sts remain on needle. On next row from WS continue as follows: bind off the first 68-71-73-74-76-77 sts along the side on jacket, work 32-32-34-36-38-40 sts (= sleeve), slip them on 1 stitch holder and bind off the last 34-37-41-44-49-54 sts on shoulder. Cut the thread. 2ND PART: Work as first part but reversed (dec from RS instead of WS). RIGHT FRONT PIECE: Beg in the side on jacket and work in towards mid front and down towards bottom edge on front piece. Cast on 67-67-67-66-65-63 sts on circular needle size 5 mm / US 8 with 1 strand of each color (= 2 strands). Work first row from RS: K 2 sts in first st and then K the rest of row = 68-68-68-67-66-64 sts on needle. Insert 1 marker in 2nd st at beg of row (seen from RS). Turn and K row from WS. Then work in garter st back and forth while AT THE SAME TIME inc 1 st on each side of st with marker – READ INCREASE TIP (= 2 sts inc). Repeat inc every other row (i.e. on every row from RS), 32-35-39-43-48-53 more times (= 33-36-40-44-49-54 inc in total) = 134-140-148-155-164-172 sts on needle. On next row from RS after last inc, bind off the first 34-37-41-45-50-55 sts on needle (= bottom edge on front piece), work the remaining 100-103-107-110-114-117 sts on needle and cast on 17-17-17-21-21-21 new sts at the end of row for collar = 117-120-124-131-135-138 sts – insert 1 marker. Continue in garter st back and forth for band/collar AT THE SAME TIME inc 1 st at end of every other row at the top by collar (i.e. at the end of every row from RS) until band/collar measures approx. 10-10-10-12-12-12 cm / 4"-4"-4"-4¾"-4¾"-4¾" from marker, then LOOSELY bind off. LEFT FRONT PIECE: Cast on and work as right but reversed. I.e. 1st row from WS and inc on every row from WS. Bind off in bottom edge from WS (instead of RS). ASSEMBLY: Sew seam mid back on back piece - sew edge to edge in front loop of outermost st to avoid a visible seam. Sew the shoulder seams. Sew collar tog mid back and sew collar to neckline at the back of neck. SLEEVE: Slip the 32-32-34-36-38-40 sts from stitch holder on back piece in one side of piece back on circular needle size 5 mm / US 8, in addition pick up from RS, 32-32-34-36-38-40 sts along front piece by armhole (pick up 1 st in every st) = 64-64-68-72-76-80 sts on needle for sleeve. Insert 1 marker – now measure piece from here. Work back and forth in garter st until sleeve measures 6 cm / 2⅜" from marker. Then work in stockinette st back and forth on needle. AT THE SAME TIME when sleeve measures 7 cm / 2¾" from marker, dec 1 st in each side. Repeat dec every 3-3-2½-2-2-1½ cm / 1⅛"-1⅛"-⅞"-¾"-¾"-½" 12-12-13-15-15-16 more times (= 13-13-14-16-16-17 dec in total in each side) = 38-38-40-40-44-46 sts remain on needle When sleeve measures 44-44-42-40-38-36 cm / 17¼"-17¼"-16½"-15¾"-15"-14¼" from marker (NOTE: shorter measurements in the larger sizes because of wider shoulders and approx. 5 cm / 2" remain until finished measurements), switch to needle size 4 mm / US 6. Then work in garter st back and forth for 5 cm / 2" before loosely binding off. Sleeve measures approx. 49-49-47-45-43-41 cm / 19¼"-19¼"-18½"-17¾"-17"-16⅛" from marker. Repeat in the other side of piece. Sew underarm and side seams in one inside 1 edge st. |
|
 |
|
Have you finished this pattern?Tag your pictures with #dropspattern #osebergcardigan or submit them to the #dropsfan gallery. Do you need help with this pattern?You'll find 15 tutorial videos, a Comments/Questions area and more by visiting the pattern on garnstudio.com. © 1982-2026 DROPS Design A/S. We reserve all rights. This document, including all its sub-sections, has copyrights. Read more about what you can do with our patterns at the bottom of each pattern on our site. |
|


With over 40 years in knitting and crochet design, DROPS Design offers one of the most extensive collections of free patterns on the internet - translated to 17 languages. As of today we count 324 catalogs and 12272 patterns - 12262 of which are translated into English (US/in).
We work hard to bring you the best knitting and crochet have to offer, inspiration and advice as well as great quality yarns at incredible prices! Would you like to use our patterns for other than personal use? You can read what you are allowed to do in the Copyright text at the bottom of all our patterns. Happy crafting!
Post a comment to pattern DROPS 151-44
We would love to hear what you have to say about this pattern!
If you want to leave a question, please make sure you select the correct category in the form below, to speed up the answering process. Required fields are marked *.