
Popular categories
Looking for a yarn?


|
|
Oseberg |
|
 |
 |
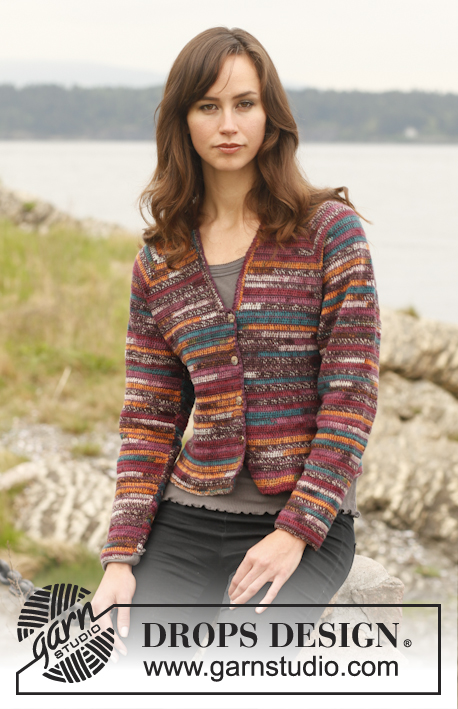
Knitted DROPS jacket in garter st in 2 strands "Fabel". Size: S - XXXL.
DROPS 151-44 |
|
|
GARTER ST (back and forth on needle): K all rows. 1 ridge = 2 rows K. INCREASE TIP: Inc 1 st by making 1 YO. K YOs on next row to make holes. ---------------------------------------------------------- BACK PIECE: The piece is worked back and forth on circular needle because of no of sts. Work from mid back on back piece, out towards the sides and up towards the shoulder. Cast on 119-119-119-115-113-109 sts on circular needle size 5 mm with 1 strand of each colour (= 2 strands). Work first row as follows from RS: K 58-58-58-56-55-53, work 2 sts in next st, K 1, work 2 sts in next st and K 58-58-58-56-55-53 = 121-121-121-117-115-111 sts on needle. Insert 1 marker in the 60th-60th-60th-58th-57th-55th st on needle and 1 marker in the 2nd st after 1st marker. There are now 59-59-59-57-56-54 sts after last marker and 1 st between the 2 sts with markers in the middle on row. Turn and K row from WS. Then work in garter st back and forth while AT THE SAME TIME inc 1 st on each side of both sts with markers – READ INCREASE TIP (= 4 sts inc). Repeat inc every other row (i.e. every row from RS), 40-43-47-52-57-62 more times (= 41-44-48-53-58-63 inc in total on each side of both markers). AT THE SAME TIME when piece measures 58-60-62-64-66-68 cm from bottom edge and up (piece measures approx. 23-25-27-30-33-36 cm from the middle and outwards and 3 inc remain on each side of both markers), cast off the middle 13-13-13-17-17-17 sts on needle for neck (i.e. between the 2 markers) and finish each part separately. 1ST PART (left side of piece seen from RS): Continue with garter st and inc as before. AT THE SAME TIME cast off 1 st at beg of the next 2 rows from neck. After last inc by marker and after neck dec, piece measures approx. 59-61-63-65-67-69 cm from the shoulder and down, approx. 25-27-29-32-35-38 cm from the middle and outwards and 134-140-148-154-163-171 sts remain on needle. On next row from WS continue as follows: Cast off the first 68-71-73-74-76-77 sts along the side on jacket, work 32-32-34-36-38-40 sts (= sleeve), slip them on 1 stitch holder and cast off the last 34-37-41-44-49-54 sts on shoulder. Cut the thread. 2ND PART: Work as first part but reversed (dec from RS instead of WS). RIGHT FRONT PIECE: Beg in the side on jacket and work in towards mid front and down towards bottom edge on front piece. Cast on 67-67-67-66-65-63 sts on circular needle size 5 mm with 1 strand of each colour (= 2 strands). Work first row from RS: K 2 sts in first st and then K the rest of row = 68-68-68-67-66-64 sts on needle. Insert 1 marker in 2nd st at beg of row (seen from RS). Turn and K row from WS. Then work in garter st back and forth while AT THE SAME TIME inc 1 st on each side of st with marker – READ INCREASE TIP (= 2 sts inc). Repeat inc every other row (i.e. on every row from RS), 32-35-39-43-48-53 more times (= 33-36-40-44-49-54 inc in total) = 134-140-148-155-164-172 sts on needle. On next row from RS after last inc, cast off the first 34-37-41-45-50-55 sts on needle (= bottom edge on front piece), work the remaining 100-103-107-110-114-117 sts on needle and cast on 17-17-17-21-21-21 new sts at the end of row for collar = 117-120-124-131-135-138 sts – insert 1 marker. Continue in garter st back and forth for band/collar AT THE SAME TIME inc 1 st at end of every other row at the top by collar (i.e. at the end of every row from RS) until band/collar measures approx. 10-10-10-12-12-12 cm from marker, then LOOSELY cast off. LEFT FRONT PIECE: Cast on and work as right but reversed. I.e. 1st row from WS and inc on every row from WS. Cast off in bottom edge from WS (instead of RS). ASSEMBLY: Sew seam mid back on back piece - sew edge to edge in front loop of outermost st to avoid a visible seam. Sew the shoulder seams. Sew collar tog mid back and sew collar to neckline at the back of neck. SLEEVE: Slip the 32-32-34-36-38-40 sts from stitch holder on back piece in one side of piece back on circular needle size 5 mm, in addition pick up from RS, 32-32-34-36-38-40 sts along front piece by armhole (pick up 1 st in every st) = 64-64-68-72-76-80 sts on needle for sleeve. Insert 1 marker – now measure piece from here. Work back and forth in garter st until sleeve measures 6 cm from marker. Then work in stocking st back and forth on needle. AT THE SAME TIME when sleeve measures 7 cm from marker, dec 1 st in each side. Repeat dec every 3-3-2½-2-2-1½ cm 12-12-13-15-15-16 more times (= 13-13-14-16-16-17 dec in total in each side) = 38-38-40-40-44-46 sts remain on needle When sleeve measures 44-44-42-40-38-36 cm from marker (NOTE: shorter measurements in the larger sizes because of wider shoulders and approx. 5 cm remain until finished measurements), switch to needle size 4 mm. Then work in garter st back and forth for 5 cm before loosely casting off. Sleeve measures approx. 49-49-47-45-43-41 cm from marker. Repeat in the other side of piece. Sew underarm and side seams in one inside 1 edge st. |
|

|
|
|
Have you made this or any other of our designs? Tag your pictures in social media with #dropsdesign so we can see them! Do you need help with this pattern?You'll find tutorial videos, a Comments/Questions area and more by visiting the pattern on garnstudio.com. © 1982-2024 DROPS Design A/S. We reserve all rights. This document, including all its sub-sections, has copyrights. Read more about what you can do with our patterns at the bottom of each pattern on our site. |
|


With over 40 years in knitting and crochet design, DROPS Design offers one of the most extensive collections of free patterns on the internet - translated to 17 languages. As of today we count 304 catalogues and 11422 patterns - 11422 of which are translated into English (UK/cm).
We work hard to bring you the best knitting and crochet have to offer, inspiration and advice as well as great quality yarns at incredible prices! Would you like to use our patterns for other than personal use? You can read what you are allowed to do in the Copyright text at the bottom of all our patterns. Happy crafting!
Comments / Questions (88)
Een gecompliceerd patroon, maar een prachtig resultaat! Een tip: zet het achterpand op, op dikkere rechte naalden en ga na een toer verder op de goede dikte rondbreinaalden. De opzetnaald wordt anders te strak, en dat is lastig bij het in elkaar zetten.
03.12.2023 - 09:32Ich stricke die Jacke in Gr. L mit Originalwolle, jedoch mit 4,5er Nadeln. Maschenprobe 18M =36R Wie muss ich die Anleitung umrechnen? Ich habe noch nie mit eine Jacke komplett in kraus gestrickt. über Antwort wäre ich sehr dankbar
30.08.2021 - 15:20DROPS Design answered:
Liebe Mafra, waschen Sie Ihre Maschenprobe, legen Sie sie flach um sie trocknen zu lassen - dann messen Sie wieder; sollte sie immer noch stimmen, dann versuchen Sie wieder mit größeren Nadeln - Hier lesen Sie mehr über Maschenprobe. Viel Spaß beim stricken!
30.08.2021 - 16:07Ich stricke die Jacke in Größe L. Wie viele Maschen sollte ich nach 62 cm ab der unteren Kante vor den drei restlichen Zunamen auf der Nadel haben? Ich bin etwas verwirrt
23.03.2021 - 17:02DROPS Design answered:
Liebe Elke, sollte Ihre Maschenprobe in der Höhe stimmen, dann haben Sie 301 Maschen auf der Nadel wenn die Arbeit 62 cm misst, dh vor den 3 letzten Zunahmen = 104 M, 1 M mit Markierung, 91 M, 1 M mit Markierung, 104 M. Viel Spaß beim stricken!
24.03.2021 - 07:19Can l use any type of yarn
11.09.2020 - 04:53DROPS Design answered:
Dear Jan, this jacket is worked with 2 strands DROPS Fabel (read more about the yarn here) - you can read more about alternatives here and find the list of DROPS stores shipping worldwide here. Happy knitting!
11.09.2020 - 08:13Necesitaría saber qué es insertar un MP. Muchas gracias.
23.05.2019 - 02:21DROPS Design answered:
Hola Annabella. Tienes colocar un marcapuntos después del punto indicado en el patrón (según la talla trabajada). Estos marcapuntos se utilizan para marcar donde se van a hacer los aumentos. Los marcapuntos siguen la labor.
25.05.2019 - 18:33Onder de duitse vragen heb ik al wat kunnen opmaken maar ben nu aan de vierde poging toe. moet je echt ca 300 steken op de 80cm rondbreipen krijgen.. is de foto van het model op de rug anders dan het werkelijke breipatroon? groet paula
13.12.2017 - 10:21DROPS Design answered:
Hoi Paula, Ja, dat aantal steken klopt inderdaad en de foto komt ook overeen. Je breit a.h.w. vanaf midden achter, vanaf de onderkant naar boven en dan via de punt weer naar beneden. Door het meerderen aan beide kanten van de maarkeerdraaden creëer je de punt op het achterpand. Op het eind naai je de middenachter naad dicht. Deze naad zijn de steken die je voor het achterpand hebt opgezet. Als je aan de slag gaat, zul je zien dat het zich vanzelf wijst.
15.12.2017 - 11:46Hallo, ich komme mit den Zunahmen für den Kragen nicht klar. Ich habe 21M zugenommen, davor habe ich eine Markierung gesetzt. Soll es jetzt 12 cm im der Länge oder in der Breite sein.
09.03.2017 - 23:15DROPS Design answered:
Liebe Frau Junge, nachdem Sie die 21 M für den Kragen zugenommen haben, stricken Sie Kraus re mit Zunahmen bis der Kragen ca 12 cm in der Höhe ab der Markierung misst. Viel Spaß beim stricken!
10.03.2017 - 08:57Kære drops, jeg mangler masker når jeg er nået til det afsnit hvor der står efter sidste udtagning (halsaflukning) Der er jo kun taget 48 m ud og de 58 jeg har fra opslag minus aflukning til hals så jeg har ikke 148 m som jeg skal bruge i str. l Venlig hilsen Lone
30.07.2015 - 12:37DROPS Design answered:
Hej Lone, Du har 68 m, tager ud på hver side af mærketråden ialt 40 gange = 80 + 68 = 148 m. God fornøjelse!
31.07.2015 - 11:17Pour l'encolure dos la diminution est de 13m + 2 * 1m soit 17m pour chaque devant on ajoute 17m donc 34m au total est-ce une erreur ou comment l'on fait ? merci
25.05.2015 - 11:00DROPS Design answered:
Bonjour Annick, en taille S on commence avec 121 m, puis on augmente 4 m x 41 = 164 augm + 121 m = 285 - on rabat 13 m pour l'encolure = 272/2 côté = 136 m. On rabat ensuite 2 x 1 m côté encolure = 134 m, puis on rabat 68 m (il en reste 66), on tricote et on met en attente les 32 m suivantes et il reste bien 34 m. Bon tricot!
26.05.2015 - 10:39The instructions for the left front says 'decrease' at bottom edge. Should this say 'increase' as there is no mention of decreasing for the Right front.
23.04.2015 - 13:58DROPS Design answered:
Dear Jeanne, the dec under left front piece refer to the sts you cast off at the bottom edge (= at the beg of RS row on right front piece and at the beg of WS row on left front piece). Happy knitting!
23.04.2015 - 15:25