
Popular categories
Looking for a yarn?


Comments / Questions (63)
![]() Jasmin wrote:
Jasmin wrote:
Hallo, das meinte ich nicht wirklich. Die Frage war dann eher, wieviele Stäbchenreihen hat die Passe am Ärmel? Der Ärmel ist ja "obenrum" mit einem dichteren Muster (Stäbchenreihen), nach unten hin kommt das Lochmuster. Wieviele Reihen häkelt mann oben, bevor das neue Muster am Ärmel losgeht??
15.06.2016 - 14:48DROPS Design answered:
Liebe Jasmin, in der 2. Reihe wird mit dem Muster nach Diagramm A.2 begonnen (siehe Anleitungstext).
16.06.2016 - 08:14
![]() Jasmin wrote:
Jasmin wrote:
Hallo, meine Mutter häkelt diese Jacke in Größe L für mich. Wieviele Stäbchenreihen sind es am Ärmel, bevor das Loch-Muster A2 bzw. A3 anfängt?
08.06.2016 - 19:52DROPS Design answered:
Liebe Jasmin, mit dem Muster wird wie beschrieben in der 2. Reihe begonnen. Achten Sie darauf, dass die Ärmel von oben nach unten gehäkelt werden, also an die Passe angehäkelt werden.
10.06.2016 - 08:19
![]() DR wrote:
DR wrote:
Hallo, Ik heb het vestje af, volgens de maten, maar het valt me een beetje tegen. Met name het raglangedeelte op de mouwen valt erg breed, terwijld de mouwen vrij strak zijn. Ik heb al iets minder geminderd maar dan nog. Het zijn bijna een soort pofmouwen geworden. Is dat de bedoeling? Op de foto's had ik dat niet zo verwacht.
29.01.2016 - 20:54Ditte wrote:
Hej, jeg har et spørgsmål ang. kanten i nakken. Hvor mange gange skal man tage ind pr. række? Ved alle 4 raglan dele eller kun den første og sidste? Og fra hvilken side skal man markere starten af raglan stykkerne? På forhånd tak.
26.07.2015 - 16:54DROPS Design answered:
Hej Ditte, Du tager ud til raglan i og med at du starter ovenfra og hækler nedad. Du tager ud forskelligt på ærmestykkerne og på for- og bagstk. Du tager ud på hver række altså både fra retsiden og fra vrangen men forskellig antal gange. God fornøjelse!
28.07.2015 - 14:08
![]() Anja Schmid wrote:
Anja Schmid wrote:
Hallo, beim Häkeln habe ich festgestellt, dass zu 10 cm 4 Stäbchenreihen fehlen, insgeamt fehlen für die Passe also ca. 10 Reihen. Da ich das Originalgarn verwende bin ich dochetwas erstaunt. Hätte ich nur jede 2. Reihe zunehmen müssen? Was kann ich jetzt noch tun, ohne alles auftrennen zu müssen?
01.06.2015 - 20:34DROPS Design answered:
Liebe Anja, haben Sie die Maschenprobe eingehalten? Bei Raglanpullovern ist es immer ganz wichtig, die Maschenprobe auch in der Höhe einzuhalten, Sie müssen dann ggf. die Nadelstärke anpassen. Welche Größe häkeln Sie? Für Gr. S gilt z.B., dass Sie insgesamt 22 R mit Raglanzunahmen häkeln, was lt. Maschenprobe 22 cm entspricht (10 R mit Stb = 10 cm) und das passt zu der Skizze.
08.06.2015 - 10:21
![]() Jean Krettek wrote:
Jean Krettek wrote:
Hallo, ich bin gerade dabei diese olle Jacke zu häkeln. Bin gerade bei den zunahmen Jetzt weiß ich aber nicht wo die Zunahmen für das Vorderteil und Ärmel hin sollen. ch habe ja nur 4 Mustersätze.
25.05.2015 - 19:41DROPS Design answered:
Schauen Sie mal auf das Foto, die schräge Linie, die Sie am Übergang vom Ärmel zu Rumpfteil sehen, ist einer von 4 A.1, Sie nehmen jeweils rechts und links von diesen 4 A.1 zu. A.1 bildet die Grenze zwischen Vorteil und Ärmeln und Rückenteil, somit erfolgen die Zunahmen in diesem Wechsel (schauen Sie in die Anleitung für die genaue Art der Zunahme): Vorderteil-M, Vorderteilzunahme, A.1, Ärmelzunahme, Ärmel-M, Ärmelzunahme, A.1, Rückenteilzunahme, Rückenteil-M, Rückenteilzunahme, A.1, Ärmel-Zunahme, Ärmel-M, Ärmelzunahme, A.1, Vorderteilzunahme, Vorderteil-M.
26.05.2015 - 09:19
![]() Isabel wrote:
Isabel wrote:
Obrigada.mas a minha duvida e que eu terminei o diagrama A.3 e na ultima carreira de A.3 acabei com os 6 diminuicoes de dois pontos altos,agora vou fazer as diminuicoes de um ponto alto de duas em duas carreiras.a minha duvida e se continuo a transformar A.2 em pontos altos de cada lado.
12.05.2015 - 15:37DROPS Design answered:
Tudo indica que deve continuar a adaptar A.2 em pa de cada lado. "Continuar A.2 em idas e voltas com 1 e 2 pa de cada lado da peça até a manga medir cerca de 39-39-38-38-37-37 cm a partir do marcador.." Bom croché!
13.05.2015 - 09:59
![]() Isabel wrote:
Isabel wrote:
Estou com o tamanho M.obrigada
12.05.2015 - 01:09DROPS Design answered:
Os números relativos ao tamanho M ao sempre os segundos indicados. Aconselha-se a sublinhar esses números ou a pintá-los com uma caneta fluorescente.
12.05.2015 - 10:42
![]() Isabel wrote:
Isabel wrote:
Nas mangas,depois de crochetar uma vez A.3 em altura,que faço a seguir?
12.05.2015 - 00:19DROPS Design answered:
Depois do diagrama A.3 começa-se a fazer as diminuições das mangas. Aconselha-se a ler com muita atenção esta parte. Bom croché!
12.05.2015 - 10:40
![]() Ditte wrote:
Ditte wrote:
Hej, jeg har to spørgsmål: 1) Jeg blev lidt forvirret allerede fra begyndelsen da der står at man skal hækle 2. række fra vrangen. Betyder det bare at man vender arbejdet og hækler tilbage? 2) Jeg hækler str. S modellen. Efter 2. række har jeg 20 fm og ikke 19 i det sidste stykke. Og når jeg tæller antal masker i beskrivelsen giver det også 20 fm: 124-18 +5+18+5+30+5+18+5=20. Har jeg misforstået noget? På forhånd tak for hjælpen!
22.04.2015 - 17:20DROPS Design answered:
Hej Ditte. Ja, du skal vende arbejdet naar du haekler tilbage. Husk du erstatter den förste m med 3 l = 1 st (3 l)+ 18+5+18+5+30+5+18+5+19 = 124 masker.
23.04.2015 - 14:15
|
||||||||||
Forget-Me-Not#forgetmenotcardigan |
||||||||||
|
|
||||||||||
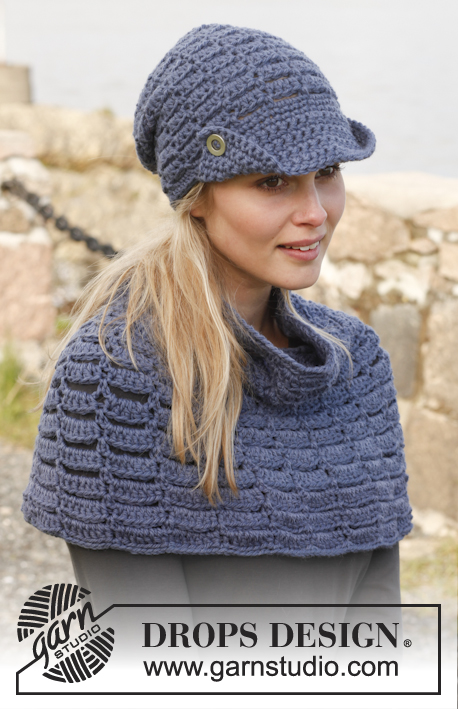
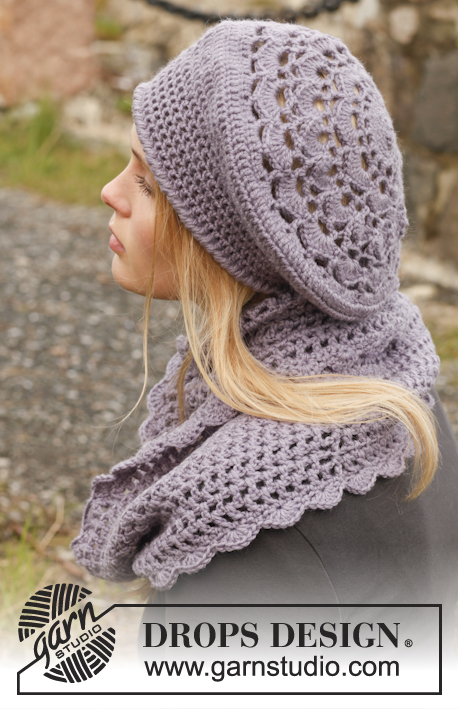
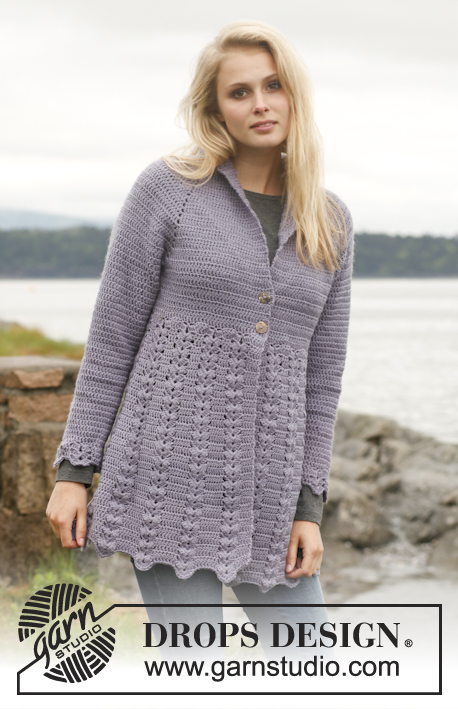
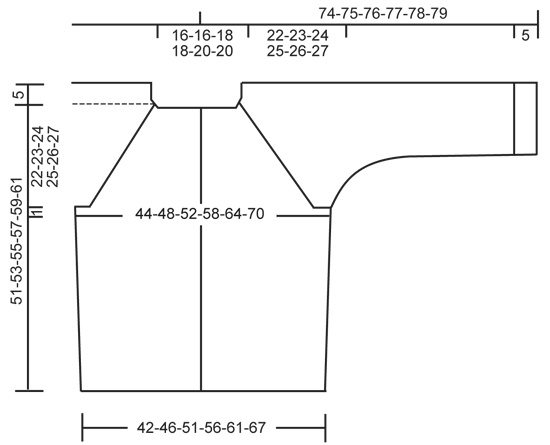
Crochet DROPS jacket with raglan and lace pattern worked top down in ”BabyAlpaca Silk”. Size: S - XXXL.
DROPS 149-19 |
||||||||||
|
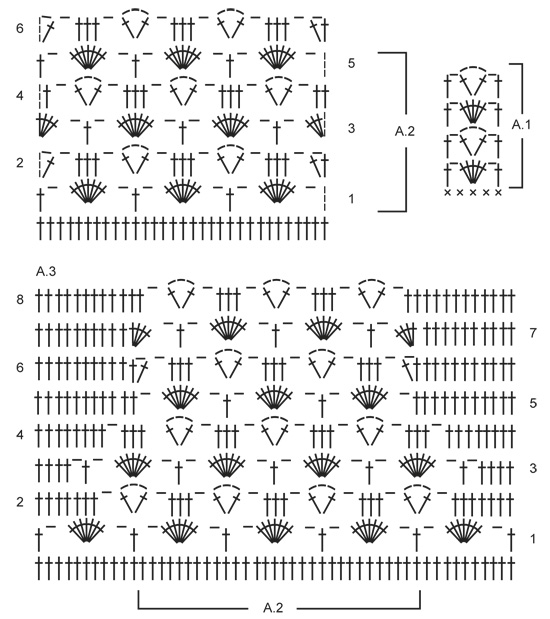
CROCHET INFO: Replace first dc at beg of every dc row with ch 3, finish row with 1 dc in 3rd ch from beg of previous row. PATTERN: See diagrams A.1 to A.3. INCREASE TIP: Inc 1 dc by working 2 dc in same st. DECREASE TIP 1: Work 1 sc/tr but wait with last YO and pull through (= 2 sts on hook), then work next sc/tr but on last pull through, pull YO through all sts on hook = 1 sc/tr dec. DECREASE TIP 2: Work 1 sc but wait with last YO and pull through (= 2 sts on hook), work next sc but wait with last YO and pull through (= 3 sts on hook), work next sc but now pull last YO through all 4 sts on hook (= 2 sts dec). ----------------------------------------------------------- JACKET: The piece is worked top down. Worked back and forth from mid front. YOKE: Ch 166-166-176-176-187-187 on hook size 3.5 mm/US E/4 with BabyAlpaca Silk. Work first row as follows from WS: Work 1 sc in 2nd ch from hook, * skip ch 1, 1 sc in each of the next 3 ch *, repeat from *-* until 0-0-2-2-1-1 ch remains and finish with 1 sc in each of the last 0-0-2-2-1-1 ch = 124-124-132-132-140-140 sc (includes 4 sc in each side towards mid front for band). READ CROCHET INFO and work next row as follows from RS: 3 ch (= 1dc), 1 dc in each of the next 18-18-20-20-22-22 sc, work A.1 over the next 5 sts (i.e. 1 dc in first sc, skip 1 sc, ch 1, 5 dc in next sc, skip 1 sc, ch 1 and 1 dc in next sc), work 1 dc in each of the next 18 sc (= sleeve), A.1 over the next 5 sc, 1 dc in each of the next 30-30-34-34-38-38 sc (= back piece), A.1 over the next 5 sc, 1 dc in each of the next 18 sc (= sleeve), A.1 over the next 5 sts and 1 dc in each of the last 19-19-21-21-23-23 sc, turn piece. READ ALL OF THE FOLLOWING SECTION BEFORE CONTINUING AND REMEMBER THE CROCHET GAUGE! Continue back and forth with dc and A.1 in every transition between body and sleeves. AT THE SAME TIME on next row (= WS) beg inc for raglan and inc as follows – NOTE: The inc on body and sleeves are uneven: RAGLAN INC ON FRONT AND BACK PIECE: Inc 2 dc before/after A.1 on front and back piece by working 2 dc in each of the last 2 dc before/after A.1 on front and back piece. Repeat inc with 2 dc on every row 1-5-6-11-14-20 more times (= 2-6-7-12-15-21 times in total). Then inc 1 dc before/after A.1 by working 2 dc in last dc before/after A.1 on front and back piece. Repeat inc with 1 dc on every row 19-16-16-12-10-5 more times (= 20-17-17-13-11-6 times in total). RAGLAN INC ON SLEEVES: Inc 2 dc before/after A.1 in each side on sleeves by working 2 dc in each of the last 2 dc before/after A.1 on sleeves. Repeat inc with 2 dc on every row 13-14-15-16-18-19 more times (= 14-15-16-17-19-20 times in total). Then inc 1 dc before/after A.1 by working 2 dc in last dc before/after A.1 on sleeves. Repeat inc with 1 dc on every row 7-7-7-7-6-6 more times (= 8-8-8-8-7-7 times in total). TRANSITION FROM A.1 TO DC: AT THE SAME TIME on last row with inc work 5 dc over A.1 instead of A.1 in every transition between body and sleeves. After last inc, there are 364-392-416-448-484-520 dc on row. Work next row as follows from RS (if next row is worked from WS, cut the yarn and beg from RS): Work 1 dc in each of the first 46-51-55-61-67-74 dc (= left front piece), skip the next 94-98-102-106-112-116 dc (= sleeve), work 12 ch, work 1 dc in each of the next 84-94-102-114-126-140 dc (= back piece), skip the next 94-98-102-106-112-116 dc (= sleeve), work 12 ch and work 1 dc in each of the last 46-51-55-61-67-74 dc = 200-220-236-260-284-312 sts on row. Then finish body and sleeves separately. BODY: Insert 1 marker on row – now measure piece from here. Work first row as follows from WS: 3 ch (= 1dc), work 1 dc in each of the next 3 dc (= band), work 1 dc in every dc and 12 dc in ch-space under each sleeve until 4 dc remain on row AT THE SAME TIME inc 49-49-63-69-75-77 dc evenly over these sts, finish with 1 dc in each of the last 4 dc (= band) = 249-269-299-329-359-389 dc on row. On next row from RS, work pattern according to diagram A.2 with 4 dc in each side for band, i.e. work 1st row as follows: 3 ch (= 1 dc), 1 dc in each of the first 3 dc (= band), 1 dc in next dc, * ch 1, skip 4 dc, 7 dc in next dc, ch 1, skip 4 dc, 1 dc in next dc *, repeat from *-* 24-26-29-32-35-38 times in total and finish with 1 dc in each of the last 4 dc on row. Continue pattern like this according to diagram A.2 (repeat rows 2-5 in diagram). When piece measures approx. 28-29-30-31-32-33 cm / 11"-11⅜"-11¾"-12¼"-12½"-13" from marker – finish after 3rd or 5th row in pattern, cut the yarn (piece measures approx. 56-58-60-62-64-66 cm / 22"-22¾"-23⅝"-24⅜"-25¼"-26" from shoulder and down). SLEEVE: = 94-98-102-106-112-116dc. Worked back and forth. Insert 1 marker on row – now measure piece from here. Work first row as follows from WS: ch 6 loosely, work 1 dc in every dc on sleeve and finish row with 8 ch, turn piece. Work 1 dc in 4th ch from hook, work 1 dc in each of the next ch 4, 1 dc in every dc from previous row and 1 dc in each of the 6 ch from beg of previous row = 106-110-114-118-124-128 dc on row. Work next row as follows from RS: 3 ch (= 1 dc), 1 dc in each of the next 6-8-5-7-5-7 dc, insert 1 marker, work pattern according to diagram A.2 over the next 91-91-101-101-111-111 sts, insert 1 marker and continue with 1 dc in each of the last 8-10-7-9-7-9 dc (1st row in A.2 has now been worked). Move the markers downwards when working. READ ALL OF THE FOLLOWING SECTION BEFORE CONTINUING! Continue pattern like this back and forth AT THE SAME TIME work pattern between the 2 markers on the next rows as shown in A.3 (beg on 2nd row in diagram), i.e. replace 1 repetition of A.2 in each side between markers with dc (these dc are in addition to dc outside the markers. Use the markers to help with correct no of sts). AT THE SAME TIME on 2nd row in A.2/A.3 dec 2 dc in each side by working the first 4 dc on row tog 2 by 2 and the last 4 dc on row tog 2 by 2 – READ DECREASE TIP 1. Repeat dec with 2 dc in each side on every row 3-5-3-6-4-6 more times (= 4-6-4-7-5-7 times in total). Then dec 1 dc in each side every 2nd-2nd-3rd-5th-4th-6th row a total of 8-6-7-3-5-3 times. After last dec there is 1 dc on one side of A.2 and 2 dc on the other side of A.2 (A.2 is over the middle 71-71-81-81-91-91 sts). Continue A.2 back and forth with 1 and 2 dc in each side until sleeve measures approx. 39-39-38-38-37-37 cm / 15¼"-15¼"-15"-15"-14½"-14½" from marker (NOTE: Shorter measurements in the larger sizes because of wider shoulder and longer sleeve cap). Approx. 5 cm / 2" remain until finished measurements, try the jacket on for correct sleeve length. Then work dc back and forth over all sts – NOTE: Over sts in A.2 there should be 53-53-61-61-67-67 dc = 56-56-64-64-70-70 dc on row. When edge with dc measures 5 cm / 2" and sleeve measures approx. 44-44-43-43-42-42 cm / 17¼"-17¼"-17"-17"-16½"-16½" from armhole, cut the yarn. ASSEMBLY: Sew sleeve seams tog edge to edge in outer loops of edge sts. Sew the openings under the sleeves. Sew on buttons (button between dc on band). ELEVATION IN BACK OF NECK: To make the neckline higher in the back of neck work an elevation as follows: Insert 1 marker in st in each corner in neckline, i.e. at beg of every raglan line. Work on hook size 3.5 mm as follows: Beg in 1st st from mid front at the edge of band and work 1 sc in every sc around the neck until 10 sc remain on row, but work 1 st before every marker as follows: 1 hdc in next st, 1 dc in next st (move marker to this st) and 1 hdc in next st. Turn, work 1 sc in every st until 10 sts remain in the other side, but over the 3 sts in every corner (i.e. st with marker + 1 st on each side of this), work 3 sc tog – READ DECREASE TIP 2. Turn and work until 18 sc remain on row, turn and work until 18 sc remain on row in the other side. Continue back and forth like this with sc and dec in every corner until edge measures approx. 2 cm / ¾" at the widest mid back, then work 1 row over all sts with 1 sc in every sc. Fasten off. |
||||||||||
Diagram explanations |
||||||||||
|
||||||||||
 |
||||||||||
 |
||||||||||
Have you finished this pattern?Tag your pictures with #dropspattern #forgetmenotcardigan or submit them to the #dropsfan gallery. Do you need help with this pattern?You'll find 7 tutorial videos, a Comments/Questions area and more by visiting the pattern on garnstudio.com. © 1982-2026 DROPS Design A/S. We reserve all rights. This document, including all its sub-sections, has copyrights. Read more about what you can do with our patterns at the bottom of each pattern on our site. |
||||||||||


With over 40 years in knitting and crochet design, DROPS Design offers one of the most extensive collections of free patterns on the internet - translated to 17 languages. As of today we count 325 catalogs and 12298 patterns - 12288 of which are translated into English (US/in).
We work hard to bring you the best knitting and crochet have to offer, inspiration and advice as well as great quality yarns at incredible prices! Would you like to use our patterns for other than personal use? You can read what you are allowed to do in the Copyright text at the bottom of all our patterns. Happy crafting!
Post a comment to pattern DROPS 149-19
We would love to hear what you have to say about this pattern!
If you want to leave a question, please make sure you select the correct category in the form below, to speed up the answering process. Required fields are marked *.