
Popular categories
Looking for a yarn?


Comments / Questions (63)
![]() Ourd59 wrote:
Ourd59 wrote:
Merci pour votre réponse Une dernière question sur la rehausse Faut il continuer à faire des rangs raccourcis de 18 mailles Jusqu’à obtenir 2 cm Merci
11.10.2021 - 22:01DROPS Design answered:
Bonjour Ourd59, tout à fait, continuer ainsi: en diminuant à chaque "coin" de chaque raglan et en laissant 18 ms non travaillées à la fin de chaque rang de chaque côté jusqu'à ce que cette partie mesure 2 cm au milieu dos, terminez par 1 rang de mailles serrées tout le long de l'encolure. Bon crochet!
12.10.2021 - 08:47
![]() Ourd59 wrote:
Ourd59 wrote:
Bonjour , J’ai du mal à comprendre la rehausse du dos Pourriez m’indiquer ce que vous appelez le début du raglan ? Merci
09.10.2021 - 01:18DROPS Design answered:
Bonjour Ourd59, le début de chaque raglan correspond à la maille centrale de A.1 (qui forme le début d'où partent la ligne de chacun des raglans). Placez un marqueur dans cette maille et crochetez 3 m ens à l'endroit ainsi: la maille avant le marqueur + la maille avec le marqueur + la maille après le marqueur. Bon crochet!
11.10.2021 - 07:08
![]() Ourd59 wrote:
Ourd59 wrote:
Bonjour Je ne comprends pas pour le 1 er rang prendre sur l’envers Faut il crocheter la chaînette sur l’envers ou considérer que le 1 er rang est un rang envers ? Merci
07.10.2021 - 04:24DROPS Design answered:
Bonjour Ourd59, le tout premier rang de mailles serrées est effectivement un rang sur l'envers. Le rang suivant (= le 1er rang de brides et le 1er rang des diagrammes) se crochète sur l'endroit. Bon crochet!
07.10.2021 - 08:41
![]() Marta wrote:
Marta wrote:
Hola! tengo un problema con la tension del patron. He usado aguja de 3,5mm y me sale una muestra de 12cm de ancho por 10 de alto y usando una de 3mm me sale una muestra de 10cm de ancho por 8cm de alto. Mi talla seria la S y no se muy bien como podria adaptarlo. Muchas gracias por su respuesta.
20.06.2019 - 18:08DROPS Design answered:
Hola Marta. Lo importante es la tensión en horizontal para poder trabajar el patrón sin tener que recalcular. Si te sale la muestra con ganchillo de 3 mm 22 puntos=10 cm, es la tensión correcta. Para alcanzar las medidas necesarias vas a tener que trabajar algunas filas extra en vertical.
20.06.2019 - 22:30
![]() Gail wrote:
Gail wrote:
On sleeve, I have decreased to the point of having 81A.2 pattern stitches in the middle of the sleeve, but have 6 dc on one side and 7 dc on other, not1 dc on one side and 2 dc on other. I decrease 4dc on each side for 7, then 1dc every 5th row times 3. Advise.
13.01.2019 - 20:45DROPS Design answered:
Dear Gail, in 4th size you start with 1 dc, 7 dc, A.2 (=101 sts), 9 dc. You will work by and 10 sts in A.2 in dc (see M.3) so that you will have 1dc+7 dc + 10 dc (from A.2 as in A.3) before the 81 sts in A.2 and 10 dc (from A.2 as in A.3)+9 dc. YOu will dec 2 sts 7 times and 1 st 3 times = 17 sts are dec on each side. Before the 81 sts: 18 sts - 17 sts= 1 dc remain, after the 81 sts: 19 sts - 17 sts = 2 dc remain. Happy crocheting!
14.01.2019 - 12:28Ivana wrote:
Hello! Why make 3 ch at the beginning of a row? Since it is dc, it is better to do 2 ch instead of 3 ch. Please correct me if I'm wrong. I don't see buttonholes in the pattern. Are they just a decoration or I'm missing something during reading pattern? Thanks for your help!
17.05.2018 - 09:56DROPS Design answered:
Hello, Ivana! 3 ch at the beginning: it is adequate to 1 tr (brittish eng, 1 dc in US terminology!), 2 ch we use when crochet 1 dc (brittish eng, 1 sc in US). Butthonholes: instead of buttonholes we use space between trebles on band. Happy crocheting! Hana
17.05.2018 - 12:52Ivana wrote:
Hello! One question. When doing raglan there is a total of four A.1. pattern repeating. If you inc 2 dc before/after A.1 on front and back piece by working 2 dc in each of the last 2 dc before/after A.1 on front and back then you have inc in ALL OF THE FOUR A.1. pattern. In that case, there are no A.1. left for raglan inc for sleeves... Could you please explain this part of the pattern? Thank you very much for your help!
17.05.2018 - 09:55DROPS Design answered:
Dear Ivana, you will increase by working 2/1 dc in the 2/1 dc before/after A.1 and work A.1 as before => the number of dc will increase by 2 /1 (front pieces) by 4/2 (back pieces and sleeves). A.1 is the raglan line and should be worked over the same sts vertically. Happy crocheting!
17.05.2018 - 13:21Monica wrote:
Hello, I've started this today, but I have a question. Why in the 1st row I have to skip 1 chain every 3 sc? Is this because the base chain will be more elastic? Because I usually use Single Crochet Base Chain to start (and this is very elastic), so I think I don't need to skip base chain. Thank you
17.04.2018 - 10:17DROPS Design answered:
Dear Monica, usually when you crochet the fundation chain, it's more tighten that the first row should be, that's the reason why you have then to chain more chains and skip chains evenly on first row. If your fundation row is not that tight, make sure to cast on the number of sc requested for your size, making sure it's elastic enough. Happy crocheting!
17.04.2018 - 11:06
![]() Le Gal Valerie wrote:
Le Gal Valerie wrote:
Je ne trouve pas 448 mailles a la fin des augmentations et je ne comprend pas pourquoi meme après avoir recommmencer 3 fois. Pourriez-vous m'aider?
27.03.2018 - 21:59DROPS Design answered:
Bonjour Mme Le Gal, en taille XL on augmente pour le dos et les devants: 8 m (4 sur le dos et 2 sur chaque devant) x 12 puis 4 m (2 sur le dos et 2 sur chaque devant) x 13 soit 148 m au total - pour les manches, on augmente 8 m (4 sur chaque manche) x 17 puis 4 m (2 sur chaque manche) x 8 soit 168 m au total, soit 132 ms + 148+168= 448 m. Bon crochet!
28.03.2018 - 15:29
![]() Marjolein wrote:
Marjolein wrote:
Hallo, hoeveel stokjes moet ik nu vervangen bij de derde regel na LEES ALLE ONDERSTAANDE AANWIJZINGEN.. bij de mouw? Ik haak het vest met 98 steken op de mouw, de tweede maat. Een keer patroon A2 vervangen door stokjes is volgens mij dan 10 of 11 stokjes, maar op teltekening zijn het er minder. Moet dit aan beide zijden van de mouw een heel patroon vervangen, of aan beide zijden een half patroon A2? Ik zou het vest zo graag afmaken, maar loop hier op vast..
13.11.2016 - 21:05DROPS Design answered:
Hoi Marjolein. Je hebt: 3 l (= 1 stk), 1 stk in elk van de volgende 8 stk, plaats 1 markeerder, haak in patroon volgens telpatroon A.2 over de volgende 91 st, plaats 1 markeerder en ga verder met 1 stk in elk van de laatste 10 stk (1e toer in A.2 is nu klaar)). Ik zou het dan zo haken. Je begint met tweede toer A.3 (7 stk, 1 l, (markeerder), en ga door met A.2 tweede toer in 11e stk en herhaal A.2 tot einde van de toer (10 stk over (je eindigt met 1 stk/2 l/1 stk), markeerder en 1 l, en 7 stk in de laatste 7 stk (A.3).
17.11.2016 - 15:14
|
||||||||||
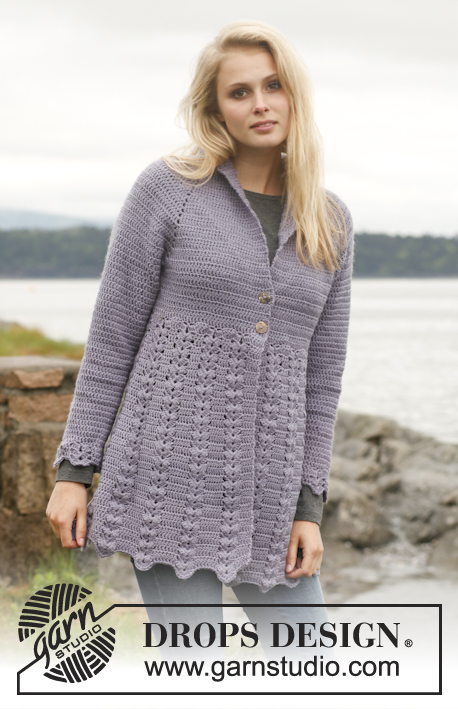
Forget-Me-Not#forgetmenotcardigan |
||||||||||
|
|
||||||||||
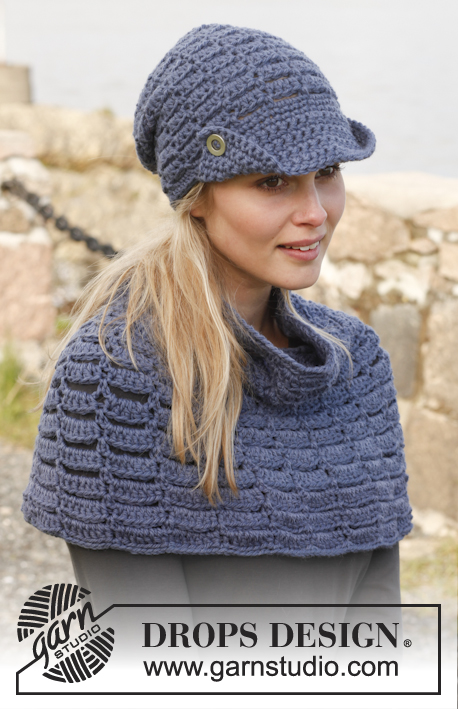
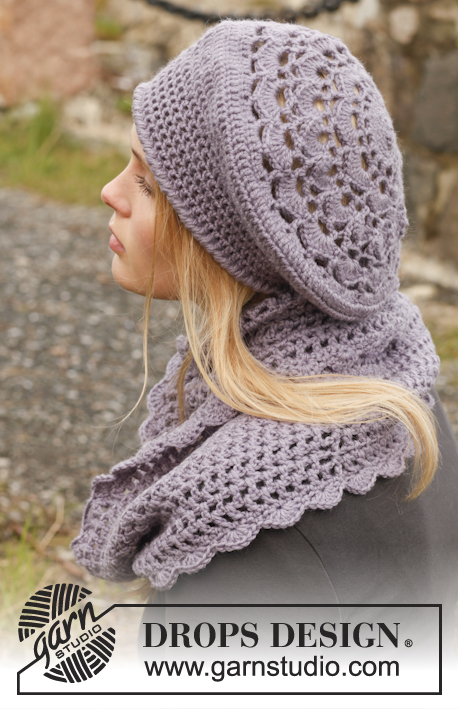
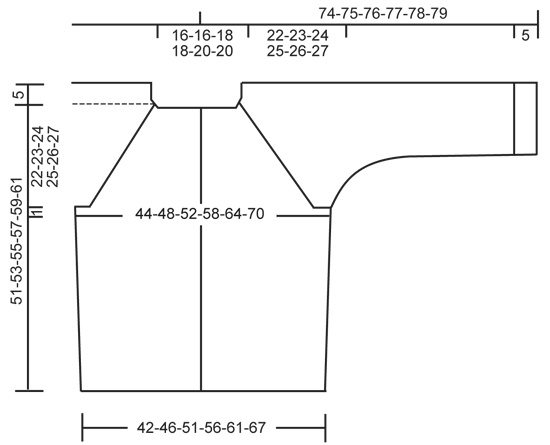
Crochet DROPS jacket with raglan and lace pattern worked top down in ”BabyAlpaca Silk”. Size: S - XXXL.
DROPS 149-19 |
||||||||||
|
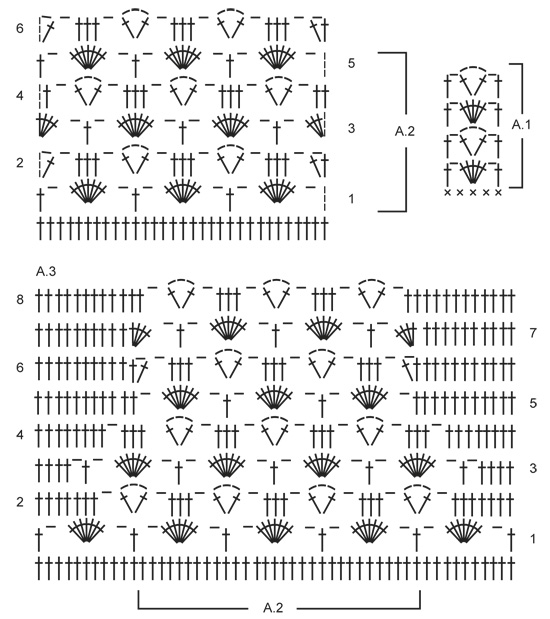
CROCHET INFO: Replace first dc at beg of every dc row with ch 3, finish row with 1 dc in 3rd ch from beg of previous row. PATTERN: See diagrams A.1 to A.3. INCREASE TIP: Inc 1 dc by working 2 dc in same st. DECREASE TIP 1: Work 1 sc/tr but wait with last YO and pull through (= 2 sts on hook), then work next sc/tr but on last pull through, pull YO through all sts on hook = 1 sc/tr dec. DECREASE TIP 2: Work 1 sc but wait with last YO and pull through (= 2 sts on hook), work next sc but wait with last YO and pull through (= 3 sts on hook), work next sc but now pull last YO through all 4 sts on hook (= 2 sts dec). ----------------------------------------------------------- JACKET: The piece is worked top down. Worked back and forth from mid front. YOKE: Ch 166-166-176-176-187-187 on hook size 3.5 mm/US E/4 with BabyAlpaca Silk. Work first row as follows from WS: Work 1 sc in 2nd ch from hook, * skip ch 1, 1 sc in each of the next 3 ch *, repeat from *-* until 0-0-2-2-1-1 ch remains and finish with 1 sc in each of the last 0-0-2-2-1-1 ch = 124-124-132-132-140-140 sc (includes 4 sc in each side towards mid front for band). READ CROCHET INFO and work next row as follows from RS: 3 ch (= 1dc), 1 dc in each of the next 18-18-20-20-22-22 sc, work A.1 over the next 5 sts (i.e. 1 dc in first sc, skip 1 sc, ch 1, 5 dc in next sc, skip 1 sc, ch 1 and 1 dc in next sc), work 1 dc in each of the next 18 sc (= sleeve), A.1 over the next 5 sc, 1 dc in each of the next 30-30-34-34-38-38 sc (= back piece), A.1 over the next 5 sc, 1 dc in each of the next 18 sc (= sleeve), A.1 over the next 5 sts and 1 dc in each of the last 19-19-21-21-23-23 sc, turn piece. READ ALL OF THE FOLLOWING SECTION BEFORE CONTINUING AND REMEMBER THE CROCHET GAUGE! Continue back and forth with dc and A.1 in every transition between body and sleeves. AT THE SAME TIME on next row (= WS) beg inc for raglan and inc as follows – NOTE: The inc on body and sleeves are uneven: RAGLAN INC ON FRONT AND BACK PIECE: Inc 2 dc before/after A.1 on front and back piece by working 2 dc in each of the last 2 dc before/after A.1 on front and back piece. Repeat inc with 2 dc on every row 1-5-6-11-14-20 more times (= 2-6-7-12-15-21 times in total). Then inc 1 dc before/after A.1 by working 2 dc in last dc before/after A.1 on front and back piece. Repeat inc with 1 dc on every row 19-16-16-12-10-5 more times (= 20-17-17-13-11-6 times in total). RAGLAN INC ON SLEEVES: Inc 2 dc before/after A.1 in each side on sleeves by working 2 dc in each of the last 2 dc before/after A.1 on sleeves. Repeat inc with 2 dc on every row 13-14-15-16-18-19 more times (= 14-15-16-17-19-20 times in total). Then inc 1 dc before/after A.1 by working 2 dc in last dc before/after A.1 on sleeves. Repeat inc with 1 dc on every row 7-7-7-7-6-6 more times (= 8-8-8-8-7-7 times in total). TRANSITION FROM A.1 TO DC: AT THE SAME TIME on last row with inc work 5 dc over A.1 instead of A.1 in every transition between body and sleeves. After last inc, there are 364-392-416-448-484-520 dc on row. Work next row as follows from RS (if next row is worked from WS, cut the yarn and beg from RS): Work 1 dc in each of the first 46-51-55-61-67-74 dc (= left front piece), skip the next 94-98-102-106-112-116 dc (= sleeve), work 12 ch, work 1 dc in each of the next 84-94-102-114-126-140 dc (= back piece), skip the next 94-98-102-106-112-116 dc (= sleeve), work 12 ch and work 1 dc in each of the last 46-51-55-61-67-74 dc = 200-220-236-260-284-312 sts on row. Then finish body and sleeves separately. BODY: Insert 1 marker on row – now measure piece from here. Work first row as follows from WS: 3 ch (= 1dc), work 1 dc in each of the next 3 dc (= band), work 1 dc in every dc and 12 dc in ch-space under each sleeve until 4 dc remain on row AT THE SAME TIME inc 49-49-63-69-75-77 dc evenly over these sts, finish with 1 dc in each of the last 4 dc (= band) = 249-269-299-329-359-389 dc on row. On next row from RS, work pattern according to diagram A.2 with 4 dc in each side for band, i.e. work 1st row as follows: 3 ch (= 1 dc), 1 dc in each of the first 3 dc (= band), 1 dc in next dc, * ch 1, skip 4 dc, 7 dc in next dc, ch 1, skip 4 dc, 1 dc in next dc *, repeat from *-* 24-26-29-32-35-38 times in total and finish with 1 dc in each of the last 4 dc on row. Continue pattern like this according to diagram A.2 (repeat rows 2-5 in diagram). When piece measures approx. 28-29-30-31-32-33 cm / 11"-11⅜"-11¾"-12¼"-12½"-13" from marker – finish after 3rd or 5th row in pattern, cut the yarn (piece measures approx. 56-58-60-62-64-66 cm / 22"-22¾"-23⅝"-24⅜"-25¼"-26" from shoulder and down). SLEEVE: = 94-98-102-106-112-116dc. Worked back and forth. Insert 1 marker on row – now measure piece from here. Work first row as follows from WS: ch 6 loosely, work 1 dc in every dc on sleeve and finish row with 8 ch, turn piece. Work 1 dc in 4th ch from hook, work 1 dc in each of the next ch 4, 1 dc in every dc from previous row and 1 dc in each of the 6 ch from beg of previous row = 106-110-114-118-124-128 dc on row. Work next row as follows from RS: 3 ch (= 1 dc), 1 dc in each of the next 6-8-5-7-5-7 dc, insert 1 marker, work pattern according to diagram A.2 over the next 91-91-101-101-111-111 sts, insert 1 marker and continue with 1 dc in each of the last 8-10-7-9-7-9 dc (1st row in A.2 has now been worked). Move the markers downwards when working. READ ALL OF THE FOLLOWING SECTION BEFORE CONTINUING! Continue pattern like this back and forth AT THE SAME TIME work pattern between the 2 markers on the next rows as shown in A.3 (beg on 2nd row in diagram), i.e. replace 1 repetition of A.2 in each side between markers with dc (these dc are in addition to dc outside the markers. Use the markers to help with correct no of sts). AT THE SAME TIME on 2nd row in A.2/A.3 dec 2 dc in each side by working the first 4 dc on row tog 2 by 2 and the last 4 dc on row tog 2 by 2 – READ DECREASE TIP 1. Repeat dec with 2 dc in each side on every row 3-5-3-6-4-6 more times (= 4-6-4-7-5-7 times in total). Then dec 1 dc in each side every 2nd-2nd-3rd-5th-4th-6th row a total of 8-6-7-3-5-3 times. After last dec there is 1 dc on one side of A.2 and 2 dc on the other side of A.2 (A.2 is over the middle 71-71-81-81-91-91 sts). Continue A.2 back and forth with 1 and 2 dc in each side until sleeve measures approx. 39-39-38-38-37-37 cm / 15¼"-15¼"-15"-15"-14½"-14½" from marker (NOTE: Shorter measurements in the larger sizes because of wider shoulder and longer sleeve cap). Approx. 5 cm / 2" remain until finished measurements, try the jacket on for correct sleeve length. Then work dc back and forth over all sts – NOTE: Over sts in A.2 there should be 53-53-61-61-67-67 dc = 56-56-64-64-70-70 dc on row. When edge with dc measures 5 cm / 2" and sleeve measures approx. 44-44-43-43-42-42 cm / 17¼"-17¼"-17"-17"-16½"-16½" from armhole, cut the yarn. ASSEMBLY: Sew sleeve seams tog edge to edge in outer loops of edge sts. Sew the openings under the sleeves. Sew on buttons (button between dc on band). ELEVATION IN BACK OF NECK: To make the neckline higher in the back of neck work an elevation as follows: Insert 1 marker in st in each corner in neckline, i.e. at beg of every raglan line. Work on hook size 3.5 mm as follows: Beg in 1st st from mid front at the edge of band and work 1 sc in every sc around the neck until 10 sc remain on row, but work 1 st before every marker as follows: 1 hdc in next st, 1 dc in next st (move marker to this st) and 1 hdc in next st. Turn, work 1 sc in every st until 10 sts remain in the other side, but over the 3 sts in every corner (i.e. st with marker + 1 st on each side of this), work 3 sc tog – READ DECREASE TIP 2. Turn and work until 18 sc remain on row, turn and work until 18 sc remain on row in the other side. Continue back and forth like this with sc and dec in every corner until edge measures approx. 2 cm / ¾" at the widest mid back, then work 1 row over all sts with 1 sc in every sc. Fasten off. |
||||||||||
Diagram explanations |
||||||||||
|
||||||||||
 |
||||||||||
 |
||||||||||
Have you finished this pattern?Tag your pictures with #dropspattern #forgetmenotcardigan or submit them to the #dropsfan gallery. Do you need help with this pattern?You'll find 6 tutorial videos, a Comments/Questions area and more by visiting the pattern on garnstudio.com. © 1982-2026 DROPS Design A/S. We reserve all rights. This document, including all its sub-sections, has copyrights. Read more about what you can do with our patterns at the bottom of each pattern on our site. |
||||||||||


With over 40 years in knitting and crochet design, DROPS Design offers one of the most extensive collections of free patterns on the internet - translated to 17 languages. As of today we count 324 catalogs and 12290 patterns - 12280 of which are translated into English (US/in).
We work hard to bring you the best knitting and crochet have to offer, inspiration and advice as well as great quality yarns at incredible prices! Would you like to use our patterns for other than personal use? You can read what you are allowed to do in the Copyright text at the bottom of all our patterns. Happy crafting!
Post a comment to pattern DROPS 149-19
We would love to hear what you have to say about this pattern!
If you want to leave a question, please make sure you select the correct category in the form below, to speed up the answering process. Required fields are marked *.