
Popular categories
Looking for a yarn?


Comments / Questions (76)
![]() Vanden Bosch Nancy wrote:
Vanden Bosch Nancy wrote:
Kan ik ergens wat meer uitleg vinden om de vlinder te haken?
07.08.2019 - 16:00DROPS Design answered:
Dag Nancy,
We hebben helaas geen speciale video of aparte uitleg voor de vlinder. Als je aangeeft waar je precies tegenaan loopt, dan kunnen we je beter helpen. Je kunt evt. ook altijd met je vragen terecht bij de lokale winkel waar je het garen hebt gekocht.
08.08.2019 - 13:37
![]() Ria Agterberg wrote:
Ria Agterberg wrote:
Bij dit patroon moet je beginnen met meer lossen omdat de eerste toer vaak gaat trekken omdat de lossenketting meestal strakker is. Ik wil iedereen aanraden om de vasten hakend op te zetten. Sinds ik weet hoe je dit kan doen maak ik hier altijd gebruik van. Het is een geweldige manier om een werkstuk te beginnen, ook zijn de steken veel makkelijker te tellen. Omdat ik de vraag las van iemand waarom je meer lossen moet opzetten dan de vasten dacht ik dat iedereen dit zou moeten weten.
03.08.2019 - 01:29
![]() Sue wrote:
Sue wrote:
I asked what type yarn is compatible to cotton viscose? Seeing that I have never heard of a Drops store I can't just drop everything n go right out n go to one n buy yarn there. So kindly please answer my question as to what other brands of yarn would be compatible to cotton viscose.
02.07.2019 - 09:16DROPS Design answered:
Dear Sue, We are able to provide free patterns thanks to our yarns sold throughout the world. You will therefore understand that we can only recomand you to contact your DROPS Store shipping to USA for any further help & assistance. Thank you for your comprehension.
02.07.2019 - 10:37
![]() Sue wrote:
Sue wrote:
Yarn called for in pattern is discontinued so I would like to know what a yarn in USA would be compatible to one called for?? Thank you in advance
26.06.2019 - 02:23DROPS Design answered:
Dear Sue, you can use our yarn converter to find alternative, your DROPS store will be able to help you finding the best matching alternative. Do not hesitate to contact them by mail or on the social medias. Happy knitting!
26.06.2019 - 06:38
![]() Jenny wrote:
Jenny wrote:
WoW, ni gör verkligen inga beskrivningar för nybörjare, detta går inte ens att följa från början!
26.05.2019 - 18:50DROPS Design answered:
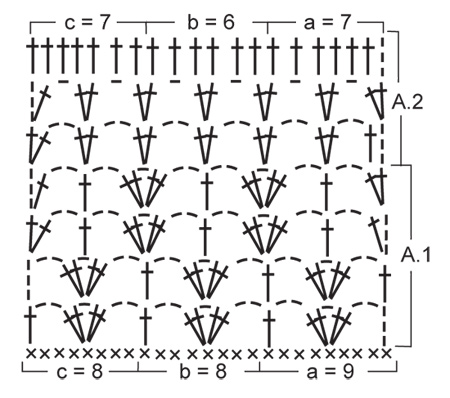
Hei Jenny. Det er veldig beklagelig. I denne oppsrkiften begynner du med å hekle 141-160-178-197-216-234 luftmasker, som skal reduseres til 121-137-153-169-185-201 masker på 1. omg slik: hekle 1 fastmaske i hver luftmaske og hoppe over ca hver 7 luftmaske. Dette gjøres for at kanten ikke skal stramme. Videre hekles det etter diagram A.1, - se hvordan å lese diagrammer her. Du hekler diag a over de første 9 fastmaskene, så gjentar du diag b til det gjenstår 8 masker, hekle diag c over disse. Spør oss gjerne om hjelp i kommentarfeltet eller benytt deg av våre videoer og tutorials. God fornøyelse
28.05.2019 - 12:08
![]() Susan wrote:
Susan wrote:
Beautiful pattern! I have only just begun but already have a problem. I think I'm following the pattern correctly. I'm using the numbers for XXL so I chained 216, then beginning in 2nd chain from hook I made 4 single crochet stitches, skipped one chain, then made 6 single crochets, repeating this to the end of the row. I have 195 stitches plus one chain left instead of 185 as the pattern states. I have counted every stitch again. I have 19 chains that were skipped, plus the one at the end.
22.09.2018 - 05:46DROPS Design answered:
Dear Susan, work: 1 single crochet in the 2nd ch from hook (= 1 sc over 2 ch), then 1 sc in each of the next 4 ch (= 4 sc over 4 ch), then repeat a total of 30 times [skip 1 ch, 1 sc in each of the next 6 ch] (= 6 sc over 7 ch x 30 = 180 sc over 210 ch) you have then: 1 sc + 4 sc + 180 sc = 185 single crochets. Happy crocheting!
24.09.2018 - 08:03
![]() Desiree Barhorst-Weller wrote:
Desiree Barhorst-Weller wrote:
Ik zou graag nog steeds antwoord op mijn vraag willen. Is er hulp mogelijk bij het haken van mouwen bij dit patroon? Ik weet niet goed hoe ik dit aan moet pakken.
26.01.2018 - 19:05DROPS Design answered:
Hallo Desiree, Dit patroon is ontworpen zonder mouwen en er is helaas geen versie met mouwen. Het handigst is om een vergelijkbaar patroon op te zoeken waar wel mouwen aan zitten. Je kunt ook hulp vragen bij de winkel waar je het garen hebt gekocht.
26.01.2018 - 19:08
![]() Desiree Barhorst-Weller wrote:
Desiree Barhorst-Weller wrote:
Ik zou erg graag lange mouwen bij deze tuniek willen maken, aangezien ik 'flubberarmen' heb en ik liever niets mouwloos draag. Hebben jullie daar ook nog patronen of hulp voor?
22.01.2018 - 09:04
![]() Hommerie wrote:
Hommerie wrote:
Bonjour, Comment peux ton savoir le nombre de pelote qu'il faut acheté par modèle. merci d'avance.
06.07.2016 - 22:54DROPS Design answered:
Bonjour Mme Hommerie, vous trouverez sous l'onglet "Fournitures" le poids total pour chaque taille, soit par ex en taille S: 550 g. Cotton Viscose se présente sous la forme de pelotes de 50 g - cf nuancier - il vous faudra alors 550g/50g=11 pelotes en taille S. Bon crochet!
07.07.2016 - 08:18
![]() Diana wrote:
Diana wrote:
Als ik de tuniek in het rond wil haken klopt het dan dat ik 2x het aantal steken min 2 moet opzetten als eerste ketting?
10.06.2014 - 14:55DROPS Design answered:
Hoi Diana. Ja, je moet het aantal 2x opzetten, maar je moet ervoor zorgen dat het telpatroon past in de rondte. Succes
11.06.2014 - 19:25
|
||||||||||
Yasmin#yasmintunic |
||||||||||
 |
 |
|||||||||
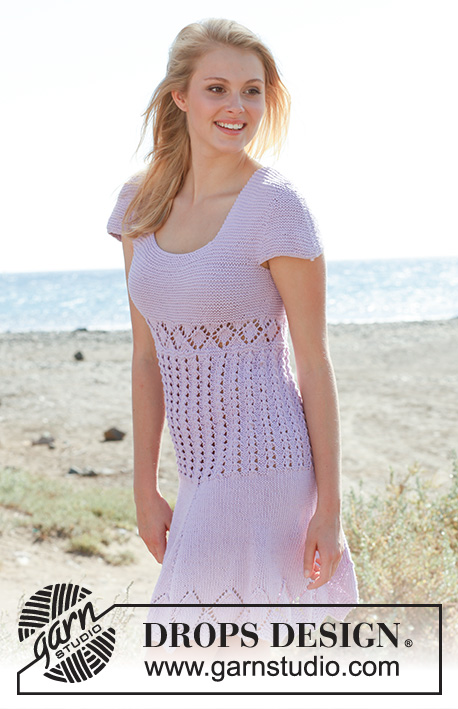
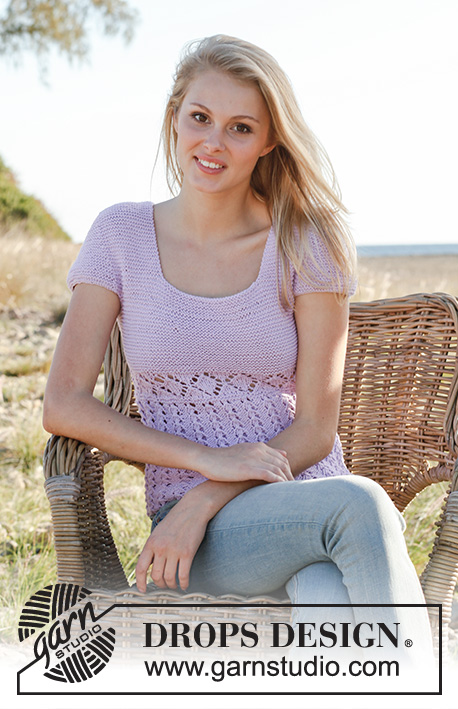
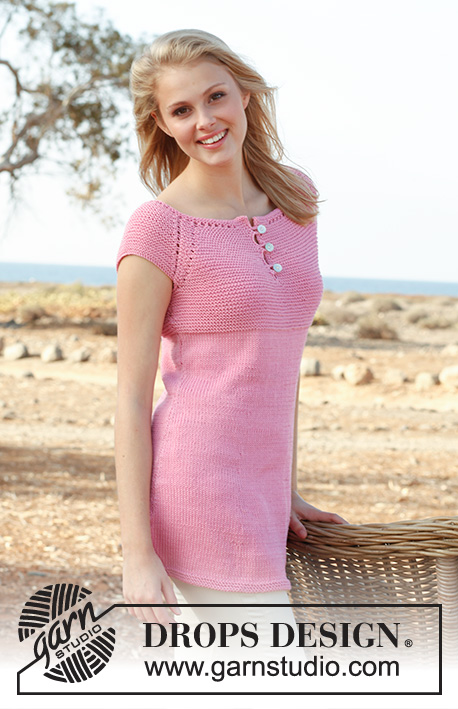
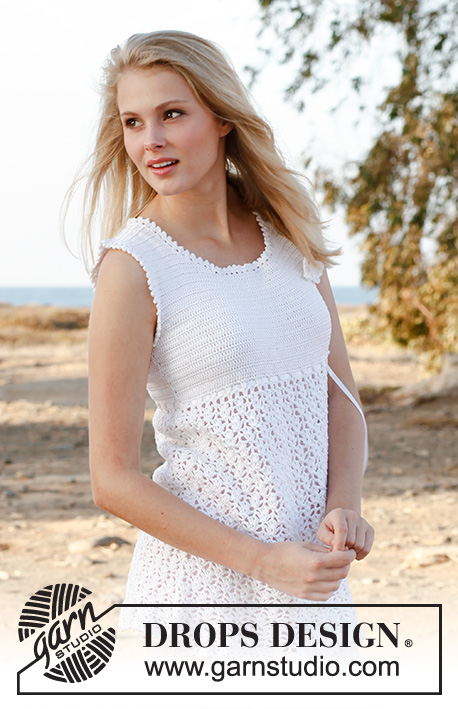
Crochet DROPS tunic with lace pattern, flounce at the bottom and butterfly for decoration in ”Cotton Viscose”.
DROPS 148-9 |
||||||||||
|
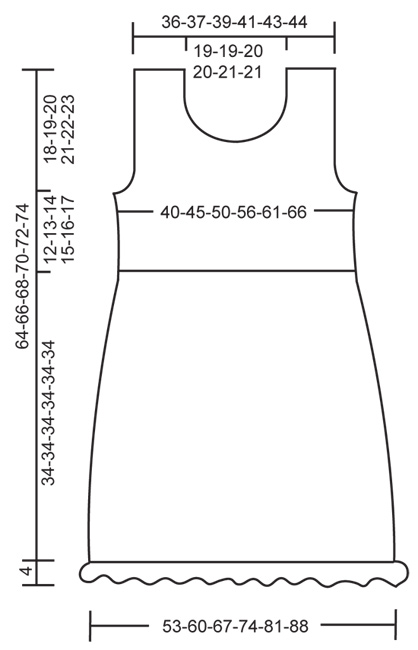
CROCHET INFO: Replace first dc on every row with 3 ch. PATTERN: See diagrams A.1 and A.2. DECREASE TIP (applies to neck and armhole): Dec at beg of row as follows: Work sl sts over no of dc to be dec. Dec at end of row as follows: When no of dc to be dec remains, turn. -------------------------------------------------------- TUNIC: Worked back and forth in 2 parts and sewn tog when finished. FRONT PIECE: With Cotton Viscose ch 141-160-178-197-216-234 on hook size 3 mm / C . Continue with 1 sc in 2nd ch from hook, then 1 sc in each of the next 6-4-8-6-4-8 ch, * skip ch 1, 1 sc in each of the next 6 ch *, repeat from *-* the entire row = 121-137-153-169-185-201 sc. Continue pattern A.1 as follows: Diagram a over the first 9 sc, diagram b until 8 sc remain, then diagram c over these (= 15-17-19-21-23-25 repetitions in total on row). Repeat the 4 rows in diagram A.1 upwards until piece measures approx. 32 cm / 12½" – finish after 4th row in diagram. REMEMBER THE CROCHET GAUGE! Then work diagram A.2 one time vertically. When A.2 has been worked, there are 92-104-116-128-140-152 dc on row. Then work 1 dc in every dc - READ CROCHET INFO. When piece measures 46-47-48-49-50-51 cm / 18"-18½"-19"-19¼"-19¾"-20" / 18"-18½"-19"-19¼"-19¾"-20", dec for armhole in each side on every row as follows – READ DECREASE TIP: 4 dc 1 time, 3 dc 0-0-1-1-2-3 times, 2 dc 0-1-1-3-3-4 times and 1 dc 1-3-4-4-5-4 times in each side = 82-86-90-94-98-102 dc remain on row. When piece measures 53-54-56-57-59-60 cm / 21"-21¼"-22"-22½"-23¼"-23½", beg neck dec and finish each shoulder separately. FIRST SHOULDER: Work dc back and forth over the first 28-30-31-33-34-36 dc in one side – AT THE SAME TIME dec towards the neck on every row: 3 dc 1 time, 2 dc 2 times and 1 dc 2 times = 19-21-22-24-25-27 dc remain on shoulder. When piece measures 64-66-68-70-72-74 cm / 25¼"-26"-26¾"-27½"-28⅜"-29⅛", cut the yarn. OTHER SHOULDER: Work the same way as the first. BACK PIECE: Work as front piece up to and with armhole dec = 82-86-90-94-98-102 dc on row. Continue to work until piece measures approx. 62-64-66-68-70-72 cm / 24⅜"-25¼"-26"-26¾"-27½"-28⅜". Now finish each shoulder separately as follows: Work 1 row with dc over the first 21-23-24-26-27-29 dc, turn, dec the first 2 dc and work the rest of row, cut the thread. Repeat on the other shoulder. ASSEMBLY: Sew shoulder seams edge to edge to avoid a chunky seam. Sew side seams edge to edge so that they are less visible. FLOUNCE AT THE BOTTOM: Work in the sc row at the bottom of body as follows (beg in one side): ROUND 1: 1 sc in first sc, * ch 3, skip 1 sc, 1 sc in next sc *, repeat from *-* the entire round, finish with 1 sl st in first sc. ROUND 2: ch 2, 1 sc in first ch-space, * ch 4, 1 sc in next ch-space *, repeat from *-* the entire round, finish with 1 sl st in first sc. ROUND 3: ch 2, 1 sc in first ch-space, * ch 4, 1 sc in next ch-space *, repeat from *-* the entire round, finish with 1 sl st in first sc. ROUND 4: ch 2, 1 sc in first ch-space, * ch 5, 1 sc in next ch-space *, repeat from *-* the entire round, finish with 1 sl st in first sc. ROUND 5: ch 2, 1 sc in first ch-space, * ch 5, 1 sc in next ch-space *, repeat from *-* the entire round, finish with 1 sl st in first sc. ROUND 6: Work as follows in every ch-space: 2 sc + 1 picot (= ch 3, 1 sc in first ch) + 2 sc. Fasten off. EDGE AROUND THE ARMHOLES AND NECK: Beg mid back of neck and mid under armhole. ROUND 1: 1 sc in first st, * ch 3, skip approx. ½ cm / ¼", 1 sc in next st *, repeat from *-* the entire round, finish with 1 sl st in first sc. ROUND 2: Work as follows in every ch-space: 1 sc + 1 picot (= ch 3, 1 sc in first ch) + 1 sc. Fasten off. SILK RIBBON: Thread a silk ribbon in the eyelet row at the top below the yoke – beg and end in the left side at the front and make a small bow. BUTTERFLY - for decoration: WINGS: Ch 15 on hook size 3 mm / C. Work all rows from RS. ROW 1: Work 3 dtr in 6th ch from hook, ch 1, 1 dc in next ch, ch 2 (on 2nd row beg working here), 2 dtr in next ch, 1 dtr in next ch, ch 3, 1 sl st in next ch, ch 3 (on 3rd row beg working here), 1 dtr in next ch, 2 dtr in next ch, ch 1, 1 dc in next ch, ch 2, 3 dtr in next ch, ch 5, 1 sl st in last ch. Fasten off. ROW 2: Start by working 1 sl st in the second of the 2 ch from previous row (see 1st row), ch 1, in next dtr work as follows: 1 hdc and 1 dc, in next dtr work as follows: 1 dc (on 4th row beg working here), ch 1, 1 tr and 1 dc, in next dtr work as follows: 1 dc and 1 hdc, ch 1, 1 sl st in the 1st of the 3 ch from previous row. Fasten off. ROW 3: Start by working 1 sl st in the third of the 3 ch from 1st row (see 1st row), ch 1, in next dtr work as follows: 1 hdc and 1 dc, in next dtr work as follows: 1 dc (on 5th row beg working here), 1 tr, ch 1, 1 dc, in next dtr work as follows: 1 dc and 1 hdc, ch 1, 1 sl st in 1 ch from 1st row. Fasten off. ROW 4: Start by working 1 sl st in dc from 2nd row (see 2nd row), ch 1, in next tr work as follows: 1 sc, 1 ch and 1 sc, ch 1, 1 sl st in next dc. Fasten off. ROW 5: Start by working 1 sl st in dc from 3rd row (see 3rd row), ch 1, in next tr work as follows: 1 sc, 1 ch and 1 sc, ch 1, 1 sl st in next dc. Fasten off. BODY: Work as follows with double yarn: ch 6, 2 sc in the 2nd ch from hook (= head). Fasten off.Sew the body on to the wings with the head up between the big wings. Finish by working a row of sl sts along the edge of the big wings. Sew the butterfly to the left side of yoke. |
||||||||||
Diagram explanations |
||||||||||
|
||||||||||
 |
||||||||||
 |
||||||||||
Have you finished this pattern?Tag your pictures with #dropspattern #yasmintunic or submit them to the #dropsfan gallery. Do you need help with this pattern?You'll find 9 tutorial videos, a Comments/Questions area and more by visiting the pattern on garnstudio.com. © 1982-2026 DROPS Design A/S. We reserve all rights. This document, including all its sub-sections, has copyrights. Read more about what you can do with our patterns at the bottom of each pattern on our site. |
||||||||||


With over 40 years in knitting and crochet design, DROPS Design offers one of the most extensive collections of free patterns on the internet - translated to 17 languages. As of today we count 325 catalogs and 12298 patterns - 12288 of which are translated into English (US/in).
We work hard to bring you the best knitting and crochet have to offer, inspiration and advice as well as great quality yarns at incredible prices! Would you like to use our patterns for other than personal use? You can read what you are allowed to do in the Copyright text at the bottom of all our patterns. Happy crafting!
Post a comment to pattern DROPS 148-9
We would love to hear what you have to say about this pattern!
If you want to leave a question, please make sure you select the correct category in the form below, to speed up the answering process. Required fields are marked *.