
Popular categories
Looking for a yarn?


Comments / Questions (53)
![]() Liliane Lohsmann wrote:
Liliane Lohsmann wrote:
Hallo, es wäre schön, wenn Sie meine Frage vom 17. d.M. beantworten würden. L.Lohsmann
20.10.2017 - 17:58DROPS Design answered:
Liebe Frau Lohsmann, Entschuldigung für die Späte Anwort. Am besten zeigen Sie die Jacke Ihr Laden, es wird einfacher für sie zu finden, warum es so aussieht. Viel Spaß beim häkeln!
23.10.2017 - 09:21
![]() Liliane Lohsmann wrote:
Liliane Lohsmann wrote:
Hallo, ich habe die Weste CHRISTEL fast fertig., bleibe jedoch immer bei der Fertigstellung hängen, u.zwar bleibt beim Hals durch die stufenweise Abnahme , beim Anhäkeln der Blende beideitig eine Ecke gerade stehen, also nicht, wie de Blende oben, abgerundet. Warum ? Was habe ich falsch gelesen oder interpretiert, Danke
17.10.2017 - 11:55DROPS Design answered:
Liebe Frau Lohsmann, am besten zeigen Sie Ihr Laden die Weste - Fotos können Sie auch per mail schicken, so können Sie eine bessere und persönnliche Antwort bekommen. Viel Spaß beim häkeln!
26.10.2017 - 10:19
![]() Malin wrote:
Malin wrote:
Strålande mönster! 2 små missar: 1) A3..."klipp av och fäst tråden" behövs inte, man bara fortsätter .2) Ok..."upprepa minskn. på VART 6:e ...v" är fel. Vart behövs inte.
01.04.2016 - 14:53Elena wrote:
Me encanta este model Pedro no entiendo LA union de las mangas en los marca punto ,podrias por favor ayudarme a salvar este obtaculo, pues no encuentro un video tutorial al respecto.gracias.Saludos
02.03.2016 - 00:31DROPS Design answered:
Hola Elena, antes de unir las mangas y el cuerpo para trabajar el canesú tenemos: 2 MP en el cuerpo y 2 en cada manga (= 6 MP). En el cuerpo tenemos 36 pts (talla S) de un delantero, 1 MP, 72 pts de la espalda, 1 MP, 36 pts del otro delantero. En la manga tenemos los 12 pts centrales bajo la manga con 1 MP a cda lado y ahora para trabajar el canesú trabajaríamos como sigue: los primeros 30 pts de 1 delantero, ahora los 38 pts no centrales de la manga, los 60 pts centrales de la espalda, los 38 pts de la otra manga y los 30 pts más externos del otro delantero. En este caso tenemos en cada lateral una abertura de 12 pts tanto en el cuerpo como en las mangas que se cosen al finalizar.
02.03.2016 - 10:46Elena wrote:
Me encanta este model Pedro no entiendo LA union de las mangas en los marca punto ,podrias por favor ayudarme a salvar este obtaculo, pues no encuentro un video tutorial al respecto.gracias.Saludos
02.03.2016 - 00:21DROPS Design answered:
Hola Elena, antes de unir las mangas y el cuerpo para trabajar el canesú tenemos: 2 MP en el cuerpo y 2 en cada manga (= 6 MP). En el cuerpo tenemos 36 pts (talla S) de un delantero, 1 MP, 72 pts de la espalda, 1 MP, 36 pts del otro delantero. En la manga tenemos los 12 pts centrales bajo la manga con 1 MP a cda lado y ahora para trabajar el canesú trabajaríamos como sigue: los primeros 30 pts de 1 delantero, ahora los 38 pts no centrales de la manga, los 60 pts centrales de la espalda, los 38 pts de la otra manga y los 30 pts más externos del otro delantero. En este caso tenemos en cada lateral una abertura de 12 pts tanto en el cuerpo como en las mangas que se cosen al finalizar.
02.03.2016 - 10:49
![]() Meta Karcher wrote:
Meta Karcher wrote:
Hallo, vielen Dank für Ihre Hilfe, dann ist es mir natürlich klar, das hatte ich nicht verstanden. Jetzt passt es:-)
27.06.2015 - 10:59
![]() Meta Karcher wrote:
Meta Karcher wrote:
Nach der Rundpasse habe ich noch 76 verbleibende Maschen. Bei der Halsblende soll ich nun jeweils 2 x 12 M stehen lassen, dann 2 x 18 M und anschließend noch 2 x 24 M, das macht zusammen 108 M, ich habe aber doch nur noch 76 M übrig, wie soll das denn funktionieren? Ich habe vielleicht einen Denkfehler, aber so klappt das auf keinen Fall. (Ich habe nach Größe L gehäkelt). Vielen Dank für Ihre Hilfe. Meta Karcher
18.06.2015 - 21:43DROPS Design answered:
In den 18 M sind ja die 12 M vom ersten Mal enthalten, es wird immer wieder bis zum Ende der R gerechnet, die M kommen nicht zusätzlich hinzu. Also: 2 x 12 M, dann je 6 M zusätzlich stehen lassen, dann nochmal je 6 M = 2 x 24 M nach R 7 = 48 M insgesamt, die Sie unbehäkelt lassen.
24.06.2015 - 10:56
![]() Sheila Griffiths wrote:
Sheila Griffiths wrote:
I have 68 stitches on the neck edge. I don't understand where the remaining 144 come from
11.05.2015 - 12:59DROPS Design answered:
Dear Mrs Griffiths, if you have the 68 sts on neck edge, then you have correct amount of sts in first both sizes, work short rows, then 2 cm dc along whole neckline (for collar). Happy crocheting!
11.05.2015 - 13:09Sheila Griffiths wrote:
Thank you for your response but the neck edge has 68 stitches and the instructions would appear to call for a decrease totaling 108 stitches - this is what I don't understand.
08.05.2015 - 21:18DROPS Design answered:
Dear Mrs Griffiths, in 2nd size, you have 212 sts and you dec 36 sts evenly a total of 4 times (= on 4th dc row from WS + on 7th dc row, then on 9th dc row + on 10th dc row): 212 - (4 x 36 = 144) = 68 sts. Happy crocheting!
11.05.2015 - 09:42
![]() Sheila Griffiths wrote:
Sheila Griffiths wrote:
I don't understand the instructions for the neck edge - it seems to be decreasing on every row by more stitches that actually exist on the neck edge. Can you help, please?
05.05.2015 - 17:15DROPS Design answered:
Dear Mrs Griffiths, under "Neck Edge", you work short rows starting on 1st row from RS, work all sts to the end of row, turn and on next row from WS work row until 12 sts remain before end of row, turn (leaving these 12 sts unworked), and work next row from RS until 12 st remain at the end of row, turn (leaving these 12 sts unworked). Continue working this way back and forth, on next 2 rows leave 18 sts unworked before end of row before turning, then on next 2 rows leave 24 sts unworked before end of row before turning (ie leave unworked 6 sts more unworked before the end of row/edge of front piece). Happy crocheting!
05.05.2015 - 17:33
|
||||||||||||||||||||||
Christel#christelcardigan |
||||||||||||||||||||||
|
|
||||||||||||||||||||||
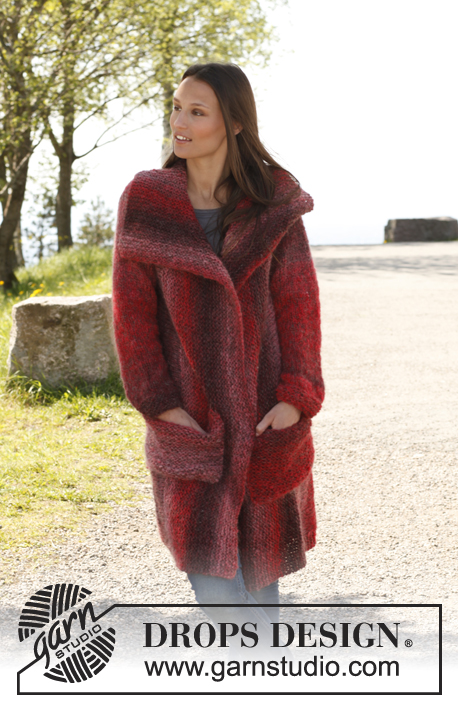
Crochet DROPS vest with round yoke in ”Lima”. Size: S - XXXL.
DROPS 140-7 |
||||||||||||||||||||||
|
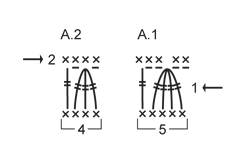
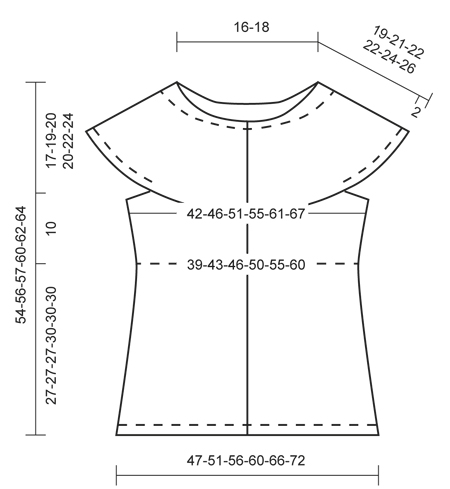
SC ROW: Beg every sc row with ch 1 (not counted as 1st sc), work 1 sc in every st the entire row, turn. PATTERN A.1 (divisible by 5 + 1): ROW 1 (= RS): Ch 4 (= 1 tr) in 1st sc, continue as follows – also see 1st row in diagram A-1: * ch 2, work 1 bobble with 4 tr, ch 2, 1 tr in next sc *, repeat from *-* the entire row, turn piece. ROW 2 (= WS): ch 1, 3 sc in 1st ch-space, skip 1st bobble, 2 sc in next ch-space, continue as follows – also see 2nd row in diagram A-1: * 1 sc in next tr, 2 sc in next ch-space, skip next bobble, 2 sc in next ch-space *, repeat from *-* the entire row, finish with 1 sc more in last ch-space on row (= same no of sc as before). PATTERN A.2 (divisible by 4 + 1): ROW 1 (= RS): Ch 4 (= 1 tr) in 1st sc, continue as follows – also see 1st row in diagram A-2: * ch 1, work 1 bobble with 3 tr, ch 1, 1 tr in next sc *, repeat from *-* the entire row, turn piece. ROW 2 (= WS): ch 1, 2 sc in 1st ch-space, 1 sc in next bobble, 1 sc in next ch-space, continue as follows – also see 2nd row in diagram A-2: * 1 sc in next tr, 1 sc in next ch-space, 1 sc in next bobble, 1 sc in next ch-space *, repeat from *-* the entire row, finish with 1 sc more in last ch-space on row (= same no of sc as before). INCREASE TIP: Inc 1 st by working 2 sts in the same st. DC ROW: Work all dc rows from RS. Beg every dc row with ch 3 (= 1st dc), skip 1st sc from previous row, work 1 dc in every sc the entire row, turn. PATTERN A.3: ROW 1 (= RS): Work 1 dc row. ROW 2 (= WS): Work 1 sc row. ROUNDS WITH SC: Beg every sc round with ch 1 (not counted as 1st sc), work 1 sc in every st the entire round, finish with 1 sl st in 1st sc. DECREASE TIP - SC: Work 1 sc but wait with last pull through (= 2 sts on hook), then work next sc but on last pull through, pull thread through all sts on hook = 1 sc dec over 2 sts -------------------------------------------------------- BODY: Worked back and forth from mid front. Ch 157-172-187-202-222-242 LOOSELY with Lima on hook size 4.5 mm/ US 7, turn and work 1 sc in 2nd ch from hook, then 1 sc in every ch the entire row = 156-171-186-201-221-241 sc, turn (1st row = RS). Work SC ROWS - read explanation above - until piece measures 2 cm / ¾". Then work PATTERN A.1 - read explanation above = 31-34-37-40-44-48 repetitions + 1 tr. When 2ND ROW has been worked, there are 156-171-186-201-221-241 sc on row. REMEMBER THE CROCHET GAUGE! Work A.1 a total of 5-5-5-6-6-6 times vertically - but work last sc row from WS as follows: ch 1, 2 sc in 1st ch-space, 1 sc in next bobble, 1 sc in next ch-space, * 1 sc in next tr, 1 sc in next ch-space, 1 sc in next bobble, 1 sc in next ch-space *, repeat from *-* the entire row, finish with 2 sc in last ch-space = 125-137-149-161-177-193 sc, turn piece. Then work PATTERN A.2 - read explanation above. When 2ND ROW has been worked, there are 125-137-149-161-177-193 sc on row. Work A.2 a total of 5 times vertically - but on last sc row from WS inc 10-10-12-14-16-18 sc evenly - READ INCREASE TIP = 135-147-161-175-193-211 sc. Piece now measures approx. 27-27-27-30-30-30 cm / 10½"-10½"-10½"-11¾"-11¾"-11¾". Continue to work PATTERN A.3 - read explanation above - AT THE SAME TIME on 1st sc row from WS inc 9-9-11-13-15-17 sts evenly = 144-156-172-188-208-228 sc. Work A.3 a total of 6 times (last row = sc row from WS), piece now measures approx. 37-37-37-40-40-40 cm / 14½"-14½"-14½"-15¾"-15¾"-15¾", cut and fasten the thread. Insert 1 marker 36-39-43-47-52-57 sc in from each side on last sc row (= 72-78-86-94-104-114 sc between markers on back piece). SLEEVE EDGE: Worked in the round. Ch 50-52-56-60-64-66 LOOSELY on hook size 4.5 mm/ US 7 with Lima and form a ring with 1 sl st in first ch. Work 1st round as follows: ch 1, then work 1 sc in every ch, finish with 1 sl st in 1st sc at beg of round (= mid under sleeve) = 50-52-56-60-64-66 sc. Continue in the round with ROUNDS WITH SC - read explanation above - until piece measures 2 cm / ¾". Now insert 1 marker on each side of the middle 12-12-12-14-16-16 sts under sleeve = 38-40-44-46-48-50 sc between markers on top of sleeve. Put piece aside and crochet another sleeve edge the same way. YOKE: Insert 1 new marker mid front on body, now measure piece from here. Work 1st row from RS as follows: Work 1 dc in each of the first 30-33-37-40-44-49 sts on right front piece, work 1 dc in each of the 38-40-44-46-48-50 sts from one sleeve edge (i.e. do not work over the 12-12-12-14-16-16 sts between markers mid under sleeve), skip 12-12-12-14-16-16 sts in the middle of the side on body (i.e. 6-6-6-7-8-8 sts on each side of marker), work 1 dc in each of the next 60-66-74-80-88-98 sts (= back piece), work 1 dc in each of the 38-40-44-46-48-50 sts from the other sleeve edge, skip 12-12-12-14-16-16 sts in the side of body (i.e. 6-6-6-7-8-8 sts on each side of marker), and work 1 dc in each of the last 30-33-37-40-44-49 sts on left front piece = 196-212-236-252-272-296 dc. Continue back and forth with A.3 as before - AT THE SAME TIME on 3rd-4th-4th-4th-5th-5th sc row from WS, dec 32-36-40-44-48-54 sc evenly - READ DECREASE TIP - SC. Repeat dec on 6th-7th-7th-7th-8th-8th sc row, then on 8th-9th-9th-9th-10th-11th sc row and finally on 9th-10th-11th-11th-12th-13th sc row = 68-68-76-76-80-80 sc remain (last row = WS), yoke now measures approx. 15-17-18-18-20-22 cm / 7"-8"-8¾" from marker. Do not cut the thread. NECK EDGE: Then work an elevation at the back of neck as follows: ROW 1 (= RS): Beg at the top of right front piece, work ch 1, 1 sc in 1st sc, * ch 1, skip 1 sc, 1 sc in next sc *, repeat from *-* around the neck, turn piece. ROW 2 (= WS): Work 1 sc in every ch and 1 ch over every sc around the neck until 12 sts remain (= 6 sc + 6 ch) on right front piece. ROW 3: Work 1 sc in every ch and 1 ch over every sc until 12 sts remain on left front piece, turn piece. ROW 4: Work 1 sc in every ch and 1 ch in every sc around the neck until 18 sts remain before edge on right front piece (= 9 sc and 9 ch), turn piece. ROW 5: Work 1 sc in every ch and 1 ch over every sc around the neck until 18 sts remain before edge on left front piece, turn piece. ROW 6: Work 1 sc in every ch and 1 ch in every sc around the neck until 24 sts remain before edge on right front piece (= 12 sc and 12 ch), turn piece. ROW 7: Work 1 sc in every ch and 1 ch over every sc until 24 sts remain before edge on left front piece. Do not cut the thread. Then work 1 row with sc in every sc and in every ch, then work sc rows until edge in sc measures 2 cm / ¾" mid front, cut and fasten the thread. ASSEMBLY: Sew the openings under the sleeves. BAND: Work from RS approx. 90 - 110 sc along the entire edge mid front on right front piece (incl neck edge). Then work 1 sc row from WS while AT THE SAME TIME adjusting no of sts to 92-94-98-102-104-108 sc. Insert 1 marker in the transition between A.2 and A.3. On next row from RS work sc - AT THE SAME TIME work 4 buttonholes evenly between marker and at the top edge in the neck (1 buttonhole = work ch 2, skip the next 2 sc) - the last buttonhole should be approx. 1 cm / ½" from the top edge. On next row work 2 sc in every ch-space for buttonhole. Work sc rows until band measures approx. 2 cm / ¾", cut and fasten the thread. Work 1 band along left front piece the same way but without buttonhole. Sew 4 buttons on to left band. |
||||||||||||||||||||||
Diagram explanations |
||||||||||||||||||||||
|
||||||||||||||||||||||
 |
||||||||||||||||||||||
 |
||||||||||||||||||||||
Have you finished this pattern?Tag your pictures with #dropspattern #christelcardigan or submit them to the #dropsfan gallery. Do you need help with this pattern?You'll find 7 tutorial videos, a Comments/Questions area and more by visiting the pattern on garnstudio.com. © 1982-2026 DROPS Design A/S. We reserve all rights. This document, including all its sub-sections, has copyrights. Read more about what you can do with our patterns at the bottom of each pattern on our site. |
||||||||||||||||||||||


With over 40 years in knitting and crochet design, DROPS Design offers one of the most extensive collections of free patterns on the internet - translated to 17 languages. As of today we count 325 catalogs and 12298 patterns - 12288 of which are translated into English (US/in).
We work hard to bring you the best knitting and crochet have to offer, inspiration and advice as well as great quality yarns at incredible prices! Would you like to use our patterns for other than personal use? You can read what you are allowed to do in the Copyright text at the bottom of all our patterns. Happy crafting!
Post a comment to pattern DROPS 140-7
We would love to hear what you have to say about this pattern!
If you want to leave a question, please make sure you select the correct category in the form below, to speed up the answering process. Required fields are marked *.