
Popular categories
Looking for a yarn?


Comments / Questions (130)
![]() Martine wrote:
Martine wrote:
Merci beaucoup pour votre réponse rapide. La vidéo n'est pas visible pour moi actuellement, mais je présume que je débute le rang dans la dans la 4 ième maille après les 3 mailles remplaçant la bride de début... Et j'en déduis que des boutonnières ne sont pas prévues.... Cordialement
26.04.2017 - 10:22DROPS Design answered:
Bonjour Martine, quand vous crochetez en rangs, vous devez crocheter 1 bride dans chaque bride, à la fin du rang, crochetez 3 ml (= 1ère bride), puis 1 bride dans la 2ème bride (= l'avant-dernière du rang précédent), continuez en bride jusqu'à la dernière bride (= les 3 ml du début du rang précédent) et crochetez la dernière bride dans la 3ème de ces 3 ml. Il n'y a pas de boutonnières, on boutonne entre les brides de la bordure devant (cf "Assemblage"). Bon crochet!
26.04.2017 - 10:57
![]() Anita wrote:
Anita wrote:
Grazie
24.04.2017 - 19:19
![]() Anita wrote:
Anita wrote:
Mi scuso ma c'è ancora una cosa che non mi è chiara: c'è scritto di aumentare una volta a sx e dopo 7 cm a dx, poi dopo altri 7 ancora a sx e dopo ulteriori 7 a sx. Quindi in una riga si fa un solo aumento in corrispondenza di un sottomanica e dopo alternativamente un aumento sotto l'altra manica? Non si fanno due aumenti in contemoranea sotto entrambi i sottomanica, nella stessa riga?
24.04.2017 - 18:34DROPS Design answered:
Buonasera Anita. Si aumenta su un lato alla volta. Buon lavoro!
24.04.2017 - 18:43
![]() Anita wrote:
Anita wrote:
Grazie mille per la risposta così rapida da permettermi di continuare il lavoro. Quindi, se ho capito bene, il segnapunti lo metto a metà delle 8 catenelle acvviate per la manica e gli aumenti dai 10 cm successivi, li faccio una volta a sx e una a dx dei segnapunti. E' così?
24.04.2017 - 18:12DROPS Design answered:
Buongiorno Anita, il segnapunti da cui misurare il lavoro lo mette quando c'è la divisione delle parti, cioè da quando lavora le 8 catenelle per il sotto manica. Per gli aumenti, quando arriva a 10 cm deve lavorare come indicato: lavorare 3 m.a. + 1 catenella nelle prime 8-9-10-11-12-13 catenelle, nella catenella successiva lavorare come segue: 3 m.a., 1 catenella, 3 m.a., 1 catenella; poi, a 17 cm farà l'aumento sul lato sinistro quando rimangono 9-10-11-12-13-14 catenelle. Buon lavoro!
24.04.2017 - 18:40
![]() Anita wrote:
Anita wrote:
Salve, ho fatto tutto lo sprone, senza i segnapunti, e iniziato il corpo con il punto fantasia ma ho un problema nella lavorazione del corpo: dove dice "Quando il lavoro misura 10 cm dal segnapunti, aumentare...." non capisco dove mettere esattamente il segnapunti e se sono più di uno e quindi come fare gli aumenti. Grazie mille
24.04.2017 - 16:10DROPS Design answered:
Buongiorno Anita. Deve inserire un segnapunti quando separa il davanti/dietro dalle maniche. Quindi quando avvia le 8 catenelle per il sottomanica e salta le maglie che verranno riprese per le maniche. Trova indicato di inserire un segnapunti e di misurare il lavoro da quel punto. Buon lavoro!
24.04.2017 - 16:47Hartini wrote:
Hi. I find your pattern so confusing. Please help me to understand this part, "Work back and forth with dc while AT THE SAME TIME inc 1 dc at all markers as follows: On every other row 5-6-6-5-5-6 times and then on every 4th row 2-2-2-3-3-3 times – READ INCREASE TIP = 221-252-264-288-300-350 dc. Work 1 row while at the same time inc 14-7-7-7-19-5 dc evenly (do not inc over the first and last 6 dc = band) = 235-259-271-295-319-355 dc." Please help. Thank you
29.03.2017 - 12:56DROPS Design answered:
Dear Mrs Hartini, continue working with dc, and inc 1 dc at all markers as explained under INCREASE TIP. You will have to inc first every 2nd row (= every row from RS), then inc every 4th row ( every other row from RS). Happy crocheting!
29.03.2017 - 15:10
![]() Valérie wrote:
Valérie wrote:
Merci, je comprends mieux.
21.11.2016 - 18:05
![]() Valérie wrote:
Valérie wrote:
Je ne comprends pas comment augmenter les groupes de brides du côté droit par exemple. Comment faire pour : " crocheter 3 B + 1 ml dans les 8-9-10-11-12-13 premières ml, dans la ml suiv, crocheter : 3 B, 1 ml, 3 B, 1 ml." Merci de votre aide
20.11.2016 - 19:36DROPS Design answered:
Bonjour Valérie, au lieu de crocheter simplement 3B dans chaque ml, vous allez ici crocheter dans la même ml: 3B, 1ml, 3B, 1ml (= vous avez ainsi 2 groupes de B au lieu d'un seul). On augmente de la même façon du côté gauche (2 groupes de B au lieu d'un seul dans une même ml). Bon crochet!
21.11.2016 - 10:01
![]() Wilma Reinders wrote:
Wilma Reinders wrote:
Wat betreft mijn vorige vraag (31-10, 15.36 uur): ik ben eruit! Sorry voor de overlast!
31.10.2016 - 18:12DROPS Design answered:
Hoi Wilma. Geen probleem - fijn dat je verder kan!
01.11.2016 - 10:00
![]() Wilma Reinders wrote:
Wilma Reinders wrote:
Ik ben tot hier gekomen. Maar het volgende snap ik niet. Hoe meerder ik? Dit is toch hetzelfde wat ik al deed? 3 stokjes in de lossen? Sorry, ik ben nog niet zo ervaren. "Herhaal steeds de 1e en 2e toer. Meerder bij een hoogte van 10 cm vanaf de markeerder 1 stk-groep aan de rechterkant als volgt: Haak 3 stk en 1 l in de eerste 8-9-10-11-12-13 l, haak in de volgende l als volgt: 3 stk, 1 l, 3 stk, 1 l."
31.10.2016 - 15:36
|
|
Chantal#chantalcardigan |
|
 |
 |
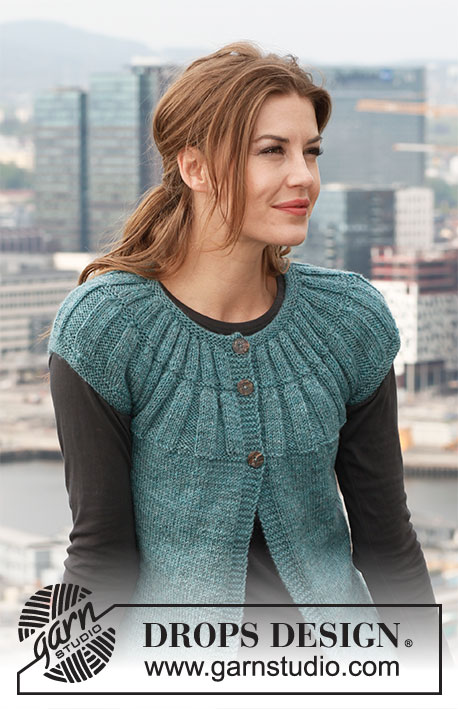
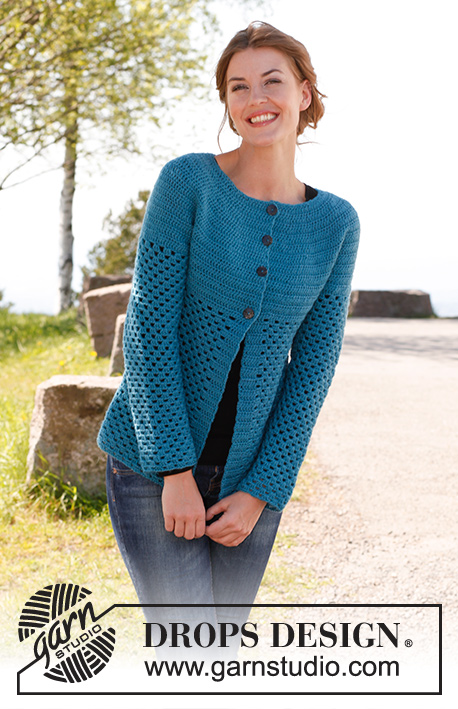
Crochet DROPS jacket in ”Karisma”. Size: S - XXXL.
DROPS 142-6 |
|
|
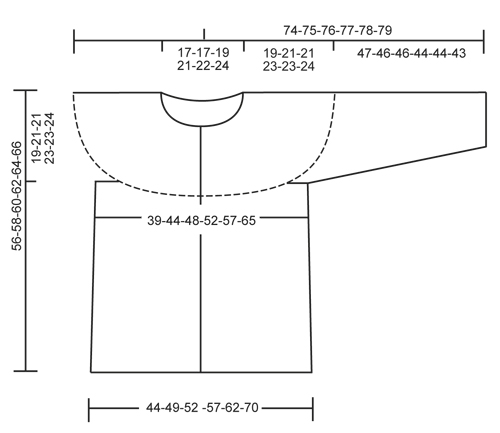
CROCHET INFO: Replace first dc on every round/row with 3 ch. Finish every round with 1 sl st in 3rd ch from beg of round. Finish every row with 1 dc in first dc from beg of previous row. INCREASE TIP: Inc by working 2 dc in 1 dc, first on one side of all markers on row, next time on the other side of all markers on row, continue inc like this. DECREASE TIP: Work 1 dc but wait with last pull through (= 2 sts on hook), then work next dc but on last pull through, pull thread through all sts on hook = 1 st dec. ---------------------------------------------------------- BODY: The piece is worked top down. Worked back and forth from mid front. Ch 111-116-121-131-136-146 (includes 3 ch to turn with) on hook size 4 mm / G/6 with Karisma. Work next row as follows: 1 dc in 4th ch (= 2 dc), 1 dc in each of the next ch 2, * skip ch 1, 1 dc in each of the next 4 ch *, repeat from *-* = 88-92-96-104-108-116 dc - read CROCHET INFO. Insert 19-20-21-23-24-26 markers in the piece as follows: Insert 1st marker after 8th dc, then insert 18-19-20-22-23-25 markers 4 dc apart, 8 dc remain after last marker. Work back and forth with dc while AT THE SAME TIME inc 1 dc at all markers as follows: On every other row 5-6-6-5-5-6 times and then on every 4th row 2-2-2-3-3-3 times – READ INCREASE TIP = 221-252-264-288-300-350 dc. Work 1 row while at the same time inc 14-7-7-7-19-5 dc evenly (do not inc over the first and last 6 dc = band) = 235-259-271-295-319-355 dc. Work next row as follows: 36-40-43-47-51-58 dc (front piece), ch 8 (= under sleeve), skip 52-56-56-60-64-68 dc from previous row (used for sleeve later), 59-67-73-81-89-103 dc (back piece), ch 8 (under sleeve), skip 52-56-56-60-64-68 dc from previous row (used for sleeve later) and 36-40-43-47-51-58 dc (front piece). Insert a marker and measure the piece from here. Work 1 dc in every dc/ch = 147-163-175-191-207-235 dc. Continue to work as follows: 1 dc in each of the first 6 dc (= band), * ch 1, skip 3 dc, work 3 dc in next dc *, repeat from *-* and finish with ch 1, skip 3 dc and work 1 dc in each of the last 6 dc (= 33-37-40-44-48-55 dc-groups with 6 dc in each side). Continue to work as follows: ROW 1: 1 dc in each of the first 6 dc, 3 dc in first ch, ch 1, * skip 3 dc, 3 dc in next ch, ch 1 *, repeat from *-* until 1 ch and 6 dc remain, finish with 3 dc in last ch and 1 dc in each of the last 6 dc. ROW 2: 1 dc in each of the first 6 dc, * ch 1, skip 3 dc, 3 dc in next ch *, repeat from *-* until 6 dc remain, finish with ch 1 and 1 dc in each of the last 6 dc. Repeat 1st and 2nd row upwards. When piece measures 10 cm / 4" from marker, inc 1 dc-group in the right side as follows: Work 3 dc + 1 ch in the first 8-9-10-11-12-13 ch, in next ch work as follows: 3 dc, ch 1, 3 dc, 1 ch. When piece measures 17 cm / 6¾", inc the same way in the left side – inc when 9-10-11-12-13-14 ch remain. When piece measures 24 cm / 9½", inc 1 dc-group in the right side, inc in the 10-11-12-13-14-15 ch the same way as before. When piece measures 31 cm / 12¼", inc in the left side – inc when 10-11-12-13-14-15 ch remain. After all inc are done there are 37-41-44-48-52-59 dc-groups on row. Cut and fasten the thread when piece measures 37-37-39-39-41-42 cm / 14½"-14½"-15¼"-15¼"-16⅛"-16½" from marker, piece measures 56-58-60-62-64-66 cm / 22"-22¾"-23⅝"-24⅜"-25¼"-26" in total. SLEEVE: Worked in the round, top down. Beg by working mid under sleeve as follows: Work 1 sc in the 5th ch of the 8 ch worked for armhole on body. Ch 3 (= 1 dc). Then work 1 dc in each of the next 3 ch. Then work 1 dc in every dc over sleeve, before working 1 dc in each of the remaining 4 ch under sleeve = 60-64-64-68-72-76 dc. Insert a marker mid under sleeve. Continue to work as follows: 1 dc in each of the first 10-10-10-12-12-14 dc, * ch 1, skip 3 dc, work 3 dc in next dc *, repeat from *-* and work 1 dc in each of the last 10-10-10-12-12-14 dc. Continue with 1 dc in each of the 20-20-20-24-24-28 dc mid under sleeve, in every ch work 3 dc + 1 ch. Continue this pattern AT THE SAME TIME when piece measures 4 cm / 1½", dec 1 dc on each side of marker - READ DECREASE TIP. Repeat dec every 3½-3½-3½-3-3-2½ cm / 1¼"-1¼"-1¼"-1⅛"-1⅛"-⅞" 9-9-9-11-11-13 more times = 40-44-44-44-48-48 dc. After all dec, work 3 dc + 1 ch in every ch. Cut and fasten the thread when sleeve measures 47-46-46-44-44-43 cm / 18½"-18½"-18"-17¼"-17¼"-17" from marker – NOTE – shorter measurements in the larger sizes because of larger neck and wider shoulders. ASSEMBLY: Sew buttons on to left front piece – the top button 1 cm / ⅜" from neck edge, the last in the transition between dc and dc-groups. Button the buttons between 2 dc on right front piece. |
|
 |
|
Have you finished this pattern?Tag your pictures with #dropspattern #chantalcardigan or submit them to the #dropsfan gallery. Do you need help with this pattern?You'll find 7 tutorial videos, a Comments/Questions area and more by visiting the pattern on garnstudio.com. © 1982-2026 DROPS Design A/S. We reserve all rights. This document, including all its sub-sections, has copyrights. Read more about what you can do with our patterns at the bottom of each pattern on our site. |
|


With over 40 years in knitting and crochet design, DROPS Design offers one of the most extensive collections of free patterns on the internet - translated to 17 languages. As of today we count 324 catalogs and 12290 patterns - 12280 of which are translated into English (US/in).
We work hard to bring you the best knitting and crochet have to offer, inspiration and advice as well as great quality yarns at incredible prices! Would you like to use our patterns for other than personal use? You can read what you are allowed to do in the Copyright text at the bottom of all our patterns. Happy crafting!
Post a comment to pattern DROPS 142-6
We would love to hear what you have to say about this pattern!
If you want to leave a question, please make sure you select the correct category in the form below, to speed up the answering process. Required fields are marked *.