
Popular categories
Looking for a yarn?


Comments / Questions (50)
![]() Gea wrote:
Gea wrote:
Ik ben nu toe aan om de gedeeltes afzonderlijk verder te breien. Hoe wordt het patroon gebreid? ik heb immers minderingen gehad. B.v. 26 steken voorpand, komt het patroon dan maar 2 keer voor en worden de andere steken recht gebreid?
24.05.2014 - 17:46DROPS Design answered:
Hoi Gea. Je breit door zoals eerst. Heb je 26 st, dat wordt dus 3 herhalingen van M.1 (24 st) en de st die niet passen in het patroon worden in tricotst gebreid (lees ook INFORMATIE VOOR HET BREIEN)
27.05.2014 - 16:20
![]() Ilona Hessner wrote:
Ilona Hessner wrote:
Hallo,unklar ist mir hier das Diagramm (Mustersatz): Ist es richtig, dass hier teilweise nur die Hinrunden dargestellt sind (Rückrunden zu stricken, wie die Maschinen erscheinen), und dann aber auch Hin- und Rückrunde (3 Umschläge, dann rückwärts gleiten lassen)? Hab die Wolle noch nicht, aber mit anderer schon mal 1 MS ausprobiert. Welche Höhe/Breite hat ein Mustersatz? Viele Grüße und danke für die herrlichen Anleitungen! Ilona Hessner
28.01.2013 - 17:23DROPS Design answered:
Lieeb Frau Hessner, Angaben zur Maschenprobe finden Sie im oberen Teil der Anleitung. Im Diagramm sind alle Reihen dargestellt, also Hin-und Rückreihen.
29.01.2013 - 09:06
![]() Kirsten Hederidder wrote:
Kirsten Hederidder wrote:
Skal diagrammet strikkes nede fra. Ellers synes jeg ikke at det passer med den pind, hvor omslag skal slippes. (tabte masker).
29.10.2012 - 19:17DROPS Design answered:
Ja du strikker altid diagrammet nede fra og op.
15.11.2012 - 13:39
![]() Konijn wrote:
Konijn wrote:
Wat moet ik precies doen bij: = 1 omsl, 1 st r afh, 1 st r, afgeh st overh
22.07.2012 - 17:48DROPS Design answered:
Kijk op de video voor het minderen 1 - ARO. Hier zie je de werkwijze voor afhalen, recht breien, overhalen. Maar vergeet niet om eerst de omslag te maken.
23.07.2012 - 16:10
![]() Marianne Holmberg wrote:
Marianne Holmberg wrote:
Ang diagram m 1 stickas 1 v avigt först och sedan mönster vartannat v rätt/avigt. vilka stickor vanliga eller rundsticka
09.07.2012 - 20:55DROPS Design answered:
Diagr visar alla varv i mönstret sett från rätsidan - Första v i mönstret stickas från avigsidan, dvs, rm från avigsidan. Du skal bruge rundsticka.
01.05.2013 - 16:50
![]() Connie wrote:
Connie wrote:
For at gøre det lettere med de 2/3 omslag, så prøv at slå "bagom" d.v.s. modsat det man normalt gør. Jeg syntes det hjalp meget. Maskerne snor sig ikke på den måde.
01.07.2012 - 18:03
![]() Christina wrote:
Christina wrote:
Står int eom det ska vara rundstickor ,men maskorna får ju int eplats på vanliga stickor.Någon som vet?
06.06.2012 - 22:53DROPS Design answered:
Hej, det är alltid bra att använda rundsticka, det är skonsamt för axlarna bland annat! 80 cm är bra! Lycka till!
12.06.2012 - 10:08
![]() Christina wrote:
Christina wrote:
Hej,stickar man denna på vanliga stickor eller rundstickor? På vanliga stickor får maskorna inte plats och på rundstickan nyper dem till ordentligt.
06.06.2012 - 02:04Duen wrote:
Beautyfull
02.06.2012 - 07:51Elsa Cardenas Castillo wrote:
Esta muy bonito ahora tratare de hacerlo
20.03.2012 - 23:45
|
|||||||||||||||||||||||||
Claudia#claudiavest |
|||||||||||||||||||||||||
 |
 |
||||||||||||||||||||||||
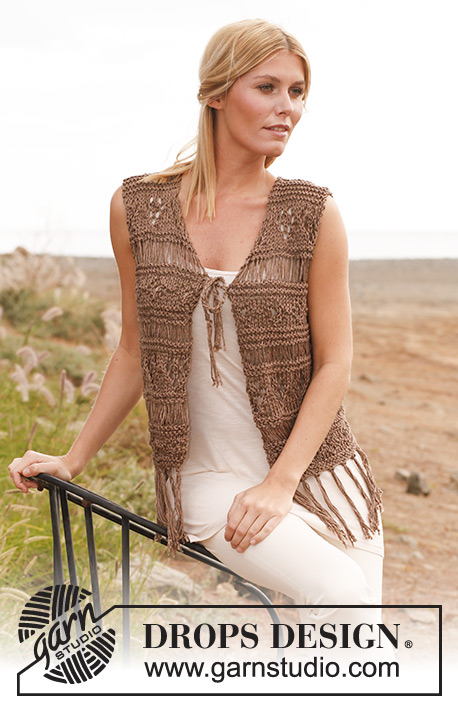
Knitted DROPS vest with textured pattern, dropped sts and fringes in ”Bomull-Lin” and ”Cotton Viscose”. Size: S - XXXL
DROPS 139-23 |
|||||||||||||||||||||||||
|
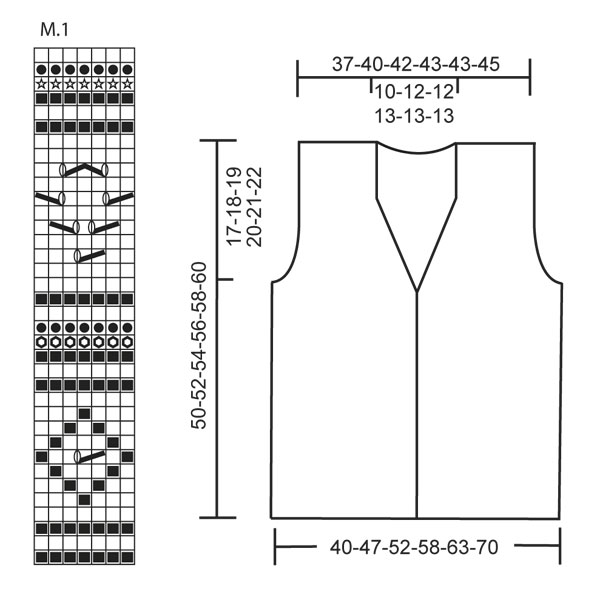
PATTERN: See diagram M.1, diagram shows every row in pattern seen from RS. First row in diagram is worked from WS. GARTER ST (back and forth on needle): K all rows. KNITTING INFO (applies to armholes after dividing the piece): Work sts that do not fit the pattern in stockinette st. NOTE: This does not apply to rows with YOs. The pattern must be worked the entire row on rows where YOs are dropped off the needle and on rows that are worked K from WS. Outermost st in each side is still worked K on all rows from WS. -------------------------------------------------------- BODY: Worked back and forth on needle from mid front. Cast on 98-112-126-140-154-168 sts on needle size 7 mm / US 10½ with 1 strand Bomull-Lin and 1 strand Cotton Viscose. Work diagram M.1 (1st row = WS). Outermost st in each side is also part of pattern but is worked K on all rows from WS. When piece measures approx. 33-34-35-36-37-38 cm / 13"-13⅜"-13¾"-14¼"-14½"-15" (stop after 1 row K from WS over all sts), work next row as follows from RS: Work 23-26-29-32-35-37 sts as before, bind off 4-4-6-6-8-10 sts for armhole, work 44-52-56-64-68-74 sts as before, bind off 4-4-6-6-8-10 sts for armhole and work the last 23-26-29-32-35-37 sts as before. Finish each part separately. LEFT FRONT PIECE: = 23-26-29-32-35-37 sts. READ ALL OF THE FOLLOWING SECTION BEFORE CONTINUING! Continue diagram M.1 as before – READ KNITTING INFO! DEC FOR NECK AND ARMHOLE: At the same time on 1st row FROM RS, dec for neck and armhole. Dec for armhole by K the first 2 sts on needle twisted tog (i.e. work in back loop of st). Repeat dec every other row a total of 0-2-3-6-8-10 times (there are no dec in size S). Dec for neck by K the last 2 sts towards mid front tog. Repeat dec every other row a total of 7-7-8-8-9-9 times. After all dec for armhole and neck, 16-17-18-18-18-18 sts remain on needle. When piece measures approx. 46-48-50-52-54-56 cm / 18"-19"-19¾"-20½"-21¼"-22" (adjust after 1 row K over all sts from WS), work in GARTER ST (see explanation above) over all sts. Bind off all sts when piece measures approx. 50-52-54-56-58-60 cm / 19¾"-20½"-21¼"-22"-22¾"-23⅝". RIGHT FRONT PIECE: Work as left front piece but reversed. When dec for neck, K the first 2 sts on needle twisted tog and when dec for armhole, K the last 2 sts on needle tog. BACK PIECE: = 44-52-56-64-68-74 sts. Work diagram M.1 – READ KNITTING INFO - At the same time dec for armholes from RS as follows: K the first 2 sts on needle twisted tog and K the last 2 sts on needle tog. Repeat dec in each side every other row a total of 0-2-3-6-8-10 times (there are no dec in size S) = 44-48-50-52-52-54 sts. Continue diagram M.1 until piece measures approx. 46-48-50-52-54-56 cm / 18"-19"-19¾"-20½"-21¼"-22" – finish pattern on the same row as on front piece. Continue working in garter st over all sts. When piece measures approx. 48-50-52-54-56-58 cm / 19"-19¾"-20½"-21¼"-22"-22¾", bind off the middle 12-14-14-16-16-16 sts for neck = 16-17-18-18-18-18 sts remain on each shoulder. Work in garter st until piece measures 50-52-54-56-58-60 cm / 19¾"-20½"-21¼"-22"-22¾"-23⅝", bind off. ASSEMBLY: Sew shoulder seams – sew edge to edge in bind off edge to avoid a chunky seam. FRINGES: Fasten fringes along the cast on edge. 1 fringe = cut 2 strands in Bomull-Lin and 2 strands in Cotton Viscose of approx. 35 cm / 13¾". Fold them double and pull loop through first st on cast on edge, pull the yarn ends through the loop and tighten. Tie 2 and 2 strands (1 strand Bomull-Lin and 1 strand Cotton Viscose) tog into a little knot at the bottom. This is done so that the ends do not split. Fasten 1 fringe in approx. every 4th st along the entire cast on edge. TIES: Cut 2 strands in Bomull-Lin and 2 strands in Cotton Viscose of 70 cm / 27½", twine them hard, fold them double and they will twine again. Tie 1 knot approx. 10 cm / 4" from strand ends so that there are fringes at the end. Pull the end that was folded on the tie through piece inside the edge st along front band on one front piece, a couple of cm / inches below the beg of dec for neck, open the folded loop and pull the yarn ends with fringes through loop and tighten. Tie 2 and 2 strands (1 strand Bomull-Lin and 1 strand Cotton Viscose) tog into a little knot at the bottom. Repeat on the other front piece. |
|||||||||||||||||||||||||
Diagram explanations |
|||||||||||||||||||||||||
|
|||||||||||||||||||||||||
 |
|||||||||||||||||||||||||
Have you finished this pattern?Tag your pictures with #dropspattern #claudiavest or submit them to the #dropsfan gallery. Do you need help with this pattern?You'll find 12 tutorial videos, a Comments/Questions area and more by visiting the pattern on garnstudio.com. © 1982-2026 DROPS Design A/S. We reserve all rights. This document, including all its sub-sections, has copyrights. Read more about what you can do with our patterns at the bottom of each pattern on our site. |
|||||||||||||||||||||||||


With over 40 years in knitting and crochet design, DROPS Design offers one of the most extensive collections of free patterns on the internet - translated to 17 languages. As of today we count 325 catalogs and 12298 patterns - 12288 of which are translated into English (US/in).
We work hard to bring you the best knitting and crochet have to offer, inspiration and advice as well as great quality yarns at incredible prices! Would you like to use our patterns for other than personal use? You can read what you are allowed to do in the Copyright text at the bottom of all our patterns. Happy crafting!
Post a comment to pattern DROPS 139-23
We would love to hear what you have to say about this pattern!
If you want to leave a question, please make sure you select the correct category in the form below, to speed up the answering process. Required fields are marked *.