
Popular categories
Looking for a yarn?


Comments / Questions (50)
![]() Cristina wrote:
Cristina wrote:
Hello, I absolutely love this vest! I was just wondering, why did you choose to use to strands of different yarn weight instead of just one thicker yarn? Is it for the effect? Just curious :) Cristina
13.02.2025 - 18:10DROPS Design answered:
Dear Cristina, yes, it's mainly so that the finished garment will have a special effect. Bomull-Lin, as a linen yarn, gives the garment a rustic effect; meanwhile Cotton Viscose gives it a brighter effect. We also don't have an exact equivalent thread in our collection that would have a similar effect by itself. Happy knitting!
16.02.2025 - 22:53
![]() Martina Heppke wrote:
Martina Heppke wrote:
Da die Cotton Viscose nicht mehr verfügbar ist, welche Alternative würden Sie mir raten? Es sollte wahrscheinlich Viscose dabei sein. LG Martina
18.11.2024 - 07:42DROPS Design answered:
Liebe Martina, benutzen Sie den Garnumrechner um die Garnalternative sowie die passende Garnmenge zu finden - gerne kann Ihnen auch Ihr DROPS Händler - auch per Telefon oder per Mail, das beste passende Garn empfehlen. Viel Spaß beim Stricken!
18.11.2024 - 16:07
![]() Cynthia wrote:
Cynthia wrote:
Hallo, kann man diese Weste auch nur mit Bomull-Lin stricken? Falls nein, was wäre die beste Garnalternative?
18.12.2019 - 21:54DROPS Design answered:
Liebe Cynthia, die beiden Garne werden hier zusammengestrickt, so sollen Sie Cotton Viscose ersetzen, gerne benutzen Sie unseren Garnumrechner, Ihr DROPS Laden empfiehlt Ihnen gerne weiter - auch telefonisch oder per E-Mail. Viel Spaß beim stricken!
19.12.2019 - 07:50
![]() Belinda Scekic wrote:
Belinda Scekic wrote:
Hej, kan ikke få maske antal til at passe på pind 5, starter med tre ret slutter med to ret? str s 98 masker
19.09.2017 - 17:23DROPS Design answered:
Hei Belinda. 1 rapport av diagram M.1 går over 7 masker. Du strikker M.1 14 ganger = 7 x 14 = 98 masker. Så har du strikket riktig skal du ha 3 masker rett til slutt. Husk at ytterste maske i hver side er vist i diagrammet, bare at de strikkes rett på alle pinner fra vrangen. God Fornøyelse!
20.09.2017 - 09:04Heather Halom wrote:
When working the chart do I work from right to left or left to right thanks
21.04.2017 - 10:38DROPS Design answered:
Dear Mrs Halom, start reading diagram from the bottom corner on the left side towards the right from WS (1st row in diagram = WS) and from the right towards the left from RS (= row 2, 4, 6, etc...). Happy knitting!
21.04.2017 - 11:00
![]() Sandra wrote:
Sandra wrote:
No entiendo bien el comienzo del diagrama M1 la primera fila dice arriba que empieza por el lado izquierdo, ¿ entonces la primera vuelta seria punto de derecho y la segunda vuelta seria por el lado derecho y punto derecho?
08.09.2015 - 10:11DROPS Design answered:
Hola Sandra. Si, es correcto.
08.09.2015 - 11:06
![]() Isabel wrote:
Isabel wrote:
Tricotei este modelo no tamanho S ficou lindo e é muito fácil. Muito obrigada por disponibilizarem as receitas. Substitui o cotton viscose por safran.
08.08.2015 - 20:33
![]() Manuela Boer wrote:
Manuela Boer wrote:
Hallo, Ik wil graag deze gilet maken, maar het patroon geeft aan twee soorten garen bruin. Ik wil deze graag in het wit maken, moet ik dan ook twee soorten garen gebruiken maar dan wit?
21.05.2015 - 18:32DROPS Design answered:
Hoi Manuela. Ja, je breit met een dubbele draad (= 2 draden). je kan vervangen door 2 draden wit van een gelijkmatige dikte (categorie A) of door 1 draad uit categorie C.
22.05.2015 - 15:10
![]() Marias wrote:
Marias wrote:
Scusate ora mi è chiaro,ho capito! Dovevo contare nel motivo il vivagno!
28.08.2014 - 08:56
![]() Marias wrote:
Marias wrote:
Scusate ma ho montato 112 maglie e per il motivo m1 lavoro le 2 laterali a diritto,e poi? Il motivo sotto è composto da ripetizioni da 7,ma 112-2 è 110 e 110 diviso 7?
28.08.2014 - 08:53
|
|||||||||||||||||||||||||
Claudia#claudiavest |
|||||||||||||||||||||||||
 |
 |
||||||||||||||||||||||||
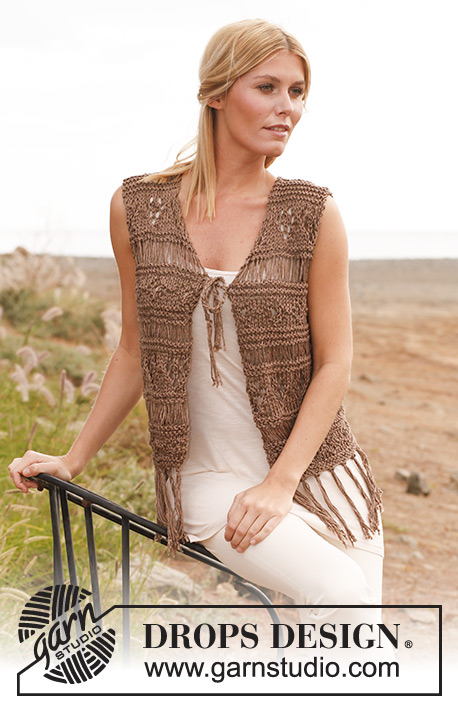
Knitted DROPS vest with textured pattern, dropped sts and fringes in ”Bomull-Lin” and ”Cotton Viscose”. Size: S - XXXL
DROPS 139-23 |
|||||||||||||||||||||||||
|
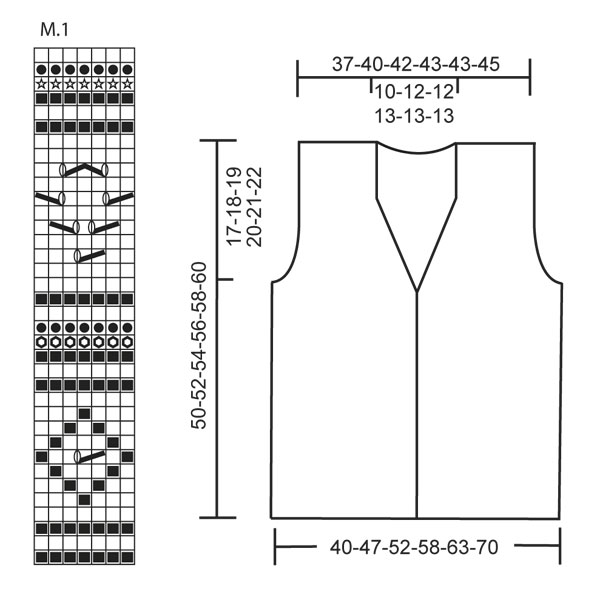
PATTERN: See diagram M.1, diagram shows every row in pattern seen from RS. First row in diagram is worked from WS. GARTER ST (back and forth on needle): K all rows. KNITTING INFO (applies to armholes after dividing the piece): Work sts that do not fit the pattern in stockinette st. NOTE: This does not apply to rows with YOs. The pattern must be worked the entire row on rows where YOs are dropped off the needle and on rows that are worked K from WS. Outermost st in each side is still worked K on all rows from WS. -------------------------------------------------------- BODY: Worked back and forth on needle from mid front. Cast on 98-112-126-140-154-168 sts on needle size 7 mm / US 10½ with 1 strand Bomull-Lin and 1 strand Cotton Viscose. Work diagram M.1 (1st row = WS). Outermost st in each side is also part of pattern but is worked K on all rows from WS. When piece measures approx. 33-34-35-36-37-38 cm / 13"-13⅜"-13¾"-14¼"-14½"-15" (stop after 1 row K from WS over all sts), work next row as follows from RS: Work 23-26-29-32-35-37 sts as before, bind off 4-4-6-6-8-10 sts for armhole, work 44-52-56-64-68-74 sts as before, bind off 4-4-6-6-8-10 sts for armhole and work the last 23-26-29-32-35-37 sts as before. Finish each part separately. LEFT FRONT PIECE: = 23-26-29-32-35-37 sts. READ ALL OF THE FOLLOWING SECTION BEFORE CONTINUING! Continue diagram M.1 as before – READ KNITTING INFO! DEC FOR NECK AND ARMHOLE: At the same time on 1st row FROM RS, dec for neck and armhole. Dec for armhole by K the first 2 sts on needle twisted tog (i.e. work in back loop of st). Repeat dec every other row a total of 0-2-3-6-8-10 times (there are no dec in size S). Dec for neck by K the last 2 sts towards mid front tog. Repeat dec every other row a total of 7-7-8-8-9-9 times. After all dec for armhole and neck, 16-17-18-18-18-18 sts remain on needle. When piece measures approx. 46-48-50-52-54-56 cm / 18"-19"-19¾"-20½"-21¼"-22" (adjust after 1 row K over all sts from WS), work in GARTER ST (see explanation above) over all sts. Bind off all sts when piece measures approx. 50-52-54-56-58-60 cm / 19¾"-20½"-21¼"-22"-22¾"-23⅝". RIGHT FRONT PIECE: Work as left front piece but reversed. When dec for neck, K the first 2 sts on needle twisted tog and when dec for armhole, K the last 2 sts on needle tog. BACK PIECE: = 44-52-56-64-68-74 sts. Work diagram M.1 – READ KNITTING INFO - At the same time dec for armholes from RS as follows: K the first 2 sts on needle twisted tog and K the last 2 sts on needle tog. Repeat dec in each side every other row a total of 0-2-3-6-8-10 times (there are no dec in size S) = 44-48-50-52-52-54 sts. Continue diagram M.1 until piece measures approx. 46-48-50-52-54-56 cm / 18"-19"-19¾"-20½"-21¼"-22" – finish pattern on the same row as on front piece. Continue working in garter st over all sts. When piece measures approx. 48-50-52-54-56-58 cm / 19"-19¾"-20½"-21¼"-22"-22¾", bind off the middle 12-14-14-16-16-16 sts for neck = 16-17-18-18-18-18 sts remain on each shoulder. Work in garter st until piece measures 50-52-54-56-58-60 cm / 19¾"-20½"-21¼"-22"-22¾"-23⅝", bind off. ASSEMBLY: Sew shoulder seams – sew edge to edge in bind off edge to avoid a chunky seam. FRINGES: Fasten fringes along the cast on edge. 1 fringe = cut 2 strands in Bomull-Lin and 2 strands in Cotton Viscose of approx. 35 cm / 13¾". Fold them double and pull loop through first st on cast on edge, pull the yarn ends through the loop and tighten. Tie 2 and 2 strands (1 strand Bomull-Lin and 1 strand Cotton Viscose) tog into a little knot at the bottom. This is done so that the ends do not split. Fasten 1 fringe in approx. every 4th st along the entire cast on edge. TIES: Cut 2 strands in Bomull-Lin and 2 strands in Cotton Viscose of 70 cm / 27½", twine them hard, fold them double and they will twine again. Tie 1 knot approx. 10 cm / 4" from strand ends so that there are fringes at the end. Pull the end that was folded on the tie through piece inside the edge st along front band on one front piece, a couple of cm / inches below the beg of dec for neck, open the folded loop and pull the yarn ends with fringes through loop and tighten. Tie 2 and 2 strands (1 strand Bomull-Lin and 1 strand Cotton Viscose) tog into a little knot at the bottom. Repeat on the other front piece. |
|||||||||||||||||||||||||
Diagram explanations |
|||||||||||||||||||||||||
|
|||||||||||||||||||||||||
 |
|||||||||||||||||||||||||
Have you finished this pattern?Tag your pictures with #dropspattern #claudiavest or submit them to the #dropsfan gallery. Do you need help with this pattern?You'll find 12 tutorial videos, a Comments/Questions area and more by visiting the pattern on garnstudio.com. © 1982-2026 DROPS Design A/S. We reserve all rights. This document, including all its sub-sections, has copyrights. Read more about what you can do with our patterns at the bottom of each pattern on our site. |
|||||||||||||||||||||||||


With over 40 years in knitting and crochet design, DROPS Design offers one of the most extensive collections of free patterns on the internet - translated to 17 languages. As of today we count 325 catalogs and 12298 patterns - 12288 of which are translated into English (US/in).
We work hard to bring you the best knitting and crochet have to offer, inspiration and advice as well as great quality yarns at incredible prices! Would you like to use our patterns for other than personal use? You can read what you are allowed to do in the Copyright text at the bottom of all our patterns. Happy crafting!
Post a comment to pattern DROPS 139-23
We would love to hear what you have to say about this pattern!
If you want to leave a question, please make sure you select the correct category in the form below, to speed up the answering process. Required fields are marked *.