
Popular categories
Looking for a yarn?


Comments / Questions (32)
![]() Priscilla DAgostino wrote:
Priscilla DAgostino wrote:
In the diagram there seems to be some kind of a finish at the end of the sleeve but there was nothing in the instructions on what you should do. What do you do at the end of the sleeve?
18.09.2021 - 18:37DROPS Design answered:
Dear Priscilla, there is no differently patterned cuff on the sleeves, that is just the last few cm that should be straight (and might be folded up, if it is to long). Happy Stitching!
19.09.2021 - 00:50
![]() Maibritt wrote:
Maibritt wrote:
Hej Drops Jeg skal i gang med ærmerne, men er lidt lost. Jeg hækler i str 12 år. Ifølge opskriften skal jeg hækle over 14 lm buer, men jeg har 17, hvad gør jeg med de sidste 3? Jeg har ikke talt den aflukkede lm bue med, altså den der udgør, hvor ærmegabet starter
14.09.2021 - 01:06DROPS Design answered:
Hei Maibritt. Stemmer heklefastheten din i høyden? Om du får flere enn 10 rader pr 10 cm, vil du få for mange luftmaskebuer du skal hekle over. mvh DROPS Design
28.09.2021 - 08:21
![]() Kalpana Chetty wrote:
Kalpana Chetty wrote:
Are the sleeves not too long? Seems a bit long for me when I look at the cardigan?
09.03.2021 - 21:39DROPS Design answered:
Dear Kalpana, the longer than usual trumpet sleeves are an intentional desing element on this piece, not in the least because it is a child's sweater, and having the sleeves knitted bit longer means, they will grow out of it later. Happy Crafting!
09.03.2021 - 22:30
![]() Lee-Ann Binetti wrote:
Lee-Ann Binetti wrote:
First time user so not much to say yet .
18.03.2020 - 08:52
![]() Lotti wrote:
Lotti wrote:
Förstår inte framstyckets diagram 1B. Det ser ut som det är 2 lm-bågar kvar efter avm. Men i mönstret står det att det ska återstå 4 lm-bågar (strl 146/152).??
16.05.2019 - 20:38DROPS Design answered:
Hei Lotti. Du har 8 luftmaskebuer, så feller du 1 luftmaskebue til ermhull og har 7 luftmaskebuer igjen. Videre feller du til hals som i A.1B. A.1B går over 5 luftmaskebuer, dvs du strikker A.1A som før over de 2 første luftmaskebuene, og A.1B over de 5 ytterste luftmaskebuene. Når A.1B er ferdig har du igjen 2 luftmaskebuer i A.1B og 2 luftmaskebuer i A.1A = 4 luftmaskebuer. Du har altså felt 3 luftmaskebuer. God fornøyelse
20.05.2019 - 08:37
![]() Sussi wrote:
Sussi wrote:
Hej kan det virkelig passe at ærmet skal være 43 cm langt??? Det er næsten 10 cm for langt?
20.11.2018 - 20:45DROPS Design answered:
Hei Sussi. Ja dette stemmer. Om du syntes det blir for langt er det selvfølgelig ikke noe i veien for at du hekler ermene kortere slik at det passer mottakeren. Du kan da felle oftere (mindre cm mellom hver felling), avhengig av hvor mye kortere du vil de skal være. God fornøyelse
23.11.2018 - 09:33Janet Garner wrote:
Hi i love the DROPS Girl’s Crocheted Cardigan in Muskat but need to make this in a bigger size age 14-15 years is the any way this can be done please ???
10.03.2018 - 23:31DROPS Design answered:
Dear janet, it's not possible to send you a customized pattern. You can make a bigger size of this pattern by making your own calculus or you could use a bigger sized crochet and worked the largest size of the pattern.
11.03.2018 - 16:08
![]() Stéphanie wrote:
Stéphanie wrote:
Bonjour, je ne comprends pas où il faut commencer les manches ? Pourriez vous me détailler un peu plus s'il vous plaît ? Il faut faire pareil pour l autre manche ? Merci par avance. Vos modèles sont super, c est la première fois que je bloque sur une explication.
21.01.2018 - 16:57DROPS Design answered:
Bonjour Stéphanie, les manches se crochètent de haut en bas, on va crocheter le 1er rang le long des emmanchures en commençant sur l'endroit au niveau des premières diminutions de l'emmanchure du devant/dos pour terminer à la dernière diminution de l'emmanchure du dos/devant. Bon crochet!
22.01.2018 - 10:10
![]() Debbie Cooney wrote:
Debbie Cooney wrote:
I'm not sure I understand the arms. When you start them are you crocheting them to the body as you go. Or by themselves to add on when completed.
24.09.2017 - 01:48DROPS Design answered:
Dear Debbie, the sleeves of this jacket is crocheted into the armhole, (and not added later). In other words, the sc'a of the first row are crocheted into the ch-loops of the body. I hope this helps. Happy crocheting!
24.09.2017 - 23:56
![]() Arjanne wrote:
Arjanne wrote:
Ik heb het rugpand en de voorpanden gehaakt en wil de mouwen erin haken. Nu moet ik voor de maat 13 lussen haken maar heb dan lussen over in de oksel. Klopt dat of wat doe ik fout? De afmetingen kloppen precies met de beschrijving van het rugpand en voorpand maar de armsgaten zijn veel groter dan de mouwen die er in komen.
08.04.2015 - 18:18DROPS Design answered:
U moet de lussen gelijkmatig verdelen over het armsgat en dan verder naar beneden haken.
08.04.2015 - 22:39
|
||||||||||
Atlantica |
||||||||||
|
|
||||||||||
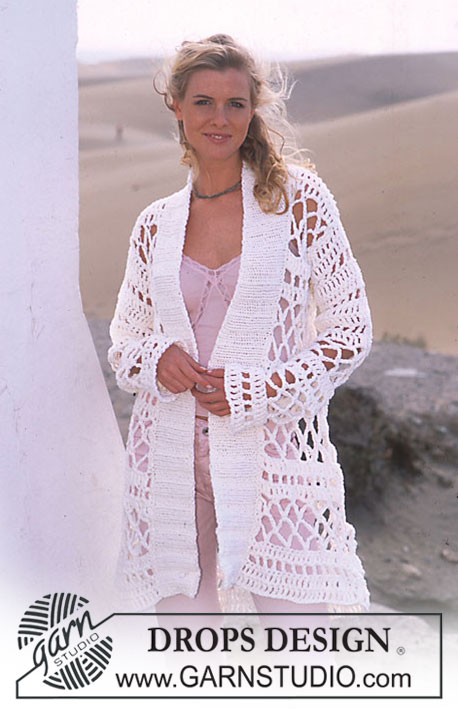
DROPS Girl’s Crocheted Cardigan in Muskat
DROPS 90-16 |
||||||||||
|
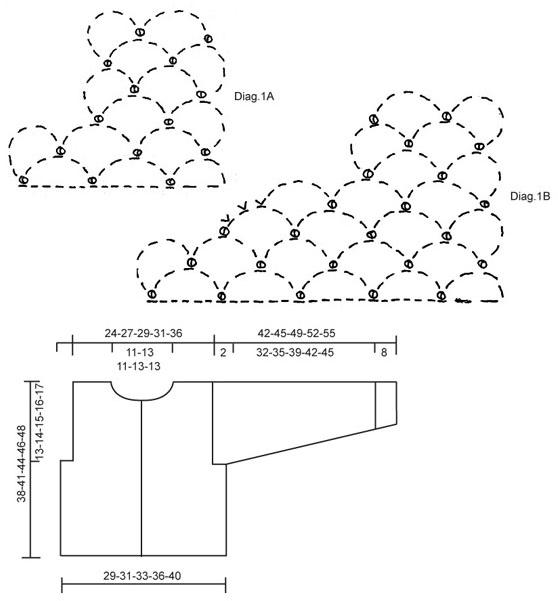
Crochet gauge: 4.5 ch-loops in width and 10 rows in height = 10 x 10 cm. Pattern: See the diagrams. Back: Ch 79-85-91-97-109. Crochet the first row as follows: 1 sc in 7th ch from hook, * ch 5, skip over 5 ch, 1 sc in the next ch *, repeat * - * = 13-14-15-16-18 ch-loops, turn the work. Continue as follows: ch 6, 1 sc in first ch-loop, * ch 5, 1 sc in the next ch-loop *, repeat * - * across row and turn the work. When the piece measures 25-27-29-30-31 cm bind off for armhole as follows: crochet as before until 1 ch-loop remains, turn the work, continue with ch- loops and repeat bind off at the other side – see Diagr.1A. You have now bound off 1 ch-loop at each side = 11-12-13-14-16 ch-loops. Continue to crochet as before. When the piece measures 36-39-42-44-46 cm dec for the neck by crocheting 2 rows over only 3-3-4-4-5 ch-loops on each shoulder (do not crochet over the center 5-6-5-6-6 ch-loops). The piece measures approx. 38-41-44-46-48 cm, cut yarn and fasten. Right front: Ch 43-43-49-49-55. Crochet as on back = 7-7-8-8-9 ch-loops. When the piece measures 25-27-29-30-31 cm bind off for armhole at side as on back = 6-6-7-7-8 ch-loops on row. When the piece measures 33-35-38-39-41 cm dec for the neck following Diagr.1B. You have now bound off 3 ch-loops for the neck and 3-3-4-4-5 ch-loops remain on shoulder. Continue until piece measures 38-41-44-46-48 cm, then cut yarn and fasten. Left front: Crochet same as the right, reversing shaping. Assembly: Crochet the shoulder together as follows: 1 sl st in first ch-loop on back, ch 3, 1 sc in first ch-loop on front, ch 3, 1 sc in first ch-loop on back. Sleeve: The sleeve is crocheted from the top down as follows: Crochet 12-13-14-14-15 ch-loops in armhole, with 5 ch in each ch-loop. Crochet back and forth in the same manner as on Body. When the piece measures 2 cm from beginning, put a marker at each side - measure the work from here. When the piece measures 2-2-3-3-3 cm dec 1 ch-loop at one side – see Diagr.1A. When the piece measures 12-13-15-16-17 cm dec 1 ch-loop at the other side. Repeat dec at each side 1 more time with 10-11-12-13-14 cm between decs at each side = 8-9-10-10-11 ch-loops remain. Continue until piece measures 40-43-47-50-53 cm from the marker, then cut yarn and fasten. Assembly: Crochet sleeve and side seams in the same manner as shoulder seams were crocheted together. Sew sleeves at lower edge of armhole with a small st where you bound off 1 ch-loop on Body. Neckband: Crochet 2 rows of sc around the neck (1st row crochet from wrong side) – crochet approx. 3 sc in each ch-loop – see that the edge is not too tight or too loose. Left button band: Crochet 4 rows of sc up along left front (including over neckband – crochet the 1st row from wrong side) – crochet approx. 3 sc in each ch-loop = approx. 99-105-114-117-123 sc, turn each row with ch 1. Right button band: Crochet the same as the left, but after 2 rows, make 5 buttonholes evenly distributed on button bands. The bottom buttonhole place approx. 2 cm from lower edge and the top one 2 sts from the top edge . 1 buttonhole = ch 2, skip over 2 sc, 1 sc in the next st. On the next row crochet 2 sc in ch-loop. Sew on buttons. |
||||||||||
Diagram explanations |
||||||||||
|
||||||||||
 |
||||||||||
Have you finished this pattern?Tag your pictures with #dropspattern or submit them to the #dropsfan gallery. Do you need help with this pattern?You'll find 3 tutorial videos, a Comments/Questions area and more by visiting the pattern on garnstudio.com. © 1982-2026 DROPS Design A/S. We reserve all rights. This document, including all its sub-sections, has copyrights. Read more about what you can do with our patterns at the bottom of each pattern on our site. |
||||||||||


With over 40 years in knitting and crochet design, DROPS Design offers one of the most extensive collections of free patterns on the internet - translated to 17 languages. As of today we count 325 catalogs and 12298 patterns - 12288 of which are translated into English (US/in).
We work hard to bring you the best knitting and crochet have to offer, inspiration and advice as well as great quality yarns at incredible prices! Would you like to use our patterns for other than personal use? You can read what you are allowed to do in the Copyright text at the bottom of all our patterns. Happy crafting!
Post a comment to pattern DROPS 90-16
We would love to hear what you have to say about this pattern!
If you want to leave a question, please make sure you select the correct category in the form below, to speed up the answering process. Required fields are marked *.