
Popular categories
Looking for a yarn?


|
||||||||||
Atlantica |
||||||||||
|
|
||||||||||
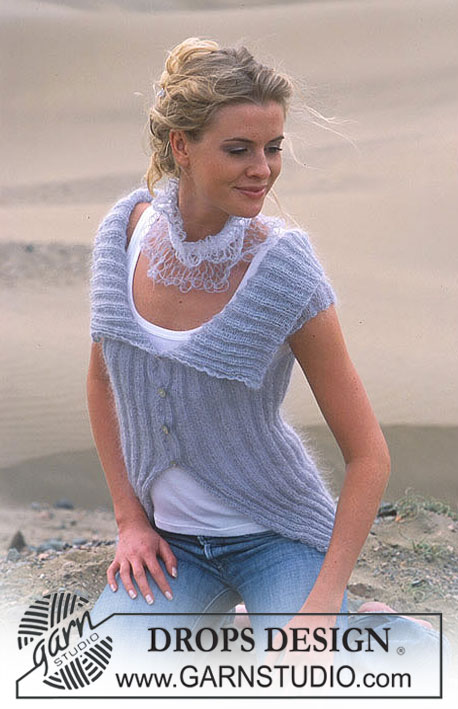
DROPS Children’s crochet jacket in "Muskat"
DROPS 90-16 |
||||||||||
|
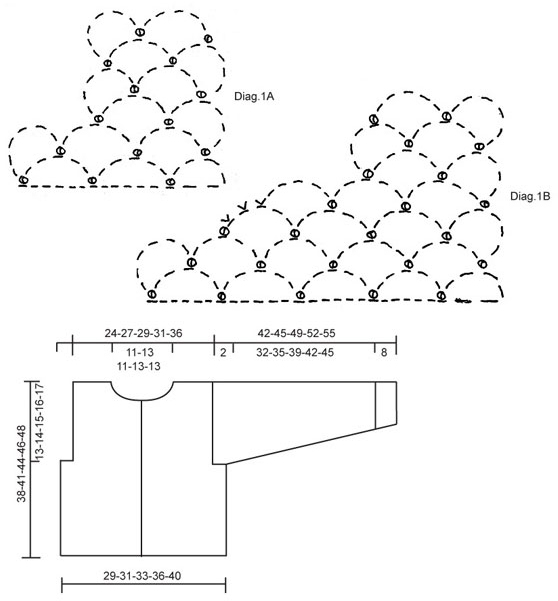
Crochet tension: Remember hook size is only a guide. 4.5 chain-spaces in width and 10 rows in height with hook size 4.5 mm = 10 x 10 cm. NOTE: Due to different crochet techniques, the crochet tension can vary from person to person; you can increase or decrease a hook size if necessary to get the right tension. ------------------------------------------------------- Back piece: Work 79-85-91-97-109 chain stitches (incl. 6 chain stitches to turn) with hook size 4.5 mm and Muskat. The first row is worked as follows: 1 double crochet in the 7th chain stitch from the hook, * 5 chain stitches, skip 5 chain stitches, 1 double crochet in next chain stitch *, repeat from *-* = 13-14-15-16-18 chain-spaces, turn piece. Then work as follows: 6 chain stitches (incl. 1 chain stitch to turn), 1 double crochet around first chain-space, * 5 chain stitches, 1 double crochet around next chain-space *, repeat from *-* to end of row and turn piece. Continue in this way upwards. Remember the crochet tension! When piece measures 25-27-29-30-31 cm, decrease to armholes as follows: Work as before until there is 1 chain-space left, turn piece, continue with chain-spaces and repeat the decrease in the other side - or see Diag.1A. You have now decreased 1 chain-space in each side = 11-12-13-14-16 chain-spaces on row. Continue working as before. When piece measures 36-39-42-44-46 cm, decrease for neck by working 2 rows just over the 3-3-4-4-5 chain-spaces on each shoulder (do not work the middle 5-6-5-6-6 chain-spaces). Piece measures approx. 38-41-44-46-48 cm, cut strand. Right front piece: Work 43-43-49-49-55 chain stitches (incl. 6 chain stitches to turn) with hook size 4.5 mm and Muskat. Continue working as for back piece = 7-7-8-8-9 chain-spaces. When piece measures 25-27-29-30-31 cm, decrease for armhole in the side as for back piece = 6-6-7-7-8 chain-spaces on row. When piece measures 33-35-38-39-41 cm, decrease for neck according to Diag.1B. You have now decreased 3 chain-spaces for neck and there are 3-3-4-4-5 chain-spaces left on the shoulder. Continue working until piece measures 38-41-44-46-48 cm and cut strand. Left front piece: Work as for right, but in reverse. Assembly: Work the shoulders together as follows: 1 slip stitch in first chain-space on back piece, 3 chain stitches, 1 double crochet around first chain-space on front piece, 3 chain stitches, 1 double crochet around first chain-space on back piece, etc. Sleeve: Work chain-spaces along the armhole and work the sleeve from the top down as follows: Crochet up evenly 12-13-14-14-15 chain-spaces with hook size 4.5 mm and Muskat with 5 chain stitches in each space. Then work back and forth in the same way as for body. When piece measures 2 cm from where the chain-spaces were crocheted up, insert 1 marker thread in each side - the piece is now measured from here. When piece measures 2-2-3-3-3 cm, decrease 1 chain-space in the one side - see Diag.1A. When piece measures 12-13-15-16-17 cm, decrease 1 chain-space in the other side. Repeat the decrease in right and left side one more time with 10-11-12-13-14 cm between each decrease = 8-9-10-10-11 chain-spaces left. Continue working until piece measures 40-43-47-50-53 cm from the marker threads and cut strand. More assembly: Work sleeve and side seams in one go in the same way as you worked the shoulders. Sew sleeves to armholes at bottom with a small stitch where you decreased 1 chain-space on front and back piece. Neck: Work 2 rows of double crochets around neck (row 1is worked from the wrong side) - work approx. 3 double crochets in each chain-space - adjust so the edge is neither too tight nor too loose. Left band: Work 4 rows of double crochets up the left front piece (over the neck band too - first row worked from the wrong side) - there should be approx. 3 double crochets in each chain-space = approx. 99-105-114-117-123 double crochets, turn each row with 1 chain stitch. Right band: Work as for left, but after row 2 work 5 buttonholes evenly spaced on band. The bottom buttonhole should be approx. 2 cm from the bottom edge and the top button 2 stitches from the top. 1 buttonhole = 2 chain stitches, skip 2 double crochets, 1 double crochet in next stitch. On the next row work 2 double crochets around the chain-space. Sew on buttons. |
||||||||||
Diagram explanations |
||||||||||
|
||||||||||
|
||||||||||
|
Have you made this or any other of our designs? Tag your pictures in social media with #dropsdesign so we can see them! Do you need help with this pattern?You'll find tutorial videos, a Comments/Questions area and more by visiting the pattern on garnstudio.com. © 1982-2024 DROPS Design A/S. We reserve all rights. This document, including all its sub-sections, has copyrights. Read more about what you can do with our patterns at the bottom of each pattern on our site. |
||||||||||


With over 40 years in knitting and crochet design, DROPS Design offers one of the most extensive collections of free patterns on the internet - translated to 17 languages. As of today we count 304 catalogues and 11422 patterns - 11422 of which are translated into English (UK/cm).
We work hard to bring you the best knitting and crochet have to offer, inspiration and advice as well as great quality yarns at incredible prices! Would you like to use our patterns for other than personal use? You can read what you are allowed to do in the Copyright text at the bottom of all our patterns. Happy crafting!
Comments / Questions (28)
Jag virkar med garnet Muskat. Det lila Colour 14 Dyelot 688, är fast spunnet= bra! Det vita är så löst spunnet, Colour 14, Duelot 806. Det är köpt 2024.03.10. DET BLIR STOR SKILLNAD på resultatet!! :((\r\n\r\nVad ska jag göra? Är det något fel på det vita garnet?? \r\n\r\nMed vänlig hälsning, \r\nMarianne
05.04.2024 - 09:48Hej, jag lägger upp 91 maskor med virknål 3,5. När jag mäter 4 och1/2 båge stämmer måttet 10 cm, MEN NÄR JAG SEDAN MÄTTER PÅ MÅTTSKISSEN stämmer inte måttet på virkningen. STÄMMER MÅTTET PÅ SKISSEN??? Hela måttet är 8 cm större än 33 cm. VAD SKA MÅTTET VARA?? Mvh Marianne Kristoffersen
25.03.2024 - 08:41DROPS Design answered:
Hej Marianne, hækler du i DROPS Muskat? Hvis du har 15 lm buer, og 4,5 lm-buer på 10 cm så får du 15 / 4,5 = 33 cm
03.04.2024 - 15:25Hvordan jeg hækler dette! Når arb måler 2-2-3-3-3 cm lukkes der 1 lm-bue i den ene side - se Diag.1A. Når arb måler 12-13-15-16-17 cm lukkes der 1 lm-bue i den anden side. Hilsen Lisbeth
09.07.2023 - 16:10DROPS Design answered:
Hei Lisbeth. Jo, du hekler frem og tilbake på samme måte som bolen, men når arbeidet måler 2-2-3-3-3 cm hekler du 1 luftmaskebue mindre, se diagram 1A. Og når arbeidet måler 12-13-15-16-17 cm felles det 1 lm-bue i den andre siden. Så gjentas disse fellingen i høyre og venstre side en gang til med 10-11-12-13-14 cm mellom hver gang det felles til det er 8-9-10-10-11 lm-buer igjen. mvh DROPS Design
24.07.2023 - 13:01Ik ben met de maat 13 -14 bezig en ik bedoel de bogen van de ene kant van de armsgaten naar de andere kant de schouders zijn al aan elkaar gehaakt jullie schrijven over 15 bogen maar ik kom op 22 bogen uit wat moet ik doen graag antwoord hier op bedankt
19.02.2023 - 18:32DROPS Design answered:
Dag Els,
Aha, je hebt te veel boogjes in het armsgat om op 15 boogjes uit te komen. Wat je zou kunnen doen (als je wel tevreden bent over de afmeting van het armsgat) is toch 22 boogjes maken en daarna wat vaker te minderen, zodat de mouw bij de pols wel de juiste maat krijgt.
22.02.2023 - 13:29Ik heb de voor pant en de rug samen gehaakt ik kom nu op 22 bogen uit als ik ze samen optel hoe komt het dat jullie op 15 bogen zitten wat doe ik verkeerd gelieve mij een antwoord er op de geven bedankt
19.02.2023 - 09:32DROPS Design answered:
Dag Els,
Als ik de bogen van de kleinste maat van beide voorpanden en het achterpand bij elkaar optel (13+7+7) , dan kom ik op 27 bogen. Welke maat ben je aan het breien en welke bogen samen optellen bedoel je precies?
19.02.2023 - 16:55Als ik 109 l haak dan kom ik op 21 bogen wat doe ik verkeerd En ben ik juist dat elke toer = 1cm is Gelieve mij iets de laten weten bedankt op voorhand
11.02.2023 - 01:31DROPS Design answered:
Dag Els,
Als je 109 lossen haakt en je haakt de eerste vaste in de 7e losse vanaf de haaknaald = eerste boogje), dan heb je nog 102 lossen over. Als je steeds 5 lossen overslaat, 5 lossen haakt en in de 6e losse een vaste haakt, dan kom je precies op nog 17 (102 delen door 6) boogjes.
12.02.2023 - 17:51In the diagram there seems to be some kind of a finish at the end of the sleeve but there was nothing in the instructions on what you should do. What do you do at the end of the sleeve?
18.09.2021 - 18:37DROPS Design answered:
Dear Priscilla, there is no differently patterned cuff on the sleeves, that is just the last few cm that should be straight (and might be folded up, if it is to long). Happy Stitching!
19.09.2021 - 00:50Hej Drops Jeg skal i gang med ærmerne, men er lidt lost. Jeg hækler i str 12 år. Ifølge opskriften skal jeg hækle over 14 lm buer, men jeg har 17, hvad gør jeg med de sidste 3? Jeg har ikke talt den aflukkede lm bue med, altså den der udgør, hvor ærmegabet starter
14.09.2021 - 01:06DROPS Design answered:
Hei Maibritt. Stemmer heklefastheten din i høyden? Om du får flere enn 10 rader pr 10 cm, vil du få for mange luftmaskebuer du skal hekle over. mvh DROPS Design
28.09.2021 - 08:21Are the sleeves not too long? Seems a bit long for me when I look at the cardigan?
09.03.2021 - 21:39DROPS Design answered:
Dear Kalpana, the longer than usual trumpet sleeves are an intentional desing element on this piece, not in the least because it is a child's sweater, and having the sleeves knitted bit longer means, they will grow out of it later. Happy Crafting!
09.03.2021 - 22:30First time user so not much to say yet .
18.03.2020 - 08:52