
Popular categories
Looking for a yarn?


Comments / Questions (25)
![]() Rosie wrote:
Rosie wrote:
What am I doing with the stitches left on the stitch holder at the end of the front pieces?
05.06.2017 - 13:37DROPS Design answered:
Dear Rosie, at the end you join the two pieces together. See explanation "Sew the collar at center back with and sew the collar edge to back neckband". You have to sew using a needle, stitch after stitch. Happy knitting!
05.06.2017 - 14:25
![]() Jayne Neale wrote:
Jayne Neale wrote:
I have knitted this cardigan but cannot find any instructions for the back neckband. Can you help please? Thank you.
07.02.2017 - 11:20DROPS Design answered:
Dear Mrs Neale, when you work the collar at the end of each front piece (short rows), the collar will be then sewn tog (collar on right front piece and collar on left front piece tog) and then sewn along neck on back piece. Happy knitting!
07.02.2017 - 11:52Tineke wrote:
Hai, Dat had ik gelezen, maar het week af van de rest van het patroon, waar men het steeds over "naalden ribbelsteek" heeft. Er kunnen soms fouten in een patroonbeschrijving geslopen zijn, dus voor de zekerheid maar even gevraagd. In ieder geval bedankt! Groetjes, Tineke
05.02.2015 - 13:50Tineke wrote:
Goedemiddag, Wordt bij de mouw bedoeld 7 cm of 7 nld. ribbelst.? Alvast bedankt! Groetjes, Tineke
05.02.2015 - 12:16DROPS Design answered:
Hoi Tineke. Er staat in het patroon: Brei 7 cm ribbelst, dus 7 cm ribbelst. Veel breiplezier.
05.02.2015 - 13:39Tineke wrote:
Goedenavond, Er is me iets niet helemaal duidelijk: Bij armsgaten achterpand staat: "Kant bij een hoogte van 41-42-43-44-45 cm af voor armsgaten aan weerskanten in elke 2e nld: 1 x 4 st, 0-1-1-2-2 x 3 st, 1-1-2-2-4 x 2 st en 2-2-3-4-3 x 1 st = 74-76-78-80-84 st." Moet ik de eerste 4 steken voor de armsgaten direct bij een hoogte van, in mijn geval, 42 cm afkanten of pas 2 naalden na de hoogte van 42 cm? Alvast bedankt! Groetjes, Tineke
30.01.2015 - 19:35DROPS Design answered:
Hoi Tineke. Je kant af bij een hoogte van 42 cm. Daarna verder afkanten in elke 2e nld.
11.02.2015 - 16:06Tineke wrote:
Hallo, Wederom bedankt! Ik had inmiddels zelf bij jullie video's gekeken en twee video's gevonden. Degene die u aangeeft en nog één: " Mazen / onzichtbare naad / kitchenersteek / grafting". Groetjes, Tineke
30.01.2015 - 10:28Tineke wrote:
Hallo, Bedankt voor de reactie. De kraagdelen aan elkaar naaien snap ik nog, maar niet hoe je dat moet doen met de (ongebreide) steken van de stekenhouder ??? Alvast bedankt! Groetjes, Tineke
29.01.2015 - 16:03DROPS Design answered:
Hoi Tineke. Dat zijn de steken van de kraag die je aan elkaar naait....
29.01.2015 - 16:56Tineke wrote:
Goedemorgen, Wat moet je doen met de steken op de stekenhouder? Volgens mij ontbreekt er een stukje van het patroon... "Kraag: Brei ribbelst op de kraag st als volgt: * 2 nld ribbelst over alle st, 2 nld ribbelst op de buitenste 10 st langs het midden voorpand (verkorte nld) *, herhaal van * - * tot de kraag een hoogte heeft van ca 7 cm aan de binnenkant en ca 14 cm aan de buitenkant. Zet de st op een st houder." Groetjes, Tineke
29.01.2015 - 11:16DROPS Design answered:
Hoi Tineke. Je naait de kraagdelen aan elkaar bij de "Afwerking" (aan het eind van het patroon).
29.01.2015 - 14:30
![]() Drops Design France wrote:
Drops Design France wrote:
Bonjour L. Ulrich, les explications du col se trouve sous le devant gauche, il se tricotera de la même façon au devant droit. Bon tricot.
11.11.2011 - 10:17
![]() L. Ulrich wrote:
L. Ulrich wrote:
Bonjour je ne trouve pas les explications pour faire le col.
11.11.2011 - 08:03
|
||||||||||
DROPS 80-8 |
||||||||||
 |
 |
|||||||||
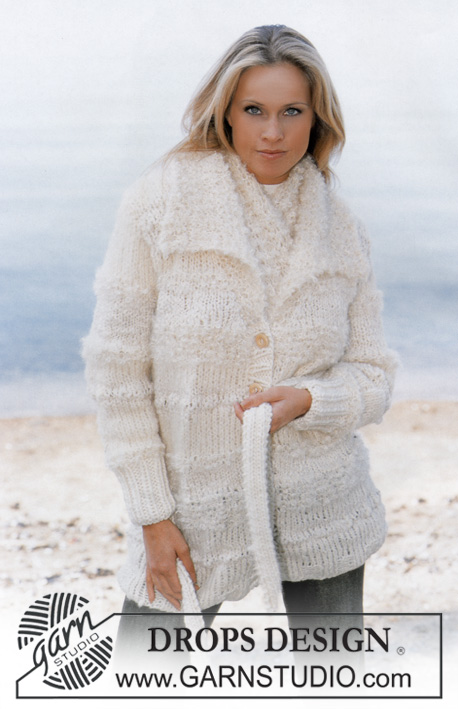
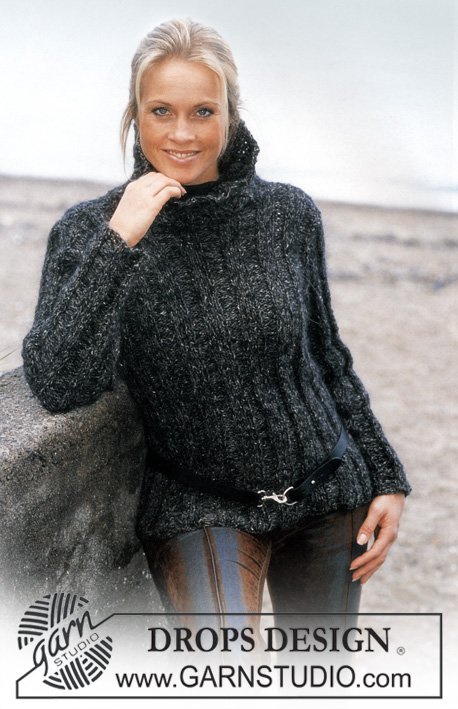
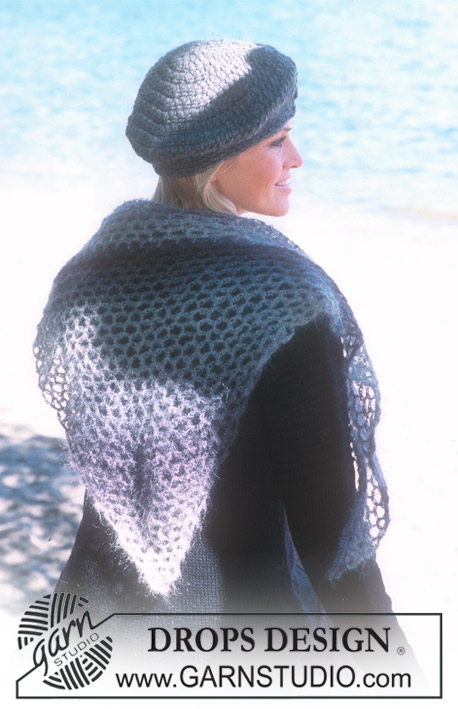
A set that includes: Cardigan, shawl, beret and purse
DROPS 80-8 |
||||||||||
|
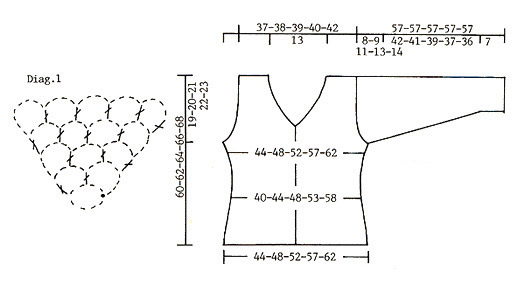
CARDIGAN: Gauge: 20 sts x 26 rows on larger needles in stockinette st = 10 x 10 cm Pattern (row 1 = wrong side): K 1 row (wrong side), K 1 row (right side row), P 1 row, and K 1 row, repeat these 4 rows. Increasing tips (for the collar): Inc by knitting 2 sts in the next to outermost st. Knitting tips (for neckband): All decs are made from right side. Dec 1 st inside of 5 buttonband sts + the increased sts of the collar, as follows: Before the buttonband/collar sts: K 2 tog. After the buttonband/collar sts: Slip 1 st as if to knit, K 1, psso. Back: Cast on 90-98-106-116-126 sts on smaller needles and knit 10 rows garter st. Change to larger needles and stockinette st. When the piece measures 5-6-7-8-9 cm dec 1 st at each side every 4 cm 4 times = 82-90-98-108-118 sts. When the piece measures 24-25-26-27-28 cm inc 1 st at each side every 4 cm a total of 4 times = 90-98-106-116-126 sts. When the piece measures 35 cm knit Pattern – see instructions above – over all sts to finished measurements. When the piece measures 41-42-43-44-45 cm bind off for armhole at each side every other row: 4 sts 1 time, 3 sts 0-1-1-2-2 times, 2 sts 1-1-2-2-4 times and 1 st 2-2-3-4-3 times = 74-76-78-80-84 sts. When the piece measures 58-60-62-64-66 cm bind off the center 22 sts for the neck. Then dec 1 st at each neck edge every other row 2 times = 24-25-26-27-29 sts remain on each shoulder. Bind off when the piece measures 60-62-64-66-68 cm. Left front: Cast on 50-54-58-63-68 sts on smaller needles and knit 10 rows garter st, change to larger needles and stockinette st, keeping 5 sts in garter st for buttonband. When the piece measures 5-6-7-8-9 cm dec and inc at the side as on back = 50-54-58-63-68 sts. Read the entire next section before knitting: When the piece measures 35 cm knit Pattern over all sts (continue to knit buttonbands in garter st) to finished measurements. Collar: When the piece measures 35-36-37-38-39 cm inc 2 sts inside of first button band st. On the next row, knit 2 rows garter st over only the outermost 7 sts at the center front (short rows). Then knit all sts – at the same time inc 1 st inside of outermost button band sts (see Increasing tips) every other row 10 times and then every 4 rows 4 times = 16 sts increased for collar - knit the increased sts in garter st. Neckband: When the piece measures 39-40-41-42-43 cm dec 1 st for neckband every other row 18 times – see knitting tips. Armhole: When the piece measures 41-42-43-44-45 cm bind off for armhole at the side as on back. After all armhole and neckband shaping is complete 40-41-42-43-45 sts remain. Continue until the piece measures 60-62-64-66-68 cm. Now bind off 24-25-26-27-29 sts on shoulder = 16 collar sts remain on needles. Collar: Continue in garter st on the collar stsas follows: * 2 rows garter st over all sts, 2 rows garter st over only the outermost 10 sts at the center front (short rows) *, repeat from * - * until the collar measures approx. 7 cm at inner edge and approx. 14 cm at outer edge. Put sts on a st holder. Right front: Cast on and knit the same as the left, reversing all shaping. Make buttonholes along buttonbands. (1 buttonhole = K tog the 3rd and 4th sts from center front and yo. On the next row twist and knit the yo so the buttonhole will not stretch out. Make buttonholes when the piece measures: Size S: 7, 14, 21, 28 and 35 cm. Size M: 8, 15, 22, 29 and 36 cm. Size L: 9, 16, 23, 30 and 37 cm. Size XL: 10, 17, 24, 31 and 38 cm. Size XXL: 11, 18, 25, 32 and 39 cm. Sleeve: Cast on 47-47-49-53-53 sts on smaller needles. Read the entire next section before knitting: Knit garter st for 7 cm, change to larger needles and stockinette st. After the garter st inc 1 st at each side every 3.5-3-25-2.5-2 cm a total of 12-14-15-15-17 times = 71-75-79-83-87 sts. When sleeve measures 38-36-34-32-30 cm knit Pattern – see instructions above – to finished measurements. When sleeve measures 49-48-46-44-43 cm bind off for sleeve cap at each side every other row: 4 sts 1 time, 3 sts 1 time, 2 sts 2 times and 1 st 3-4-6-7-11 times, then bind off 2 sts at each side until the piece measures 56 cm, then bind off 3 sts 1 time at each side. Bind off the remaining sts, the piece measures approx. 57 cm. Assembly: Sew shoulder seams. Sew the collar at center back with and sew the collar edge to back neckband. Sew in sleeves. Sew sleeve and side seams using edge sts as a seam allowance. Sew on buttons. SHAWL: Sizes: Width approx. 125 cm [48⅞"] Length at center back approx. 75 cm [29.5"] Materials: DROPS VIVALDI from Garnstudio 100 gr nr 11, blue-grey DROPS 4 mm [US F] crochet hook, or size needed to obtain correct gauge. Crochet gauge: 5 ch-loops wide and 7.5 ch-loops high = 10 x 10 cm. Pattern: See diagram. Shawl: Ch 8 and join into a ring with a sl st. Round 1: ch 8, 1 dc in ring, ch 4, 1 dc in the same ring – see diagram, turn the work. Round 2: ch 8, 1 dc in ring below, ch 4, 1 dc in the next ring below, ch 4, 1 dc in the same ring, turn the work. Round 3: ch 8, 1 dc in ring below, ch 4, 1 dc in the next ring, ch 4, 1 dc in the next ring, ch 4, 1 dc in the same ring, turn the work. Continue to inc in the same manner until there are approx. 55-56 rings across. BERET AND PURSE: Beret size: One size Purse measurement: Width: 24 cm [9.5"] Height: 30 cm [11.75"] Materials: DROPS SNOW from Garnstudio Beret: 100 gr nr 14, grey Purse: 200 gr nr 14, grey DROPS 7 mm [US K] crochet hook, or size needed to obtain correct gauge. Crochet gauge: 9 dc x 6 rows = 10 x 10 cm. Crochet tip: Replace the 1st dc of every row with ch 3. Beret: Ch 4 and join into a ring with a sl st. Round 1: Crochet 8 dc (read crochet tip) in ring, finish with 1 sl st in first dc. Round 2: Crochet 2 dc in each dc from Round 1 = 16 dc, finish with 1 sl st in first dc. Round 3: Crochet as follows: * 1 dc in dc from Round 2, 2 dc in the next dc *, repeat from * - * = 24 dc, finish with 1 sl st in first dc. Round 4: Crochet as follows: * 1 dc in dc from Round 3, 2 dc in the next dc *, repeat from * - * = 36 dc, finish with 1 sl st in first dc. Round 5: Crochet 1 dc in each dc from Round 4 and 2 dc in every 4th dc = 45 dc, finish with 1 sl st in first dc. Round 6: Crochet 1 dc in every dc from Round 5, and 2 dc in every 5th dc = 54 st, finish with 1 sl st in first dc. Round 7: Crochet 1 dc in every dc from Round 6, and 2 dc in every 6th dc = 63 dc, finish with 1 sl st in first dc. Round 8: Crochet 1 dc in every dc from Round 7, and 2 dc in every 7th dc = 72 dc, finish with 1 sl st in first dc. The work now measures approx. 25 cm in diameter. Round 9: Crochet 1 dc in every dc from Round 8. Now begin decreasing: Round 10: Crochet 1 dc in every dc from Round 9, skipping over every 6th dc = 60 dc, finish with 1 sl st in first dc. Round 11: Crochet 1 dc in every dc from Round 10, skipping over every 5th dc = 48 dc, finish with 1 sl st in first dc. Now crochet 3 rows with 1 sc in each dc from Round 11, cut yarn and fasten. Beret measures approx. 21 cm up to the top. Purse: The purse is crocheted flat, folded in half and sewn together at the side and bottom. Ch loosely 46 (incl. 3 for turning). Turn, crochet 1 dc in each ch = 43 dc (1st dc = 3 ch). Continue to crochet dc over all sts until piece measures approx. 29 cm, finish with 2 rows sc, cut yarn. Sew the purse at the side and bottom. Strap: Ch 7 (incl. 3 for turning). Turn, crochet 1 dc in each ch = 5 dc (1st dc = 3 ch). Crochet dc until strap measures approx. 55 cm, cut yarn. Crochet a second strap. Sew one strap at each side, approx. 2 cm in from edge. |
||||||||||
Diagram explanations |
||||||||||
|
||||||||||
 |
||||||||||
Have you finished this pattern?Tag your pictures with #dropspattern or submit them to the #dropsfan gallery. Do you need help with this pattern?You'll find 21 tutorial videos, a Comments/Questions area and more by visiting the pattern on garnstudio.com. © 1982-2026 DROPS Design A/S. We reserve all rights. This document, including all its sub-sections, has copyrights. Read more about what you can do with our patterns at the bottom of each pattern on our site. |
||||||||||


With over 40 years in knitting and crochet design, DROPS Design offers one of the most extensive collections of free patterns on the internet - translated to 17 languages. As of today we count 324 catalogs and 12290 patterns - 12280 of which are translated into English (US/in).
We work hard to bring you the best knitting and crochet have to offer, inspiration and advice as well as great quality yarns at incredible prices! Would you like to use our patterns for other than personal use? You can read what you are allowed to do in the Copyright text at the bottom of all our patterns. Happy crafting!
Post a comment to pattern DROPS 80-8
We would love to hear what you have to say about this pattern!
If you want to leave a question, please make sure you select the correct category in the form below, to speed up the answering process. Required fields are marked *.