
Popular categories
Looking for a yarn?


Comments / Questions (84)
Carmeli wrote:
Me gusta este modelo lo lei en ingles, no lo pude hacer, ¿tienen una traduccion en español?
16.06.2009 - 18:49
![]() DROPS Design NL wrote:
DROPS Design NL wrote:
Later staat er bijv ook een keer: Kant bij een hoogte van 10-9-8-7-5-3 cm vanaf de markeerdraad deze 70-75-79-84-91-99 st af. Dus eigenlijk staat er aangegeven vanaf waar je moet meten. Kan je hiermee verder? Succes en veel breiplezier. Gr. Tine
14.05.2009 - 13:25
![]() DROPS Design NL wrote:
DROPS Design NL wrote:
Beste Ann. Er staat in dit patroon bovenaan: LET OP: meet alle maten vanaf de opzet nld. Dus vanaf daar meten tot het hoogste deel op je nld (als je stuk schuin is, onderkant is steeds recht, maar op een gegeven moment is het werk op je naald schuin natuurlijk.)
14.05.2009 - 13:24
![]() Ann wrote:
Ann wrote:
Beste, ik heb een probleem bij het voorpand. >Op een bepaald moment moet je de hoogte meten. Maar de hoogte vanaf waar? Is het vanaf de breinaald? Of vanaf de onderkant van de vest (de basis van de hoek)Ik ben al 2maal opnieuw begonnen, maar zit dan steeds in de knoop met het aantal meerderingen.
13.05.2009 - 11:40
![]() Päivi wrote:
Päivi wrote:
Upea malli :D. Tämän mä haluun!
24.02.2009 - 17:07
![]() Judy wrote:
Judy wrote:
I love this - can't wait to start it. Great original design
15.02.2009 - 19:34
![]() DROPS Design NL wrote:
DROPS Design NL wrote:
Beste Jeanette. Je moet de omslagen gewoon recht breien, er moet kleine gaatjes in het vest komen. Het is inderdaad niet goed te zien op de foto. Succes met het breien. Gr. Tine
09.02.2009 - 16:00
![]() Jeannette wrote:
Jeannette wrote:
Klopt het dat meerderen door 1 omslag te maken terug deze omslag recht breien? Je krijgt dan namelijk gaatjes. Zie ik niet in het patroon.
04.02.2009 - 09:14Anita wrote:
Yessss! It's the one I was looking for!
03.02.2009 - 17:39
![]() Ulla wrote:
Ulla wrote:
Tämä on malli ja ohje, jonka haluaisin saada! Vauvoillehan tuolla mallilla onkin jo takkia ollut joskus.
29.01.2009 - 08:08
|
|
City Explorer#cityexplorercardigan |
|
 |
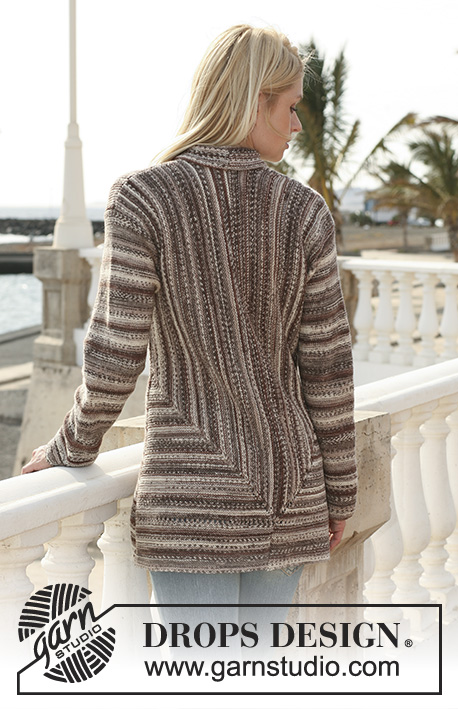 |
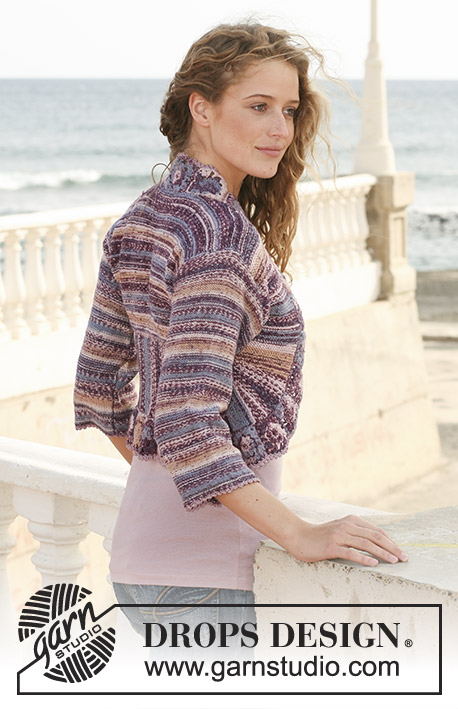
DROPS jacket knitted from side to side in garter st in ”Fabel”. Size S - XXXL.
DROPS 113-8 |
|
|
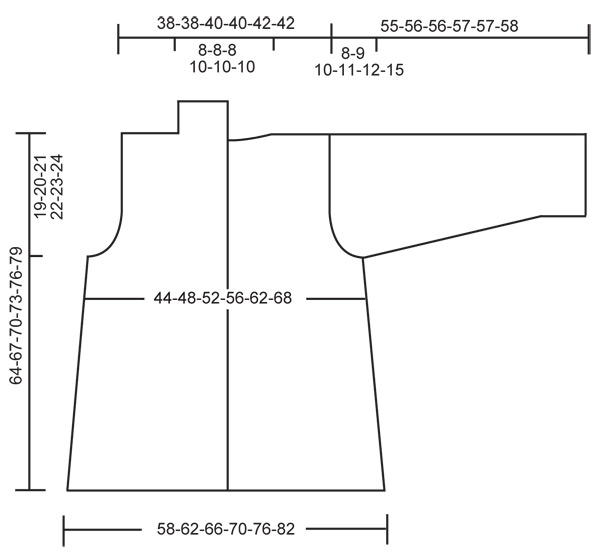
GARTER ST (back and forth on needle): K all rows. BUTTONHOLES: Make buttonholes on right front band. 1 buttonhole = K2 tog and cast on 1 new st on return row. Make buttonholes when piece measures – from bottom edge: SIZE S: 10, 17, 24, 31 and 39 cm / 4",6¾",9½",12¼" and 15¼". SIZE M: 10, 17, 24, 32 and 40 cm / 4",6¾",9½",12½" and 15¾". SIZE L: 10, 17, 25, 33 and 41 cm / 4",6¾",9¾",13" and 16⅛". SIZE XL: 10, 18, 26, 34 and 42 cm / 4",7",10¼",13⅜" and 16½". SIZE XXL: 9, 15, 22, 29, 36 and 43 cm / 3½",6",8¾",11⅜",14¼" and 17". SIZE XXXL: 9, 16, 23, 30, 37 and 44 cm / 3½",6¼",9",11¾",14½" and 17¼". -------------------------------------------------------- RIGHT FRONT PIECE: Worked from the side towards mid front, back and forth on circular needle. NOTE: make all measurements from cast on row. READ ALL OF THIS SECTION BEFORE KNITTING IT! Cast on 31-34-36-38-41-43 sts on needle size 3 mm / US 2or3 with Fabel. K 1 row from WS. Insert a marker in 2nd st at the right side of piece (as seen from RS). Row 1 = WS. Work garter st on all sts, AT THE SAME TIME on row 2 (= RS) inc 1 st on each side of st with marker, and repeat the inc on every other row a total of 53-58-62-67-74-82 times – inc by making 1 YO, K YO on return row. REMEMBER THE KNITTING GAUGE! AT THE SAME TIME on row 2 cast on new sts at the left side of piece (as seen from RS) as follows: on every 6th row: 2 sts 1-2-2-2-2-3 times, then on every 4th row: 2 sts 1-2-3-4-6-8 times, then on every other row: 2 sts 1-1-1-4-4-5 times, then cast on 40-38-38-33-31-26 sts 1 time. AT THE SAME TIME on row 4 inc 1 st at the right side of piece (as seen from RS) and repeat the inc on every 8 row a total of 16 times. AT THE SAME TIME when piece measures 18-20-22-23-26-28 cm / 7"-8"-8¾"-9"-10¼"-11" cast on 14-14-14-17-17-17 new sts for collar at the left side of piece (as seen from RS). When these sts have been cast on continue with shortened rows as follows (row 1 = WS): * 4 rows on all sts, 2 rows on the top 60-64-66-68-70-72 sts on the left side of piece (as seen from RS) *, repeat from *-*. REMEMBER INCREASES! When piece measures 22-24-26-28-31-34 cm / 8¾"-9½"-10¼"-11"-12¼"-13⅜" – increases on each side of st with marker are now complete – slip sts to the left of st with marker + st with marker (= 143-153-161-174-186-199 sts) on a stitch holder. Insert a new marker in piece. Now work next row on sts on the right side of piece as follows: *K2 tog, 1 YO *, repeat from *-* and finish with K2. Continue in garter st on all sts – continue inc on the right side of piece = 70-75-79-84-91-99 sts left on row when inc are complete. When piece measures 10-9-8-7-5-3 cm / 4"-3½"-3⅛"-2¾"-2"-1⅛" from marker bind off these 70-75-79-84-91-99 sts sts. Pick up 24-22-20-16-12-7 sts towards mid front and slip sts from stitch holder back on needle = 167-175-181-190-198-206 sts. Now work all sts (no shortened rows) for front band. K 1 row from WS, and work next row as follows from RS and bottom edge: K 24-22-20-16-12-7 sts, * K2 tog, 1 YO *, repeat from *-* and finish with K2. Continue in garter st. When front band measures 2 cm / ¾" make BUTTONHOLES – see above – and bind off when front band measures 4 cm / 1½". LEFT FRONT PIECE: Like right front piece, but without buttonholes. Assemble left front piece with WS out (i.e. mirrored). LEFT BACK PIECE: Worked back and forth on circular needle from side towards mid back. NOTE: make all measurements from cast on row. READ ALL OF THIS SECTION BEFORE KNITTING IT! Cast on 31-34-36-38-41-43 sts on needle size 3 mm / US 2or3 with Fabel. Insert a marker in the 2nd st on the right side of piece (as seen from RS). Row 1 = WS. Work garter st on all sts, AT THE SAME TIME on row 2 (= RS) inc 1 st on each side of st with marker, and repeat the inc on every other row a total of 53-58-62-67-74-82 times – inc by making 1 YO, K YO on next row. AT THE SAME TIME on row 2 cast on new sts at the left side of piece (as seen from RS) as follows: on every 6th row: 2 sts 1-2-2-2-2-3 times, then on every 4th row: 2 sts 1-2-3-4-6-8 times, then on every other row: 2 sts 1-1-1-4-4-5 times, then cast on 40-38-38-33-31-26 sts 1 time. AT THE SAME TIME on row 4 inc 1 st at the right side of piece (as seen from RS) and repeat the inc on every 8 row a total of 16 times. AT THE SAME TIME when piece measures 18-20-22-23-26-28 cm / 7"-8"-8¾"-9"-10¼"-11" bind off 4 sts on the left side of piece (as seen from RS). When piece measures 22-24-26-28-31-34 cm / 8¾"-9½"-10¼"-11"-12¼"-13⅜" – increases on each side of st with marker are now complete – bind off 125-135-143-153-165-178 sts on the left side of piece (as seen from RS). Insert a new marker in piece. Work next row as follows on remaining sts: * K2 tog, 1 YO *, repeat from *-* and finish with K2. Continue in garter st on all sts – continue inc on the right side of piece = 70-75-79-84-91-99 sts when inc are complete. Bind off when piece measures 10-9-8-7-5-3 cm / 4"-3½"-3⅛"-2¾"-2"-1⅛" from marker. RIGHT BACK PIECE: Like left back piece. Assemble right back piece with the WS out, i.e. mirrored. SLEEVE: Worked back and forth on needle. Cast on 58-60-62-64-66-70 sts (includes 1 edge st each side) on needle size 3 mm / US 2or3 with Fabel. Work garter st. When piece measures 10 cm / 4" continue in reverse stockinette st, AT THE SAME TIME inc 1 st each side and repeat the inc on every 3-2.5-2-2-1.5-1.5 cm / 1⅛"-⅞"-¾"-¾"-½"-½" a total of 12-14-16-18-21-21 times = 82-88-94-100-108-112 sts. When piece measures 47-47-46-46-45-43 cm / 18½"-18½"-18"-18"-17¾"-17" – less for the larger sizes because of longer sleeve cap and wider shoulder – bind off for sleeve cap each side at the beg of every row: 3 sts 1 time, 2 sts 4-4-5-5-5-6 times, 1 st 3-4-4-6-7-9 times, then 2 sts each side until piece measures 54-55-55-56-56-57 cm / 21¼"-21⅝"-21⅝"-22"-22"-22½", now bind off 3 sts each side 1 time and bind off remaining sts. Piece measures approx 55-56-56-57-57-58 cm / 21⅝"-22"-22"-22½"-22½"-22¾". ASSEMBLY: Sew back pieces tog mid back. Sew shoulder seams. Set in sleeves. Sew sleeve and side seam inside 1 edge st. Sew collar tog mid back and sew to neckline. Sew on buttons. |
|
 |
|
Have you finished this pattern?Tag your pictures with #dropspattern #cityexplorercardigan or submit them to the #dropsfan gallery. Do you need help with this pattern?You'll find 19 tutorial videos, a Comments/Questions area and more by visiting the pattern on garnstudio.com. © 1982-2026 DROPS Design A/S. We reserve all rights. This document, including all its sub-sections, has copyrights. Read more about what you can do with our patterns at the bottom of each pattern on our site. |
|


With over 40 years in knitting and crochet design, DROPS Design offers one of the most extensive collections of free patterns on the internet - translated to 17 languages. As of today we count 325 catalogs and 12298 patterns - 12288 of which are translated into English (US/in).
We work hard to bring you the best knitting and crochet have to offer, inspiration and advice as well as great quality yarns at incredible prices! Would you like to use our patterns for other than personal use? You can read what you are allowed to do in the Copyright text at the bottom of all our patterns. Happy crafting!
Post a comment to pattern DROPS 113-8
We would love to hear what you have to say about this pattern!
If you want to leave a question, please make sure you select the correct category in the form below, to speed up the answering process. Required fields are marked *.