Comments / Questions (83)
![]() Paula wrote:
Paula wrote:
Also, when I do the bobbles in round 5, the chain loops become very stretched, creating big holes. Is that normal? (4 bobbles are crocheted a single chain).
17.11.2013 - 17:28DROPS Design answered:
Dear Paula, at the end of round 5, 2 sides should measure 3/8’’, 1 is smaller, approx 2’’ and 1 is wider, approx 2¾’’. You may take a smaller crochet hook if necessary. Happy crocheting!
18.11.2013 - 10:05
![]() Paula wrote:
Paula wrote:
Also, when I do the bobbles in round 5, the chain loops become very stretched, creating big holes. Is that normal? (4 bobbles are crocheted a single chain).
17.11.2013 - 17:26
![]() Paula wrote:
Paula wrote:
Re Round 5 of the crochet squares: my finished product comes out flat on on side, but fairly rounded on the opposite side (which is also the longest side). Should all sides be straight? Round 6: the single crochets don't logically align with what I crocheted in Round 5. I am wondering if I am making a mistake in Round 5 with the word "next". When it says "next" in Round 5, do we actually mean "skip one", or do we mean, "very next"? thanks
17.11.2013 - 14:41DROPS Design answered:
Dear Paula, at the end of round 5, 2 sides are the same widht, 1 is smaller and the last one is wider (see measures at the end of round 5). When it says "next ch-loop" eg,it means very next one,not skip one. Happy crocheting!
18.11.2013 - 10:01
![]() Paula wrote:
Paula wrote:
What am I doing wrong with my bobbles? They are laying flat, and the entire circle is puckering.
13.11.2013 - 19:49
![]() Villani wrote:
Villani wrote:
Très confortable, très agréable à porter. Seulement : le nombre de carrés indiqués s'est révélé trop grand pour mon ouvrage. J'ai donc un peu froncé derrière, d'où un très joli effet caraco et un petit revers formant col.
04.05.2012 - 09:05
![]() Chris wrote:
Chris wrote:
Ik heb alle onderdelen van het vestje gebreid (alles afgekant), de mouwen dichtgenaaid (m.b.v. jullie instructievideo) en wil nu het voor- en achterpand aan elkaar naaien. Ik kom er maar niet uit hoe dit nu moet. Ik heb de instructievideo voor het babymutsje gezien, moet dit net zo? Of heeft de techniek een bepaalde naam die ik als zoekterm kan gebruiken (Engels, Nederlands, Duits, het is mij om het even) om ergens instructies te kunnen vinden?
20.04.2012 - 21:04DROPS Design answered:
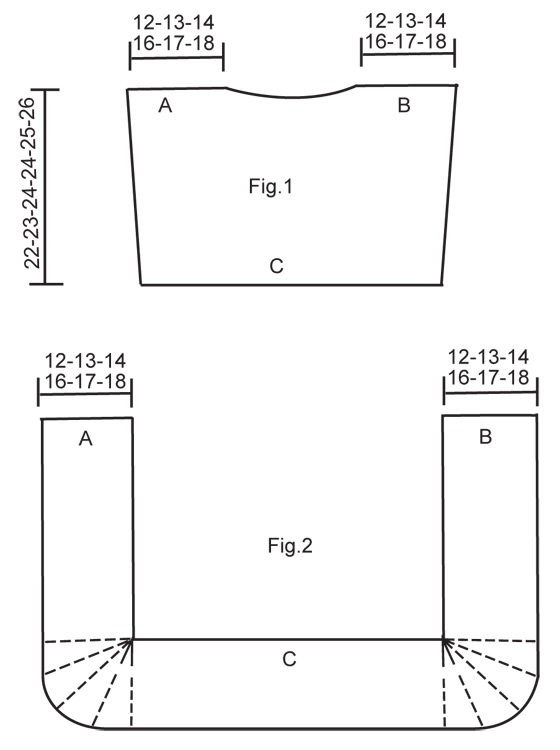
De instructievideo voor het mutsje heeft niets met dit patroon te doen. Onderaan dit zijn figuren van de twee delen: Fig 1 = achterpand en Fig 2 = voorpanden. U moet A aan A, B aan B en C aan C naaien. U moet doorgaan met de naad aan de zijkanten 18-19-20-21-22-23 cm open laten voor de armsgaten. Het is misschien makkelijker als u de delen plat op tafel neerlegt en vergelijk met de figuren of ga naar uw verkooppunt voor persoonlijke ondersteuning.
23.04.2012 - 11:58
![]() Drops Design wrote:
Drops Design wrote:
Se rettelsen og hækl ruden efter den. God fornøjelse!
16.12.2011 - 12:04
![]() Christina wrote:
Christina wrote:
Hej Jeg kan bare ikke finde hovede eller hale i de hæklet ruder omg 5, sådan som jeg læser det får jeg kun brugt 4 lm, fra omg 4så der er noget galt hjælp mig......
13.12.2011 - 16:21
![]() Drops Design wrote:
Drops Design wrote:
You work back and fort on needle, work 33 sts and then turn and work all the 33 sts back, then turn again and work 30 sts, turn again and work all 30 sts back, turn again and work 27 sts, turn and work all 27 sts back again... and so on.
22.01.2010 - 16:19
![]() Aziza wrote:
Aziza wrote:
Im having a problem with this pattern. when you caston, than knit 33 sts, turn pce work all sts u r still on the side of the 33 sts, the remain sts r oppostite and ur workin the 33sts wthr circual/straight needles. i dont undtd what wrong & ive done short rows..pls help
22.01.2010 - 14:03
Memory Lane#memorylanebolero |
|
 |
 |
DROPS bolero in garter st with turns in ”Fabel” and border in crochet squares. Size S - XXXL.
DROPS 113-14 |
|
|
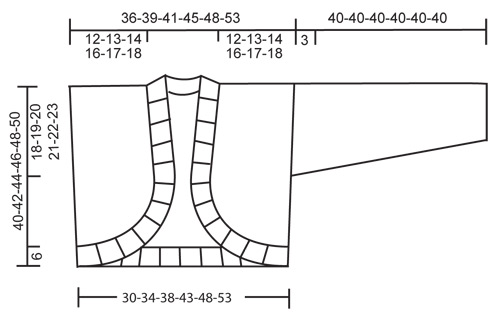
GARTER ST (back and forth on needle): K all rows. TURNS: Work shortened rows to shape the bolero at the front. Work turns as follows: Row 1: Work 24-27-30-33-36-39 sts, turn piece. Row 2: Work all sts. Row 3: Work 21-24-27-30-33-36 sts, turn piece. Row 4: Work all sts. Row 5: Work 18-21-24-27-30-33 sts, turn piece. Row 6: Work all sts. Row 7: Work 15-18-21-24-27-30 sts, turn piece. Row 8: Work all sts. Continue like this with 3 less sts before each turn until you have worked 2 rows on the 3 first sts only. Now work 2 rows on all sts. Repeat from row 1 a total of 5 times. There are now 18-20-22-24-26-28 rows garter st towards mid front and 2 rows garter st towards the side and front piece now measures approx 20-22-24-27-29-31 cm / 8"-8¾"-9½"-10⅝"-11⅜"-12¼" towards mid front and 2 cm / ¾" towards the side. ---------------------------------------------------------- ---------------------------------------------------------- BACK PIECE: Worked back and forth on needle. See fig.1. Cast on 68-78-88-98-110-122 sts on needle size 3.5 mm / US 4 with Fabel and work garter st – see above. REMEMBER THE KNITTING GAUGE! When piece measures 4 cm / 1½" continue as follows: SIZE S: Inc 1 st each side, repeat the inc on every 2.5 cm / ⅞" a total of 7 times = 82 sts. SIZE M: Inc 1 st each side, repeat the inc on every 3 cm / 1⅛" a total of 6 times = 90 sts. SIZE L: Inc 1 st each side, repeat the inc on every 5 cm / 2" a total of 3 times = 94 sts. SIZE XL: Inc 1 st each side, repeat the inc on every 5 cm / 2" a total of 3 times = 104 sts. SIZE XXL: No inc. SIZE XXXL: No inc. ALL SIZES: When piece measures 20-21-22-22-23-24 cm / 8"-8¼"-8¾"-8¾"-9"-9½" bind off the middle 22-24-22-26-26-32 sts for neck and complete each shoulder separately. Bind off at the beg of every row from neckline: 1 st 3 times = 27-30-33-36-39-42 sts left on shoulder. Bind off when piece measures 22-23-24-24-25-26 cm / 8¾"-9"-9½"-9½"-9¾"-10¼". FRONT PIECE: Worked from one shoulder towards the bottom edge, then across and up towards the other shoulder – see fig.2. Cast on 27-30-33-36-39-42 sts on needle size 3.5 mm / US 4 with Fabel. Work 21-22-23-23-24-25 cm / 8¼"-8¾"-9"-9"-9½"-9¾" garter st. Now continue with TURNS – see above. After TURNS work 28-32-36-41-46-51 cm / 11"-12½"-14¼"-16⅛"-18"-20" garter st and then work TURNS again the other side. Work 21-22-23-23-24-25 cm / 8¼"-8¾"-9"-9"-9½"-9¾" garter st and bind off. ASSEMBLY: Place back piece between side pieces on front piece. Fold the 2 side pieces on front piece towards the middle. Sew shoulder seams A to A and B to B in outer loops of sts, and sew C to C at bottom of back piece in the same way – continue the seam up along the sides so that armhole measures approx 18-19-20-21-22-23 cm / 7"-7½"-8"-8¼"-8¾"-9". CROCHET SQUARES: Explanation Bobble: 3 dc crochet tog: wait with the last pull-through until all 3 dc have been crochet, make a yarn over hook and pull yarn through all 4 sts on hook. Work 4 ch with crochet hook size 3.5 mm /E/4 and Fabel and form a ring with 1 sl st in first ch. ROUND 1: 6 sc in ring. ROUND 2: 2 sc in each sc = 12 sc. ROUND 3: 2 dc in each sc (replace first dc with 3 ch), only crochet in the back loop of sts = 24 dc. ROUND 4: 4 ch, skip 1 dc, * 1 sc, 3 ch, skip 1 dc *, repeat from *-*, and finish with 1 sl st in first ch = 12 ch-loops ROUND 5: 4 ch, in first ch-loop crochet from *-* as follows: * 1 bobble - see above, 2 ch, 1 bobble, 4 ch, 1 bobble, 2 ch, 1 bobble *, 3 ch, 1 dc in dc between the next 2 ch-loops, 3 ch, in next ch-loop crochet from *-* as above, 4 ch, 1 dc in sc between the next 2 ch-loops, 4 ch, in next ch-loop crochet from *-* as above, 3 ch, 1 dc in sc between the next 2 ch-loops, 3 ch, in next ch-loop crochet from *-* as above, and finish with 1 ch and 1 sl st in third ch from beg of round. Two of the sides are now the same width, approx 6 cm / 2⅜", 1 is smaller, approx 5 cm / 2" and 1 is wider, approx 7 cm / 2¾". ROUND 6: Crochet sc’s in all ch-loops as follows: 1 sc in first ch-loop, 2 sc in next, 5 sc in next (= corner), then 2 sc, 3 sc, 3 sc, 2 sc, 5 sc (= corner), 2 sc, 4 sc, 4 sc, 2 sc, 5 sc (= corner), 2 sc, 3 sc, 3 sc, 2 sc, 5 sc (= corner), 2 sc and 1 sc in the last ch-loop, finish with 1 sl st in first sc from beg of round. Cut the thread. Make approx 25-27-29-32-34-36 squares. Sew squares tog to a long row, edge to edge - place the squares so that all the shorter sides of squares are at the same side and all the longer sides at the opposite side in order the row becomes curved. Begin sewing the row to neckline mid back. Sew the shorter side to body piece, edge to edge. Continue down along one front piece, and along bottom edge to mid back. Beg mid back at neckline again and continue to mid back at bottom edge. If you need more/less squares, adjust this before sewing tog the squares mid back at bottom edge. SLEEVE: Worked back and forth on needle. Cast on 58-60-62-66-66-68 sts on needle size 3.5 mm / US 4 with Fabel. Work garter st. When piece measures 7 cm / 2¾" inc 1 st each side, and repeat the inc on every 3.5-3-2.5-2.5-2-2 cm / 1¼"-1⅛"-⅞"-⅞"-¾"-¾" a total of 9-10-12-12-14-15 times = 76-80-86-90-94-98 sts. When piece measures 37 cm / 14½" bind off 3 sts each side at the beg of every row until piece measures 40 cm / 15¾". Bind off remaining sts. Sew sleeve seams in outer loops of sts and set in sleeves. CROCHET BORDER: Crochet a border round the opening with crochet hook size 3.5 mm /E/4 and Cotton Viscose as follows – beg in the first square mid back at neckline: 1 sc in second st on square, * 1 picot (= 3 ch, 1 sc in first ch), skip 1 sc, 1 sc in next sc *, repeat from *-* (= 7 picots along each square + 1 in seam between each square) and finish with 1 sl st in first sc from beg of round. Crochet a similar border round sleeve edges. |
|
 |
|
 |
|
Have you finished this pattern?Tag your pictures with #dropspattern #memorylanebolero or submit them to the #dropsfan gallery. Do you need help with this pattern?You'll find 17 tutorial videos, a Comments/Questions area and more by visiting the pattern on garnstudio.com. © 1982-2026 DROPS Design A/S. We reserve all rights. This document, including all its sub-sections, has copyrights. Read more about what you can do with our patterns at the bottom of each pattern on our site. |
|


Post a comment to pattern DROPS 113-14
We would love to hear what you have to say about this pattern!
If you want to leave a question, please make sure you select the correct category in the form below, to speed up the answering process. Required fields are marked *.