
Popular categories
Looking for a yarn?


Comments / Questions (238)
![]() Iris wrote:
Iris wrote:
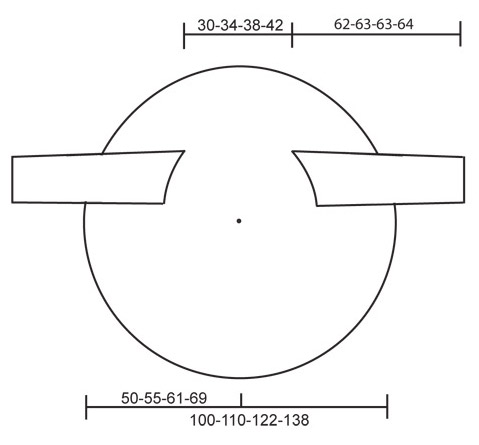
Hello! I wanted to confirm something about the pattern. You have written that the first armhole should be started when the piece measures 37cm from the 63rd stitch of the first row to the 63rd stitch on the needle following the curve (on the smallest size). Is this right? It seems like 37cm is very long. What's the circumference of the piece following the 63rd stitch around? I'm knitting this for my sister as a graduation present so I want to make sure I have it right! Thank you!
20.07.2023 - 16:53DROPS Design answered:
Dear Iris, the radius of the circumference is indicated in the pattern measurements: 50 cm. The diameter would approx. be 100cm. The width between the armholes (width of the back) would be 30 cm. 37 cm would be between the cast-on edge at the bottom of the piece up to the beginning of the armhole (so it would be 37 cm in the curve perimeter of the circle). So the total perimeter would be: 70 cm on half a circle and 70 cm on the other half. Happy knitting!
23.07.2023 - 19:06
![]() Ellie wrote:
Ellie wrote:
Hi, i was talking about the 16st we knit at the start of the row, do we have to knit that at the end of the row or is the short row in the middle of the row? thanks
09.09.2020 - 11:26DROPS Design answered:
Dear Ellie, the 2 rows over the 16 sts (row 3 and 4 in M.1, size M/L) are worked over the first 16 sts = extra short rows, they come extra to those explain in the text. This means, every time you repeat the row 1 and 2 in M.1 you will work them over 2 sts first then 8 sts - see "Short rows" at the beg. of the pattenr. Happy knitting!
09.09.2020 - 15:14
![]() Ellie wrote:
Ellie wrote:
Hi, i am trying to do this pattern. so we don't knit short rows at the other end? and decreasing the sts is it ok to do the normal dec st? thanks
08.09.2020 - 05:03DROPS Design answered:
Dear Ellie, not sure to understand properly what you mean here. You are working the short rows over all stitches, this means you will work less stitches on every row from RS (from WS work the same number of sts worked from RS), this means the number of sts not worked at the end of row from RS will by and by increase (= middle of circle), and the beg of row from RS are towards outside edge of circle. Happy knitting!
08.09.2020 - 10:34
![]() Murielle Kingsbury wrote:
Murielle Kingsbury wrote:
Je trouve ce modele absolument super. mais j'ai des difficultes a lire les instructions. je suis tres visuelle. est-ce possible d,avoir des videos specifiques a ce modele ou tout autre video qui pourrait m'aider. dans l'attente d'une aide quelquonque , un gros merci a l'avance.
20.05.2020 - 22:40DROPS Design answered:
Bonjour Mme Kingsbury, Vous allez tricoter pour le dos/les devants de la veste un cercle mais dans le sens du rayon, donc avec des rangs raccourcis pour avoir la bonne forme. Vous tricotez en suivant le diagramme M.1 mais en même temps, tricotez les rangs raccourcis, pour les emmanchures, vous allez crocheter les 2 parties (avant/après l'emmanchure) en même temps (pour garder le rythme des rangs raccourcis) mais avec 2 pelotes différentes (pour créer la fente de l'emmanchure). Pour toute assistance individuelle complémentaire, n'hésitez pas à contacter votre magasin DROPS, même par mail ou téléphone. Bon tricot!
22.05.2020 - 09:02
![]() Ghada Gamil wrote:
Ghada Gamil wrote:
In the sleeves I do not understand tge meaning of dec 10-11-13-14 sts evenly and also continue in stocking sts with ws out What do you men by evenly? and out ?
07.02.2020 - 15:26DROPS Design answered:
Dear Mrs Gamil, after the rib you have to decrease the number of stitches to avoid the sleeves to be too wide when working reversed stocking stitch. Read more here how to decrease evenly. Then you continue working in reversed stocking stitch, ie the knit stitches should be WS and the purl stitches should be RS. Happy knitting!
07.02.2020 - 15:54
![]() Anita wrote:
Anita wrote:
I am trying to understand the directions and can not make sens of it. We should go from 112 sts (medium size) to 16 sts, and start again from begining, but nowhere does the direction say cast on again, or add sts or you end up with 12 pieces and graft is together. I am very frustrated, read the directions in two different languages and still can not make sens of it. Short raws will not add up to be a circle thats only the outer edge.
15.01.2020 - 01:19DROPS Design answered:
Dear Anita, you first work 2 rows over all stitches (= 112 stitches), then work 2 rows over the first 12 stitches, and continue repeating these 4 rows, but when you work the first 2 rows, work some stitches less every time (you need short rows to get the wide of the outer circle), so next time you work: 2 rows over 112 sts - 2 sts = 110 sts, next time you work row 1/2 you work 110-2 = 108 sts, then 106 sts, then 104 sts etc.. (2 sts less 10 times in total), then work 4 sts less instead of 2, then work 8 sts less instead of 2 then 4, until only the 16 sts from the outer circle remains on needle. Happy knitting!
15.01.2020 - 09:35
![]() Tove Janka Lunden wrote:
Tove Janka Lunden wrote:
Hvor finnes disse diagrammene til hver str??....
09.01.2020 - 18:07
![]() Natty wrote:
Natty wrote:
I’m trying to use the yarn converter but need the thread count/number, can’t find it anywhere, can you help please?
20.10.2019 - 10:42DROPS Design answered:
Dear Natty, read more about our yarn converter here - you are working here either with 1 strand Silke Alpaca or 1 strand Air. Happy knitting!
21.10.2019 - 10:24
![]() Ivonne wrote:
Ivonne wrote:
Hallo! Kann ich diese Jacke auch mit Big Merino stricken? Danke!
15.05.2019 - 22:59DROPS Design answered:
Liebe Ivonne, Big Merino gehört auch der Garngruppe C – aber bitte beachten, daß Garne mit unterschiedlichen Strukturen auch unterschiedlich aussehen. Ihr DROPS Laden wird Ihnen gerne weiter helfen, die beste Alternative zu finden - auch telefonisch oder per E-Mail. Mehr über Big Merino lesen Sie unter die Farbkarte und- siehe Garnpflegetipp für Merino. Viel Spaß beim stricken!
16.05.2019 - 09:35
![]() Jane Curley wrote:
Jane Curley wrote:
The pattern says 'for Air' then quotes amount for Silke Apaca..states that is unavailable but in alternatives it does not mention 'Air'...which yarns are suitable please.
08.04.2019 - 11:51DROPS Design answered:
Dear Mrs Curley, this pattern was originally requiring 1200-1300-1450-1600 g DROPS Silke Alpaca, and we suggest now DROPS Air: 600-650-700-750 g. Happy knitting!
08.04.2019 - 12:06
|
||||||||||||||||
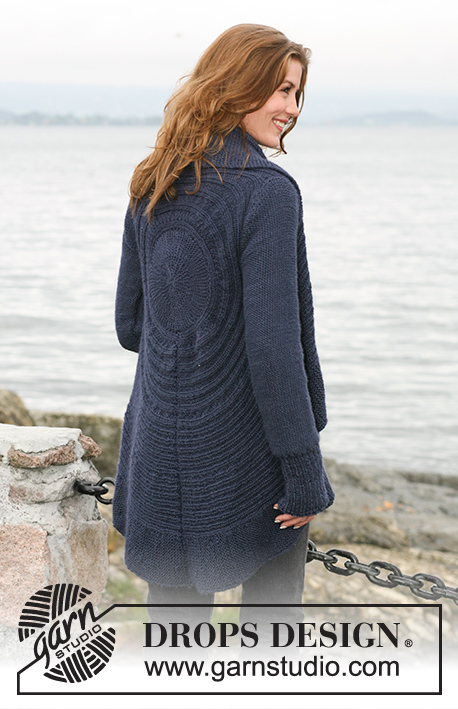
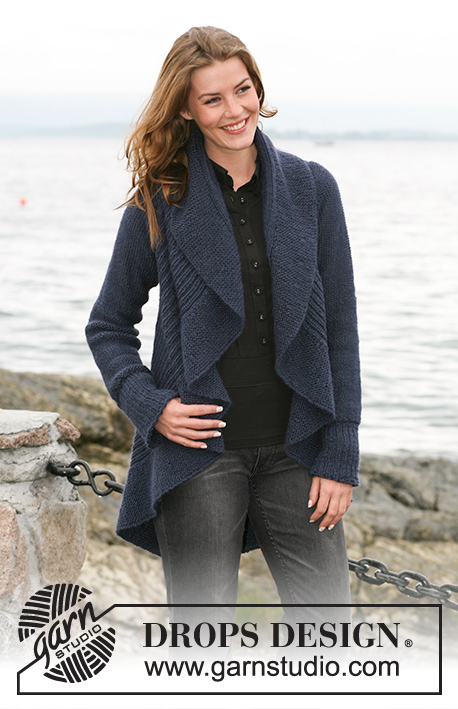
Blue Moon |
||||||||||||||||
 |
 |
|||||||||||||||
DROPS circular jacket in "SIlke-Alpaca" or ”Air” with texture pattern. Size: S to XXXL
DROPS 102-6 |
||||||||||||||||
|
Knitting gauge: 17 sts x 22 rows stockinette sts = 10 x 10 cm [4" x 4"] Pattern: See diagram M.1. Diagrams are seen from RS. NOTE: Each size has own diagram. Short rows: Work short rows to ensure circular shape of piece, as follows: 1st / 2nd row: Knit 102-112-124-140 sts, turn piece and knit back. 3rd / 4th row: Knit back and forth over 18-16-20-20 first sts on row (these sts = outermost on circle) – read knitting tip 1 below. Repeat 1st to 4th rows, but reduce stitch number by 2 sts on every 1st/2nd row before turning piece – repeat this 10-10-12-12 times in total, then reduce sts number knitted by 4 sts before piece is turned – repeat this 6-9-8-12 times in total and from this point reduce sts number by 8 sts before piece is turned – repeat 5-5-6-6 times in total. Remaining are 18-16-20-20 outermost sts of circle. Start again from beginning over all sts. – read Knitting tip 2 below. Knitting tip 1: When turning piece slip the first st as if to knit and tighten yarn before continuing knitting. This is done to avoid holes when turning. This does not applies to innermost 20-20-24-24 sts of circle – when piece is turned knit all sts as normal. Knitting tip 2: On row where all sts are knit, P 20-20-24-24 innermost sts in circle (seen from RS). Then continue as before with chart M.1. Measuring tip: All measurements on circle are done with piece lying flat. Do not measure across! Measurements follow curve to 63rd - 69th -73rd - 81st sts. CIRCLE Knit piece back and forth on needle to make room for all sts. Cast on 102-112-124-140 sts on circular needle size 4.5 mm [US 7] with Air. Insert 1 marking thread or stitch marker after 63-69-73-81 sts, make all measurements from this point. Knit chart M.1 (see diagram for your size) from right to left (i.e. from outside towards inside on circle)1st row = RS. At the same time as chart M.1 knit Short rows – see explanation above – to make circular shape. When piece measures 37-40-49-57 cm [14½"-15¾"-19¼"-22½"] from marking thread or stitch marker – read measuring tip – knit armholes. Armhole: Slip outermost 63-69-73-81 sts onto an extra needle size 4.5 mm [US 7] (circular needle to make room for all sts). Continuing, bind off next 2 sts (= armhole). Insert 1 marking thread or stitch marker between 2 bound off sts. Leave remaining sts on needle. Continuing, knit 2 parts (sts before and after armhole) separately, but knit them at the same time on separate needles with separate balls of yarn. This is done so the short rows are correct on both sides of armhole. Continue with pattern and short rows as earlier. When armhole measures 18-21-23-25 cm [7"-8¼"-9"-9¾"] cast on 2 new sts over armhole(i.e. between the 2 parts). Continuing, slip all sts onto one needle again = 102-112-124-140 sts. Insert 1 marking thread or stitch marker after 63-69-73-81 sts. Continuing, measure piece from this point. Now knit chart M.1 and short rows on all sts. Continue like this until piece measures approx 15-17-19-21 cm [6"-6 ¾"-7½"-8 ¼"], this should be a ½ circle. Continue until piece measures approx 30-34-38-42 cm [11 ¾"-13⅜"-15"-16½"] from marking thread – read measuring tip. Now make armholes in same way. When all sts are back on one needle again insert 1 marking thread or stitch marker after 63-69-73-81 sts. Continue measuring from here. Continue with chart M.1 and short rows until piece measures approx 37-40-49-57 cm [14½"-15 ¾"-19 ¼"-22½"] from marking thread or stitch markers (adjust to 1 whole pattern repeat with short rows). Bind off loosely. Sleeve: Knit piece back and forth on circular needles. Cast on 56-59-65-68 sts (incl 1 front edge sts on each side) on needles size 4.5 mm [US 7] with Air. P1 row from WS. Continue with Rib K2/P1 and 1 edge sts on each side. When Rib measures 13-13-14-14 cm [5⅛"-5⅛"-5½"-5½"] K 1 row from WS at the same time dec 10-11-13-14 sts evenly = 46-48-52-54 sts. Continue in stockinette sts with WS out until complete measurement. When piece measures 16 cm [6¼"] inc 1 sts on each side on every 9 -4.5 -3.5 -3 cm [3½"-1 ¾"-1 ¼"-1⅛"] 5-9-11-13 times in total = 56-66-74-80 sts. When piece measures 56 cm [22"] bind off top shape sleeve top on each side on every other row: 4 sts 1-2-2-2 times. Continuing, bind off 2 sts on each side until piece measures approx 61-62-62-63 cm [24"-24⅜"-24⅜"-24 ¾"]. Then bind off 4 sts 1 time on each side. Piece measures approx 62-63-63-64 cm [24⅜"-24 ¾"-24 ¾"-25 ¼"]. Bind off remaining sts. Assembly: Sew circle tog in outermost edge of cast on sts and bind off edge. Sew in sleeves so seams under sleeve meet at middle of marking thread or stitch marker placed at bottom of armhole and middle of sleeve top meet marking thread or stitch marker placed on top of armhole. Sew sleeve seams. |
||||||||||||||||
Diagram explanations |
||||||||||||||||
|
||||||||||||||||
 |
||||||||||||||||
 |
||||||||||||||||
Have you finished this pattern?Tag your pictures with #dropspattern or submit them to the #dropsfan gallery. Do you need help with this pattern?You'll find 14 tutorial videos, a Comments/Questions area and more by visiting the pattern on garnstudio.com. © 1982-2026 DROPS Design A/S. We reserve all rights. This document, including all its sub-sections, has copyrights. Read more about what you can do with our patterns at the bottom of each pattern on our site. |
||||||||||||||||


With over 40 years in knitting and crochet design, DROPS Design offers one of the most extensive collections of free patterns on the internet - translated to 17 languages. As of today we count 324 catalogs and 12278 patterns - 12268 of which are translated into English (US/in).
We work hard to bring you the best knitting and crochet have to offer, inspiration and advice as well as great quality yarns at incredible prices! Would you like to use our patterns for other than personal use? You can read what you are allowed to do in the Copyright text at the bottom of all our patterns. Happy crafting!
Post a comment to pattern DROPS 102-6
We would love to hear what you have to say about this pattern!
If you want to leave a question, please make sure you select the correct category in the form below, to speed up the answering process. Required fields are marked *.