
Popular categories
Looking for a yarn?


Comments / Questions (32)
![]() Hanneke wrote:
Hanneke wrote:
Dank je wel !
28.08.2018 - 09:22
![]() Hanneke Spaans wrote:
Hanneke Spaans wrote:
Ik heb een vraag over het begin van het haken van de capuchon van het gehaakt mouwloos meisjes vest . Er staat begin middenvoor is dat dan beginnen op het linker of rechtervoorpand alvast bedankt groet Hanneke
26.08.2018 - 11:24DROPS Design answered:
Dag Hanneke, Ja dat klopt, dat is het begin van het rechter of linker voorpand.
27.08.2018 - 21:40
![]() Hanneke wrote:
Hanneke wrote:
Dus dan moet ik in de 2etoer 2stokjes overslaan , en hoe ga ik dan verder met de 3etoer
19.06.2018 - 16:18DROPS Design answered:
Dag Hanneke, De derde toer van M.1 is weer het zelfde als de tweede toer in het telpatroon. Zie diagram 1 onderaan bij het patroon.
20.06.2018 - 10:39
![]() Hanneke wrote:
Hanneke wrote:
Ik kan de instructie video van het patroon gehaakt mouwloos meisjes vest met capuchon niet vinden , ik snap de tel tekening niet goed
19.06.2018 - 11:00DROPS Design answered:
Dag Hanneke, Er is niet specifiek voor dit patroon een video. Bij het patroon staan wel meer algemene video's over hoe je mindert en delen aan elkaar haakt .e.d. Wat begrijp je precies niet? Op de eerste toer haak je steeds twee stokjes in de vaste van de vorige toer en sla je een vaste over. Op de 2e toer haak je steeds 2 stokjes tussen die 2 stokjes.
19.06.2018 - 15:47
![]() Hanneke wrote:
Hanneke wrote:
Heb ik het goed begrepen , dat het patroon met een dubbele draad wordt gehaakt
14.06.2018 - 22:50DROPS Design answered:
Dag Hanneke, Dat klopt inderdaad; het werk wordt met 2 draden Alpaca gebreid.
15.06.2018 - 15:23
![]() Daisy wrote:
Daisy wrote:
Bonjour Concernant les boutons.vos consignes concernent ils les 2 cotés. Cordialement Daisy
02.07.2016 - 06:47DROPS Design answered:
Bonjour Daisy, chaque housse de bouton se compose de 3 tours, on place ensuite le bouton à l'intérieur et on referme la housse en passant le fil autour des mailles du dernier tour. On doit faire ainsi 1 housse par bouton. Bon crochet!
04.07.2016 - 10:27
![]() Daisy wrote:
Daisy wrote:
Salut C'est encore moi. J'ai fait les 32 mailles.Mais pour la suite je m'y perd.on dit de faire comme le gilet.c'est à dire de faire le M1 ensuite le M2 et encore le M1 tout le tour? Merci.bonne journée
23.06.2016 - 04:09DROPS Design answered:
Bonjour Daisy, pour la capuche, on crochète uniquement en groupes de B = en suivant M.2. Bon crochet!
23.06.2016 - 08:57
![]() Daisy wrote:
Daisy wrote:
De bonjour Concernant la capuche, elle doit se faire en deux parties ? Les 32 groupes de B c'est à répartir entre les 2 parties? Merci pour tout
22.06.2016 - 16:11DROPS Design answered:
Bonjour Daisy, la capuche se fait tout le long de l'encolure, du bord devant droit jusqu'au bord du devant gauche (sur l'endroit) = 32 groupes de B d'un bord à l'autre de l'encolure devant de chaque côté. Bon crochet!
22.06.2016 - 18:26
![]() Daisy wrote:
Daisy wrote:
Merci beaucoup. Votre site est génial
22.06.2016 - 10:58
![]() Daisy wrote:
Daisy wrote:
Bonjour et merci pour votre réponse Pour le dos le modèle 5/6 ans. Après les 21 ms si je fais comme le dos au début je trouve 11 groupes de B pas 9. Comment faites vous pour trouver 9? Merci d'avance
21.06.2016 - 10:18DROPS Design answered:
Bonjour Daisy, il y avait quelques erreurs sous le devant gauche, il a été corrigé (cf onglet "correction" également) - on a 11 groupes de B en taille 5/6 ans après les 21 ms. Bon crochet!
21.06.2016 - 11:49
|
||||||||||
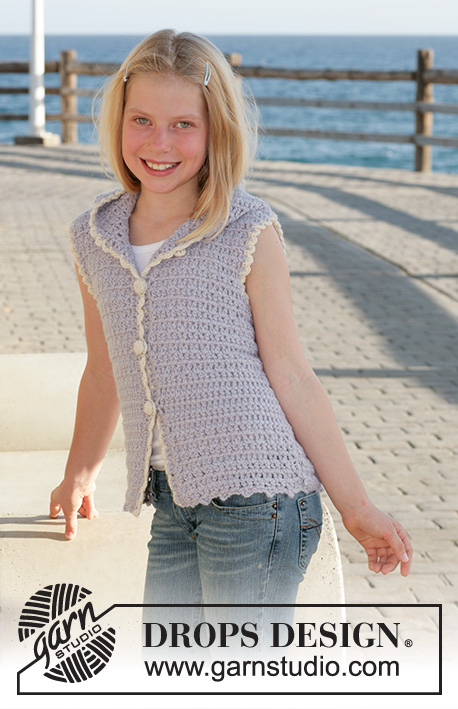
Lavender Rows#lavenderrowsvest |
||||||||||
 |
 |
|||||||||
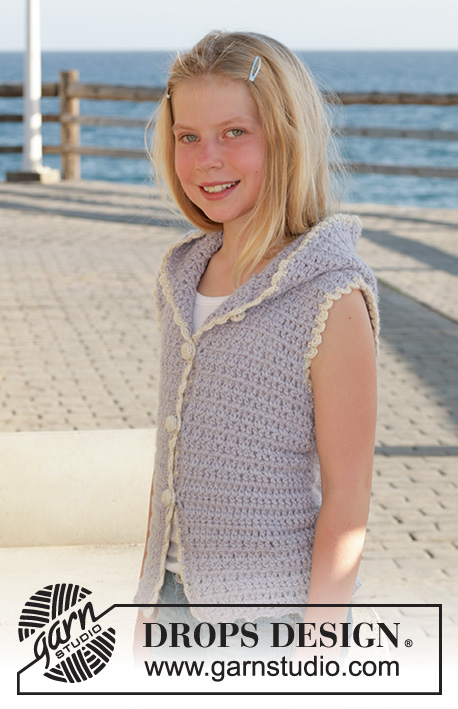
Crochet vest in DROPS Alpaca. Size children 5 to 14 years.
DROPS Children 15-9 |
||||||||||
|
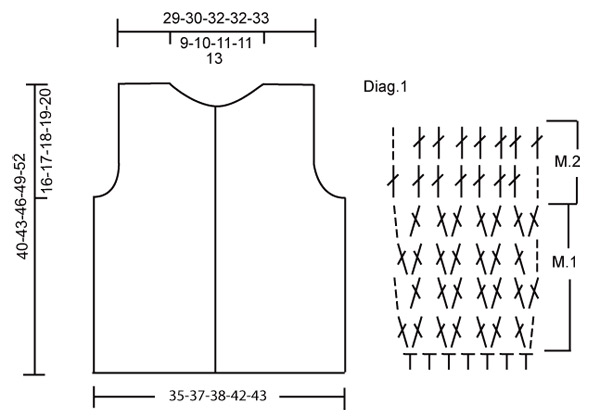
Crochet gauge: 6 dc groups in the width and 10 rows in the height using hook size 5 mm / H with 2 strands of Alpaca = 10 x 10 cm / 4" x 4" Crochet info: Substitute 1 dc at beg. of row with 3 ch. Finish each row with a dc in the 3rd ch from previous row. Binding off tips (apply for the armholes and the neck line): Bind off as follows at the beg. of row: Substitute 1 dc group with 1 sl st in each dc group. Bind off as follows at the end of row: Turn the piece when the number of dc-groups to be Bind off equals the number of remaining dc-groups on row. Diagram: See diagram M.1 and M.2 (drawing is for better understanding of pattern). The diagrams are shown from the RS. Back piece: Ch 72-74-49-86-88 (includes 1 ch to turn with) on hook size 5 mm / H/8 with 2 diagram s of light lilac. Read crochet info and see M.1 and M.2. Crochet 1st row as follows: Crochet 1 sc in the 2nd ch, then 1 sc in each of the next ch 2, *skip 3 ch and crochet 1 sc in the next 4 ch* repeat from *-* a total of 9-10-10-11-12 times. For size 5/6, 9/10 and 11/12 years finish the row as follows: skip ch 3, crochet 1 sc in each of the last 2 ch = 41-43-45-49-51 sc on row. Crochet 2nd row as follows: ch 3, 1 dc in the first sc *skip over 1 sc, 2 dc in the next sc*, repeat from *-* = 21-22-23-25-26 dc groups, turn. Crochet the 3rd row as follows: ch 3, 1 dc in the first dc, *skip over 1 dc, 2 dc between the 2 dc from previous row* (crochet around all of the st) Repeat from *-*. Continue M.1 until the work measures 10-10-11-12-13 cm / 4"-1"-4⅜"-4¾"-5⅛". Then crochet according to M.2 (1 dc in each dc) until the piece measures 17-17-19-20-22 cm / 6¾"-6¾"-7½"-8"-8¾". Continue according to M.1 and at the same time when the piece measures 24-26-28-30-32 cm / 9½"-10¼"-11"-11¾"-12½" bind off for the arm holes each side on every row as follows- read binding off tips 1 dc group a total of 2-2-2-3-3 times = 17-18-19-19-20 dc groups on row. Continue until the piece measures approx. 38-41-44-47-50 cm / 15"-16⅛"-17¼"-18½"-19¾" (now there are only 2 rows left until finish). Crochet 1 row with only 7 dc groups each side, on the next row crochet only over the 6 outer most dc groups (i.e do not crochet over the mid 3-4-5-5-6 dc groups = neckline). Fasten off, the piece measures approx. 40-43-46-49-52 cm / 15¾"-17"-18"-19¼"-20½". Left front: Ch 37-37-39-44-44 (including1 ch to turn with) using hook size 5 mm / H with 2 strands of light lilac. Read crochet info and see diagram M.1 and M.2 Crochet the first row as follows: Crochet 1 sc in the 2nd ch and then 1 sc in each of the next ch 2, *skip 3 ch and crochet 1 sc in they next 4 ch*. Repeat from *-* a total of 4-4-5-5-5 times. For size 5/6, 7/8, 11/12 and 13/14 years finish the row as follows: Skip ch 3, crochet 1 sc in each of the last 2 ch = 21-21-23-25-25 sc. Continue to crochet as for the back piece = 11-11-12-13-13 dc groups. Remember to crochet M.2 when the work measures 10-10-11-12-13 cm / 4"-1"-4⅜"-4¾"-5⅛" and M.1 again when piece measures 17-17-19-20-22 cm /6¾"-6¾"-7½"-8"-8¾". Bind off for armholes as done for the back piece = 9-9-10-10-10 dc groups. When the piece measures approx. 36-39-42-45-48 cm / 14¼"-15¼"-16½"-17¾"-19" bind off for the neck as follows: crochet only on the 7 dc groups at the side and on the next row bind off 1 dc group towards the neck – read casting/binding off tips above until 6 dc groups left for each shoulder. Cut the thread when the piece measures approx. 40-43-46-49-52 cm / 40-43-46-49-52 cm / 15¾"-17"-18"-19¼"-20½"'. Right front: Crochet as left front but reverse. Assembly: Sew the shoulder seams and the side seams in the outer most edge with small neat stitches. Crochet border: Crochet around the edges with hook size 5 mm/H and 2 strands of light lilac Alpaca Front edge: Beg. at the bottom of the right front corner and crochet approx 44-52 dc up along the front edge, cut the thread. Crochet dc down along the left front piece. Hood: Beg. at the mid front and crochet approx 32-36 dc groups around the neckline- also over the front edges. Now crochet dc groups as done for the sleeveless cardigan until the piece measures approx. 28-28-28-30-32 cm / 11"-11"-11"-11¾"-12½" and then fasten off. Double the hood and sew it tog. at the top with small neat stitches. Crochet edge: Crochet an edge around the cardigan with 2 strands of off white (this means up along one front piece, around the hood and down along the other front piece and around both arm holes, do not crochet at the bottom edge) as follows: 1 sc in the first st, *ch 3, 1 dc in the first of the 3 ch just crochet, skip approx 1 cm / ⅜", 1 sc in the next st*, and finish with a sl st in the first ch on beg. of round. Buttons: Crochet covers for 4-4-4-5-5 buttons using hook size 2 mm / B with 1 strand of off white Alpaca as follows: Ch 2, then crochet 16 dc in the first of the 2 ch and finish with a sl st at the top of the first dc (= 1 round). 2nd round: Crochet 1 sc in each dc and finish with 1 sl st in the first sc on round. 3rd round: Ch 3 and then 1 dc in every other sc and finish with 1 sl st in the 3rd ch at the beg. of round = 8 dc. Put button inside the cover and sew around the edge and pull tight . Sew the buttons on the left front piece. The top button should be approx 1 cm / ⅜" from the neckline and then 8 cm / 3⅛" in between, use the holes in the crochet edge as button holes. |
||||||||||
Diagram explanations |
||||||||||
|
||||||||||
 |
||||||||||
Have you finished this pattern?Tag your pictures with #dropspattern #lavenderrowsvest or submit them to the #dropsfan gallery. Do you need help with this pattern?You'll find 7 tutorial videos, a Comments/Questions area and more by visiting the pattern on garnstudio.com. © 1982-2026 DROPS Design A/S. We reserve all rights. This document, including all its sub-sections, has copyrights. Read more about what you can do with our patterns at the bottom of each pattern on our site. |
||||||||||


With over 40 years in knitting and crochet design, DROPS Design offers one of the most extensive collections of free patterns on the internet - translated to 17 languages. As of today we count 324 catalogs and 12290 patterns - 12280 of which are translated into English (US/in).
We work hard to bring you the best knitting and crochet have to offer, inspiration and advice as well as great quality yarns at incredible prices! Would you like to use our patterns for other than personal use? You can read what you are allowed to do in the Copyright text at the bottom of all our patterns. Happy crafting!
Post a comment to pattern DROPS Children 15-9
We would love to hear what you have to say about this pattern!
If you want to leave a question, please make sure you select the correct category in the form below, to speed up the answering process. Required fields are marked *.