
Popular categories
Looking for a yarn?


Comments / Questions (89)
![]() Marja wrote:
Marja wrote:
Olisiko mahdollista saada ohje piirrokset näkyville?
29.02.2024 - 19:41DROPS Design answered:
Nyt piirrokset avautuvat.
05.03.2024 - 17:35
![]() Marja wrote:
Marja wrote:
Miten piirrokset saa näkyville?
20.02.2024 - 09:20
![]() Marja wrote:
Marja wrote:
Hei. Piirrokset eivät näy nyt sivustolla. ei mallineuleet eikä kokokaaviot.
14.02.2024 - 10:31
![]() Lillemor wrote:
Lillemor wrote:
Det gjelder hatten igjen har dere forbuttet forklaringene på skråstrekrne over 3 masker. Det første kast og 2 smn. Nede i h hjørne skal vel lene til venstre og neste 2 smn og kast skal lene til høyre. Men det blir motsatt når jeg følger Tegnforklaringen
18.07.2023 - 19:53DROPS Design answered:
Hei Lillemor. Se vårt svar på ditt forrige spørsmål :) (om du ikke vil vente på en evnt rettesel fra Design avd., ville jeg ha strikket de ikonene motstatt av slik det står). mvh DROPS Design
26.07.2023 - 11:13
![]() Lillemor wrote:
Lillemor wrote:
Jeg ser på masketallet på hatten. Det bør vel være et multiplum av 12 + 2 kantmansker. Dere starter med 12 m differanse, men når man starter på M1 (b) så er det 16 m i differanse og ingen av tallene gir 2 kantmaster pluss et helt antall av rapporten. Skal det stå 98 m - 110 m (som gir 8-9 repetisjoner av mønsteret). I så fall er antall fellemasker feil. Jeg har sjekka rettelsene
18.07.2023 - 14:51DROPS Design answered:
Hei Lillemor Maskeantallet i den minste str. stemmer, men ikke den største str. Oppskriften er oversendt Design avd. slik at de kan dobbeltsjekke og evnt komme med en rettelse. De vil også sjekke diagramikonene i diagrammet. mvh DROPS Design
26.07.2023 - 10:45
![]() Debbie wrote:
Debbie wrote:
Hi- after you garter st 7 stitches b4 & after st marker for armhole & binding - the decrease starts but there is no mention of the garter st cont around the armholes- so why garter?
21.05.2023 - 19:21DROPS Design answered:
Dear Debbie, you have knitted 7 stitches in garter stitch on each side of the marker (14 stitches on each armhole). Then, you cast off the middle 6 stitches on each armhole, so you will have 4 stitches in garter stitch towards the armholes on each side of each armhole. As you can see in the back piece and front piece, you will continue working these 4 stitches in garter stitch until they have been decreased. The garter stitch is used just for the edge of the armhole, so that the edge will not be rolled. Happy knitting!
21.05.2023 - 20:08
![]() Roosa wrote:
Roosa wrote:
Hei! Hatun ohjeessa (korjauksessa) lukee näin: "Kun olet neulonut M.1:n mukaan kerran korkeudessa, jatka neulomalla ainaoikeaa lopulliseen mittaan asti. Kun työn korkeus on 14-16 cm, kiinnitä 8-9 merkkilankaa työhön oikealta puolelta näin:" Mistä tuo korkeus 14-16cm mitataan? Luomisreunasta, vai siitä, kun kuvio loppuu ja jatketaan neulomalla ainaoikeaa? Kiitokset jo etukäteen!
09.05.2023 - 10:26DROPS Design answered:
Hei, korkeus mitataan luomisreunasta.
10.05.2023 - 17:16
![]() Nicole Vena wrote:
Nicole Vena wrote:
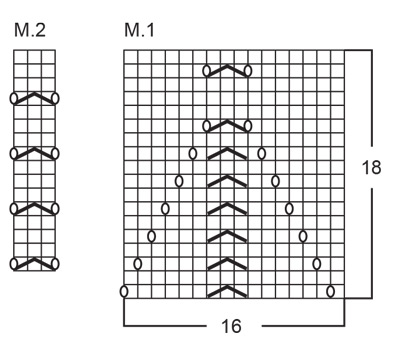
With there being 2 M.1 diagrams, when do you know to do M.1a and M.1b? I've read the pattern multiple times and it never tells you which one to use only M.1. I will be making the 9-10 size.
02.05.2023 - 23:45DROPS Design answered:
Dear Mrs Vena, diagram M.1a is worked for the top and diagram M.1b is worked for the hat. Happy knitting!
03.05.2023 - 08:01
![]() Nadège wrote:
Nadège wrote:
Bonjour, Pour les diminutions dos/devant doit-on faire la première diminutions tout de suite après M1 puis la seconde 10 cm après ou alors la première diminution doit-elle se faire 10 cm après M1 et la seconde 10 cm après ? Merci pour votre retour
29.03.2023 - 08:44DROPS Design answered:
Bonjour Nadège, la 1ère diminution se fait juste après M.1 et la suivante 10 cm après la 1ère. Bon tricot!
29.03.2023 - 10:22
![]() Lotte wrote:
Lotte wrote:
Jeg vil strikke hatten i model Kaya. Men vil gerne flette to farver garn sammen . Kan jeg fortsat bruge Muscat, eller skal jeg skifte til et andet garn (så snoren ikke bliver for tyk)??
19.03.2023 - 12:16DROPS Design answered:
Hei Lotte. 2 tråder Muskat vil bli for tykt for denne oppskriften. Vi har dessverre ingen lignende oppskrift der du kan bruke 2 tråder Muskat. mvh DROPS Design
20.03.2023 - 13:38
|
|||||||||||||||||||
Kaia#kaiatop |
|||||||||||||||||||
 |
 |
||||||||||||||||||
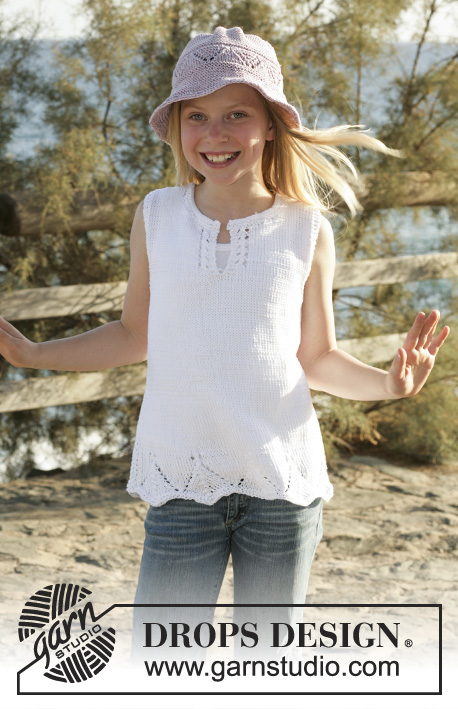
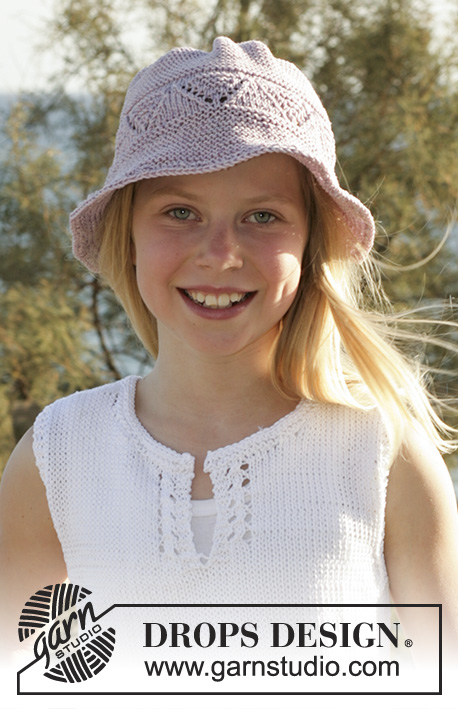
Knitted top and hat with lace pattern, in DROPS Muskat or DROPS Belle. Size children 5 to 14 years.
DROPS Children 15-6 |
|||||||||||||||||||
|
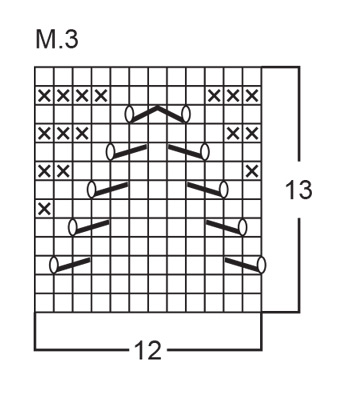
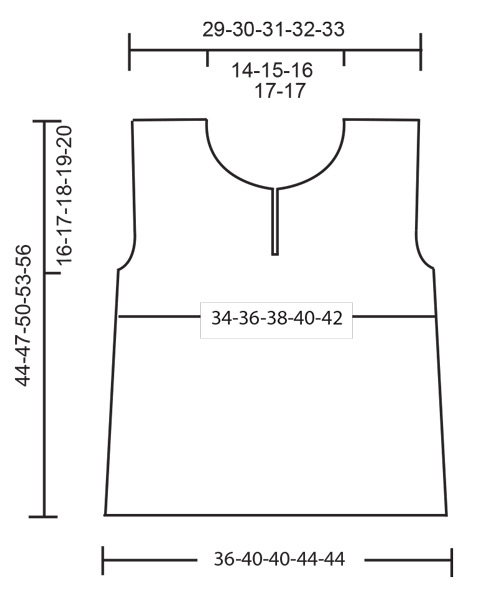
TUNIC: Pattern: See diagrams M.1 and M.2. The diagrams show all rows in pattern seen from RS. Garter sts round on needle: 1st round: K, 2nd round: P Garter sts back and forth: Knit on all rows. Decreasing tips (apply for the arm hole): All decreases are done from the RS. Dec as follows for the arm holes inside 4 garter sts: Before 4 garter sts: K2 tog. After 4 garter sts: slip a st as if to knit, K1, psso. BACK AND FRONT PIECE Work in the around. Bend the circular needle double (or use 2 needles) and cast on 144-160-160-176-176 sts around 2 needles with Muskat or "Belle"(this will make the casting on edge more elastic). Pull out one needle. Insert a marker at the beg. of round and a marker after 72-80-80-88-88 sts (= the sides). K1 round, P1 round, K1 round, P 1 round and then continue according to diagram M.1 – see explanation above. When M.1 is completed in 1 vertical repeat continue in stockinette sts over all sts. At the same time start dec 1 st each side of the markers, repeat dec on every 10-6-15-7-15 cm / 4"-2⅜"-6"-2¾"-6" a total of 2-4-2-4-2 times (= 4 dec per round) = 136-144-152-160-168 sts. When the piece measures 27-29-31-33-35 cm / 10⅝"-11⅜"-12¼"-13"-13¾" work 2 round of garter sts over 14 sts each side (7 sts each side of the marker) and rem sts as before. On the next round bind off the mid 6 sts for the arm holes each side. Now continue each part separately. BACK PIECE = 62-66-70-74-78 sts. Continue with 4 garter sts towards the armholes. Start dec 1 sts for the armholes each side on every other row – read decreasing tips: 2-3-4-5-6 times = 58-60-62-64-66 sts. When the piece measures 42-45-48-51-54 cm / 16½"-17¾"-19"-20"-21¼" bind off the mid 26-28-30-32-32 sts for the neck and work each side separately. Continue and bind off 1 st in beg of next row from neck = 15-15-15-15-16 sts left for shoulder. Bind off when the piece measures 44-47-50-53-56 cm / 17¼"-18½"-19¾"-21"-22". FRONT PIECE = 62-66-70-74-78 sts. Continue with 4 garter sts towards the arm holes and dec for armholes each side as done for the back piece. At the same time when the piece measures 30-32-34-36-38 cm / 11¾"-12½"-13⅜"-14¼"-15" work 2 rows of garter sts over thee mid 6 sts (work rem sts as before). On the next row put half of the sts on a stitch holder and finish each side separately. Side-1: Continue the dec. for the armhole. Knit 4 garter sts at the side and 3 garter sts towards the slit. Inside the 3 garter sts for the slit work according to diagram M.2. When the piece measures 39-42-44-47-49 cm / 15¼"-16½"-17¼"-18½"-19¼" put 8-9-10-11-11 sts at the mid front on a stitch holder for the neck. Then bind off for the neck on every row starting from neck as follows: 2 sts 2 times and 1 st 2 times = 15-15-15-15-16 sts left for shoulder. Bind off when piece measures 44-47-50-53-56 cm / 17¼"-18½"-19¾"-21"-22". Side -2: Put sts from the stitch holder back on needle. Work as side-1 but reverse. ASSEMBLY Sew the shoulder seams. NECK EDGE Pick up approx. 66-82 sts (including the sts from the stitch holder) around the neck on circular needles size 4.5 mm / US 7. K4 rows of garter sts back and forth with opening mid front. Bind off loosely. -------------------------------------------- Knitted hat with pattern in DROPS Muskat Pattern: See diagram M.3. Diagram are showing every row in pattern seen from RS. 1 row = RS. Garter sts back and forth: Knit all rows. ---------------------------------------- HAT: Work back and forth on needle. Cast on 133-145 sts loosely (includes 1 edge st each side) on needle size 3 mm / US 2.5 with Muskat and work in garter sts. When piece measures 5 cm / 2" dec 35-35 sts evenly by K2 tog approx every 3rd -4th sts = 98-110 sts. Continue in garter st for 1 cm / ½", then work following diagram M.3 with 1 edge st each side in garter st. After M.3 is worked 1 time in height continuing in garter sts until piece is completed. When piece measures 14-16 cm / 5½"-6¼" insert 8-9 markers in piece from RS as follows: K 2-2, insert 1 marker, * K12, insert 1 marker *, repeat from *-* 7-8 times in total. After last marker there are 12-12 sts left on row, K these sts. Next row from WS: K all sts. Continue in garter st, and on every row from RS dec 1 st on left side of all markers a total of 11 times = 10-11 sts left on row. Cut and pull the yarn end through remaining sts and sew away tight. Sew hat tog mid back in outermost part of outer most sts to make a neat seam. Hat measures approx 19-21 cm / 7½"-8¼" in height. Attach 1 thin steel wire along the casting on edge of hat: On hooks size 3 mm / C crochet 1 round with sc around steel wire + casting on edge, this is done to make hat firm at bottom edge. |
|||||||||||||||||||
Diagram explanations |
|||||||||||||||||||
|
|||||||||||||||||||
 |
|||||||||||||||||||
 |
|||||||||||||||||||
 |
|||||||||||||||||||
Have you finished this pattern?Tag your pictures with #dropspattern #kaiatop or submit them to the #dropsfan gallery. Do you need help with this pattern?You'll find 19 tutorial videos, a Comments/Questions area and more by visiting the pattern on garnstudio.com. © 1982-2026 DROPS Design A/S. We reserve all rights. This document, including all its sub-sections, has copyrights. Read more about what you can do with our patterns at the bottom of each pattern on our site. |
|||||||||||||||||||


With over 40 years in knitting and crochet design, DROPS Design offers one of the most extensive collections of free patterns on the internet - translated to 17 languages. As of today we count 324 catalogs and 12290 patterns - 12280 of which are translated into English (US/in).
We work hard to bring you the best knitting and crochet have to offer, inspiration and advice as well as great quality yarns at incredible prices! Would you like to use our patterns for other than personal use? You can read what you are allowed to do in the Copyright text at the bottom of all our patterns. Happy crafting!
Post a comment to pattern DROPS Children 15-6
We would love to hear what you have to say about this pattern!
If you want to leave a question, please make sure you select the correct category in the form below, to speed up the answering process. Required fields are marked *.