
Popular categories
Looking for a yarn?


Comments / Questions (68)
![]() L J MCTAVISH wrote:
L J MCTAVISH wrote:
Do I switch from M2 to M3 as soon as l get to decreasing for the neckline or continue M2 all rows of M2 have been completed
14.11.2019 - 06:24DROPS Design answered:
Hi LJ, You continue with M2 until all the rows have been completed before starting M3. Happy knitting!
14.11.2019 - 07:16
![]() L J MCTAVISH wrote:
L J MCTAVISH wrote:
I don't understand how to decrease for the neckline. It says to decrease within first 7 band stitches. So how do you do that without loosing the band. Does the first stitch after the band then become the last band stitch? And how does the pattern work with the missing decreased stitches
14.11.2019 - 04:06DROPS Design answered:
Hi again LJ, You increase on the main part of the body (not on the band) so either just after or just before the band. Happy knitting!
14.11.2019 - 07:18
![]() Bitha wrote:
Bitha wrote:
Ich bin gerade bei den Abnahmen für den Hals angekommen und habe einen Knoten im Kopf: Wie soll ich die Angabe "bei jeder 2. Reihe 1 M ... und bei jeder 4. R 9 Mal" verstehen? Also bei jeder 2 R rechts und links 1 M (muss ja so, damit es symmetrisch wird). Aber jede 4. R auch noch? Dann habe ich ja jede 4. R 2 Abnahmen. Richtig so?
21.02.2019 - 11:13DROPS Design answered:
Liebe Bitha, für den Hals nehmen Sie so ab: 1 M in jeder 2. Reihe 9 -11-13 Mal (= *1 Reihe mit Abnahme, 1 Reihe ohne Abnahme* von *-* 8-10-12 Mal wiederholen, dann 1 Reihe mit Abnahme = 9-11-13 M wurden beidseitig abgenommen), dann *3 Reihe ohne Abnahme, 1 Reihe mit Abnahme * von *bis* 9 Mal wiederholen. Viel Spaß beim stricken!
21.02.2019 - 11:24
![]() Yvette wrote:
Yvette wrote:
Bonjour moi je suis a faire le modèle 101-32 je suis rendu a la fin de M 2 et en étant que je n'ai pas de grille pour les diminutions je suis bloqué, pourriez vous m'aider S.V.P. Merci
22.01.2018 - 15:46DROPS Design answered:
Bonjour Yvette, tricotez maintenant M3 et diminuez comme indiqué pour l'encolure et pour les emmanchures, quand vous tricotez le point ajouré et les diminutions, assurez-vous de bien avoir le bon nombre de mailles (dans le point ajouré 1 jeté doit compenser 1 diminution). Tricotez en jersey les mailles qui ne peuvent plus se tricoter dans le point ajouré. Bon tricot!
22.01.2018 - 18:02
![]() Chantal Ouellet wrote:
Chantal Ouellet wrote:
Quelle différence y a-t-il entre une maille endroit et une maille au point mousse ?
30.03.2015 - 13:26DROPS Design answered:
Bonjour Mme Ouellet, la m end va se tricoter à l'env sur l'env (et la m env à l'end sur l'env) - la m point mousse se tricote à l'endroit à chaque rang. Bon tricot!
30.03.2015 - 16:03
![]() Tricia wrote:
Tricia wrote:
I got it! It's one continuous piece! So when it says back piece: = 109 sts is that when the armholes separate the back from the front sides?
18.06.2014 - 16:08DROPS Design answered:
Dear Tricia, you are correct, back and both front pieces are worked on the same needle until armholes, then each piece is worked separately, ie you will have 109 sts for back piece. Happy knitting!
18.06.2014 - 18:17
![]() Tricia wrote:
Tricia wrote:
The initial cast on says 238 for an XL, is that for the back and both front pieces? Do they all start with the same CO? I didn't see a different CO for the back and front panels. I don't know why I'm confused, but I am.
18.06.2014 - 15:00
![]() Karin wrote:
Karin wrote:
Bei Mustersatz M4 hat sich irgentwo ei Fehler eingeschlichen.Kann mir jemand weiterhelfen? Würde das Jäckchen gerne nachstricken,
31.05.2014 - 05:58DROPS Design answered:
Liebe Karin, ich kann keinen Fehler finden. Zunahmen (Umschläge) und Abnahmen gleichen sich immer aus. Sie stricken M.4 ja am Ärmel, erst M.4A (9 M), dann M.4B (18 M) und zuletzt M.4C (10 M). Für Größe M passt der Mustersatz M.4B 2,5x, für Größe M und L passt M.4B 3x und für Größe XL und XXL passt M.4B 3,5x in der Breite über die Ärmel-M.
31.05.2014 - 10:35
![]() Marlene wrote:
Marlene wrote:
I just left a comment about pattern M.1b being 17 stitches, then went back to the pattern and realized what I thought was the center 4 stitches is actually 3 stitches. It's no fun being old and near-sighted!
24.03.2014 - 23:28
![]() Marlene wrote:
Marlene wrote:
Cast on, decreases on row one, and number of stitches done in pattern M.1b are incorrect. They are based on a 16 stitch repeat, and M.1b is 17 stitches.
24.03.2014 - 23:00
|
||||||||||||||||
Seaside Affair#seasideaffaircardi |
||||||||||||||||
|
|
||||||||||||||||
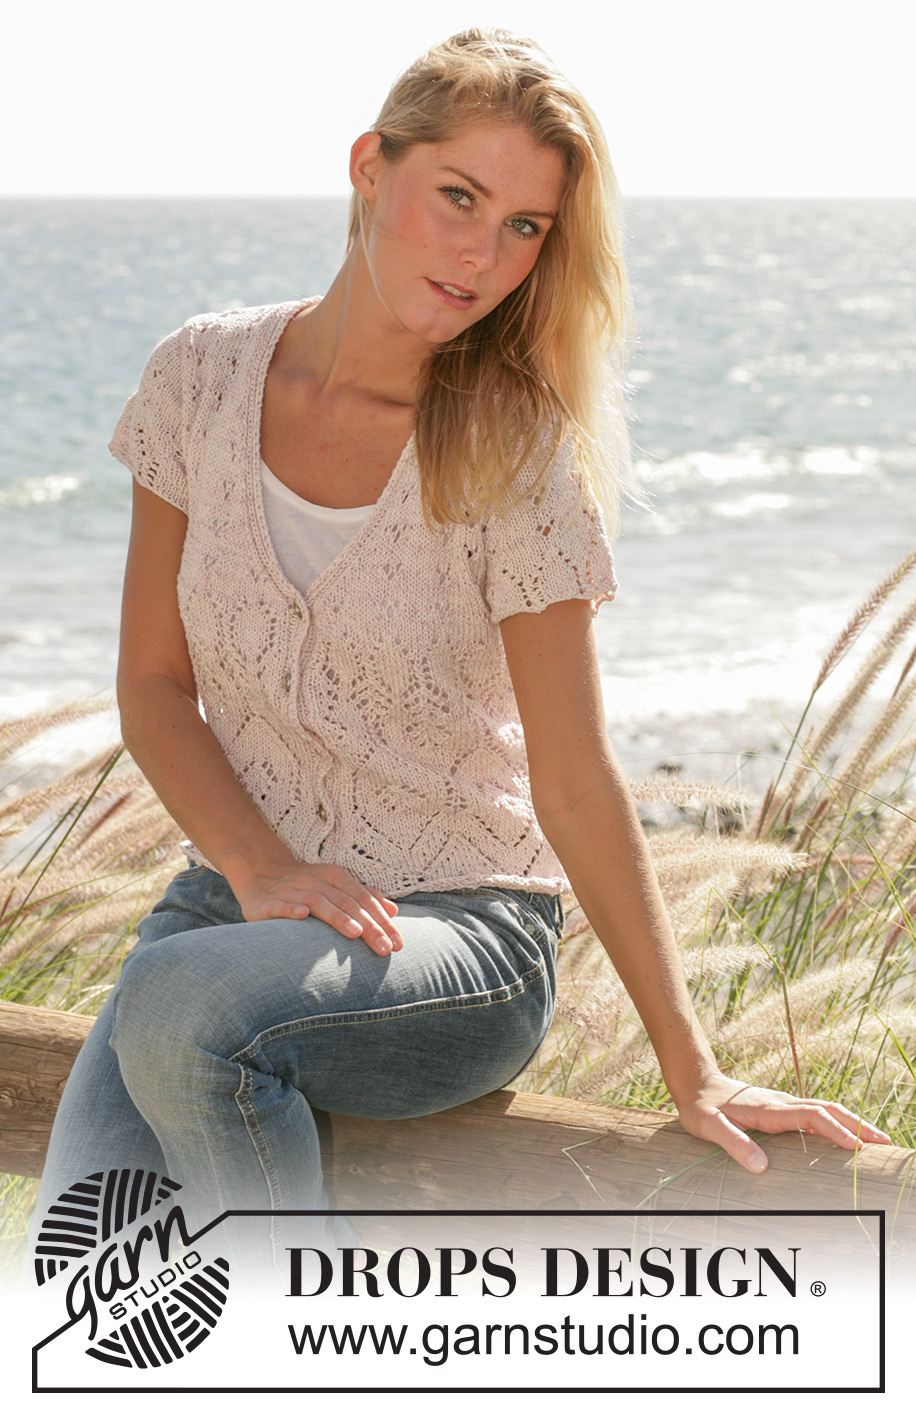
DROPS Jersey with short sleeve, V-neck and lace pattern in “Muskat”
DROPS 101-32 |
||||||||||||||||
|
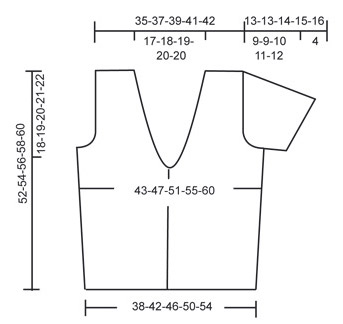
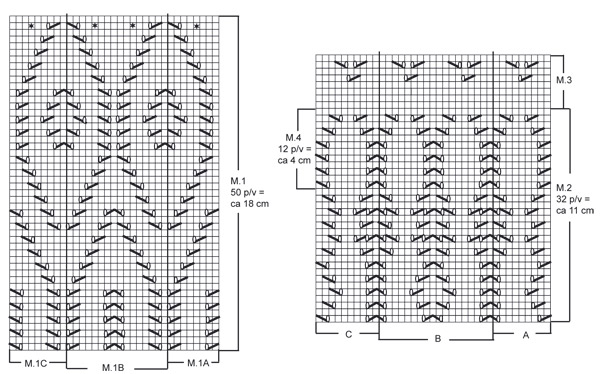
Knitting gauge: 21 sts x 28 rows on needle size 4 mm / US 6 with Muscat in stockinette sts = 10 x 10 cm / 4" x 4" Front band: Work front edge as follows from the edge (viewed from RS): K1 in garter st on all rows, K1, P2, K1, P2, K1. Pattern: Diagram M.1 to M.4. Diagrams are seen from RS. Decreasing tip (applies to neckline): Dec from RS within 7 first band sts on each side Dec as follows after 7 sts: Slip 1 sts as if to knit, K1, psso. Dec as follows before 7 sts: K2 tog Note: Knit sts that cannot be incorporated into diagram during dec. in stockinette sts Buttonholes: Bind off for buttonhole on right front band. 1 buttonhole = K 5th and 6th sts tog from mid front, make a yo. Bind off for buttonhole when piece measures: Size S: 4, 10, 16, 22 and 28 cm / 1½",4",6¼",8¾" and 11" Size M: 4, 11, 17, 23 and 29 cm / 1½",4⅜",6¾",9" and 11⅜". Size L: 4, 11, 17, 24 and 30 cm / 1½",4⅜",6¾",9½" and 11¾". Size XL: 4, 11, 18, 25 and 31 cm / 1½",4⅜",7",9¾" and 12¼". Size XXL: 4, 11, 18, 25 and 32 cm / 1½",4⅜",7",9¾" and 12½". ___________________________________________________________________ Back and front pieces: Work piece back and forth on circular needles from mid front. Cast on 187-204-221-238-255 sts loosely (includes 8 front band sts on each side) on circular needles size 4 mm / US 6 and K2 rows – at the same time dec 10-11-12-13-14 sts evenly on 1st row = 177-193-209-225-241 sts. Continuing, work next row as follows (from RS): 8 front band sts – see explanation above, diagram M.1A (= 8 sts), M.1B over 144-160-176-192-208 sts, M.1C (= 9 sts) and 8 front band sts. Continue pattern. NOTE: Remember buttonhole on right front band – see explanation above. On second last row of M.1 inc 20-22-24-26-28 sts as shown on diagram = 197-215-233-251-269 sts. Then work M.2 as follows: 8 front band sts as before, A (= 9 sts), B over 162-180-198-216-234 sts, C (= 10 sts) and front band as before. After M.2 piece measures approx 29 cm / 11½" – insert 1 marker in 54th-58th-63rd-67th-72nd sts from each side. Read entire section before knitting commences! Continue with M.3 until complete measurement is reached. Neckline: At the same time when piece measures 29-30-31-32-33 cm / 11⅜"-11¾"-12¼"-12½"-13" dec for neckline each side at front edges – see Decreasing tip: Dec 1 sts on every other row 9-9-11-11-13 times and then on every 4th row 9 times. Armholes: At the same time when piece measures 34-35-36-37-38 cm / 13⅜"-13¾"-14¼"-14½"-15" bind off 9 sts on each side for armhole (= sts with marker + 4 sts on each side of this). Complete back and front piece separately. Back piece: = 81-91-99-109-117 sts. Bind off for armholes each side on every other row: 3 sts 0-1-1-1-1 times, 2 sts 1-1-2-3-3 times and 1 st 2-2-2-3-5 times = 73-77-81-85-89 sts left on row. Continue with M.3 – work sts that cannot be incorporated into diagram in stockinette sts, there should be at least 2 sts stockinette sts outside 1 pattern repeat each side. When piece measures approx 49-51-53-55-57 cm / 19¼"-20"-21"-21⅝"-22½" – stop after at least 2 rows stockinette sts – bind off 31-33-35-37-39 sts for neck. and bind off 1 sts to shape neckline on every other row 2 times = 19-20-21-22-23 sts left on each shoulder. Bind off when piece measures 52-54-56-58-60 cm / 20½"-21¼"-22"-22¾"-23½". Right front piece: Continue dec for neckline– at the same time bind off for armhole at side like back piece. After all dec there are 27-28-29-30-31 sts on shoulder. When piece measures 52-54-56-58-60 cm / 20½"-21¼"-22"-22¾"-23½" bind off 19-20-21-22-23 sts from shoulder side towards the neck for shoulder. Continue working over the remaining 8 front band sts for 8-8-9-9-9 cm / 3⅛"-3⅛"-3½"-3½"-3½", slip sts onto a stitch holder. Sew edge to back piece afterwards, do not work further than indicated as edge is easily stretched when sewing it on. Left front piece: Work like right but reversed. Sleeve: Work sleeve back and forth on needles. Cast on 71-81-81-91-91 sts (includes 1 edge st on each side) on needle size 4 mm / US 6 and K2 rows – at the same times on 1st row dec 5-6-6-7-7 sts evenly = 66-75-75-84-84 sts. Continue with M.4 as follows: 1 edge st, A (= 9 sts), B over 45-54-54-63-63 sts, C (= 10 sts) and 1 edge st. After M.4 continue with M.3 at the same time bind off to shape sleeve cap on each side on every other row: 3 sts 1 time, 2 sts 2 times, 1 sts 7-7-8-9-11 times, continuing bind off 2 sts on each side until piece measures 12-12-13-14-15 cm / 4¾"-4¾"-5⅛"-5½"-6", then bind off 3 sts 1 time on each side. Bind off when piece measures 13-13-14-15-16 cm / 5⅛"-5⅛"-5½"-6"-6¼". Assembly: Sew 2 edges from front piece tog with crafting sts. Sew band neatly for neckline on back – remember to stretch slightly. Sew shoulder seams and sleeve seams and sew in sleeves. Sew on the buttons. |
||||||||||||||||
Diagram explanations |
||||||||||||||||
|
||||||||||||||||
 |
||||||||||||||||
 |
||||||||||||||||
Have you finished this pattern?Tag your pictures with #dropspattern #seasideaffaircardi or submit them to the #dropsfan gallery. Do you need help with this pattern?You'll find 14 tutorial videos, a Comments/Questions area and more by visiting the pattern on garnstudio.com. © 1982-2026 DROPS Design A/S. We reserve all rights. This document, including all its sub-sections, has copyrights. Read more about what you can do with our patterns at the bottom of each pattern on our site. |
||||||||||||||||


With over 40 years in knitting and crochet design, DROPS Design offers one of the most extensive collections of free patterns on the internet - translated to 17 languages. As of today we count 324 catalogs and 12291 patterns - 12281 of which are translated into English (US/in).
We work hard to bring you the best knitting and crochet have to offer, inspiration and advice as well as great quality yarns at incredible prices! Would you like to use our patterns for other than personal use? You can read what you are allowed to do in the Copyright text at the bottom of all our patterns. Happy crafting!
Post a comment to pattern DROPS 101-32
We would love to hear what you have to say about this pattern!
If you want to leave a question, please make sure you select the correct category in the form below, to speed up the answering process. Required fields are marked *.