
Popular categories
Looking for a yarn?


Comments / Questions (62)
![]() Ingrid wrote:
Ingrid wrote:
Muito lindo esse modelo
31.05.2021 - 03:37
![]() Manuel Carranco De Huelva wrote:
Manuel Carranco De Huelva wrote:
Hola de nuevo. Podéis quitar del tablón el comentario anterior porque he cometido un error y contestarme en privado? Gracias de antemano.
07.08.2020 - 13:50DROPS Design answered:
Hola Manuel. No contestamos en privado, ni tampoco hacemos patrones personalizados. En tu caso la medida es de 25 cm, trabajando un poco más prieto puedes disminuir algunos mm. El tamaño de pompón depende del molde que estés usando. Las máquinas para hacer pompones vienen con varios tamaños.
16.08.2020 - 17:28
![]() Manuel Carranco De Huelva wrote:
Manuel Carranco De Huelva wrote:
Hola. Las puedes de hacer de 24.5 cm y con el pompom más grande? Gracias. Mi dueña es muy exigente y las quiere así exactamente.
07.08.2020 - 13:32DROPS Design answered:
Ver la respuesta arriba.
16.08.2020 - 17:30
![]() Raquel wrote:
Raquel wrote:
Estoy intentando hacer las pantuflas, pero no con las instrucciones ni con el vídeo me apaño. ¿Habría la posibilidad de tener un patrón dibujado? En caso de no poder, agradecería si me pudierais dar más detalles de las vueltas y puntos.
17.10.2019 - 21:08DROPS Design answered:
Hola Raquel. Este patrón no tiene diagrama. Se comienza en la punta del pie y se trabaja en redondo hasta el empeine. A partir de aquí se trabaja de ida y vuelta desde el centro del empeine para formar el talón. Al terminar se hace la costura en el centro posterior y se trabaja la parte de la pierna. Puedes acercarte a una tienda especializada DROPS o contactar por teléfono o e-mail para obtener más ayuda.
17.10.2019 - 21:19
![]() Kajsa Claesson wrote:
Kajsa Claesson wrote:
Jag har provat både och men får de ändå inte att stämma. Gjorde lösare efter första gången då de blev trångt.
10.11.2016 - 16:18
![]() Kajsa Claesson wrote:
Kajsa Claesson wrote:
Hej ! Hela toffeln blir alldeles för smal får inte på den på foten. Vad gör jag för fel? /Kajsa
10.11.2016 - 16:15DROPS Design answered:
Hej Kajsa. Har du set mit svar til dig herunder?
10.11.2016 - 16:17
![]() Kajsa Claesson wrote:
Kajsa Claesson wrote:
Hej ! Hela toffeln blir alldeles för smal får inte på den på foten. Vad gör jag för fel? /Kajsa
09.11.2016 - 20:58DROPS Design answered:
Hej Kajsa. Haekler du for stramt (stemmer din haeklefasthed)?
10.11.2016 - 13:02
![]() Cheryl wrote:
Cheryl wrote:
I still do not understand what it means to divide the piece and crochet back and forth
03.11.2015 - 21:16DROPS Design answered:
Dear Cheryl, when you have worked in the round until you have reached the stated measurement for your size, do not work in the round anymore, but work in rows, ie at the end of next row, do not join with a sl st at the beg of row, but turn and work next row from WS. At the end of next row, turn and work next row from RS. Continue like this working alternately from RS and WS, this will create the opening for leg. When you have reached the final measurement for slipper, fold last row double and crochet tog 1 row in both layers (mid back on heel). Happy crocheting!
04.11.2015 - 09:11Deemah wrote:
Hello it's a nice pattern but would you do a video for it please because so many things I didn't understand it please do a video it good when we see some one works !?
18.10.2014 - 14:34DROPS Design answered:
Dear Deemah, you will find several relevant videos to this pattern on the right side of the picture under tab "video". You start on the toe working in the round, then continue back and forth (for the opening of leg), then crochet tog the mid back. Finish then crocheting in the round around the opening of leg for the cuff. Happy crocheting!
20.10.2014 - 10:00
![]() Roxanne Stowell wrote:
Roxanne Stowell wrote:
How do I download the pattern?
07.08.2014 - 00:40DROPS Design answered:
Dear Mrs Stowell, click on the "print" button to either print it with a printer or save it with a virtual pdf printer. Happy crocheting!
07.08.2014 - 10:15
|
|
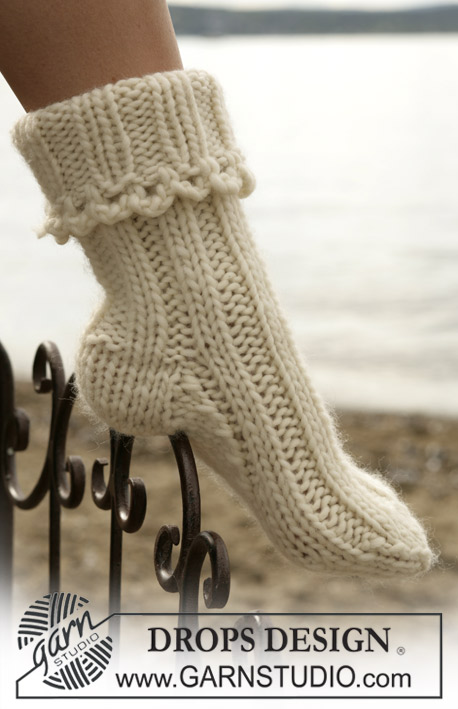
Pom Pom Adore Slippers |
|
|
|
|
DROPS Crochet slippers in Snow
DROPS 98-7 |
|
|
Crochet gauge: 11 sc = 10 cm [4"] in the width. Crochet info: Substitute the first sc at the beginning of round/row with 1 ch. Finish each round with 1 sl st in the ch from beg of previous round (1 sl st in the ch from beg of previous row when crocheting back and forth). Foot: Beginning with the toe, crochet in Snow and hook size 8 mm [US L/11] as follows: 1st round: Crochet 3 ch and make a loop with a sl st in the first ch. 2nd round: Crochet 5-5-6 sc around the loop – read crochet info! 3rd round: 2 sc in each sc = 10-10-12 sc. 4th round: *1 sc in the first sc, 2 sc in the next sc*, repeat from *-* = 15-15-18 sc. 5th – 7th round: Crochet 1 sc in each sc. 8th round: *1 sc in the first sc, 1 sc in the second sc and 2 sc in the third sc*, repeat from *-* = 20-20-24 sc. Continue to crochet 1 sc into each sc until the piece measures approx 11-13-14 cm [4,4"- 5,1"- 5½"]. Heel: Now divide the piece and crochet back and forth from the centre top of the foot – remember crochet info – 1 sc into each sc. When the slipper measures approx 22-25-28 cm [8,75"- 9,75"- 11"] place it flat and crochet it tog at the centre back with a row of sc through both layers. Cut the thread and sew. Leg: Crochet 1 round of sc round the opening of the slipper (beginning at the centre front). Continue around with 1 sc in each sc until the leg measures 11 cm [4,4"], continue to crochet back and forth from the centre front as follows: 1st row: Turn the piece and crochet back until 1 sc left (which should be left un-worked from now on). 2nd row: Turn the piece and crochet back over the sts from previous row until 1 sc left (which should be left un-worked from now on) = 2 sts at the centre front. 3rd row: Turn the piece and crochet over the sts from previous row. Cut the thread. Continue to crochet around the edge of the leg in Puddel as follows. 1st round: 1 sc in each sc around all of the leg (incl the slit at the centre front). Finish with a sl st in the first sc. 2nd round: *3 ch, 1 sc in the following sc*, repeat from *-*, and finish with a sl st in the first ch from beg of round. Cut the thread. Assembly: Make a pompom with a diameter of 5 cm [2"] in Puddel (please see Garnstudio’s School of Handicraft on the pattern front page). Sew the pompom to the slipper at the centre front between the leg and the foot. |
|
Have you finished this pattern?Tag your pictures with #dropspattern or submit them to the #dropsfan gallery. Do you need help with this pattern?You'll find 9 tutorial videos, a Comments/Questions area and more by visiting the pattern on garnstudio.com. © 1982-2026 DROPS Design A/S. We reserve all rights. This document, including all its sub-sections, has copyrights. Read more about what you can do with our patterns at the bottom of each pattern on our site. |


With over 40 years in knitting and crochet design, DROPS Design offers one of the most extensive collections of free patterns on the internet - translated to 17 languages. As of today we count 324 catalogs and 12290 patterns - 12280 of which are translated into English (US/in).
We work hard to bring you the best knitting and crochet have to offer, inspiration and advice as well as great quality yarns at incredible prices! Would you like to use our patterns for other than personal use? You can read what you are allowed to do in the Copyright text at the bottom of all our patterns. Happy crafting!
Post a comment to pattern DROPS 98-7
We would love to hear what you have to say about this pattern!
If you want to leave a question, please make sure you select the correct category in the form below, to speed up the answering process. Required fields are marked *.