
Popular categories
Looking for a yarn?


Comments / Questions (185)
![]() Muriel wrote:
Muriel wrote:
Bonjour, je ne comprends pas comment tricoter les 4 augmentations de chaque côté des marqueurs en suivant M2 svp? Ça ne suit plus le dessin du coup? Merci d'avance.
30.11.2020 - 22:08DROPS Design answered:
Bonjour Muriel, quand on va augmenter le nombre de mailles du devant et du dos, on doit augmenter le nombre de mailles du motif M.2 tricoté sur les côtés, donc effectivement, le diagramme ne se suivra plus sur les côtés, mais ce qui est important est de bien le continuer correctement sur les 2 faces dos et devant. Bon tricot!
01.12.2020 - 09:54
![]() RIVET Claude-luc wrote:
RIVET Claude-luc wrote:
Bonjour,je serais interessé par l'achat de se modèle.pourriez vous me fournir le prix
25.11.2020 - 16:13DROPS Design answered:
Bonjour Mr Rivet, merci de bien vouloir vous adresser à l'un de nos magasins en France - voir la liste ici.
25.11.2020 - 16:47
![]() Jeanett wrote:
Jeanett wrote:
Er ved halslukning. Hvordan strikkes der fra midt foran, der er jo lukket til hals og jeg har start ved skulder, så der blir rod i indtagninger til raglan. Nogen vil blive fra bagsiden?
23.08.2020 - 22:21DROPS Design answered:
Hej Jeanett, øverst i opskriften ser du hvordan du tager ind til raglan fra vrangen: Tag ind således fra vrangen: Start 4 m før mærketråden, 2 vr sammen, 4 vr, 2 drejet vr sammen. God fornøjelse!
27.08.2020 - 14:07
![]() Bella wrote:
Bella wrote:
Hej! Jag ska sticka denna tröja och har stickat 3 provlappar med stickor 5, 5,5 och 6. Med stickor 5,5 får jag 18 m x 23/24 v och med stickor 6 får jag 16 m x 20 v. Idealet är 17 m x 22 v. Hur ska jag tänka när jag vill sticka en tröja i M? Ska jag ta 5,5 stickor och sticka i storlek L eller 6 stickor och sticka i storlek S/M?
18.08.2020 - 21:30DROPS Design answered:
Hej Bella. Det beror på vilka mått du vill ha på plagget. Har du inte den stickfasthet som uppges i mönstret så får du inte de måtten som står i måttskissen utan då får du räkna ut måtten själv (1,6 m/cm respektive 1,8 m/cm). Mvh DROPS Design
20.08.2020 - 12:26
![]() Jeanett Holm-Knudsen wrote:
Jeanett Holm-Knudsen wrote:
Strikker i xL Aller første runde ender jeg med ar have strikket 154m skal så strikke 3 altså 157m men sidder med 183m ? Hvad er rettelserne i opskrift?
19.05.2020 - 21:31DROPS Design answered:
Hei Jeanett. I str XL har du lagt opp 183 masker og det strikkes slik: 5 rett, * 3 vrang, 3 rett *, gjenta fra *-* over de neste 30 maskene, strikk M.1 (= 26 masker), * 3 rett, 3 vrang *, gjenta fra *-* over de neste 30 maskene, 5 rett, * 3 vrang, 3 rett *, gjenta fra *-* over de neste 84 maskene og avslutt med 3 vrang = 5+30+26+30+5+84+3= 183 masker. Når du skal strikke siste omgang av M.1, økes det 1 maske ved å strikke 2 masker i 1 maske der det er en sort prikk i M.1 = 4 økte masker, men det skal felles 2 masker på baksiden av arbeidet = 183+4-2= 185 masker. Rettelsen fra 04/12/2013 gjaldt 2 vrangmasker (rad 9, maske 14 og 17) som skulle være rettmasker. mvh DROPS design
25.05.2020 - 13:53
![]() Monica wrote:
Monica wrote:
Buongiorno, questo è un pattern molto bello,mi piacerebbe poterlo eseguire con i ferri ad una punta e le relative cuciture sui fianchi....è possibile avere le indicazioni?
27.04.2020 - 17:47DROPS Design answered:
Buonasera Monica, può lavorare le parti in modo separato calcolando 1 maglia in più ad ogni lato per le cuciture. Buon lavoro!
27.04.2020 - 21:47
![]() Marivi wrote:
Marivi wrote:
¡Hola! Estoy haciendo la talla más grande, y he llegado al raglán: 8 dism en cada vuelta alterna (1 en cada lado del MP) en 24 veces, o sea en 48 vueltas, pero ¿qué quiere decir que disminuya en cada vuelta 6 veces??? Muchas gracias y felicidades por vuestra pagina web 😊
13.04.2020 - 10:54DROPS Design answered:
Hola Marivi. Las disminuciones de raglán se trabajan en dos partes. Primero disminuimos cada 2ª vuelta 24 veces, ( es decir, en una vuelta sí, en la siguiente no, en la tercera sí, e.t.c) después cada vuelta 6 veces (después de las 48 vueltas, disminuir 8 puntos en cada una de las siguientes 6 vueltas, no una sí y la siguiente no).
14.04.2020 - 20:57
![]() Oroitz wrote:
Oroitz wrote:
Hola, al principio del patron creo que falta un dato cuando empezamos a tejer el grafico despues de cambiar las agujas a 5mm. 5D,M2,M3,(falta M2?), 5, M2 Si no falta nada no se como continuar. Gracias
07.01.2020 - 00:42DROPS Design answered:
Hola Oroitz. Tienes razón. Ha sido una errata al publicar el patrón. El texto es el siguiente: ... cont como sigue: 3-5-3-5-3 derechos, M.2 sobre los 24-24-30-30-36 pts siguientes, M.3 (= 30 pts), M.2 sobre los 24-24-30-30-36 pts siguientes – leer el diagrama en sentido inverso para que el motivo sea idéntico a ambos lados de M.3, 3-5-3-5-3 derechos y M.2 sobre los 73-73-85-85-97 pts restantes. Gracias por el aviso. En breve actualizaremos el patrón.
07.01.2020 - 23:03
![]() CHOTTE wrote:
CHOTTE wrote:
J'aimerais tricoter ce pull avec une laine avec un pourcentage de laine moindre que puis-je choisir ?
16.11.2019 - 09:41DROPS Design answered:
Bonjour Mme Chotte, utilisez notre convertisseur pour voir les différentes alternatives, votre magasin DROPS saura vous apporter toute l'assistance nécessaire, même par mail ou téléphone. Vous trouverez ici, plus d'infos sur les alternatives. Bon tricot!
18.11.2019 - 08:56
![]() Elaine wrote:
Elaine wrote:
Suite à votre réponse j’en déduit donc que c’est M3 que l’on fait sans les torsades ?
21.03.2019 - 11:58DROPS Design answered:
Bonjour Elaine, vous tricotez le col en côtes 3 m end/3 m env mais au milieu devant, tricotez seulement 2 m env (au-dessus des 2 m env au milieu de M.3). Bon tricot!
21.03.2019 - 12:48
|
||||||||||||||||||||||||||||
To the Sea |
||||||||||||||||||||||||||||
|
|
||||||||||||||||||||||||||||
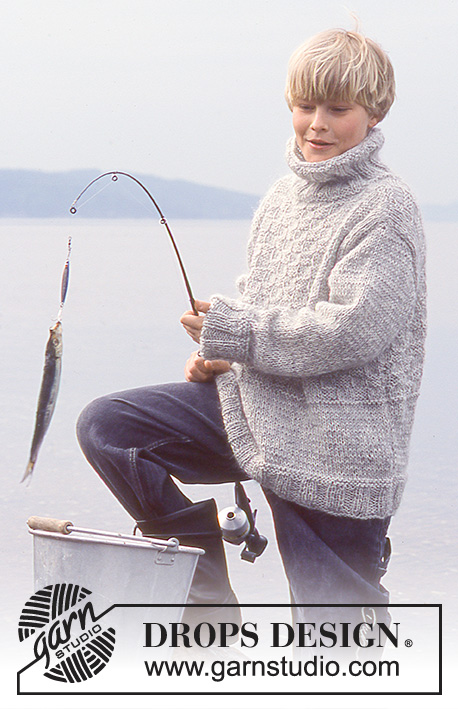
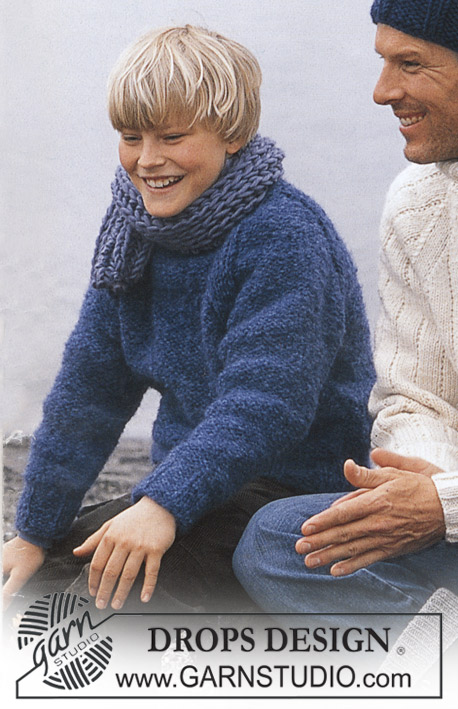
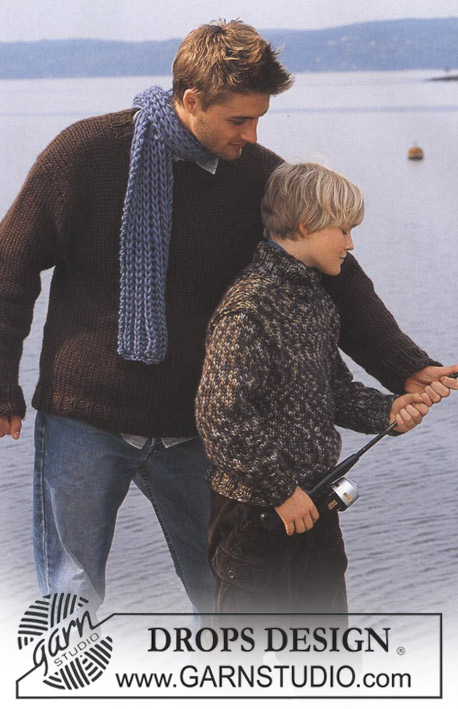
Knitted men's sweater with cables and high neck in DROPS Alaska, plus hat in DROPS Snow
DROPS 85-23 |
||||||||||||||||||||||||||||
|
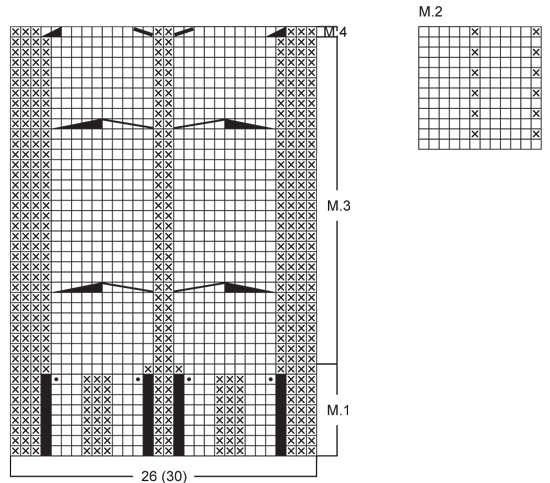
Gauge: 17 sts x 22 rows on larger needles in stockinette st = 10 x 10 cm. Rib: *K 3, P 3*, repeat from *-*. Pattern: See the chart below. The pattern is seen from the right side. Decreasing tips (for raglan): Dec as follows on right side: Start 4 sts before the marker: Sl 1 as if to knit, K 1, psso, K 4 (the marker is in the middle of these 4 sts), K 2 tog. Dec as follows on wrong side: Start 4 sts before the marker, P 2 tog, P 4, P 2 tog, twisting sts (if this is too difficult, sl 2, return to left needle 1 by 1, twisting each, then P 2 tog). BODY Cast on 155-159-179-183-203 sts on smaller circular needles; join and knit rib as follows: K 3-5-3-5-3 (put a marker in the center st = side), *P 3, K 3*, repeat *-* over the following 24-24-30-30-36 sts, Pattern 1 (= 26 sts), *K 3, P 3*, repeat *-* over the following 24-24-30-30-36 sts, K 3-5-3-5-3 (put a marker in the center st = side), *P 3, K 3*, repeat *-* over the following 72-72-84-84-96 sts and finish with P 3. On the last row of Pattern 1 dec 2 sts on back and at the same time inc 4 sts on the front as shown in chart = 157-161-181-185-205 sts. When Pattern 1 is complete (the piece measures approx. 4 cm) change to larger circular needles and continue as follows: K 3-5-3-5-3, Pattern 2 over the following 24-24-30-30-36 sts, Pattern 3 (= 30 sts), Pattern 2 over the following 24-24-30-30-36 sts – reverse the pattern so that it will be the same on both sides of Pattern 3, K 3-5-3-5-3 and Pattern 2 over the remaining 73-73-85-85-97 sts. When the piece measures 12 cm inc 1 st at each side of sts with markers at each side every 5-4-6-4-4 cm a total of 4-6-4-6-6 times – knit the increased sts in Pattern 2 as you go along = 173-185-197-209-229 sts. When the piece measures 34-41-42-43-43 cm bind off 7 sts at each side for armhole (= the sts with the markers + 3 sts each side = 82-88-94-100-110 sts on front and 77-83-89-95-105 sts on back. Lay piece aside and knit the sleeves. SLEEVE Cast on 42-42-42-48-48 sts on double-pointed needles 4 mm [US 6]; join and place a marker at the join. Knit rib. When the piece measures 4 cm change to larger double pointed needles and work following Pattern 2 (the pattern will not come out even). When the piece measures 9-12-14-14-14 cm inc 1 st on each side of seed st at marker every 3.5-2.5-2-2.5-2 cm a total of 11-14-17-15-20 times (knit the incd sts into the pattern as you go along) = 64-70-76-78-88 sts. When the piece measures 50-51-53-53-54 cm bind off 7 sts at marker (the st with the marker + 3 sts each side of marker) = 57-63-69-71-81 sts. Lay piece aside and knit second sleeve. Yoke: Put the sleeves in on the same circular needles as Body where you bound off for armhole = 273-297-321-337-377 sts Put a marker in each transition between Body and sleeves = 4 markers. Knit 2-3-0-0-0 rows before decreasing. Read the entire next section before knitting: Raglan shaping: Dec 1 st at each side of each marker (= 8 decs) – see Decreasing tips above. Dec every other row 18-21-23-24-24 times and every row 0-0-1-1-6 times. Pattern: When the piece measures 50-59-61-63-65 cm – adjust to end after a cable – knit Pattern 4 over the center 30 sts (decreasing the 4 sts incd on the last row of Pattern 1 at lower edge of Body) – knit the remaining sts as before. On the next row put the center 30-30-30-34-34 sts on a st holder for the neck and knit back and forth on needles. Continue to dec 1 st at each neck edge every other row 1-2-2-2-2 times. After all raglan and neck shaping is complete, 93-91-91-95-95 sts remain and the piece measures approx. 56-66-68-70-72 cm to shoulder. Neckband: Pick up and knit approx. 32-38 sts in front neck (incl. sts on st holder) on double-pointed needles and put all sts on same needles = approx. 125-133 sts. Join and P 1 row, then K 1 row, decreasing evenly distributed to 83-89-89-95-95 sts. Knit rib (K 3, P 3) – but at center front there should be a P 2, following pattern on front. When the collar measures 18-20-20-22-22 cm bind off all sts in rib. Fold neckband out to right side. If you want a crew neck, knit as follows: knit rib until the collar measures approx. 10-11-12-12-13 cm, bind off in pattern. Fold the neckband to wrong side and stitch in place. Assembly: Sew opening under the sleeve. HAT: Sizes: one-size Materials: DROPS SNOW from Garnstudio 100 gr nr 15, marine blue. DROPS 9 mm [US 13] double-pointed needles, or size needed to obtain correct gauge. Gauge: 10 sts x 14 rows in stockinette st = 10 x 10 cm. Rib: *P 5, K 2*, repeat from *-*. Hat: Cast on 56 sts; join and place a marker at the join. Knit 1 row stockinette st, then knit rib – see instructions above. When the piece measures 12 cm dec all P 5 to P 4 = 48 sts. When the piece measures 15 cm dec all P 4 to P 3 = 40 sts. Dec in the same way 2 more times with 3 cm between each dec round so that there will be 1 P less for each dec round = 24 sts – the rib is now *K 2, P 1*. When the piece measures 22 cm knit the next row as follows: *K 2 tog, P 1*, repeat from *-* over all sts = 16 sts. Cut yarn and pull through the remaining sts, fasten neatly. Hat measures approx 23 cm high. |
||||||||||||||||||||||||||||
Diagram explanations |
||||||||||||||||||||||||||||
|
||||||||||||||||||||||||||||
 |
||||||||||||||||||||||||||||
 |
||||||||||||||||||||||||||||
Have you finished this pattern?Tag your pictures with #dropspattern or submit them to the #dropsfan gallery. Do you need help with this pattern?You'll find 25 tutorial videos, a Comments/Questions area and more by visiting the pattern on garnstudio.com. © 1982-2026 DROPS Design A/S. We reserve all rights. This document, including all its sub-sections, has copyrights. Read more about what you can do with our patterns at the bottom of each pattern on our site. |
||||||||||||||||||||||||||||


With over 40 years in knitting and crochet design, DROPS Design offers one of the most extensive collections of free patterns on the internet - translated to 17 languages. As of today we count 324 catalogs and 12278 patterns - 12268 of which are translated into English (US/in).
We work hard to bring you the best knitting and crochet have to offer, inspiration and advice as well as great quality yarns at incredible prices! Would you like to use our patterns for other than personal use? You can read what you are allowed to do in the Copyright text at the bottom of all our patterns. Happy crafting!
Post a comment to pattern DROPS 85-23
We would love to hear what you have to say about this pattern!
If you want to leave a question, please make sure you select the correct category in the form below, to speed up the answering process. Required fields are marked *.