
Popular categories
Looking for a yarn?


Comments / Questions (185)
![]() Arlene wrote:
Arlene wrote:
A question about sizing. For a 48 inch chest which size should I choose?
27.11.2021 - 22:12DROPS Design answered:
Dear Arlene, the finished sizes of the garnment can be found on the shcematic drawing at the bottom of the pattern. We suggest that you take a sweater that fits the intended wearer and compare. Happy Stitching!
28.11.2021 - 00:21
![]() Liana wrote:
Liana wrote:
When switching to double point needles to knit the ribbing at the collar, are you using the 4mm or the 5mm?
08.05.2021 - 19:19DROPS Design answered:
Dear Liana, the pattern does not says you have to change the needles, but you can, if you feel it is necessary (it always depends on the knitter's induvidual gauge). Happy Knitting!
08.05.2021 - 21:53
![]() Dorrit wrote:
Dorrit wrote:
Tak for svar igår.Jeg strikker i størrelse large. Hvad skal jeg så mht. til de 5 masker. Mønstret lige efter ribben
29.04.2021 - 08:24DROPS Design answered:
Hej Dorrit, du strikker de 179 masker således: 3ret, (3vrang,3ret)over 30masker, M.1=26m, (3ret,3vrang)over 30 masker, 3 ret, (3vrang,3ret)over 84 masker, 3 vrang = ialt 179masker. Når du har strikket 7 omgange på denne måde, tager du ud ifølge M.1. Sæt gerne et mærke på hver side af M.1, så du er sikker på at det kommer midt på :)
29.04.2021 - 15:10
![]() Dorrit wrote:
Dorrit wrote:
Er startet på mønstret. Skal der startes med 5 ret i starten af pinden altså før 3 ret, M2 30 m,M 3, M 20sv.osv. Hilsen Dorrit
28.04.2021 - 10:05DROPS Design answered:
Hej Dorrit, ja det stemmer hvis du strikker str S/M eller XL. God fornøjelse!
28.04.2021 - 14:38
![]() Dorrit wrote:
Dorrit wrote:
Er lige startet - st. L .skal der ikke strikkes 3 ret,3 vrang hele tiden?eller skal der i midten kun strikkes 2 vrang.Kan ikke lige gennemskue det. Hilsen Dorrit
23.04.2021 - 07:42DROPS Design answered:
Hej Dorrit. I mitten av M.1 är det kun 2 m vrang, i övrigt är det 3 ret, 2 vrang. Mvh DROPS Design
23.04.2021 - 12:10
![]() Gwenstef wrote:
Gwenstef wrote:
Bonjour, Je souhaite tricoter ce modèle mais il ne reste plus de choix en laine Drops Alaska. En quelle laine puis-je la remplacer ? de préférence une laine qui donne un rendu similaire en mérino et pas trop lourde. Merci.
26.03.2021 - 18:14DROPS Design answered:
Bonjour Gwenstef, DROPS Alaska est toujours disponible dans de nombreux coloris (cf nuancier) mais vous pouvez la remplacer par 1 fil du groupe C ou 2 fils de groupe A - retrouvez ici plus d'infos sur les alternatives. Bon tricot!
06.04.2021 - 07:32
![]() CECILE LAVENU wrote:
CECILE LAVENU wrote:
Bonjour, je tricote le modèle en taille S/M je ne comprends pas quand on doit faire des diminutions raglan sur l'envers du travail (explication donnée en début de modèle) , puisque le modèle se tricote en tricot circulaire (donc que des rangs endroit) et qu'en plus, les diminutions se faisant tous les 2 rangs, on est necessairement sur un rang endroit? merci de vos explications
26.03.2021 - 08:01DROPS Design answered:
Bonjour Mme Lavenu, on va devoir rabattre les mailles de l'encolure devant; il faudra alors continuer à tricoter en rangs, à partir d'un côté de l'encolure devant jusqu'à l'autre côté; on diminuera alors pour le raglan sur l'envers (pas dans les 3 premières tailles). Bon tricot!
26.03.2021 - 08:09
![]() Alissa wrote:
Alissa wrote:
Hi! I’m enjoying knitting this pattern so far. I have a few questions. I have just joined my sleeves to the circular needles with the rest of the sweater. I am making the L size, what does it mean to dec every other row 23 times and dec every row 1 time? Also, where do I start knitting? Decreasing at one of the markers? Thank you for your help.
12.02.2021 - 22:16DROPS Design answered:
Dear Alissa, at each raglan line (where the bodi-parts and the sleeves meet) you have 4 knitted stitch (two of each side of teh marker. As the pattern states, at each of these you shou "Start 4 sts before the marker: Sl 1 as if to knit, K 1, psso, K 4 (the marker is in the middle of these 4 sts), K 2 tog." Every other row / round means that you should decrease every second row, 23 times, then once without leaving out that one row. Your row can be started either at the middle of teh back, or at the middle of one of the raglan lines (at the marker) at the back. Happy Knitting!
13.02.2021 - 21:09
![]() Irene wrote:
Irene wrote:
Jag kan inte få maskantalet att stämma när jag räknar antalet maskor på storlek S. Man lägger upp 159 maskor men vid räkning blir det fler maskor
05.01.2021 - 23:52DROPS Design answered:
Hej Irene, I str S har du lagt opp 159 masker og det strikkes slik: 5 rett, * 3 vrang, 3 rett *, gjenta fra *-* over de neste 24 maskene, strikk M.1 (= 26 masker), * 3 rett, 3 vrang *, gjenta fra *-* over de neste 24 maskene, 5 rett, * 3 vrang, 3 rett *, gjenta fra *-* over de neste 72 maskene og avslutt med 3 vrang = 5+24+26+24+5+72+3= 159 masker. God fornøjelse!
11.01.2021 - 13:18
![]() Christiane wrote:
Christiane wrote:
Hallo, liebes Team, ich habe gerade begonnen mit dem Modell. Gleich zu Beginn heißt es, dass man in M1 Maschen zunimmt (was ersichtlich ist) und gleichzeitig zwei Maschen im Rücken abnimmt. Dazu konnte ich aber nichts finden, wie nehme ich die zwei Maschen ab? Danke. Beste Grüße
06.12.2020 - 09:33DROPS Design answered:
Liebe Christiane, das Diagram zeigt nur, wie die 4 Zunahmen (Vorderteil) gestrickt werden, beim M.1 am Rückenteil nehmen Sie einfach 2 Maschen regelmäßig ab. Viel Spaß beim stricken!
07.12.2020 - 08:23
|
||||||||||||||||||||||||||||
To the Sea |
||||||||||||||||||||||||||||
|
|
||||||||||||||||||||||||||||
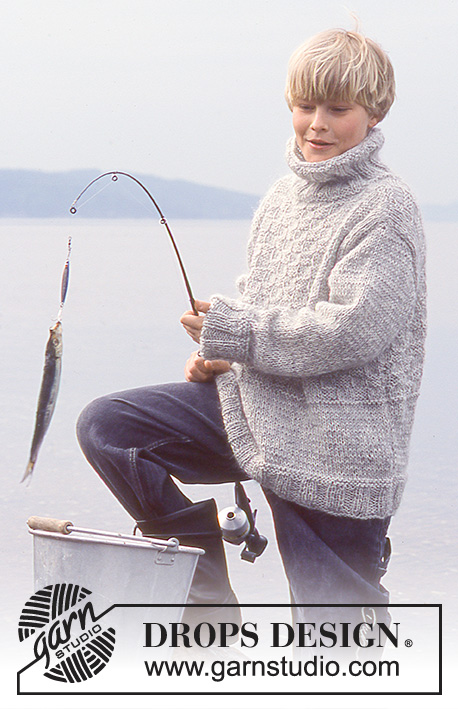
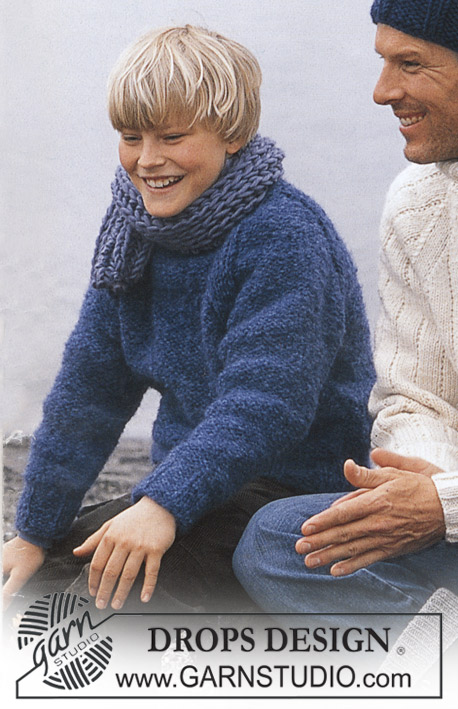
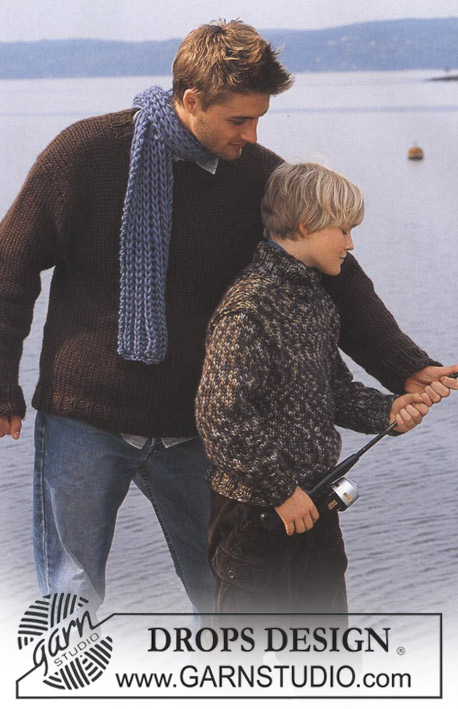
Knitted men's sweater with cables and high neck in DROPS Alaska, plus hat in DROPS Snow
DROPS 85-23 |
||||||||||||||||||||||||||||
|
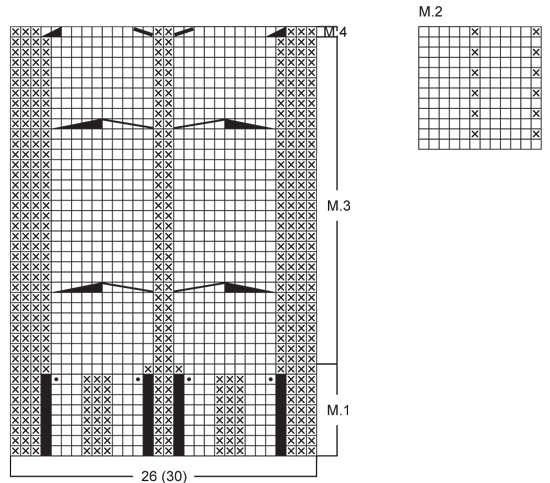
Gauge: 17 sts x 22 rows on larger needles in stockinette st = 10 x 10 cm. Rib: *K 3, P 3*, repeat from *-*. Pattern: See the chart below. The pattern is seen from the right side. Decreasing tips (for raglan): Dec as follows on right side: Start 4 sts before the marker: Sl 1 as if to knit, K 1, psso, K 4 (the marker is in the middle of these 4 sts), K 2 tog. Dec as follows on wrong side: Start 4 sts before the marker, P 2 tog, P 4, P 2 tog, twisting sts (if this is too difficult, sl 2, return to left needle 1 by 1, twisting each, then P 2 tog). BODY Cast on 155-159-179-183-203 sts on smaller circular needles; join and knit rib as follows: K 3-5-3-5-3 (put a marker in the center st = side), *P 3, K 3*, repeat *-* over the following 24-24-30-30-36 sts, Pattern 1 (= 26 sts), *K 3, P 3*, repeat *-* over the following 24-24-30-30-36 sts, K 3-5-3-5-3 (put a marker in the center st = side), *P 3, K 3*, repeat *-* over the following 72-72-84-84-96 sts and finish with P 3. On the last row of Pattern 1 dec 2 sts on back and at the same time inc 4 sts on the front as shown in chart = 157-161-181-185-205 sts. When Pattern 1 is complete (the piece measures approx. 4 cm) change to larger circular needles and continue as follows: K 3-5-3-5-3, Pattern 2 over the following 24-24-30-30-36 sts, Pattern 3 (= 30 sts), Pattern 2 over the following 24-24-30-30-36 sts – reverse the pattern so that it will be the same on both sides of Pattern 3, K 3-5-3-5-3 and Pattern 2 over the remaining 73-73-85-85-97 sts. When the piece measures 12 cm inc 1 st at each side of sts with markers at each side every 5-4-6-4-4 cm a total of 4-6-4-6-6 times – knit the increased sts in Pattern 2 as you go along = 173-185-197-209-229 sts. When the piece measures 34-41-42-43-43 cm bind off 7 sts at each side for armhole (= the sts with the markers + 3 sts each side = 82-88-94-100-110 sts on front and 77-83-89-95-105 sts on back. Lay piece aside and knit the sleeves. SLEEVE Cast on 42-42-42-48-48 sts on double-pointed needles 4 mm [US 6]; join and place a marker at the join. Knit rib. When the piece measures 4 cm change to larger double pointed needles and work following Pattern 2 (the pattern will not come out even). When the piece measures 9-12-14-14-14 cm inc 1 st on each side of seed st at marker every 3.5-2.5-2-2.5-2 cm a total of 11-14-17-15-20 times (knit the incd sts into the pattern as you go along) = 64-70-76-78-88 sts. When the piece measures 50-51-53-53-54 cm bind off 7 sts at marker (the st with the marker + 3 sts each side of marker) = 57-63-69-71-81 sts. Lay piece aside and knit second sleeve. Yoke: Put the sleeves in on the same circular needles as Body where you bound off for armhole = 273-297-321-337-377 sts Put a marker in each transition between Body and sleeves = 4 markers. Knit 2-3-0-0-0 rows before decreasing. Read the entire next section before knitting: Raglan shaping: Dec 1 st at each side of each marker (= 8 decs) – see Decreasing tips above. Dec every other row 18-21-23-24-24 times and every row 0-0-1-1-6 times. Pattern: When the piece measures 50-59-61-63-65 cm – adjust to end after a cable – knit Pattern 4 over the center 30 sts (decreasing the 4 sts incd on the last row of Pattern 1 at lower edge of Body) – knit the remaining sts as before. On the next row put the center 30-30-30-34-34 sts on a st holder for the neck and knit back and forth on needles. Continue to dec 1 st at each neck edge every other row 1-2-2-2-2 times. After all raglan and neck shaping is complete, 93-91-91-95-95 sts remain and the piece measures approx. 56-66-68-70-72 cm to shoulder. Neckband: Pick up and knit approx. 32-38 sts in front neck (incl. sts on st holder) on double-pointed needles and put all sts on same needles = approx. 125-133 sts. Join and P 1 row, then K 1 row, decreasing evenly distributed to 83-89-89-95-95 sts. Knit rib (K 3, P 3) – but at center front there should be a P 2, following pattern on front. When the collar measures 18-20-20-22-22 cm bind off all sts in rib. Fold neckband out to right side. If you want a crew neck, knit as follows: knit rib until the collar measures approx. 10-11-12-12-13 cm, bind off in pattern. Fold the neckband to wrong side and stitch in place. Assembly: Sew opening under the sleeve. HAT: Sizes: one-size Materials: DROPS SNOW from Garnstudio 100 gr nr 15, marine blue. DROPS 9 mm [US 13] double-pointed needles, or size needed to obtain correct gauge. Gauge: 10 sts x 14 rows in stockinette st = 10 x 10 cm. Rib: *P 5, K 2*, repeat from *-*. Hat: Cast on 56 sts; join and place a marker at the join. Knit 1 row stockinette st, then knit rib – see instructions above. When the piece measures 12 cm dec all P 5 to P 4 = 48 sts. When the piece measures 15 cm dec all P 4 to P 3 = 40 sts. Dec in the same way 2 more times with 3 cm between each dec round so that there will be 1 P less for each dec round = 24 sts – the rib is now *K 2, P 1*. When the piece measures 22 cm knit the next row as follows: *K 2 tog, P 1*, repeat from *-* over all sts = 16 sts. Cut yarn and pull through the remaining sts, fasten neatly. Hat measures approx 23 cm high. |
||||||||||||||||||||||||||||
Diagram explanations |
||||||||||||||||||||||||||||
|
||||||||||||||||||||||||||||
 |
||||||||||||||||||||||||||||
 |
||||||||||||||||||||||||||||
Have you finished this pattern?Tag your pictures with #dropspattern or submit them to the #dropsfan gallery. Do you need help with this pattern?You'll find 25 tutorial videos, a Comments/Questions area and more by visiting the pattern on garnstudio.com. © 1982-2026 DROPS Design A/S. We reserve all rights. This document, including all its sub-sections, has copyrights. Read more about what you can do with our patterns at the bottom of each pattern on our site. |
||||||||||||||||||||||||||||


With over 40 years in knitting and crochet design, DROPS Design offers one of the most extensive collections of free patterns on the internet - translated to 17 languages. As of today we count 324 catalogs and 12278 patterns - 12268 of which are translated into English (US/in).
We work hard to bring you the best knitting and crochet have to offer, inspiration and advice as well as great quality yarns at incredible prices! Would you like to use our patterns for other than personal use? You can read what you are allowed to do in the Copyright text at the bottom of all our patterns. Happy crafting!
Post a comment to pattern DROPS 85-23
We would love to hear what you have to say about this pattern!
If you want to leave a question, please make sure you select the correct category in the form below, to speed up the answering process. Required fields are marked *.