
Popular categories
Looking for a yarn?


Comments / Questions (185)
![]() Sara wrote:
Sara wrote:
Bonjour, J'ai une petite question sûrement bête mais il est indiqué :"Sur le dernier rang du diagramme M1 diminuer 2 mailles au dos et au même moment augmenter 4 mailles sur le devant comme dans le diagramme = 157-161-181-185-205 mailles." or sur le diagramme le dernier rang de M1 semble être le rang d'après les augmentations. Sinon ce rang tes en fait le premier rang de M3? Merci de votre réponse et bon dimanche.
15.01.2017 - 12:41DROPS Design answered:
Bonjour Sara, diminuez/augmentez dans M.1 comme indiqué dans le diagramme (= dernier rang des côtes), puis tricotez le tour suivant comme indiqué (on n'a plus les côtes 3 m end/3 m env). M.3 commence alors au tour suivant. Bon tricot!
16.01.2017 - 09:51
![]() Le Floc'h wrote:
Le Floc'h wrote:
Bonjour Je commence tout juste le pull en taille L et ne comprend où mettre le marqueur dans les côtes 3-5-3-5-3 le nombre total de mailles étant impair !!! Où est le milieu . Merci de votre aide
24.09.2016 - 15:24DROPS Design answered:
Bonjour Mme Le Floc'h, le marqueur se met en taille L dans la centrale, soit la 3ème de ces 3 m end (vous aurez ainsi: 2 m end, 1 m end avec le marqueur, 2 m end). Bon tricot!
26.09.2016 - 11:55Ben Ayres wrote:
Hi; " – reverse the pattern so that it will be the same on both sides of Pattern 3, I don't understand the comment on "reverse pattern". Am I not just knitting the pattern once per row (otherwise there would need to be another 30 sts)? I have read the entire pattern, and this is the only part that has me confused. Thank You Ben
09.09.2016 - 13:49DROPS Design answered:
Dear Ben, M.2 is 12 sts, but you have to work it over 24-30 sts, ie repeat M.2 2 times in width (= 24 sts) or 2 times in width + 6 first sts (= 30 sts). When working M.2 before M.3 read diagram from the right towards the left, when working M.2 after M.3 read diagram from the right towards the left. Happy knitting!
09.09.2016 - 13:56
![]() Sarah Perryman wrote:
Sarah Perryman wrote:
Hi, when the front stitches are on the stitch holder and I'm working backwards and forwards, should I still be working in pattern 2? Or knitting all stitches?
21.07.2016 - 08:47DROPS Design answered:
Dear Mrs Perryman, yes continue in pattern M.2 but now work diagrm back and forth on remaining sts on needle until all raglan andd neck shaping are done and piece masures final measurement to shoulder. Happy knitting!
21.07.2016 - 09:16
![]() Mette S wrote:
Mette S wrote:
Jeg har sat 34 masker på tråd til hals, og strikket 4 pinde, hvoraf jeg har lukket af mod halsen 2 gange. Skal jeg strikke de 32 til 38 masker op foran i halsen nu? Eller strikke videre uden maskerne på tråden til arbejdet måler de 72 cm, og derefter starte på halsen?
23.05.2016 - 12:04DROPS Design answered:
Hej Mette. Du skal afslutte dine indtagninger og arbejdet maaler 72 cm op til skulder. Först derefter tager du masker op til halsen.
23.05.2016 - 13:43
![]() Sarah Perryman wrote:
Sarah Perryman wrote:
Hi, it says to decrease 2 stars on back in last round of pattern 1 - where should these decreases happen? Thanks in advance.
06.04.2016 - 17:51DROPS Design answered:
Dear Mrs Perryman, when working last round in M.1 inc 4 sts as shown in M.1 and at the same time dec 2 sts evenly in remaining sts. Happy knitting!
07.04.2016 - 09:13Robert Smith wrote:
"On the next row put the center 30-30-30-34-34 sts on a st holder for the neck and knit back and forth on needles. Continue to dec 1 st at each neck edge every other row 1-2-2-2-2 times" After putting the centre on holder I can't figure out how to stitch back and forth. Do I need to cut the yarn and pick up.on the other side?
23.02.2016 - 21:35DROPS Design answered:
Dear Mrs Smith, after you have put sts on a st holder, work now alternately from RS and from WS, ie turn at the end of each row (rows now start and end towards neckline). Happy knitting!
24.02.2016 - 10:16
![]() Rosanna wrote:
Rosanna wrote:
Per realizzare questo modello nella taglia L se, invece della lana Alaska, utilizzo la lana DROPS AIR, quanta lana devo utilizzare? Grazie
03.01.2016 - 16:43DROPS Design answered:
Buonasera Rosanna, Air appartiene al gruppo filati C come Alaska, per cui può utilizzarla per realizzare questo modello seguendo le istruzioni indicate a patto che il suo campione corrisponda a quello indicato. Guardi questa lezione per calcolare la quantità di filato necessaria. Buon lavoro!!
03.01.2016 - 18:30
![]() Filomena wrote:
Filomena wrote:
Hallo ich habe Rumpf und Ärmel f nun alles auf einer Rundnadel. Ich habe aber Mühe mit der Raglanabnahme. Solange ich Runden stricke wird die Abnahme mit rechten Maschen gemacht ist das richtig? In der Anleitung steht bei Rückreihe linke Masche das verwirrt mich. Ausserdem steht zuerst abheben stricken darüberziehen und nach dem Markierungsfaden zusammenstricken. Muss das nicht umgekehrt sein (gem.Videos). Und ist das beim rechten und linken Ärmel gleich? Hoffe meine Frage ist verständlich.
16.12.2015 - 17:27DROPS Design answered:
Sie machen die Abnahmen zuerst ja nur in Runden und zwar so, wie in der Anleitung beschrieben. Die Videos sind ja allgemein gültig, letztendlich kommt es darauf an, was in der Anleitung steht. Es ist an jedem Markierungsfaden gleich, also vor dem Markierer überzogen zusammenstricken und nach dem Markierer zusammenstricken. Wenn Sie die M für den Halsausschnitt stillgelegt haben, arbeiten Sie ja in Hin- und Rück-R weiter und machen ab dann auch Abnahmen in Rück-R.
20.12.2015 - 17:24
![]() Nique wrote:
Nique wrote:
Dank je voor dit antwoord. Klopt het dan ook dat in dit patroon de mouwen op een rondbreinaald worden gebreid? Dat staat niet heel duidelijk in de patroonbeschrijving. Alvast bedankt weer.
09.12.2015 - 15:53DROPS Design answered:
Hoi Nique. Ja, klopt. Je breit op breinaalden zonder knop in de rondte - of een korte rondbreinaald (bijvoorbeeld 40 cm)
09.12.2015 - 16:30
|
||||||||||||||||||||||||||||
To the Sea |
||||||||||||||||||||||||||||
|
|
||||||||||||||||||||||||||||
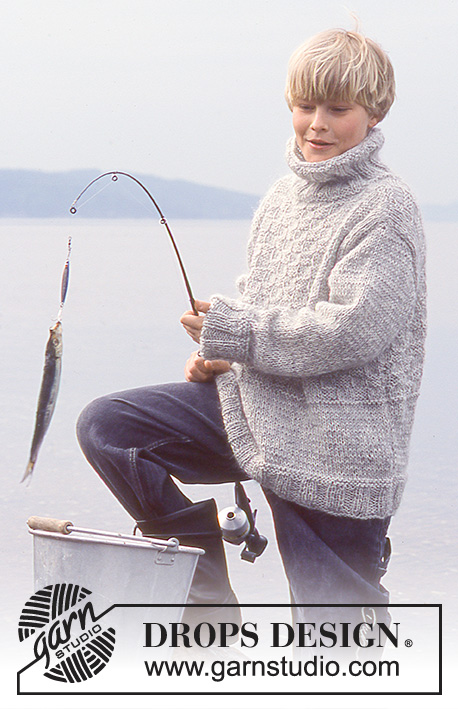
Knitted men's sweater with cables and high neck in DROPS Alaska, plus hat in DROPS Snow
DROPS 85-23 |
||||||||||||||||||||||||||||
|
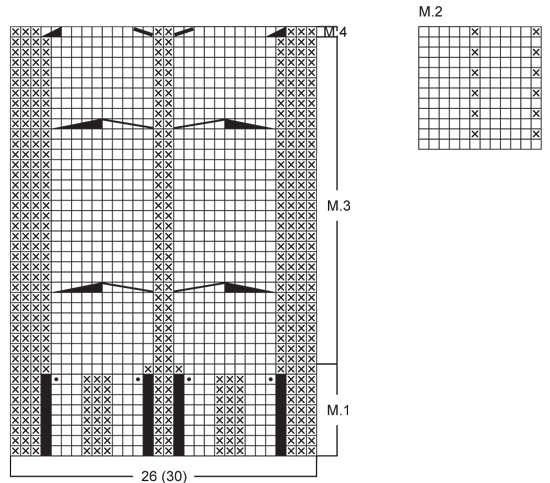
Gauge: 17 sts x 22 rows on larger needles in stockinette st = 10 x 10 cm. Rib: *K 3, P 3*, repeat from *-*. Pattern: See the chart below. The pattern is seen from the right side. Decreasing tips (for raglan): Dec as follows on right side: Start 4 sts before the marker: Sl 1 as if to knit, K 1, psso, K 4 (the marker is in the middle of these 4 sts), K 2 tog. Dec as follows on wrong side: Start 4 sts before the marker, P 2 tog, P 4, P 2 tog, twisting sts (if this is too difficult, sl 2, return to left needle 1 by 1, twisting each, then P 2 tog). BODY Cast on 155-159-179-183-203 sts on smaller circular needles; join and knit rib as follows: K 3-5-3-5-3 (put a marker in the center st = side), *P 3, K 3*, repeat *-* over the following 24-24-30-30-36 sts, Pattern 1 (= 26 sts), *K 3, P 3*, repeat *-* over the following 24-24-30-30-36 sts, K 3-5-3-5-3 (put a marker in the center st = side), *P 3, K 3*, repeat *-* over the following 72-72-84-84-96 sts and finish with P 3. On the last row of Pattern 1 dec 2 sts on back and at the same time inc 4 sts on the front as shown in chart = 157-161-181-185-205 sts. When Pattern 1 is complete (the piece measures approx. 4 cm) change to larger circular needles and continue as follows: K 3-5-3-5-3, Pattern 2 over the following 24-24-30-30-36 sts, Pattern 3 (= 30 sts), Pattern 2 over the following 24-24-30-30-36 sts – reverse the pattern so that it will be the same on both sides of Pattern 3, K 3-5-3-5-3 and Pattern 2 over the remaining 73-73-85-85-97 sts. When the piece measures 12 cm inc 1 st at each side of sts with markers at each side every 5-4-6-4-4 cm a total of 4-6-4-6-6 times – knit the increased sts in Pattern 2 as you go along = 173-185-197-209-229 sts. When the piece measures 34-41-42-43-43 cm bind off 7 sts at each side for armhole (= the sts with the markers + 3 sts each side = 82-88-94-100-110 sts on front and 77-83-89-95-105 sts on back. Lay piece aside and knit the sleeves. SLEEVE Cast on 42-42-42-48-48 sts on double-pointed needles 4 mm [US 6]; join and place a marker at the join. Knit rib. When the piece measures 4 cm change to larger double pointed needles and work following Pattern 2 (the pattern will not come out even). When the piece measures 9-12-14-14-14 cm inc 1 st on each side of seed st at marker every 3.5-2.5-2-2.5-2 cm a total of 11-14-17-15-20 times (knit the incd sts into the pattern as you go along) = 64-70-76-78-88 sts. When the piece measures 50-51-53-53-54 cm bind off 7 sts at marker (the st with the marker + 3 sts each side of marker) = 57-63-69-71-81 sts. Lay piece aside and knit second sleeve. Yoke: Put the sleeves in on the same circular needles as Body where you bound off for armhole = 273-297-321-337-377 sts Put a marker in each transition between Body and sleeves = 4 markers. Knit 2-3-0-0-0 rows before decreasing. Read the entire next section before knitting: Raglan shaping: Dec 1 st at each side of each marker (= 8 decs) – see Decreasing tips above. Dec every other row 18-21-23-24-24 times and every row 0-0-1-1-6 times. Pattern: When the piece measures 50-59-61-63-65 cm – adjust to end after a cable – knit Pattern 4 over the center 30 sts (decreasing the 4 sts incd on the last row of Pattern 1 at lower edge of Body) – knit the remaining sts as before. On the next row put the center 30-30-30-34-34 sts on a st holder for the neck and knit back and forth on needles. Continue to dec 1 st at each neck edge every other row 1-2-2-2-2 times. After all raglan and neck shaping is complete, 93-91-91-95-95 sts remain and the piece measures approx. 56-66-68-70-72 cm to shoulder. Neckband: Pick up and knit approx. 32-38 sts in front neck (incl. sts on st holder) on double-pointed needles and put all sts on same needles = approx. 125-133 sts. Join and P 1 row, then K 1 row, decreasing evenly distributed to 83-89-89-95-95 sts. Knit rib (K 3, P 3) – but at center front there should be a P 2, following pattern on front. When the collar measures 18-20-20-22-22 cm bind off all sts in rib. Fold neckband out to right side. If you want a crew neck, knit as follows: knit rib until the collar measures approx. 10-11-12-12-13 cm, bind off in pattern. Fold the neckband to wrong side and stitch in place. Assembly: Sew opening under the sleeve. HAT: Sizes: one-size Materials: DROPS SNOW from Garnstudio 100 gr nr 15, marine blue. DROPS 9 mm [US 13] double-pointed needles, or size needed to obtain correct gauge. Gauge: 10 sts x 14 rows in stockinette st = 10 x 10 cm. Rib: *P 5, K 2*, repeat from *-*. Hat: Cast on 56 sts; join and place a marker at the join. Knit 1 row stockinette st, then knit rib – see instructions above. When the piece measures 12 cm dec all P 5 to P 4 = 48 sts. When the piece measures 15 cm dec all P 4 to P 3 = 40 sts. Dec in the same way 2 more times with 3 cm between each dec round so that there will be 1 P less for each dec round = 24 sts – the rib is now *K 2, P 1*. When the piece measures 22 cm knit the next row as follows: *K 2 tog, P 1*, repeat from *-* over all sts = 16 sts. Cut yarn and pull through the remaining sts, fasten neatly. Hat measures approx 23 cm high. |
||||||||||||||||||||||||||||
Diagram explanations |
||||||||||||||||||||||||||||
|
||||||||||||||||||||||||||||
 |
||||||||||||||||||||||||||||
 |
||||||||||||||||||||||||||||
Have you finished this pattern?Tag your pictures with #dropspattern or submit them to the #dropsfan gallery. Do you need help with this pattern?You'll find 25 tutorial videos, a Comments/Questions area and more by visiting the pattern on garnstudio.com. © 1982-2026 DROPS Design A/S. We reserve all rights. This document, including all its sub-sections, has copyrights. Read more about what you can do with our patterns at the bottom of each pattern on our site. |
||||||||||||||||||||||||||||


With over 40 years in knitting and crochet design, DROPS Design offers one of the most extensive collections of free patterns on the internet - translated to 17 languages. As of today we count 324 catalogs and 12278 patterns - 12268 of which are translated into English (US/in).
We work hard to bring you the best knitting and crochet have to offer, inspiration and advice as well as great quality yarns at incredible prices! Would you like to use our patterns for other than personal use? You can read what you are allowed to do in the Copyright text at the bottom of all our patterns. Happy crafting!
Post a comment to pattern DROPS 85-23
We would love to hear what you have to say about this pattern!
If you want to leave a question, please make sure you select the correct category in the form below, to speed up the answering process. Required fields are marked *.