
Popular categories
Looking for a yarn?


Comments / Questions (20)
![]() Clara J Shaw wrote:
Clara J Shaw wrote:
Hello! I am in the early stage of this pattern. I completed the back rows up to this point When the piece measures 13 and 23 cm inc 1 ch-loop at each side by crocheting 1 extra ch-loop in the outermost ch-loop at each side (1 ch-loop = 1 dc + ch 4 – at start of row replace 1 dc with ch 3). I understand why, but not how clearly. It seems like a decrease over a group. Thanks
15.02.2020 - 16:52DROPS Design answered:
Dear Mrs Shaw, to increase 1 ch-space on each side, you should just work as follows: turn and crochet 7 chains (= 1st dc + 1st ch-space), 1 dc in the last dc from previous row, 4 chains, and continue as before until the last dc at the end of row and work: 1 dc in last dc, 4 ch, 1 dc in same dc. Turn and work as before with 2 chain-spaces (1 dc, 4 ch, 1 dc, 4 ch) on each side. After 2nd inc you will have 3 ch-spaces on each side - Diag 1 might help you to vizualize how it should look at. Happy crocheting!
17.02.2020 - 08:40
![]() Maria Teresa Lopez wrote:
Maria Teresa Lopez wrote:
Hice una pregunta hace más de medio año! No me han contestado. Me siento ignorada!
25.01.2020 - 18:10
![]() Mickey wrote:
Mickey wrote:
Klopt het dat de L.boog die je meerderd open blijven, dus niet in de volgende toeren 3 stokjes, 4l, 3 stokjes?
13.06.2018 - 13:38
![]() Mariette wrote:
Mariette wrote:
Waarom meerderen bij het achterpand bij 13 en 23 cm en bij de voorpanden bij 8 en 18 cm.?
19.03.2018 - 16:20DROPS Design answered:
Hallo Mariette, Dit is om te voorkomen dat er een grote verspringing in de zijnaad komt bij het in elkaar zetten van het werk. Daarom minder je a.h.w. om en om op het voor en achterpand, steeds om de 5 cm: 8-13-18-23
21.03.2018 - 21:06Margarita Sanchez wrote:
Me encantan sus tejidos me gustaria q me enviara el patron talka M
20.02.2018 - 21:45
![]() Sabine wrote:
Sabine wrote:
Bitte um Hilfe :-) ich versteh die Sache mit dem zusätzlichen Luftmaschenbogen bei 13 und 23 cm nicht. wie genau soll ich den luftmaschenbogen zufügen ? ich hab dann 2 stäbchen und 4 luftmaschen am Ende der Reihe ???und auf jeder Seite einmal bei 13 und einmal bei 23 cm ?
08.04.2017 - 21:12DROPS Design answered:
Liebe Sabine, bei 13 und 23 cm sollen Sie 1 Lm-Bogen zunehmen, am Anfang der Reihe häkeln Sie: 3 Lm (= 1. Stb), 4 LM, 1 Stb in dem 1. Lm-Bogen, 4 Lm und wie zuvor weiterhäkeln und am Ende Der Reihe häkeln Sie: 1 Stb im letzten Lm-Bogen, 4 Lm, 1 Stb im gleichen Lm-Bogen, 1 Stb. Viel Spaß beim häkeln!
12.04.2017 - 11:26
![]() Inma wrote:
Inma wrote:
Hola, no consigo entender cómo se hacen los aumentos. " Aumentar un arco de cadena a ambos lados, siendo un arco de cadena igual a un punto alto más 4 cadenas". Al final lo que hago es alargar la cadena inicial, no hay que hacer más puntos altos juntos?? En mi caso particular, para talla L, comienzo con 13 grupos de puntos altos juntos. No debería tener 15 grupos al aumentar, uno a cada lado?? O quizás eso sería un aumento excesivo. Gracias de antemano
08.03.2017 - 19:30DROPS Design answered:
Hola Inma. Los aumentos se trabajan como sigue: al principio de la fila trabajar 7 puntos de cadeneta + 1 punto alto + 4 puntos de cadeneta en el primer arco, al final de la fila trabajar (1 punto alto + 4 puntos de cadeneta) 2 veces en el último arco.
19.03.2017 - 19:41
![]() Debbie D. wrote:
Debbie D. wrote:
I ordered the yarn for this pattern, but I found the pattern confusing to follow after the second round of increases. I ended up ripping it out and will use the yarn for another pattern. I consider myself an intermediate level crocheter. I tried and tried to figured this pattern out and couldn't do it.
09.03.2015 - 12:32DROPS Design answered:
Dear Debbie, you are always welcome to ask your question here when you don't understand something, and remember you will always get help from your DROPS store. Happy crocheting!
09.03.2015 - 13:25
![]() Willie wrote:
Willie wrote:
Bij voor pand bij 8cm losse-boogje meerderen-moet ik dan 3stokjes 4 losse en 3 stokjes extra meerderen
03.06.2014 - 23:09DROPS Design answered:
Hoi Willie. Meerder bij een hoogte van 8 en 18 cm 1 l-boogje aan de zijkant zoals beschreven voor het achterpand, dwz, je meerdert alleen aan de zijkant door 1 extra l-boogje te haken in het laatste l-boogje aan weerskanten
04.06.2014 - 17:16
![]() Sollaug wrote:
Sollaug wrote:
Oppskrift nr. 88-19
19.01.2008 - 19:34
|
||||||||||
Fresh Air |
||||||||||
|
|
||||||||||
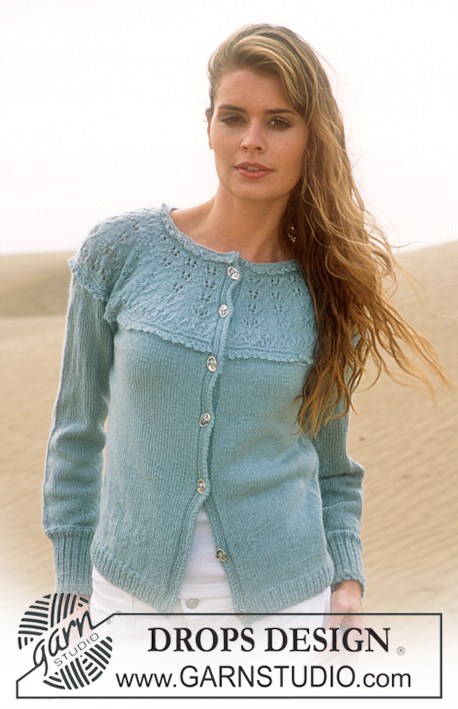
DROPS Crocheted cardigan in Safran
DROPS 88-19 |
||||||||||
|
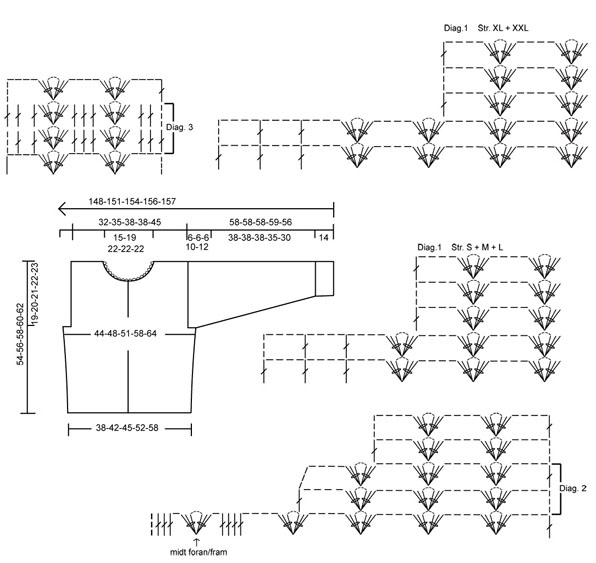
Crochet gauge: 3 repeats in width (1 repeat = 1 ch-loop + 1 dc-group) and 8 rows = approx. 10 x 10 cm. Diagrams: See diagrams. There are two Diagrams 1: one for Sizes S + M + L and one for Sizes XL + XXL. Diagrams 2 and 3 are the same for all sizes. «Midt foran/fram» means «center front». Crochet tips (for 3 dc-tog): Crochet 1 dc, but hold the last loop on the hook, (= 2 loops on hook), 1 new dc in the same st/loop, but hold the last loop on the hook (= 3 loops on hook), 1 new dc in the same st/loop, and now pull the yarn through all 4 loops on hook. Buttonband-tips: So that the buttonbands are not too tight, replace the first dc at the start of every row at the center front edge with ch 4. Back: Ch 115-124-133-151-169. Establish pattern on the first row as follows - read Crochet tips: start in the 16th ch from hook and crochet 3 dc-tog, ch 4 and 3 dc-tog in the same ch, * ch 4, skip over 8 ch, in the next ch: 3 dc-tog, ch 4 and 3 dc-tog *, repeat * - * a total of 10-11-12-14-16 times, ch 4, skip over 8 ch and finish with 1 dc in the last ch = 11-12-13-15-17 dc-groups, turn the work. Now crochet every row as follows: ch 7, in the ch-loop of the first dc-group crochet 3 dc-tog, ch 4 and 3 dc-tog, * ch 4, in the ch-loop in the next dc-group crochet 3 dc-tog, ch 4 and 3 dc-tog *, repeat * - * and finish with ch 4 and 1 dc in 5th ch after last dc-group. When the piece measures 13 and 23 cm inc 1 ch-loop at each side by crocheting 1 extra ch-loop in the outermost ch-loop at each side (1 ch-loop = 1 dc + ch 4 – at start of row replace 1 dc with ch 3). When the piece measures 35-36-37-38-39 cm bind off for armhole at each side following Diagram 1 (use the appropriate diagram for your size) = 9-10-11-11-13 dc-groups remain. Continue in the pattern as before. When the piece measures 53-55-57-59-61 cm bind off for the neck as follows: ch 7, in the ch-loop of first dc-group crochet 3 dc-tog, ch 4 and 3 dc-tog, ch 4, in the ch-loop in the next dc-group crochet 3 dc-tog, ch 4 and 3 dc-tog, finish with ch 4 and 1 dc in the top of the first 3 dc-tog in the next dc-group. Cut yarn and fasten, there are 2 dc-groups remaining on shoulder and the piece measures approx. 54-56-58-60-62 cm. Repeat on the other side of neck. Right front: Ch 70-79-79-88-97 (incl. ch 4 to turn with). Establish pattern on the 1st row as follows (from center front edge): 1 dc in 5th ch from hook, 1 dc in each of the 2 following ch, ch 1, skip over 2 ch, in the next ch crochet 3 dc-tog, ch 4 and 3 dc-tog, ch 1, skip over 2 ch, 1 dc in each of the 4 following sc(= buttonband), * ch 4, skip over 8 ch, in the next ch crochet 3 dc-tog, ch 4 and 3 dc-tog *, repeat * - * a total of 5-6-6-7-8 times, ch 4, skip over 8 ch and finish with 1 dc in last ch = 5-6-6-7-8 dc-groups + button bands, turn the work. 2nd row: ch 7, in the ch-loop in the first dc-group crochet 3 dc-tog, ch 4 and 3 dc-tog, * ch 4, in the ch-loop in the next dc-group crochet 3 dc-tog, ch 4 and 3 dc-tog *, repeat * - * a total of 4-5-5-6-7 times, then ch 4, *1 dc in each of the 4 following dc, ch 1, in the ch-loop in dc-group crochet 3 dc-tog, ch 4 and 3 dc-tog, ch 1, 1 dc in each of the 4 last dc * (* - * = buttonband), turn the work. Repeat 2nd row – read buttonband-tips above. When the piece measures 8 and 18 cm inc 1 ch-loop at the side as on back. When the piece measures 35-36-37-38-39 cm bind off for armhole at the side as on back. When the piece measures 42-44-46-48-50 cm bind off for the neck following Diagram 2 – follow Diagram 2 until only 2 dc-groups remain on shoulder (for all Sizes), then continue as shown on the 2 top rows of Diagram. When the piece measures 54-56-58-60-62 cm, cut yarn and fasten. Left front: Crochet the same as the right, reversing shaping. Sleeve: Ch 79-79-79-88-88. Establish pattern on the first row as follows: start in the 16th ch from hook and crochet 3 dc-tog, ch 4 and 3 dc-tog in that ch, * ch 4, skip over 8 ch, in the next ch crochet 3 dc-tog, ch 4 and 3 dc-tog *, repeat * - * a total of 6-6-6-7-7 times, ch 4, skip over 8 ch and finish with 1 dc in the last ch = 7-7-7-8-8 dc-groups, turn the work. Continue pattern as on Body. When the piece measures 8 cm crochet Diagram 3 twice, then continue regular pattern to finished dimensions. When the piece measures 14 cm inc at one side by crocheting 1 extra ch-loop in the outermost ch-loop, then continue as before. Repeat increase on the other side when the piece measures 19-18-18-17.5-16.5 cm. Repeat inc on alternate sides 3-4-4-4-5 times more every 5-4-4-3.5-2.5 cm (10-8-8-7-5 cm between each inc on the same side). 4-5-5-5-6 ch-loops have been increased at each side. When the piece measures 52-52-52-49-44 cm put a marker at each side (to mark where sleeves will be attached to Body). When the piece measures 58-58-58-59-56 cm (the sleeves are shorter in the larger sizes because of the wider shoulders), cut yarn and fasten. Assembly: Crochet together the shoulders as follows: 1 sl st in first ch-loop on back, ch 3, 1 sc in first ch-loop on front, ch 3, 1 sc in the next ch-loop on back, etc. Crochet the sleeve and side seams in the same manner, then crochet the sleeves into the body (the marker on sleeves should match up with the side on Body). Crocheted edge for neck: Crochet 1 row with ch-loops around the neck as follows (from right side): 1 sc in 1st dc on buttonband, * ch 5, skip over 1 row (or approx. 1 cm), 1 sc in the next dc *, repeat * - * and finish with 1 sl st in last dc – see that the edge is not too tight or too loose. Then crochet 2 rows of sc – on the first row crochet approx. 3 sc in each ch-loop, on the next row crochet 1 sc in each sc from previous row. Sew 6 buttons evenly distributed on left front in the center of the 4 outermost dc on buttonband. Place the top button approx. 1 cm from the top and the bottom approx. 2 cm from bottom edge. Use ch-loops on the right buttonband as buttonholes. |
||||||||||
Diagram explanations |
||||||||||
|
||||||||||
 |
||||||||||
Have you finished this pattern?Tag your pictures with #dropspattern or submit them to the #dropsfan gallery. Do you need help with this pattern?You'll find 4 tutorial videos, a Comments/Questions area and more by visiting the pattern on garnstudio.com. © 1982-2026 DROPS Design A/S. We reserve all rights. This document, including all its sub-sections, has copyrights. Read more about what you can do with our patterns at the bottom of each pattern on our site. |
||||||||||


With over 40 years in knitting and crochet design, DROPS Design offers one of the most extensive collections of free patterns on the internet - translated to 17 languages. As of today we count 325 catalogs and 12298 patterns - 12288 of which are translated into English (US/in).
We work hard to bring you the best knitting and crochet have to offer, inspiration and advice as well as great quality yarns at incredible prices! Would you like to use our patterns for other than personal use? You can read what you are allowed to do in the Copyright text at the bottom of all our patterns. Happy crafting!
Post a comment to pattern DROPS 88-19
We would love to hear what you have to say about this pattern!
If you want to leave a question, please make sure you select the correct category in the form below, to speed up the answering process. Required fields are marked *.