
Popular categories
Looking for a yarn?


Comments / Questions (10)
![]() Nadja wrote:
Nadja wrote:
Ich stricke das Top in Größe M. Beim Rückenteil habe ich jetzt erst 18 Reihen (plus fünf Reihen ab Anschlag ohne Zunahmen) laut Anleitung gestrickt, die Arbeit misst aber schon 10 cm ab Anschlag. Die Maschenprobe stimmt, die Maße vom Vorderteil passen auch exakt. Laut Anleitung müsste ich noch 14 Reihen stricken, um mit den Zunahmen die gewünschte Maschenanzahl zu erreichen. Aber dann würde es zu lang. Es ist doch korrekt, dass nur in den Hinreihen zugenommen wird? Was mache ich falsch?
19.08.2025 - 15:04
![]() Doris wrote:
Doris wrote:
Vielen herzlichen Dank für die schnelle und verständliche Antwort. Ich mag Ihre Strickanleitungen sehr , und mit Ihrer schnellen Hilfe ist es mir auch als weniger erfahrene Strickerin möglich, tolle Stricksachen fertig zu stellen. Danke!
19.05.2025 - 18:49
![]() Doris wrote:
Doris wrote:
Hallo, beim Rückenteil steht 2. Reihe … die zugenommenen Maschen fortlaufend in das Rippenmuster einarbeiten.. können Sie mir bitte erklären, wie dann die 2. Reihe zu stricken ist? Folgt auf 2 Maschen i-cord, 2 Maschen rechts, 2 Maschen links eine linke oder eine rechte Masche? Wie erfolgt die Einarbeitung der zugenommenen Maschen in den Folgereihen? Vielen Dank für die Antwort!!
18.05.2025 - 14:01DROPS Design answered:
Liebe Doris, die 2 ersten Zunahmen werden links bei den Rückreihen gestrickt (so sind sie rechte Maschen bei der Vorderseite gesehen), die 2 nächsten Zunahmen werden dann bei den Rückreihen rechts gestrickt (so sind sie linke Maschen bei der Vorderseite gesehen); und so verbreitet sich das Rippenmuster an beiden Seiten. Viel Spaß beim Stricken!
19.05.2025 - 08:27
![]() Laura wrote:
Laura wrote:
¿Tendrian algun vídeo que explique com aumentar en las sisas cuando se está trabajando el elástico 2x2? No consigo mantenen la secuencia de elástico conforme voy aumentando.
14.05.2025 - 13:57DROPS Design answered:
Hola Laura, cuando vayas aumentando puntos estos se irán ajustando a la secuencia del elástico. Ten en cuenta que aumentas siempre en el mismo sitio. Por lo tanto, tendrías por ejemplo: los primeros 6 pts (acabas con 2 reveses),hebra (este punto se trabaja de revés), elástico (comienzas con 2 derechos) y trabajas hasta que queden 6 puntos (por ejemplo, acabas con 2d), hebra (este punto se trabaja después de revés) y trabajar los 6 pts restantes. Entonces te quedarán 3 reveses seguidos, pero en la siguiente vuelta tendrás 4 reveses (aumentarás otro revés) y en la siguiente 2r, 1d, 2r. Y así irás aumentando y ajustando la secuencia a la vez.
18.05.2025 - 14:38
![]() Będzie Po Polsku wrote:
Będzie Po Polsku wrote:
Dziękuję :)
28.04.2025 - 14:21
![]() Będzie Po Polsku wrote:
Będzie Po Polsku wrote:
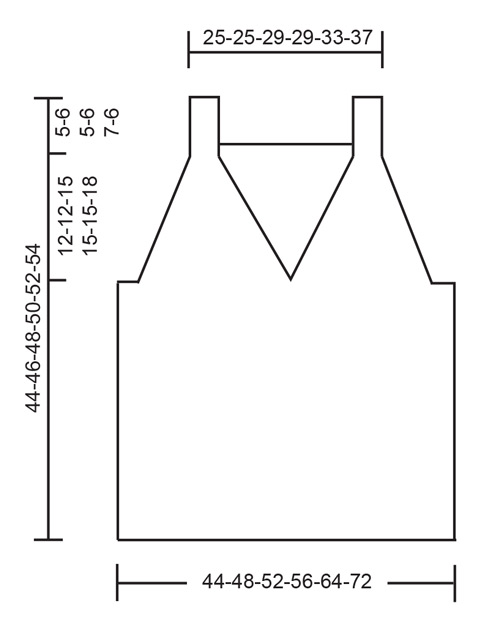
Dzień dobry, brakuje mi tu obrazka z naniesionymi wymiarami, jak to ma miejsce przy innych wzorach, przez co nie mogę określić rozmiaru (w części Państwa wzorów te same wymiary to rozmiar xxl a w innej części xxxl) - który to będzie rozmiar na 128cm w biuście?
25.04.2025 - 14:43DROPS Design answered:
Witaj, poprosiłam o dodanie rysunku z miarami na stronie. Sprawdź w przyszłym tygodniu, już powinien się pojawić. Pozdrawiamy!
25.04.2025 - 15:47
![]() Ursula wrote:
Ursula wrote:
Bonjour, pouvez-vous m'expliquer ce que veut dire 2Mailles I Cord ? est-ce-que ce sont les 2 mailles du début de chaque rang ? Cordialement Ursula
04.04.2025 - 17:51DROPS Design answered:
Bonjour Ursula, vous trouverez comment tricoter ces 2 mailles sous 2 MAILLES I-CORD au tout début des explications mais également dans cette vidéo, lorsque l'on tricote les bretelles, on va tricoter les 2 premières et les 2 dernières mailles de cette façon. Bon tricot!
07.04.2025 - 07:32
![]() Benoit wrote:
Benoit wrote:
Bonjour, Auriez-vous un diagramme ou des vidéos pour la première partie du dos? Lorsque nous devons faire les augmentations pour les emmanchures avec les mailles en côtes ? Merci
31.03.2025 - 23:50DROPS Design answered:
Bonjour Mme Benoît, dans cette vidéo, nous montrons comment incorporer des augmentations pour les tricoter en côtes 2/2 - mais notez que dans la vidéo, c'est une autre technique d'augmentations qui est pratiquée, ici, on va augmenter en utilisant cette technique. Bon tricot!
01.04.2025 - 09:08
![]() Maria wrote:
Maria wrote:
Jag saknar information om mått för de olika storlekarna! Hur ska jag veta vilken jag bör sticka för att passa?
30.03.2025 - 21:30
![]() Karin Bleul wrote:
Karin Bleul wrote:
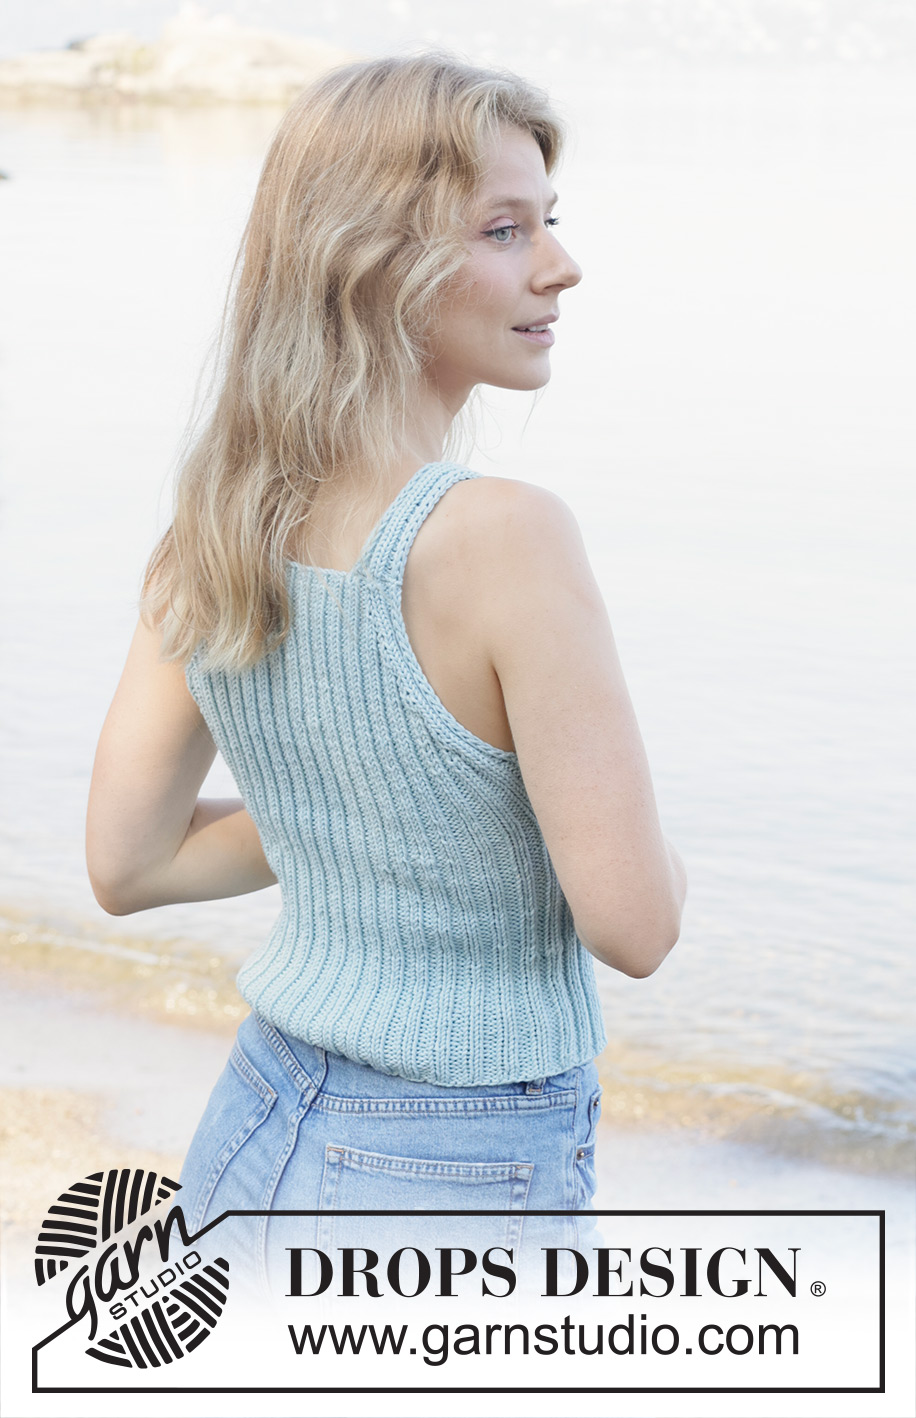
Ich habe leider keinen Schnitt für das Shirt Hidden gefunden. Ohne diesen kann ich mir die Rückseite leider nicht vorstellen. Es wäre schön, wenn sie das nachtragen können. Auch Fotos von der Rückseite sind hilfreich. Liebe Grüße an das DROPS Team von Karin
19.03.2025 - 18:11DROPS Design answered:
Liebe Karin, danke für den Hinweis, den haben wir ihn gerade hochgeladen. Viel Spaß beim Stricken!
20.03.2025 - 10:18
|
|||||||||||||
Hidden Creek Top#hiddencreektop |
|||||||||||||
 |
 |
||||||||||||
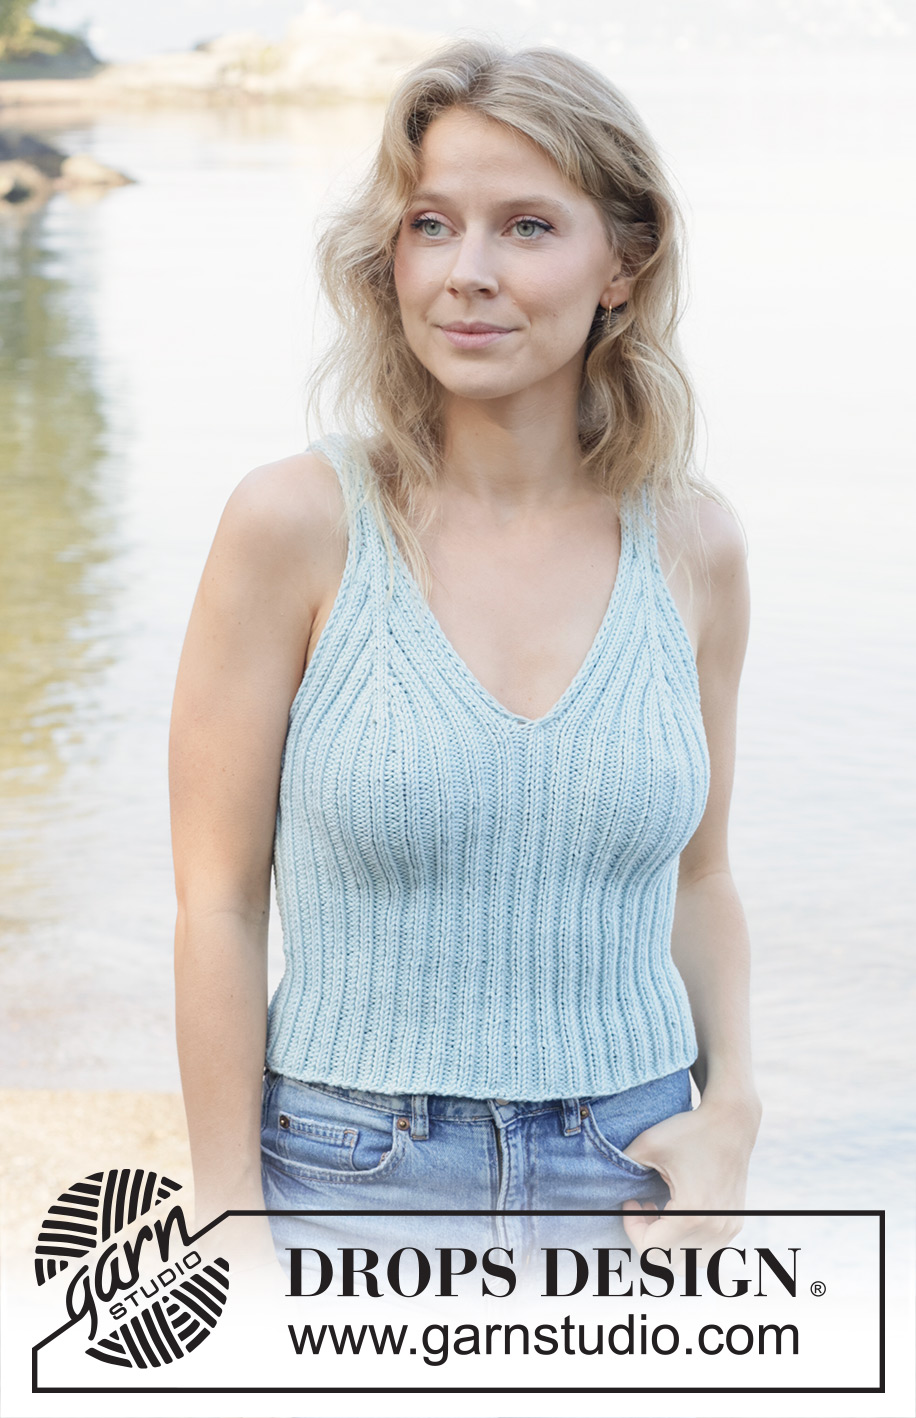
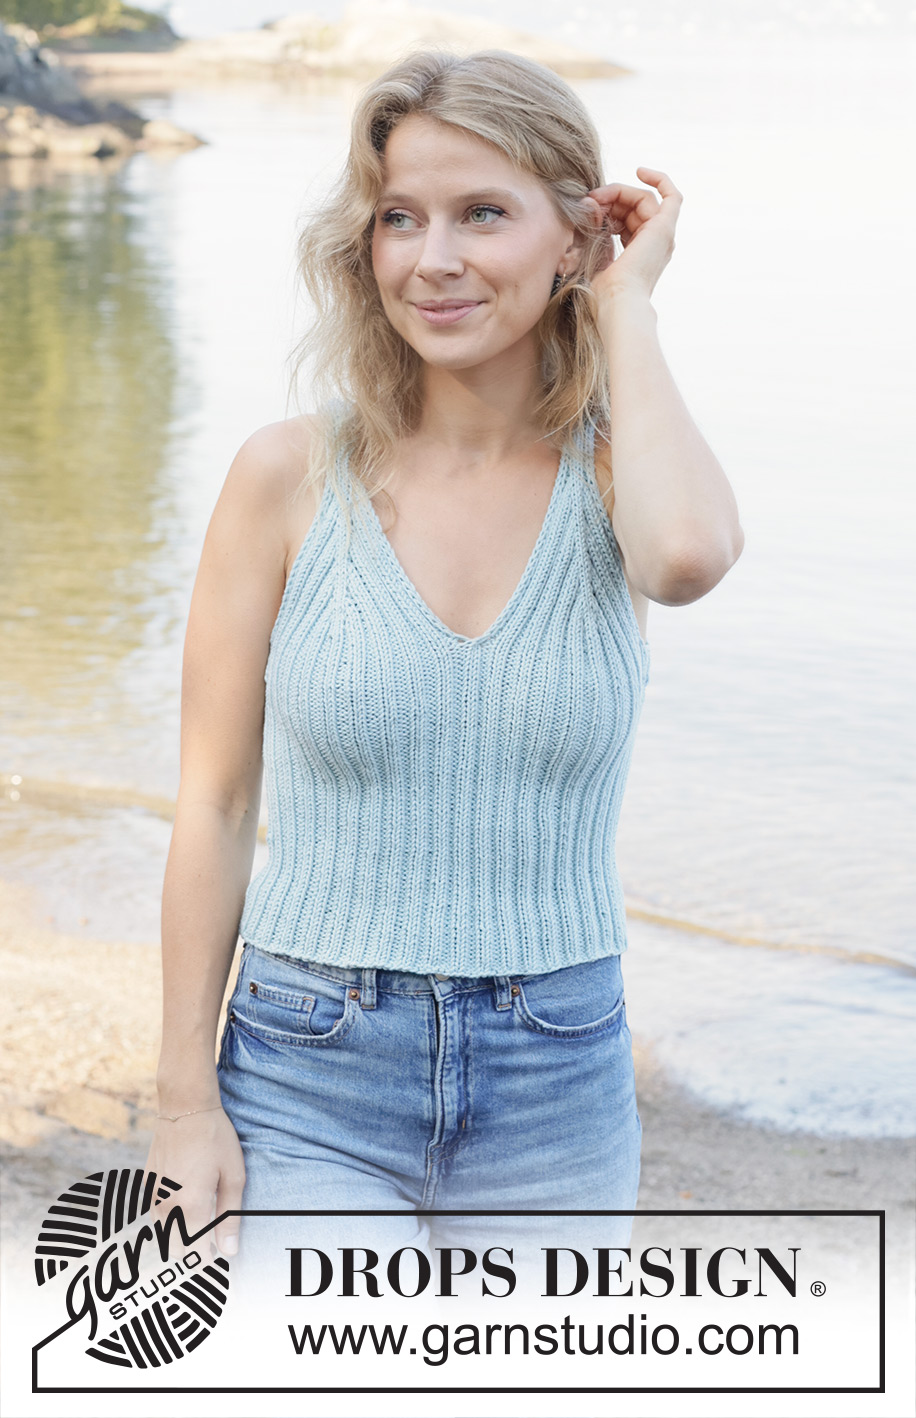
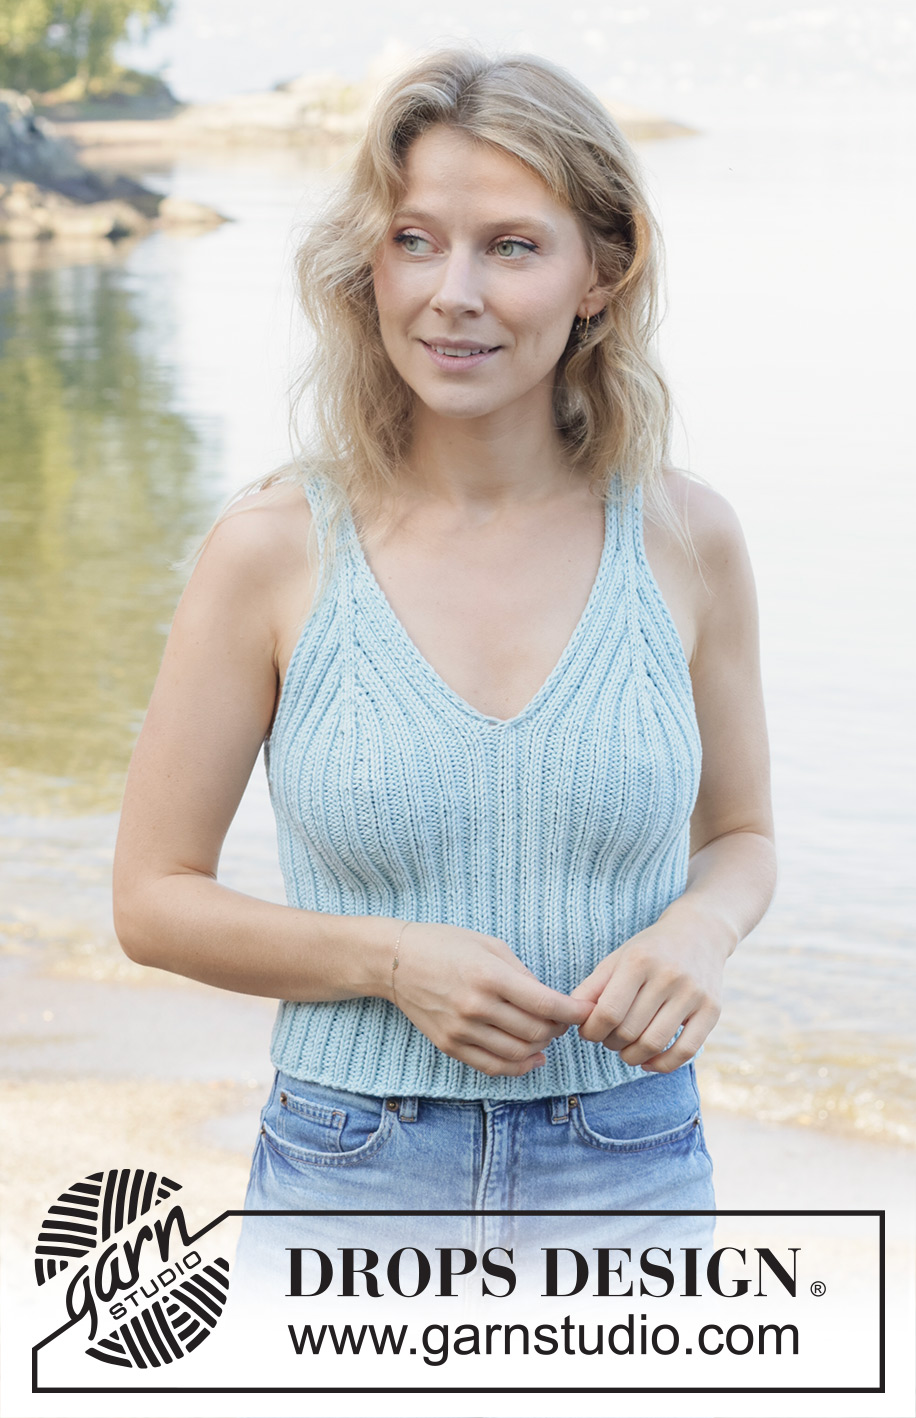
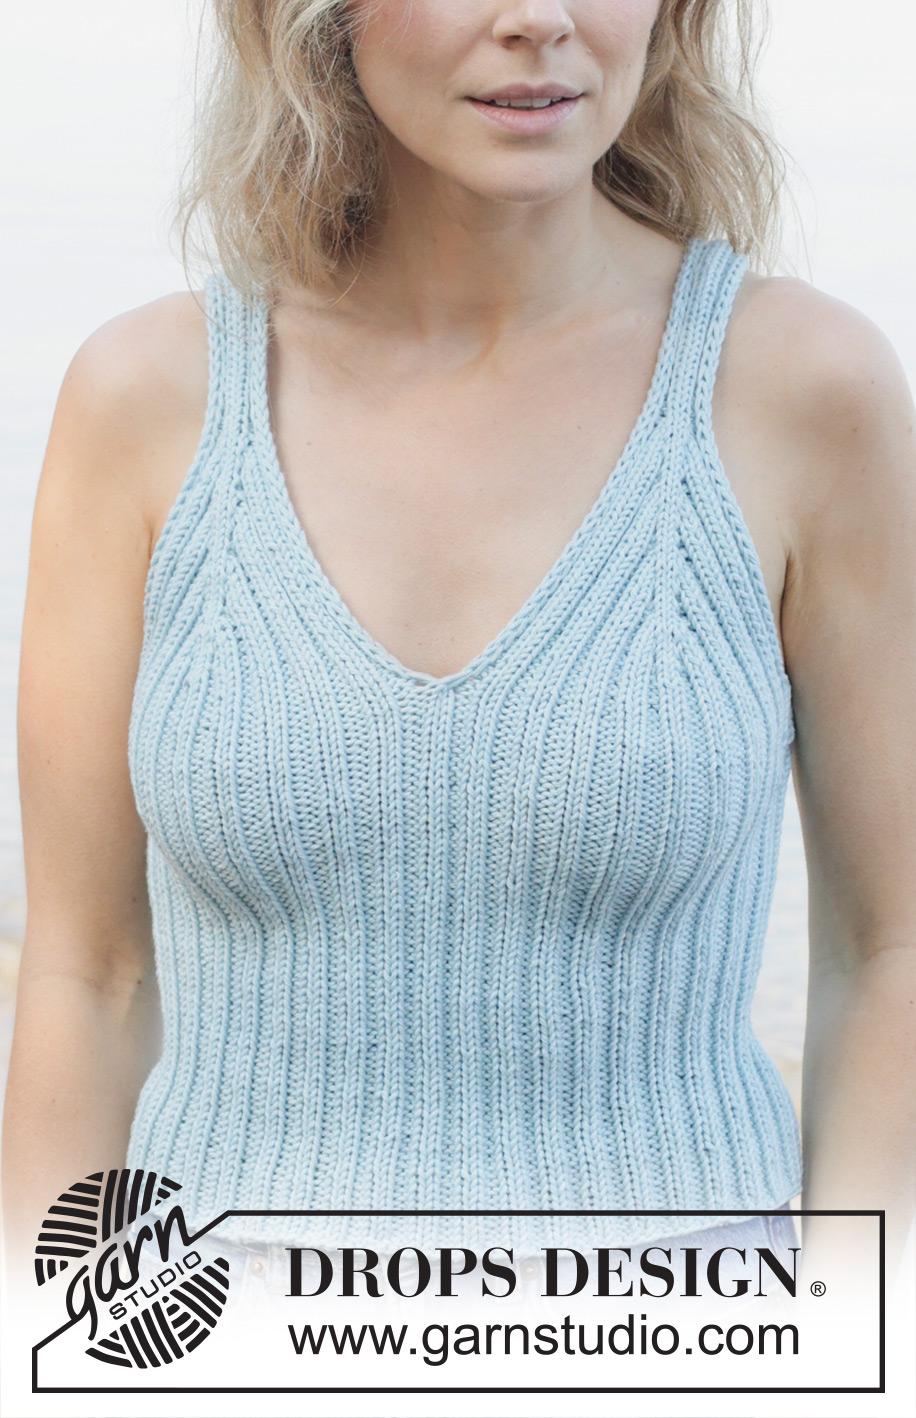
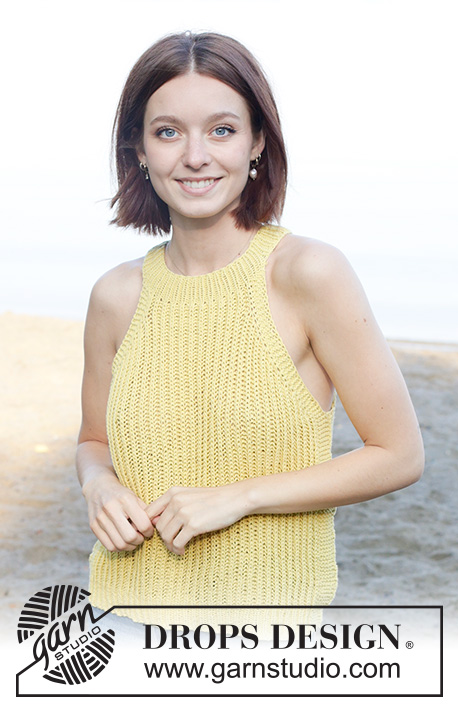
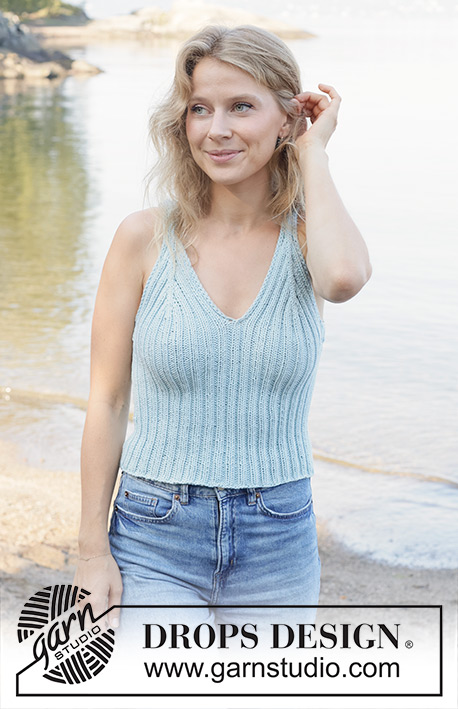
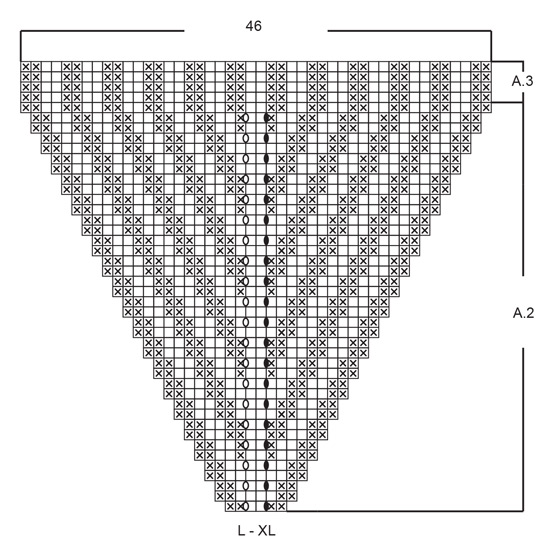
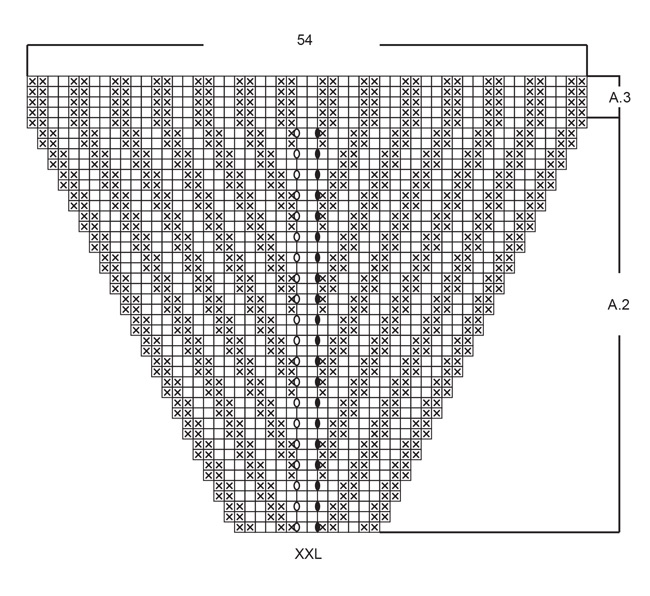
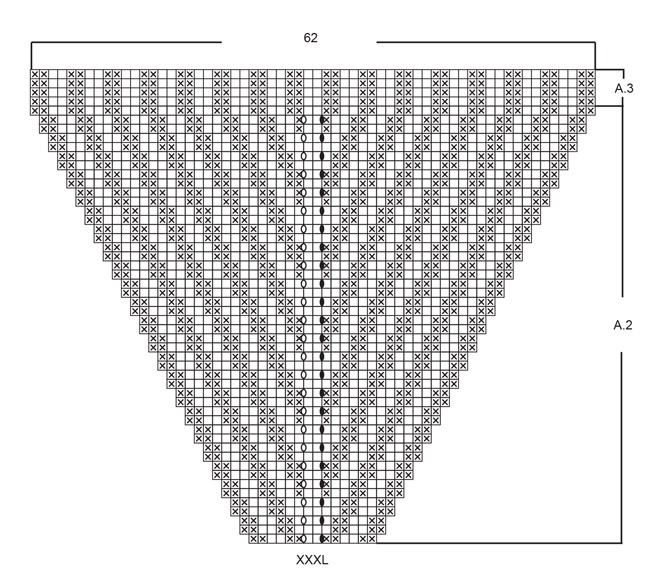
Knitted top/singlet in DROPS Paris. The piece is worked top down with straps, rib, V-neck and I-cord. Sizes S - XXXL.
DROPS 259-12 |
|||||||||||||
|
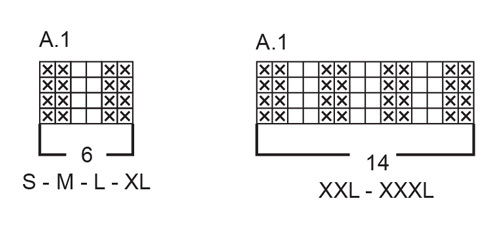
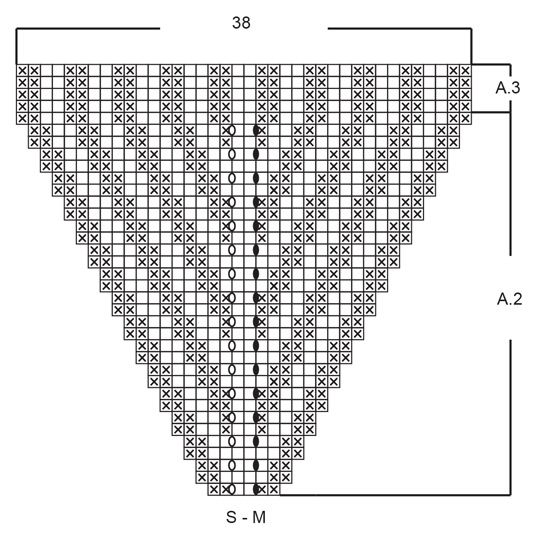
------------------------------------------------------- EXPLANATIONS FOR THE PATTERN: ------------------------------------------------------- 2 EDGE STITCHES I-CORD: FIRST 2 STITCHES: Work like this on all rows: Slip 1 stitch purl-wise with strand in front, knit 1. LAST 2 STITCHES: Work like this on all rows.: Work until there are 2 stitches left on the row, slip 1 stitch purl-wise with strand in front, knit 1. PATTERN: See diagrams A.1 to A.3. Choose diagram for your size. The diagrams show all rows on the pattern, seen from the right side. INCREASE TIP: INCREASE 1 STITCH TOWARDS RIGHT – from right side: Use the left needle to pick up the strand between 2 stitches from the previous row, pick up the strand from the back and knit the front loop. INCREASE 1 STITCH TOWARDS LEFT – from right side: Use the left needle to pick up the strand between 2 stitches from the previous row, pick up the strand from the front and knit the back loop. ------------------------------------------------------- START THE PIECE HERE: ------------------------------------------------------- TOP – SHORT OVERVIEW OF THE PIECE: The piece is worked top down with circular needle, starting with 2 separate front pieces which are worked as far as the armholes. The back piece is worked back and forth as far as the armholes. The front and back pieces are then joined and the body finished in the round. The straps are sewn to the back piece to finish. STRAPS AND FRONT PIECES: Cast on 10-10-10-10-18-18 stitches with circular needle size 3.5 MM = US 4 and DROPS Paris. Work the first row from the wrong side as follows: 2 EDGE STITCHES I-CORD – read description above, work PATTERN A.1 – read description above (remember the diagrams are read from left to right from the wrong side), 2 edge stitches I-cord. Continue this pattern back and forth until the strap measures 8-10-8-10-9-7 cm = 3⅛"-4"-3⅛"-4"-3½"-2¾" (5-6-5-6-7-6 cm = 2"-2⅜"-2"-2⅜"-2¾"-2⅜" on the front piece and 3-4-3-4-2-1 cm = 1⅛"-1½"-1⅛"-1½"-¾"-⅜" on the back piece) with the next row from the right side. Insert 1 marker; the front piece is now measured from here. Work as follows: 2 edge stitches I-cord, A.2, 2 edge stitches I-cord. Continue this pattern. Remember to maintain the knitting gauge. When A.2 is finished there are 42-42-50-50-58-66 stitches and the piece measures approx. 12-12-15-15-15-18 cm = 4¾"-4¾"-6"-6"-6"-7" from the marker. If the piece is shorter than this, continue with A.3 across A.2 (the edge stitches worked as before) to the correct length, finishing after a row from the wrong side. Lay the piece to one side and work 1 more front piece in the same way. BACK PIECE: Cast on 50-50-58-58-66-74 stitches with circular needle size 3.5 MM = US 4 and DROPS Paris. Work the first row from the wrong side as follows: 2 edge stitches I-cord, work rib (knit 2, purl 2) until there are 4 stitches left, knit 2 and 2 edge stitches I-cord. Work the next row from the right side as follows: 2 edge stitches I-cord, work rib (purl 2, knit 2) until there are 4 stitches left, purl 2 and 2 edge stitches I-cord. Continue these 2 rows. When you have worked 5 rows and the next row is from the right side, increase for the armholes as follows: ROW 1 (right side): Work the first 6 stitches as before, increase 1 stitch towards the right – read INCREASE TIP, rib as before until there are 6 stitches left, increase 1 stitch towards the left, work the last 6 stitches as before. ROW 2 (wrong side): Work as before – the increased stitches are worked into the rib. Make sure the outermost 6 stitches on each side are always 2 stitches I-cord, knit 2, purl 2 at the beginning of the row and purl 2, knit 2, 2 stitches I-cord at the end of the row (from the wrong side). Work ROWS 1 and 2 a total of 16-16-20-20-24-28 times (32-32-40-40-48-56 rows worked, with the next row from the right side) = 82-82-98-98-114-130 stitches. The piece measures approx. 14-14-17-17-20-23 cm = 5½"-5½"-6¾"-6¾"-8"-9" from the cast-on edge. If the piece is shorter than this, continue with edge stitches and rib to the correct length, finishing after a row from the wrong side. Now join the front and back pieces for the body. BODY: Start with the back piece and work as follows from the right side: Knit together the 2 edge stitches (1 decreased stitch), work rib (purl 2, knit 2) as before until there are 2 stitches left, knit the 2 edge stitches together (1 stitch decreased), cast on 8-16-8-16-16-16 stitches (under the armhole), continue across one front piece from the right side as follows: Knit together the 2 edge stitches (1 decreased stitch), work rib as before until there are 2 edge stitches left, place these 2 stitches on a cable needle held behind the piece, knit together the first 2 stitches on the second front piece (1 stitch decreased), knit together the 2 stitches on the cable needle (1 stitch decreased = 2 knitted stitches mid-front below the V-neck), work rib as before until there are 2 stitches left, knit these 2 stitches together (1 stitch decreased), cast on 8-16-8-16-16-16 stitches (under the armhole) = 176-192-208-224-256-288 stitches. Now continue with rib in the round as follows: Knit 1, work rib (purl 2, knit 2) until there are 3 stitches left, purl 2 and knit 1. Continue this rib until the body measures 27-28-28-29-30-30 cm = 10⅝"-11"-11"-11⅜"-11¾"-11¾" from the join. Bind off a little loosely with rib. ASSEMBLY: Sew the straps to the top of the back piece, outermost on each side. The top measures approx. 44-46-48-50-52-54 cm = 17¼"-18"-19"-19¾"-20½"-21¼" from mid-shoulder. |
|||||||||||||
Diagram explanations |
|||||||||||||
|
|||||||||||||
 |
|||||||||||||
 |
|||||||||||||
 |
|||||||||||||
 |
|||||||||||||
 |
|||||||||||||
 |
|||||||||||||
Have you finished this pattern?Tag your pictures with #dropspattern #hiddencreektop or submit them to the #dropsfan gallery. Do you need help with this pattern?You'll find 17 tutorial videos, a Comments/Questions area and more by visiting the pattern on garnstudio.com. © 1982-2026 DROPS Design A/S. We reserve all rights. This document, including all its sub-sections, has copyrights. Read more about what you can do with our patterns at the bottom of each pattern on our site. |
|||||||||||||


With over 40 years in knitting and crochet design, DROPS Design offers one of the most extensive collections of free patterns on the internet - translated to 17 languages. As of today we count 324 catalogs and 12290 patterns - 12280 of which are translated into English (US/in).
We work hard to bring you the best knitting and crochet have to offer, inspiration and advice as well as great quality yarns at incredible prices! Would you like to use our patterns for other than personal use? You can read what you are allowed to do in the Copyright text at the bottom of all our patterns. Happy crafting!
Post a comment to pattern DROPS 259-12
We would love to hear what you have to say about this pattern!
If you want to leave a question, please make sure you select the correct category in the form below, to speed up the answering process. Required fields are marked *.