
Popular categories
Looking for a yarn?


Comments / Questions (62)
![]() Jan Low wrote:
Jan Low wrote:
How much should I allow for any shrinkage in the Safran yarn on washing? Thanks
14.03.2024 - 17:11DROPS Design answered:
Dear Mrs Low, cotton can shring between 3-5%, but when washing Safran correctly, I don't think Safran should shrink much. But it is easy to wash it in 40`C and not gentel 40`C, then it can shrink. Always make first a swatch and wash it to be sure.
15.03.2024 - 13:01
![]() Johanna wrote:
Johanna wrote:
Leuk patroon, waarvan ik een foto wilde meesturen, maar ik zie geen mogelijkheid. Mvg, Johanna
22.08.2023 - 11:03
![]() Sana wrote:
Sana wrote:
When it says to make 9 squares does that mean 9 squares per color combination or just 9 squares. Also it says for size large to make 2 extra squares. Does that mean make 11 squares in total or is that included in the 9 squares.
17.08.2023 - 03:10DROPS Design answered:
Hi Sana, For size L you work 9 squares in each colour combination, apart from squares 1 and 2 where you work 10 squares (an extra square in each colour combination). Happy crocheting!
17.08.2023 - 09:03
![]() Tina Hamlet wrote:
Tina Hamlet wrote:
Please can you tell me if this is in UK terms or US terms
22.07.2023 - 17:59DROPS Design answered:
Hi Tina, this information can be found in the pink box just above the pattern instructions (you write from Brittish web-page, so probably you see the Brittish (UK) terms). Happy crocheting!
23.07.2023 - 07:13
![]() Jayde wrote:
Jayde wrote:
How many squares are needing for a xxxl? :)
11.07.2023 - 01:45DROPS Design answered:
Hi Jade, For size xxxl you always use the last number in each series. Happy crocheting!
11.07.2023 - 07:03
![]() Sana wrote:
Sana wrote:
Hi I’m very confused what the 5-6-9-10-12 squares mean? Is that the number of squares or the measurement in cm or pertaining to the square category?
09.07.2023 - 04:57DROPS Design answered:
Hi Sana, The different numbers refer to the different sizes. So if you are working size XS/S you work 5 squares, size M you work 6 squares, etc. Happy crocheting!
10.07.2023 - 07:45
![]() Dana Valdez wrote:
Dana Valdez wrote:
Acabo de terminar mi prenda. Es una perfecta pieza en talla M. El patrón es simplemente increíble. ¡Muchas gracias!
06.07.2023 - 09:46
![]() Sandrine wrote:
Sandrine wrote:
Pouvez vous afficher le schéma des granny assemblés du top ?
23.06.2023 - 11:53DROPS Design answered:
Bonjour Sandrine, nous n'avons pas de diagramme pour l'assemblage des carrés, mais cette vidéo peut vous aider à comprendre comment faire, attention, suivez bien les indications de ce modèle, car on utilise des carrés différents dans la vidéo. Bon crochet!
23.06.2023 - 15:47
![]() Khushi wrote:
Khushi wrote:
How many inches is a single granny square? Both for the larger one and the smaller one
05.06.2023 - 23:26DROPS Design answered:
Hi Khushi, 1 square measures approx. 7½ cm x 7½ cm = 2 7/8" x 2 7/8". Happy crocheting!
06.06.2023 - 06:43
![]() Yannick wrote:
Yannick wrote:
Bonjour, Si je veux faire ce modèle en crochet 2.5, combien de mailles dois faire pour les carrés grands et petits ? Merci pour votre réponse. Bonne journée.
05.06.2023 - 11:01DROPS Design answered:
Bonjour Yannick, votre tension sera alors complètement différente, il va vous falloir recalculer en fonction de votre propre tension combien de carrés il vous faudra ou bien combien de tours ajouter à A.1 pour avoir les bonnes mesures. Si vous avez besoin d'aide pour ce faire, n'hésitez pas à contacter votre magasin, même par mail ou téléphone. Notez que la quantité totale en sera également affectée. Bon crochet!
05.06.2023 - 13:16
|
||||||||||||||||
Woodstock Weekend#woodstockweekendtop |
||||||||||||||||
 |
 |
|||||||||||||||
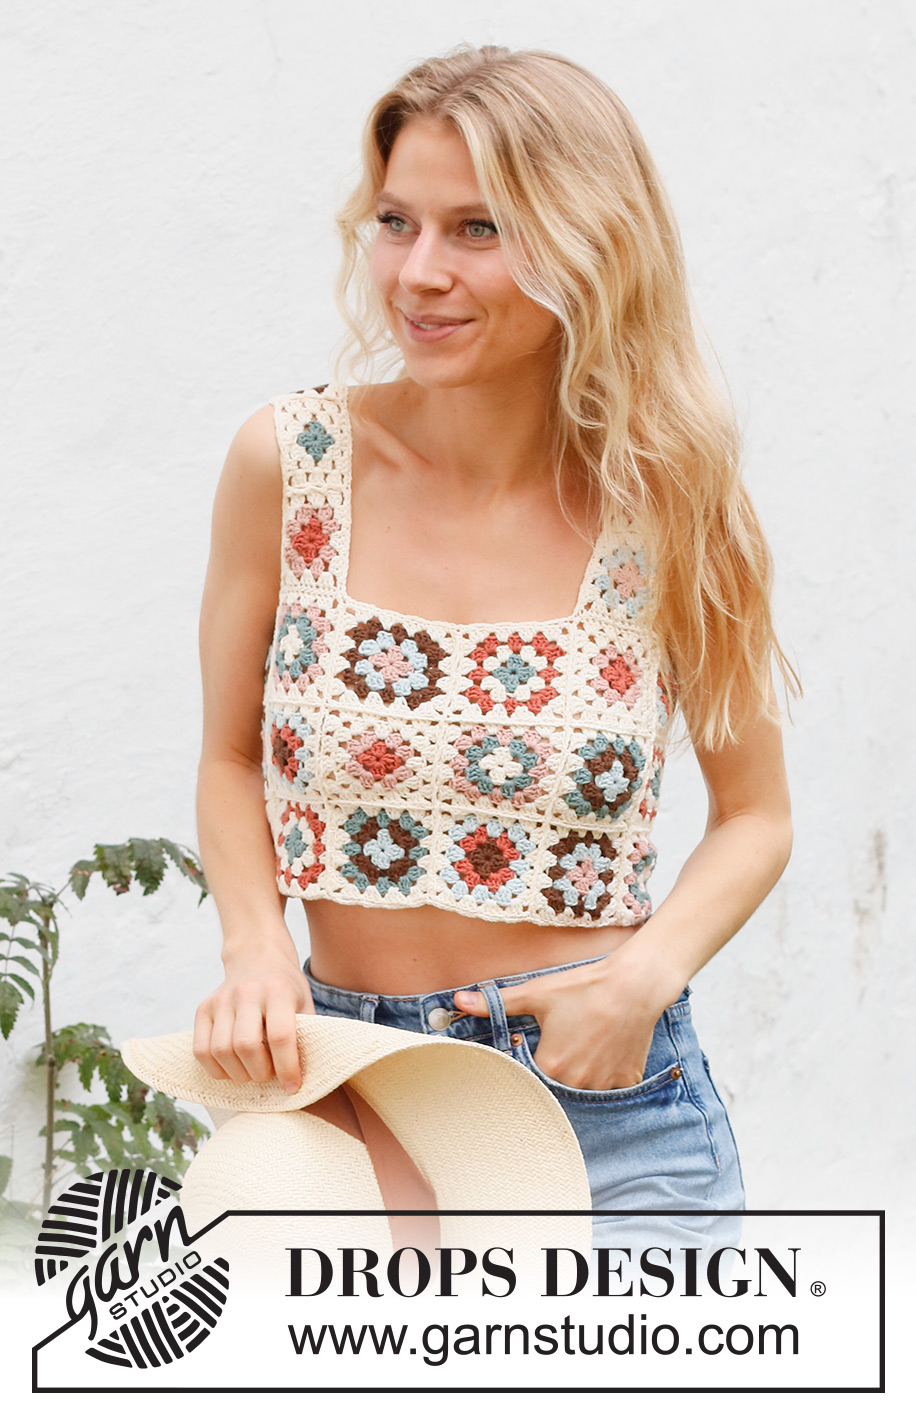
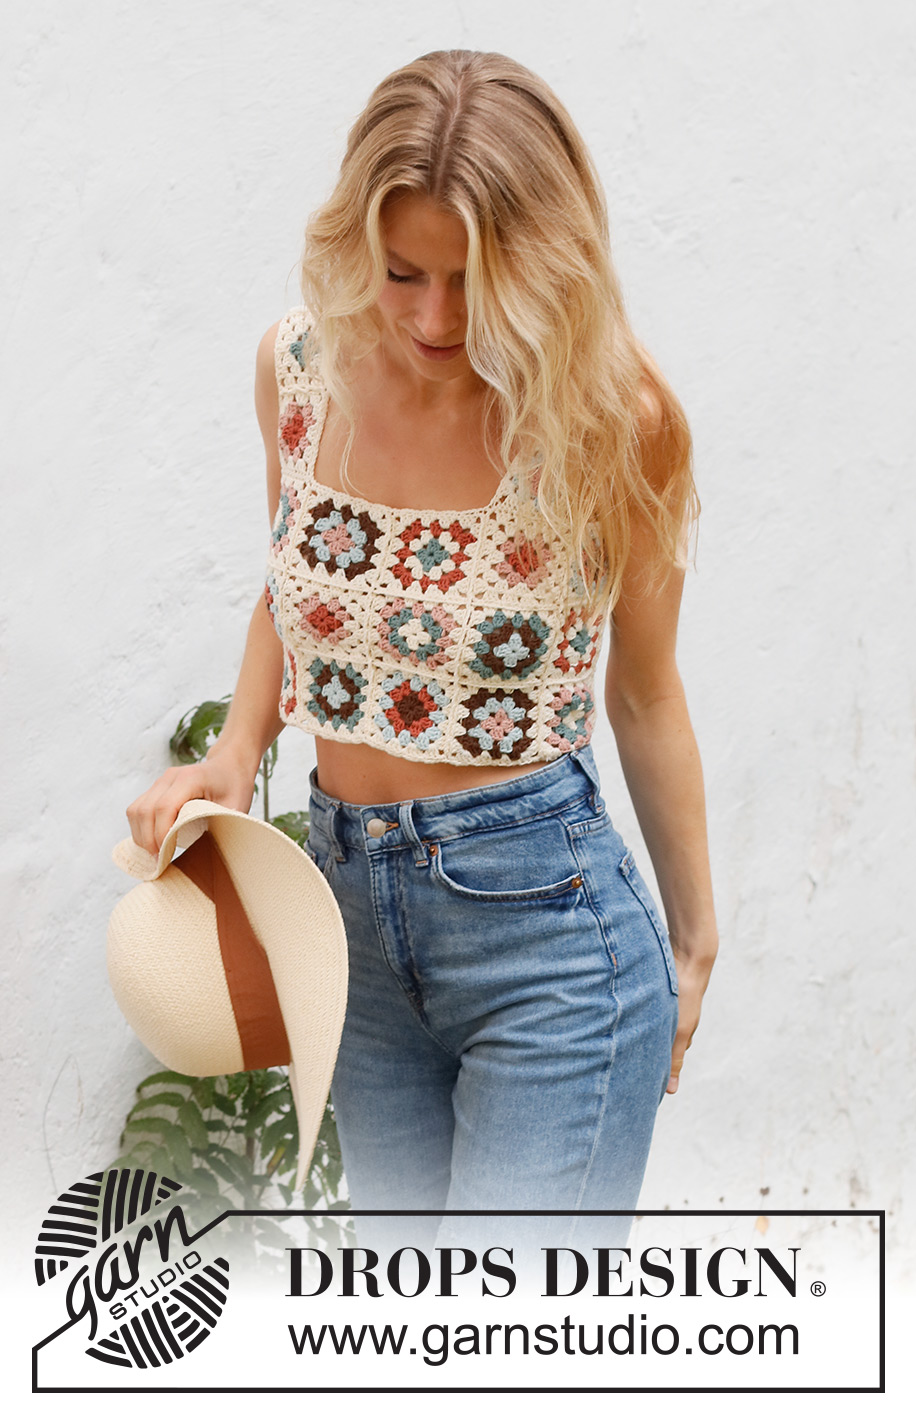
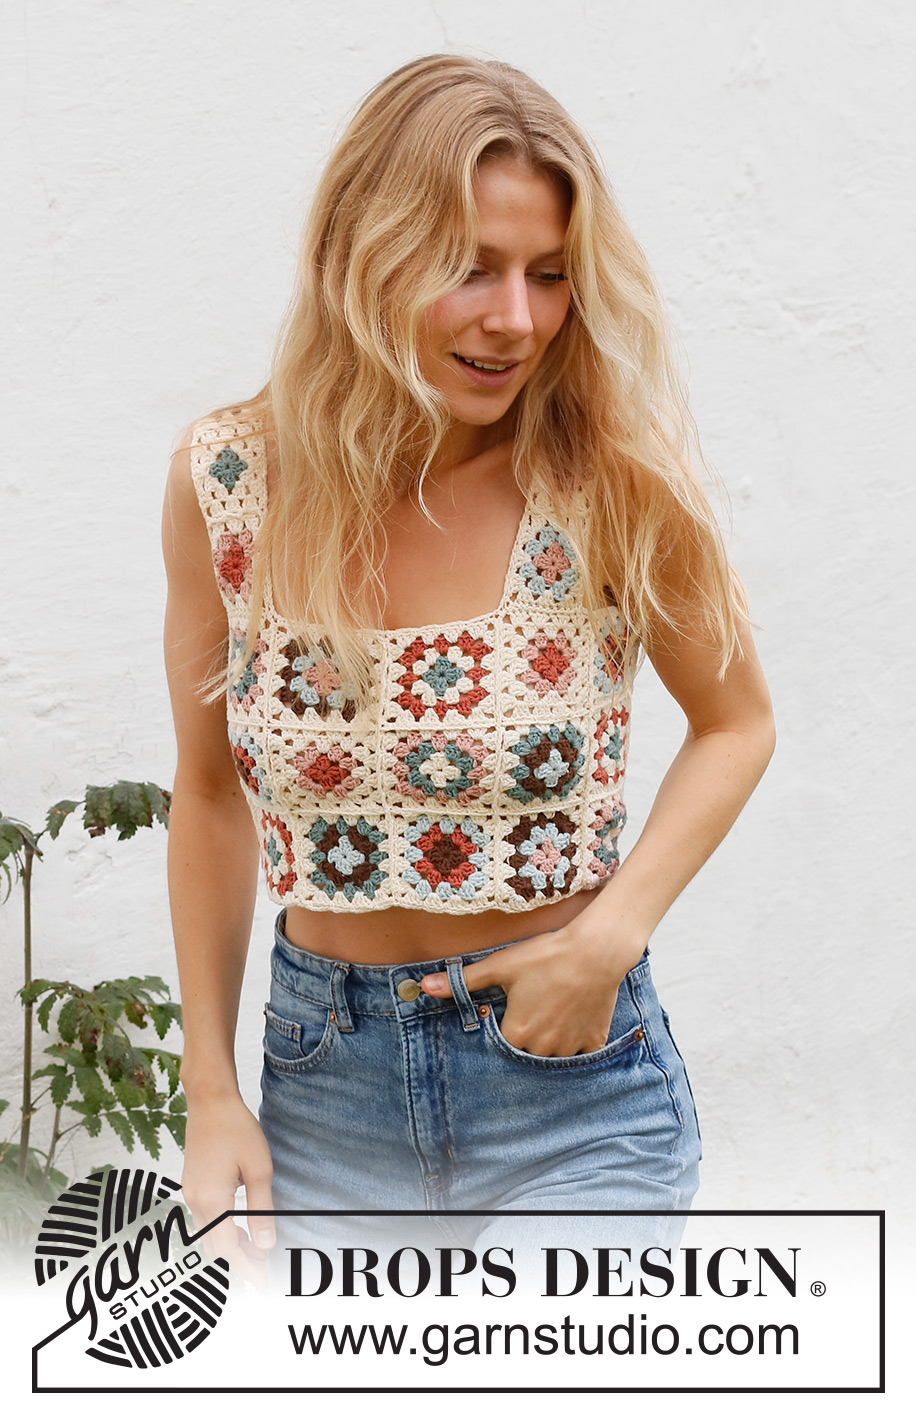
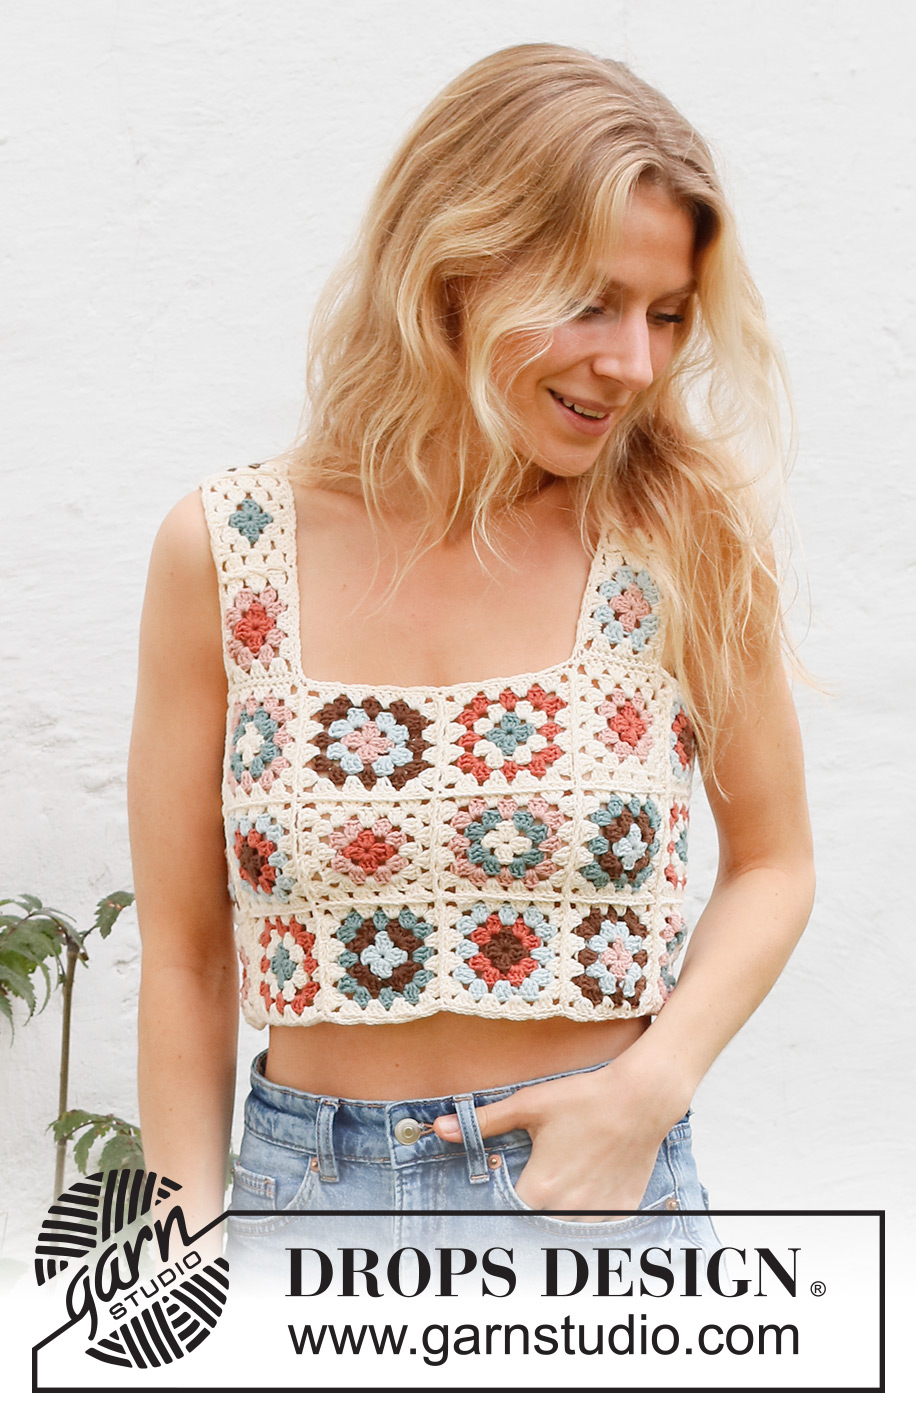
Crocheted top with granny squares in DROPS Safran. Sizes S - XXXL.
DROPS 231-31 |
||||||||||||||||
|
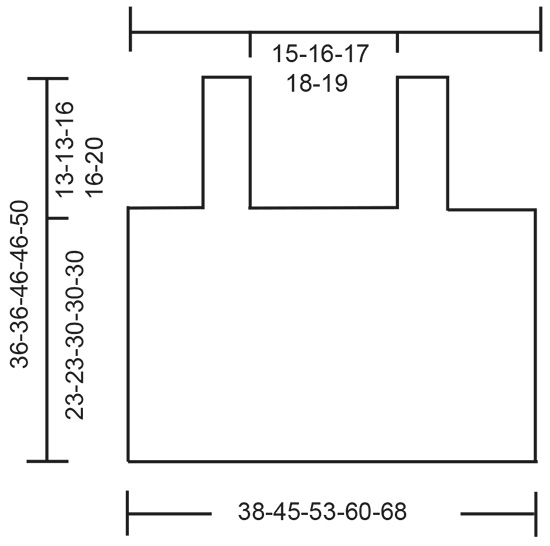
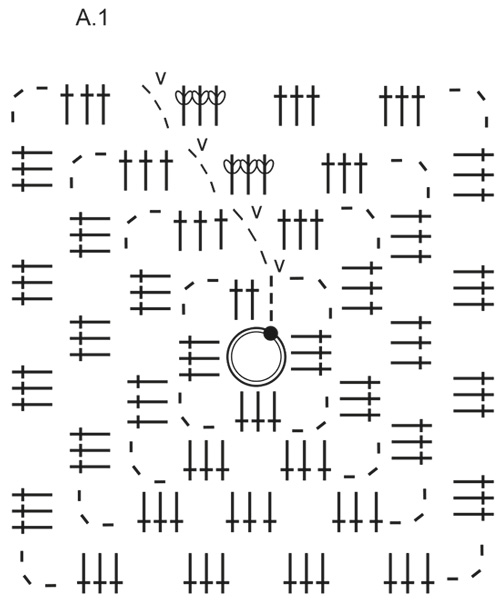
------------------------------------------------------- EXPLANATIONS FOR THE PATTERN: ------------------------------------------------------- COLOR COMBINATIONS: SQUARE 1: Round 1 color mint, Round 2 color coffee, Round 3 color sea green, Round 4 color off white. SQUARE 2: Round 1 color sea green, Round 2 color off white, Round 3 color red clay, Round 4 color off white. SQUARE 3: Round 1 color coffee, Round 2 color red clay, Round 3 color mint, Round 4 color off white. SQUARE 4: Round 1 color powder pink, Round 2 color mint, Round 3 color coffee, Round 4 color off white. SQUARE 5: Round 1 color red clay, Round 2 color powder pink, Round 3 color off white, Round 4 color off white. SQUARE 6: Round 1 color off white, Round 2 color sea green, Round 3 color powder pink, Round 4 color off white. PATTERN: See diagram A.1. COLOR-CHANGE: To get a neat transition when changing colors at the beginning of a round, work the last slip stitch on the round with the new color. CHAIN STITCH: If you work outermost on the hook the chain stitch will often be too tight; 1 chain stitch should be as long as 1 double crochet is wide. ------------------------------------------------------- START THE PIECE HERE: ------------------------------------------------------- TOP – SHORT OVERVIEW OF THE PIECE: The piece consists of granny squares, which are crocheted together to finish. GRANNY SQUARE: Work squares in different COLOR COMBINATIONS – read description above. Fasten or work in the strands as you go. The squares are worked according to diagram A.1 with hook size 3.5 MM = US E/4 - read COLOR-CHANGE in explanations above. Work 5-6-9-10-12 squares in each color combination, in size L work 2 extra squares (squares 1 and 2), in size XL/XXL work 4 extra squares (squares 1, 2, 3 and 4) = 30-36-56-64-72 squares on the front and back pieces. Then work smaller squares for the straps, just working the first 3 rounds in A.1 (round 4 is not worked). Work 1-1-1-1-2 squares in each color combination, but always working round 3 with color off white. Sizes XS/S - M : Work 2 extra squares (squares 1 and 2) Size L-XL/XXL: Work 4 extra squares (squares 1, 2, 3 and 4) = 8-8-10-10-12 small squares. ASSEMBLY: The large squares are crocheted together into a rectangle for the front and back pieces. Lay the squares out in your chosen order, with 3-3-4-4-4 squares in height and 10-12-14-16-18 squares in width – see photo for inspiration. Crochet the squares together width-wise, then upwards. Start on the right side, with the first square on the top and second row. Lay the squares wrong side to wrong side. Work through both layers with color off white, from the right side as follows: 1 single crochet around the 3 chain stitches in the corner, * 3 chain stitches, skip 1 double crochet group, 1 single crochet between the next 2 double crochet groups *, work from *-* 3 times, finish with 3 chain stitches, skip a double crochet group, work 1 single crochet around the corner and 3 chain stitches. Lay the next 2 squares from the top and second row wrong side to wrong side. Crochet them together in the same way as the first 2 squares. Continue until all the squares in the top 2 rows have been worked together. Sizes XS/S - M: Crochet the bottom row together to the 2 top rows in the same way. Sizes L - XL/XXL and XXXL: Work the next 2 rows to the 2 top rows in the same way. Crochet the squares together in height, in the same way. When all the squares have been crocheted together, crochet the sides together. Cut and fasten the strands. Crochet 4-4-5-5-6 small squares together in a row in the same way. Repeat for the second strap. Lay the top flat, with either a half or whole square on each side, the rectangle has been crocheted together mid-back. Place the 2 straps at the top, 5 ½-8½-12-15-19 cm = 2⅛"-3¼"-4¾"-6"-7½" in from each side, with 15-16-17-18-19 cm = 6"-6¼"-6¾"-7"-7½" between the 2 straps mid-front. Sew the straps to the top front and back. Try on the top and adjust the number of small squares if necessary. CROCHET EDGES: Work an edge around the bottom with color off white as follows: 1 single crochet around the 3 chain stitches in a corner of a square, * 3 chain stitches, skip 1 double crochet group, 1 single crochet between the next 2 double crochet groups *, work from *-* 3 times, finish with 3 chain stitches, skip a double crochet group and 1 single crochet around the corner, work 2 chain stitches, 1 single crochet around the 3 chain stitches in the corner of the next square. Continue like this around the bottom edge. Work a similar edge around each armhole and the neck. |
||||||||||||||||
Diagram explanations |
||||||||||||||||
|
||||||||||||||||
 |
||||||||||||||||
 |
||||||||||||||||
Have you finished this pattern?Tag your pictures with #dropspattern #woodstockweekendtop or submit them to the #dropsfan gallery. Do you need help with this pattern?You'll find 11 tutorial videos, a Comments/Questions area and more by visiting the pattern on garnstudio.com. © 1982-2026 DROPS Design A/S. We reserve all rights. This document, including all its sub-sections, has copyrights. Read more about what you can do with our patterns at the bottom of each pattern on our site. |
||||||||||||||||


With over 40 years in knitting and crochet design, DROPS Design offers one of the most extensive collections of free patterns on the internet - translated to 17 languages. As of today we count 324 catalogs and 12290 patterns - 12280 of which are translated into English (US/in).
We work hard to bring you the best knitting and crochet have to offer, inspiration and advice as well as great quality yarns at incredible prices! Would you like to use our patterns for other than personal use? You can read what you are allowed to do in the Copyright text at the bottom of all our patterns. Happy crafting!
Post a comment to pattern DROPS 231-31
We would love to hear what you have to say about this pattern!
If you want to leave a question, please make sure you select the correct category in the form below, to speed up the answering process. Required fields are marked *.