
Popular categories
Looking for a yarn?


Comments / Questions (59)
![]() Valerie wrote:
Valerie wrote:
Did ye all use the 3.0 or 3.5 hook for the Woodstock?
06.07.2025 - 21:33DROPS Design answered:
Dear Valerie, we use a 3.5mm hook for the pattern, as indicated in CROCHET HOOK in the Materials heading above. Happy crochetting!
06.07.2025 - 22:13
![]() Nina wrote:
Nina wrote:
Ik wil de top graag wat langer. Als ik er nog 3 rijen blokken extra bij maak aan de onderkant, hoeveel bollen katoen heb ik dan nodig van elke kleur?
28.06.2025 - 19:57DROPS Design answered:
Dag Nina,
Dat zou ik zo niet weten en het is ook afhankelijk van je maat. Meestal kun je overgebleven bollen terugsturen naar de winkel. Vraag je verkooppunt naar de voorwaarden.
29.06.2025 - 09:49
![]() Ludovica wrote:
Ludovica wrote:
Come capisco quale taglia è quella più giusta per me?
20.06.2025 - 07:30DROPS Design answered:
Buonasera Ludovica, in fondo alla pagina di ogni modello può trovare lo schema con le taglie. Lo confronti con uno simile già in suo possesso e potrà trovare la taglia corretta. Buon lavoro!
20.06.2025 - 23:00
![]() G Moss wrote:
G Moss wrote:
What are the bust measurements etc to determine sizing.
23.05.2025 - 03:26DROPS Design answered:
Hi G Moss, You will find a size chart at the bottom of the pattern, with all the measurements for the different sizes. Regards, Drops Team.
23.05.2025 - 05:52
![]() Margo wrote:
Margo wrote:
Bonjour, J’ai du mal à comprendre les instructions pour l’assemblage : 1) Je ne comprends pas quand vous dites : « crocheter de *-* 3 fois, terminer par 3 mailles en l'air ». Qu’est ce que « *-* » signifie ? 2) Pourquoi doit-on finir avec 3 mailles en l’air après avoir fait une maille serrée dans le deuxième coin ? À quoi servent ces 3 mailles en l’air supplémentaires ? 3) Je ne comprends pas dans quel ordre on doit crocheter les carrés… Merci !
15.07.2024 - 17:34DROPS Design answered:
Bonjour Margo, vous répétez la partie entre les * puis après avoir crocheté 3 fois cette partie (de *à*), vous crochetez 3 mailles en l'air puis vous sautez 1 groupe de brides et vous crochetez 1 maille serrée autour du coin, puis 3 mailles en l'air pour la transition avec les 2 carrés suivants, continuez ensuite avec 1 maille serrée, 3 mailles en l'air comme avant jusqu'à ce que les carrés soient assemblés entre eux. Bon crochet!
29.07.2024 - 10:10
![]() Poyung Yassine wrote:
Poyung Yassine wrote:
I have just purchased this pattern on Etsy UK, but they seemed to have chopped off the key to the diagram. Is this person allowed to do this? They have called this pattern Crochet pattern-Granny Square top and the seller is DigitalonlyCrafts.
06.07.2024 - 02:28
![]() Corinne Zanette wrote:
Corinne Zanette wrote:
Bonjour, Je souhaiterais savoir s'il est nécessaire de bloquer les carrés avant de les assembler. Merci d'avance pour votre réponse.
29.06.2024 - 07:57DROPS Design answered:
Bonjour Mme Zanette, certaines bloquent tout, d'autres rien, c'est à chacune de voir selon ses habitudes/expériences; n'hésitez pas à demander conseil à votre magasin si besoin, même par mail ou téléphone, on saura vous aider. Bonne continuation!
01.07.2024 - 08:21
![]() Tanja Van Voorthuijsen wrote:
Tanja Van Voorthuijsen wrote:
Beste lezer, Ik ben de weekend Woodstock aan het haken in de maat S. In de wijziging van het patroon (in rood) staat aangegeven dat ik 2 granny square’s extra moet haken . Wat ga ik met deze 2 extra granny’s doen? Het lijfje bestaat toch uit 3 x 10 granny squares? Bij voorbaat dank voor uw reactie.
10.06.2024 - 14:20DROPS Design answered:
Dag Tanja,
In het online patroon is de correctie al verwerkt. Mocht je het patroon afgedrukt hebben voor de correctiedatum, dan was de correctie nog niet in de afdruk verwerkt.
12.06.2024 - 16:36
![]() Naomi wrote:
Naomi wrote:
I'm struggling to understand how to do the edging. Do you have an alternative explanation/video/visual for this? Thanks
05.06.2024 - 20:44DROPS Design answered:
Dear Naomi, there is no specific video to this edge, but the last round in this video is worked the same way: with 1 double crochet (UK-English) between each treble crochet group and 3 chains between each double crochet - note that you should work here 2 chains between 2 squares. Happy crocheting!
06.06.2024 - 07:42
![]() Bella wrote:
Bella wrote:
How many squares in total would i make for a size medium and say you have a bigger chest and a small waist what size would you use ?
03.06.2024 - 16:15DROPS Design answered:
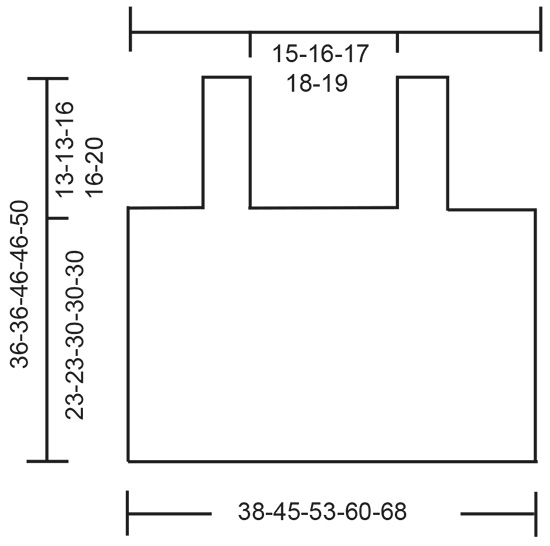
Dear Bella, you need 36 squares for the front and the back for size M. For sizing please see the schematic drawing. Take a garnment that fits the intended wearer and compare the measurements and select that is closest. Happy Crafting!
03.06.2024 - 23:54
|
||||||||||||||||
Woodstock Weekend#woodstockweekendtop |
||||||||||||||||
 |
 |
|||||||||||||||
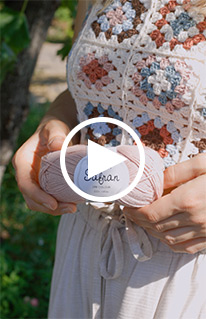
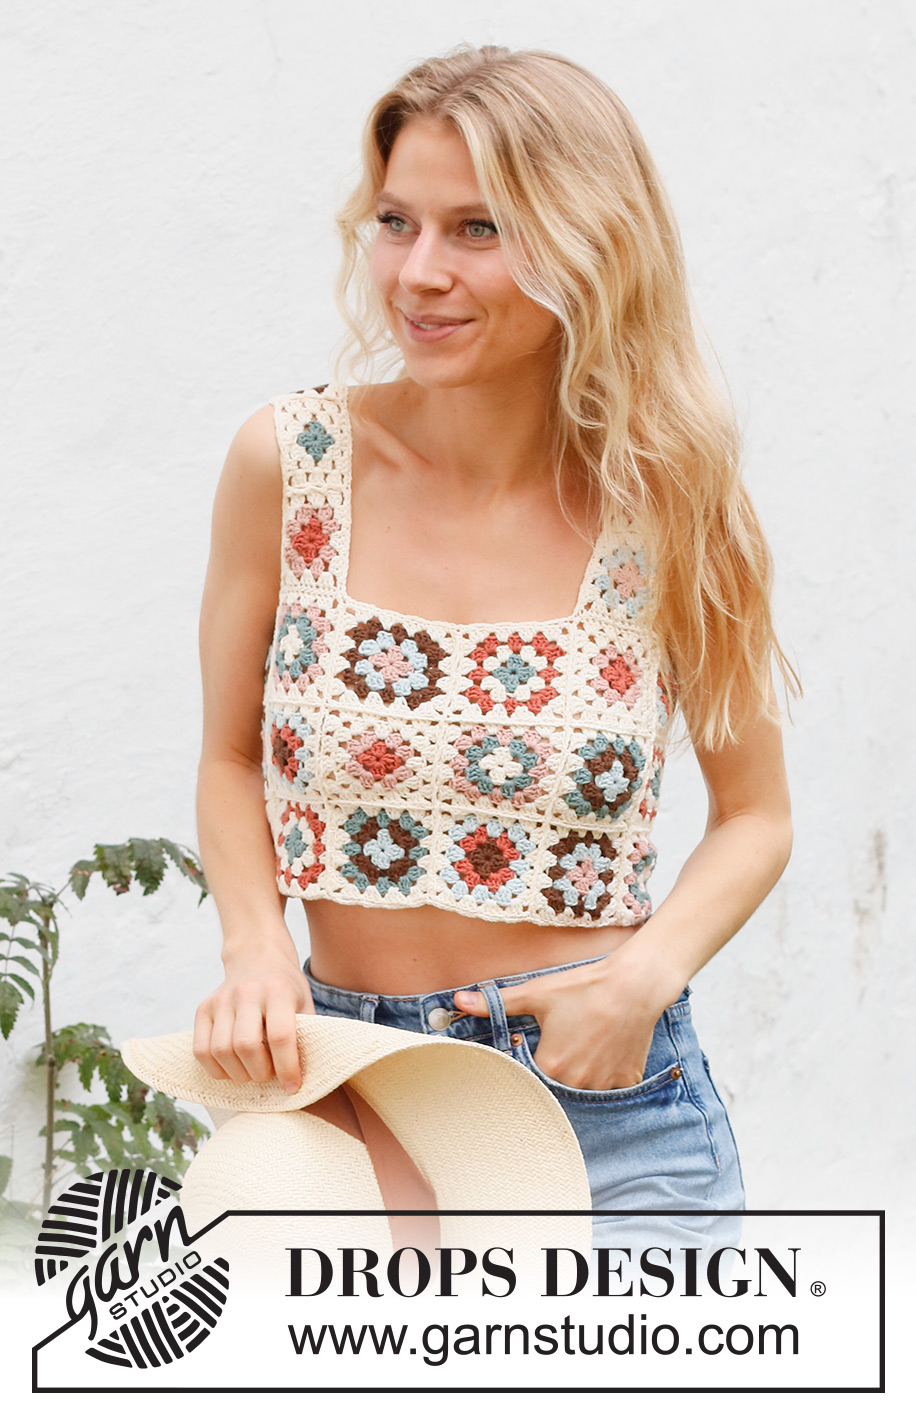
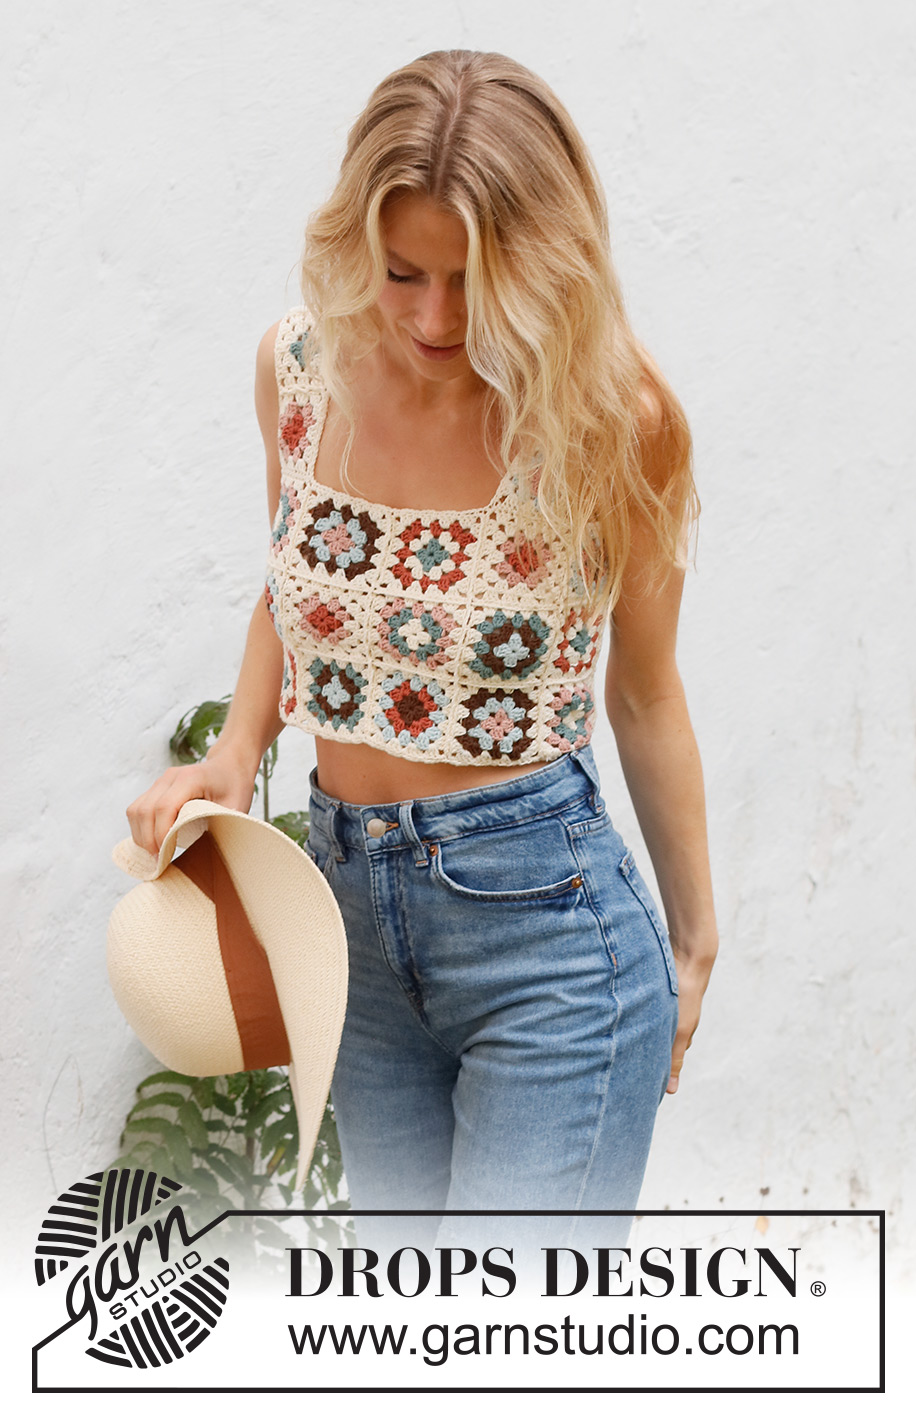
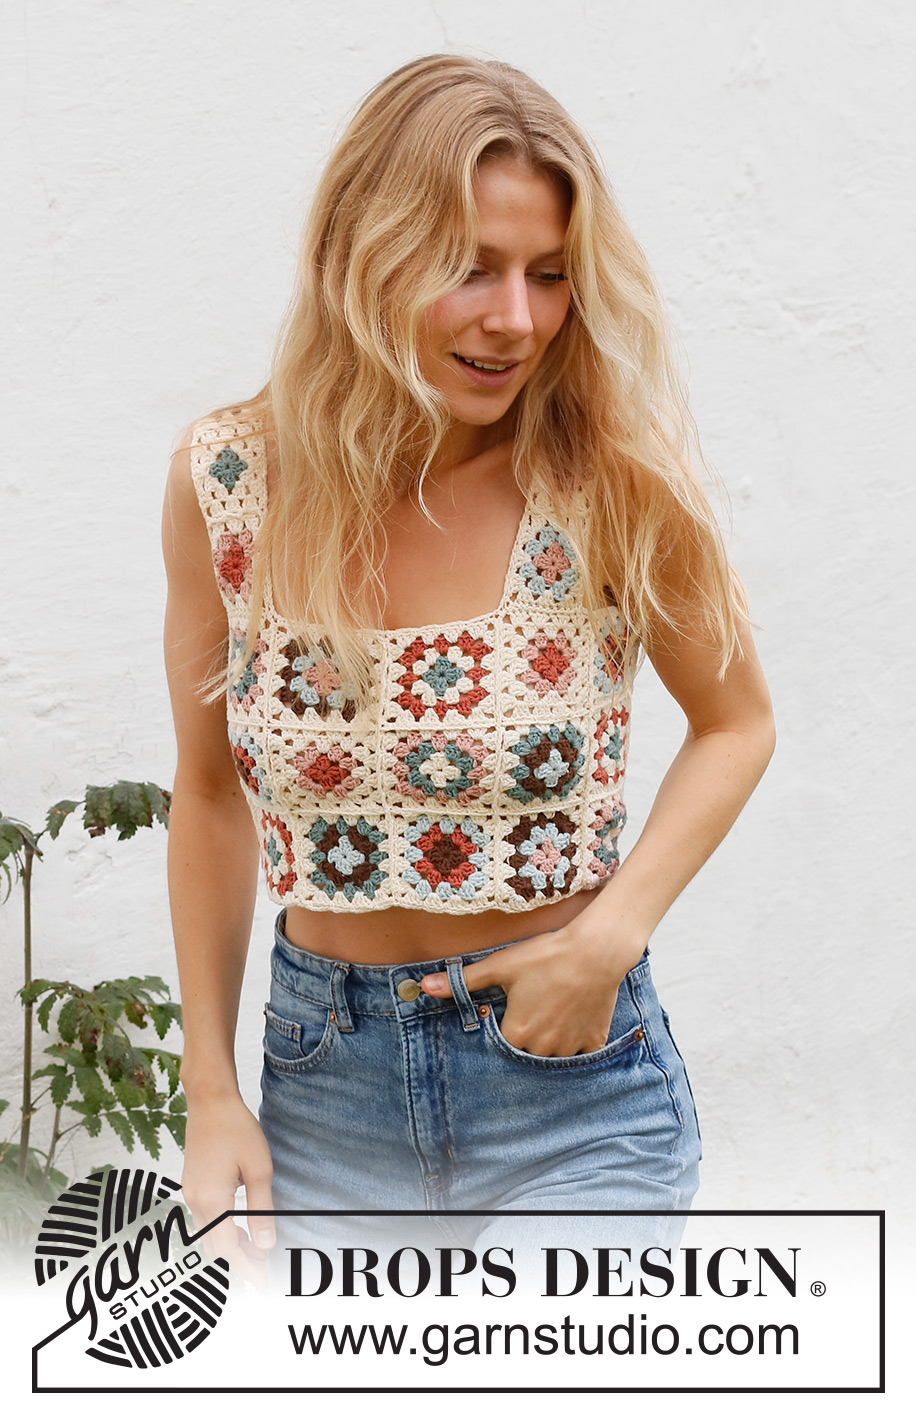
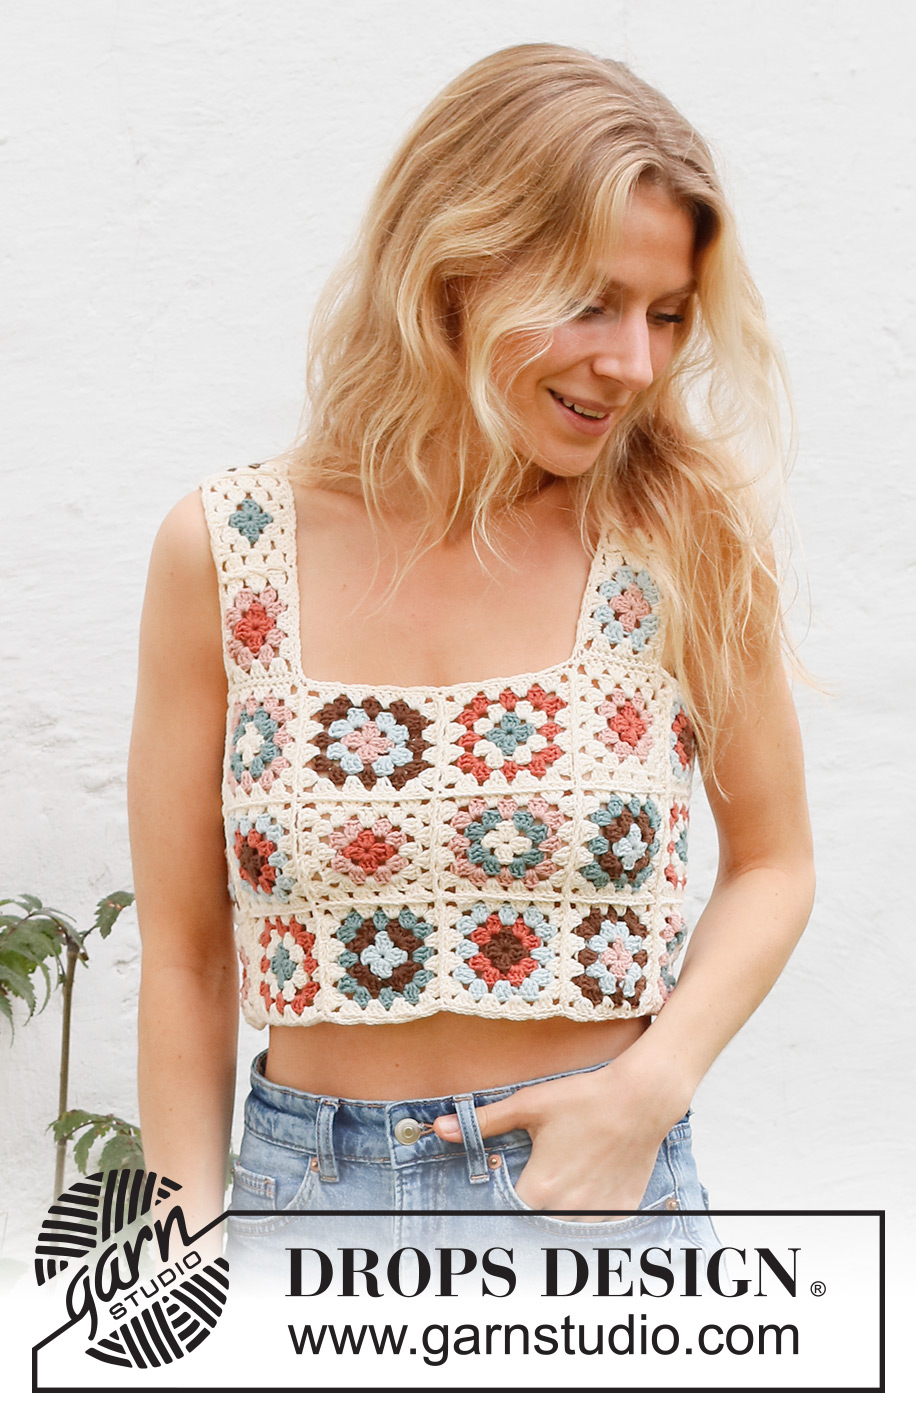
Crocheted top with granny squares in DROPS Safran. Sizes S - XXXL.
DROPS 231-31 |
||||||||||||||||
|
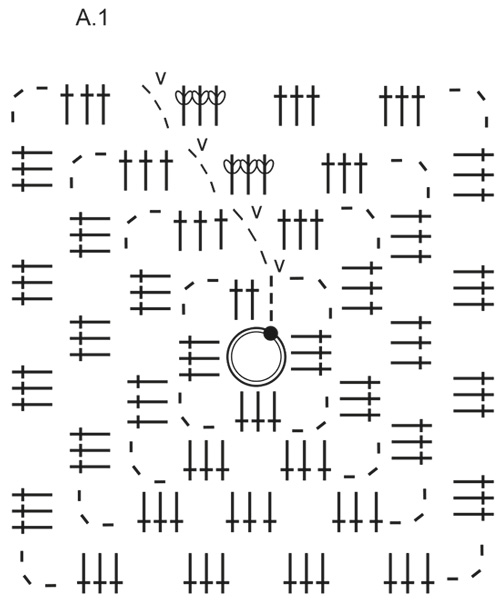
------------------------------------------------------- EXPLANATIONS FOR THE PATTERN: ------------------------------------------------------- COLOUR COMBINATIONS: SQUARE 1: Round 1 colour mint, Round 2 colour coffee, Round 3 colour sea green, Round 4 colour off white. SQUARE 2: Round 1 colour sea green, Round 2 colour off white, Round 3 colour red clay, Round 4 colour off white. SQUARE 3: Round 1 colour coffee, Round 2 colour red clay, Round 3 colour mint, Round 4 colour off white. SQUARE 4: Round 1 colour powder pink, Round 2 colour mint, Round 3 colour coffee, Round 4 colour off white. SQUARE 5: Round 1 colour red clay, Round 2 colour powder pink, Round 3 colour off white, Round 4 colour off white. SQUARE 6: Round 1 colour off white, Round 2 colour sea green, Round 3 colour powder pink, Round 4 colour off white. PATTERN: See diagram A.1. COLOUR-CHANGE: To get a neat transition when changing colours at the beginning of a round, work the last slip stitch on the round with the new colour. CHAIN STITCH: If you work outermost on the hook the chain stitch will often be too tight; 1 chain stitch should be as long as 1 treble crochet is wide. ------------------------------------------------------- START THE PIECE HERE: ------------------------------------------------------- TOP – SHORT OVERVIEW OF THE PIECE: The piece consists of granny squares, which are crocheted together to finish. GRANNY SQUARE: Work squares in different COLOUR COMBINATIONS – read description above. Fasten or work in the strands as you go. The squares are worked according to diagram A.1 with hook size 3.5 mm - read COLOUR-CHANGE in explanations above. Work 5-6-9-10-12 squares in each colour combination, in size L work 2 extra squares (squares 1 and 2), in size XL/XXL work 4 extra squares (squares 1, 2, 3 and 4) = 30-36-56-64-72 squares on the front and back pieces. Then work smaller squares for the straps, just working the first 3 rounds in A.1 (round 4 is not worked). Work 1-1-1-1-2 squares in each colour combination, but always working round 3 with colour off white. Sizes XS/S - M : Work 2 extra squares (squares 1 and 2) Size L - XL/XXL: Work 4 extra squares (squares 1, 2, 3 and 4) = 8-8-10-10-12 small squares. ASSEMBLY: The large squares are crocheted together into a rectangle for the front and back pieces. Lay the squares out in your chosen order, with 3-3-4-4-4 squares in height and 10-12-14-16-18 squares in width – see photo for inspiration. Crochet the squares together width-wise, then upwards. Start on the right side, with the first square on the top and second row. Lay the squares wrong side to wrong side. Work through both layers with colour off white, from the right side as follows: 1 double crochet around the 3 chain stitches in the corner, * 3 chain stitches, skip 1 treble crochet group, 1 double crochet between the next 2 treble crochet groups *, work from *-* 3 times, finish with 3 chain stitches, skip a treble crochet group, work 1 double crochet around the corner and 3 chain stitches. Lay the next 2 squares from the top and second row wrong side to wrong side. Crochet them together in the same way as the first 2 squares. Continue until all the squares in the top 2 rows have been worked together. Sizes XS/S - M: Crochet the bottom row together to the 2 top rows in the same way. Sizes L - XL/XXL and XXXL: Work the next 2 rows to the 2 top rows in the same way. Crochet the squares together in height, in the same way. When all the squares have been crocheted together, crochet the sides together. Cut and fasten the strands. Crochet 4-4-5-5-6 small squares together in a row in the same way. Repeat for the second strap. Lay the top flat, with either a half or whole square on each side, the rectangle has been crocheted together mid-back. Place the 2 straps at the top, 5½-8½-12-15-19 cm in from each side, with 15-16-17-18-19 cm between the 2 straps mid-front. Sew the straps to the top front and back. Try on the top and adjust the number of small squares if necessary. CROCHET EDGES: Work an edge around the bottom with colour off white as follows: 1 double crochet around the 3 chain stitches in a corner of a square, * 3 chain stitches, skip 1 treble crochet group, 1 double crochet between the next 2 treble crochet groups *, work from *-* 3 times, finish with 3 chain stitches, skip a treble crochet group and 1 double crochet around the corner, work 2 chain stitches, 1 double crochet around the 3 chain stitches in the corner of the next square. Continue like this around the bottom edge. Work a similar edge around each armhole and the neck. |
||||||||||||||||
Diagram explanations |
||||||||||||||||
|
||||||||||||||||
|
||||||||||||||||
|
||||||||||||||||
Have you finished this pattern?Tag your pictures with #dropspattern #woodstockweekendtop or submit them to the #dropsfan gallery. Do you need help with this pattern?You'll find 11 tutorial videos, a Comments/Questions area and more by visiting the pattern on garnstudio.com. © 1982-2025 DROPS Design A/S. We reserve all rights. This document, including all its sub-sections, has copyrights. Read more about what you can do with our patterns at the bottom of each pattern on our site. |
||||||||||||||||


With over 40 years in knitting and crochet design, DROPS Design offers one of the most extensive collections of free patterns on the internet - translated to 17 languages. As of today we count 314 catalogues and 11821 patterns translated into English (UK/cm).
We work hard to bring you the best knitting and crochet have to offer, inspiration and advice as well as great quality yarns at incredible prices! Would you like to use our patterns for other than personal use? You can read what you are allowed to do in the Copyright text at the bottom of all our patterns. Happy crafting!
Post a comment to pattern DROPS 231-31
We would love to hear what you have to say about this pattern!
If you want to leave a question, please make sure you select the correct category in the form below, to speed up the answering process. Required fields are marked *.